Table of Contents
Advertisement
Advertisement
Table of Contents

Related Manuals for Covidien Nellcor PM100N


Summary of Contents for Covidien Nellcor PM100N
- Page 1 Nellcor Bedside SpO Patient Monitoring System PM100N Home Use Guide...
- Page 2 © 2014 Covidien. All rights reserved. COVIDIEN, COVIDIEN with logo, and Covidien logo and Positive Results for Life are U.S. and internationally registered trademarks of Covidien AG. ™* brands are trademarks of their respective owners. Other brands are trademarks of a Covidien company.
-
Page 3: Table Of Contents
Contents Risks of Using the Device ............12 Glossary ................5 Safety Symbols ................15 Welcome ..............8 WARNINGS................... 15 Cautions ..................18 What Does the Monitoring System Do? ......8 Why You Use the Monitoring System ........9 Prepare to Use the Monitoring System ..... 21 What Is Your Role As Caregiver? ..........9 What Is the Clinician’s Role? .......... - Page 4 Monitor the Patient ..........28 Clean the Monitoring System and Sensor ..40 Identify Main Screen Components ........29 To Clean the Monitoring System ......... 41 If the Sensor Comes Off the Patient ........30 To Clean the Sensor ..............42 If the Sensor Disconnects from the Monitoring To Disinfect the Monitoring System and Sensor ...
-
Page 5: Glossary
Glossary 24-Hour Clock The monitoring system shows time on the screen using a 24-hour clock. The format is hh:mm:ss (hours:minutes:seconds) without “a.m. ” or “p.m. ” On a 24-hour clock, each day starts at 00:00:00 (midnight). 01:00:00 is 1:00 a.m., 02:00:00 is 2:00 a.m., and so forth. 12:00:00 is noon (12:00 p.m.). The clock continues with 13:00:00 representing 1:00 p.m. - Page 6 Frequency A measurement of alternating current (AC) electricity that indicates how often the current reverses direction and returns to its original direction each second. The unit of measurement is the hertz (Hz). To operate or charge its battery, the monitoring system requires power from a wall outlet providing 100-240 Volts AC (VAC) at a frequency of 50/60 Hz (hertz).
- Page 7 Sensor An accessory used to collect and send patient information to the monitoring system. The sensor collects measurements by detecting the patient’s pulse rate and amount of of oxygen in the blood and sending this information to the monitoring system. Sensor Site The place on the patient’s body where the sensor is applied, such as a finger, toe, ear lobe, or forehead.
-
Page 8: Welcome
Welcome his manual is for the home caregiver or patient using the Nellcor™ bedside SpO patient monitoring system (PM100N). WARNING - Read this entire guide before using the monitoring system. This guide provides important information for avoiding injury and for proper use of the monitoring system. -
Page 9: Why You Use The Monitoring System
Why You Use the Monitoring System What Is Your Role As Caregiver? • Turning the monitoring The Nellcor™ bedside SpO patient monitoring system is prescribed for home use to allow a patient or system on and off caregiver to monitor the patient’s SpO and pulse rate •... -
Page 10: What Is The Clinician's Role
What Is the Clinician’s Role? If you have any questions about the information The clinician is a trained health care professional who: provided in this guide, ask your clinician. • Prescribes a monitoring system and sensors for use in your home Before Using the Monitoring System in the Home or While Traveling •... -
Page 11: If You Need To Store The Monitoring System
If You Need to Store the Monitoring System Caution - Do not plug the monitoring system into a power outlet that is controlled by a wall switch. If you need to store the monitoring system, you can Inadvertent use of the wall switch can interrupt power store it in a clean, dry location in your home. -
Page 12: Safety Information
Safety Information Benefits of Using the Device minimal possibility of electric shock when used correctly. Incorrect use may cause electric shock. Use of the device in homecare monitoring, when Incorrect usage includes, but is not limited to: Use of prescribed by a clinician, may provide faster an incompatible battery, operation with the battery notification of changing physical symptoms to enable cover removed, liquid spilled on device, visible... - Page 13 • The monitoring system’s screen contains toxic the device’s display may be difficult to read in bright chemicals. These chemicals do not touch the patient light conditions. or caregiver unless the screen is broken. Do not • The monitoring system should be used with a touch a broken screen as this will result in contact compatible, prescribed sensor.
- Page 14 • Alarms occur when the patient’s SpO Note: Take caution when plugging the monitoring or pulse system into an outlet connected to a light switch. rate measurements are outside the preset range If the switch is turned off, the system will run on set by your clinician.
-
Page 15: Safety Symbols
Your device is equipped with features that enable it WARNINGS - What You Must to perform certain functions that benefit the patient. Do To Avoid Serious Harm But there are certain things that you must be aware of when using it, in order to gain full benefit from it. WARNING –... - Page 16 WARNING – Never use a battery other than the one WARNING – Avoid leaving cables loose, as this may provided with the monitoring system. Batteries that lead to tripping or strangulation. are not compatible may cause electric shock. WARNING – Do not place the monitoring system in WARNING –...
- Page 17 WARNING – Do not use a monitoring system or sensor • Applying the sensor with the assistance of tape or that appears damaged. Use of a damaged monitoring other adhesives system or sensor may result in incorrect readings. • Leaving the sensor in one place for longer than recommended WARNING –...
-
Page 18: Cautions
WARNING – Avoid using the monitoring system Cautions - What You Must in situations of excessive patient motion, sensor Do To Avoid Other Harm application errors, and certain bright light conditions, as these conditions may affect the pulse oximetry Caution – Do not operate or store the monitoring readings and pulse signal. - Page 19 Caution – Do not cover/block the speaker holes or Caution – The monitoring system can run on battery silence or lower the volume of the audible alarm. power. The monitoring system will visually and audibly Doing so may reduce the safety of the monitoring alarm when the battery is low on power.
- Page 20 Caution – Do not cover the monitoring system as this may lead to excessive heat build-up. Caution – Avoid possible interference from sources of electromagnetic interference such as, but not limited to: Cellular phones, radio transmitters, motors, telephones, lamps, electrosurgical units, defibrillators, and other devices.
-
Page 21: Prepare To Use The Monitoring System
Prepare to Use the Monitoring System Parts of the Monitoring System erform the following steps to prepare the monitoring system for use with your patient: • Identify the parts of the monitoring system • Choose a place for the monitor close to a power outlet •... -
Page 22: Additional Connectors
Additional Connectors AC Power Cord Connector Service Connector (Only use when instructed by your clinician.) Communications Port (Only use when instructed by your clinician.) Support 1.800.635.5267 PM100N Home Use Guide... -
Page 23: How To Use The Buttons And Knob
How to Use the Buttons and Knob Knob: Turn the knob to highlight selections on the screen or to increase or decrease a value in a menu. Silence Alarm Button: Press once to Then, press the knob to make or confirm a selection. temporarily turn off the alarm sound. -
Page 24: Choose Ac Or Battery Power
Choose AC or Battery Power • To use AC power: Plug one end of the power cord (provided) into the back of the monitoring system (circled in picture). Plug the other end of the cord into a wall outlet. Look for the AC power and battery charge indicators on the front panel indicating the monitoring system is receiving power. -
Page 25: Connect The Sensor To The Monitoring System
Connect the Sensor to the Monitoring System 3. Close the latch over the sensor connector. Make sure the latch is completely closed. 1. Insert the extension cable connector firmly into the connector on the monitoring system. The Attach the Sensor to the Patient connector fits in one direction only. -
Page 26: Turn On The Monitoring System
Turn On the Monitoring System If you do not hear tones or see a screen that looks like the example (numbers may be different), make Press and hold the Power button for about 1 second. sure the sensor is attached to the patient and to the The Power button, Home button, and Silence Alarm monitoring system. -
Page 27: Turn Off The Monitoring System
Turn Off the Monitoring System Press and hold the Power button for about 3 seconds. The screen and button lights turn off, indicating the monitoring system has powered off. Support 1.800.635.5267 PM100N Home Use Guide... -
Page 28: Monitor The Patient
Monitor the Patient s you monitor the patient, you will perform the following tasks: • Recognize what the main screen looks like under normal conditions • Identify and respond to alarms • Identify and reduce signal interference • Check battery status (if using the monitoring system on battery power) •... -
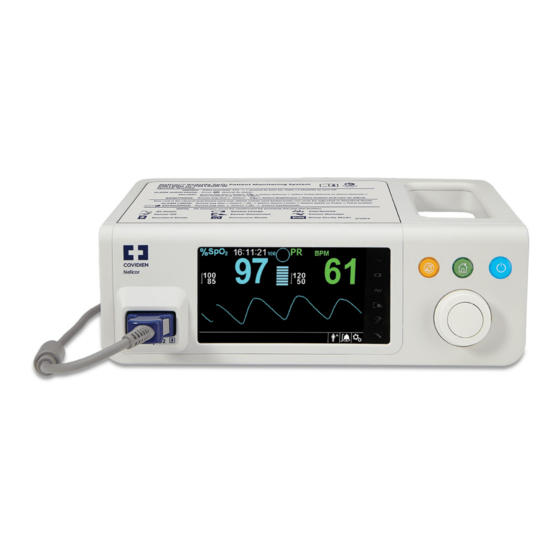
Page 29: Identify Main Screen Components
Identify Main Screen Components 1. Time of day (hours:minutes:seconds in 24-hour clock format) 2. Battery power level 3. Message area 4. Current %SpO (oxygen) reading 5. Pulse indicator (blip bar) 6. Current pulse rate (beats per minute, BPM) 7. Homecare Mode indicator 8. -
Page 30: If The Sensor Comes Off The Patient
If the Sensor Comes Off the Patient If the sensor has come off the patient, the screen shown at the right appears. Reattach the sensor. If you have trouble, contact your clinician. If the Sensor Disconnects from the Monitoring System If the sensor disconnects from the monitoring system, the screen shown at the right appears. -
Page 31: If A Pulse Rate Alarm Occurs
If a Pulse Rate Alarm Occurs If a high or low pulse rate occurs, you will see a yellow background on the pulse rate reading and a message at the bottom of the screen. You will hear an alarm. WARNING - If a pulse rate alarm occurs, the patient may require medical attention. -
Page 32: To Silence An Alarm Tone
To Silence an Alarm Tone If Signal Interference Occurs Temporarily silence an alarm tone by pressing the If the monitoring system is not receiving a strong Silence Alarm button. signal from the sensor, you will see the signal interference symbol. The Alarm Silenced symbol appears on the screen. -
Page 33: When Using The Monitoring System On Battery Power
When Using the Monitoring System on Battery Critically Low Battery Power The message “Critically Low Battery” appears and When the monitoring system is powered by its internal you will hear an alarm. battery (not plugged in to a power outlet), battery WARNING - In a critically low battery condition, status is indicated by the following symbols: connect the power cord now. -
Page 34: To Adjust Volume
To Adjust Volume 3. Turn the knob to highlight the volume setting you want to change (Alarm or Pulse). You can adjust the volume of alarms and the pulse beep as follows: 4. Press the knob. The volume setting is highlighted in yellow on black, indicating it can be changed. -
Page 35: To Adjust Brightness
To Adjust Brightness 4. Press the knob again. The brightness setting is highlighted in yellow on black, indicating it can be You can adjust the brightness of the screen as follows: changed. 1. Press the Home button to view the Options Menu. 5. -
Page 36: To View Alarm Settings Made By Your Clinician
To View Alarm Settings Made by Your Clinician 3. Press the knob. The Review Alarm Settings screen appears. You can view the settings that determine when an alarm is generated for the patient. Your clinician sets You will see the limits your clinician has set for the these values based on the patient’s needs. - Page 37 4. Press the Home button to go back to the main screen. Support 1.800.635.5267 PM100N Home Use Guide...
-
Page 38: Change The Sensor
Change the Sensor Examples of Sensor Placement our clinician can help you determine when the sensor needs changing or moving to another location on the patient. Check for the following when a sensor has been applied to the patient for a period of time: •... -
Page 39: Sensor Information
Sensor Information Some of the sensors are provided in sterile packaging, and some are not. If you have questions about the sensors you are using on the patient, contact your clinician. Support 1.800.635.5267 PM100N Home Use Guide... -
Page 40: Clean The Monitoring System And Sensor
Clean the Monitoring System and Sensor WARNING - If there is any type of fluid spill on the monitoring system, clean and dry the monitoring system immediately to prevent an interruption in operation. If there is any substance on the screen that makes it hard to read, clean the screen so that all numbers and indicators are easy to see. -
Page 41: To Clean The Monitoring System
To Clean the Monitoring System 3. Gently wipe all surfaces of the monitoring system. Use any of the following to clean the monitoring 4. Allow the monitoring system to dry. system: • A soft cloth dampened with tap water, isopropyl alcohol, or a 10% bleach solution (ask your clinician) •... -
Page 42: To Clean The Sensor
To Clean the Sensor To Disinfect the Monitoring System and Sensor Refer to the instructions provided by your clinician. If the sensor is reusable, your clinician will provide instructions on how to clean it and how often it should be cleaned. If the sensor is disposable, periodically dispose of it and replace it with a new one as directed by your clinician. -
Page 43: Accessories
Accessories he monitoring system has a few accessories. Ask your clinician if they are available for your use. • 10-Hour or 15-Hour Battery – Allows longer use of the monitoring system before recharging. The standard monitoring system comes with a 5-hour battery. -
Page 44: Symbols
Symbols he symbols that appear on the labels attached Symbol Description to the monitoring system are described in this Ingress protection (IP) rating: Protected chapter. against access to hazardous parts by a finger or solid object greater than 12.5mm in size. Symbol Description Protected against falling drops of water... - Page 45 Symbol Description Reference code (part number) Manufacturer Serial number Date of manufacture Support 1.800.635.5267 PM100N Home Use Guide...
-
Page 46: Index
Index clinician’s role 10 (oxygen) reading 6, connectors 21-22, 25, 30 7, 29 accessories 43 operating environment storage 11, 18 AC power 24 13, 18 alarm settings, viewing oxygen (%SpO ) reading description of monitoring 36-37 6, 7, 29 system 8, 21-22 temperature, operating 18 alarm silenced symbol 32 disinfecting 40, 42... - Page 47 Notes:...
- Page 48 Part No. PT00093014 Rev A (A7460-2) 2018-08 COVIDIEN, COVIDIEN with logo, and Covidien logo and Positive Results for Life are U.S. and internationally registered trademarks of Covidien AG. Other brands are trademarks of a Covidien company. ™* brands are trademarks of their respective owners.
Need help?
Do you have a question about the Nellcor PM100N and is the answer not in the manual?
Questions and answers
We already have a NellcorCovidien PM100N unit and were able to change the SPO2 and BPM limits on our own. But we just bought a second unit that is used. And, unbeknownst to us, this unit is Homecare mode and requires a password to change it to Standard mode...which will allow us to change the SPO2 and BPM limits. We do not have a password. Is there anyway around this? Can the unit be reset to factory settings? Thank you