
Related Manuals for Covidien Nellcor OxiMax N-600x


Summary of Contents for Covidien Nellcor OxiMax N-600x
- Page 1 Operator’s Manual Nellcor N-600x Pulse Oximeter Alarm Management System Oximax Technology...
- Page 2 To obtain information about a warranty, if any, contact Covidien Technical Services at 1.800.635.5267 or your local representative. Purchase of this instrument confers no express or implied license under any Covidien patent to use the instrument with any pulse oximeter that is not manufactured or licensed by...
-
Page 3: Table Of Contents
Table Of Contents Chapter 1. Safety Information ............... 1 Overview ..........................1 Warnings ..........................1 Cautions ..........................3 Chapter 2. General Introduction ............5 Overview ..........................5 Oximeter Description and Intended Use..............5 Description ..........................5 Intended Use ..........................5 List of Components ......................6 Front Panel ..........................7 User Interface..........................7 Oximeter Visual Indicators....................8 Monitoring Values ....................... - Page 4 Using OxiMax™ Pulse Oximetry Sensors..............31 Sensor Detection........................31 Sensor Detection Failure ....................32 Managing the Oximeter Backlight................32 Managing the View Display ..................33 Using the General Care Format (GCF) Display............33 Using the Pleth Display...................... 34 Using the Blip Display......................35 Using the Real-Time Trend Display ................
- Page 5 GCX Wall Mount Arm and Channel ................92 GCX Roll Stand ........................93 Soft-Sided Carrying Case....................94 Chapter 7. Performance Considerations ..........95 Overview ........................... 95 Performance Considerations ..................95 Primary Considerations...................... 95 Oximetry Considerations....................96 Patient Conditions ....................... 96 OxiMax™...
- Page 6 Chapter 11. Product Specifications ............ 121 Overview .........................121 Physical Characteristics....................121 Electrical Requirements .....................121 Power............................121 Battery............................121 Rating of Nurse Call Relay ....................122 Environmental Conditions..................122 Operating..........................122 Transport and Storage .....................122 Performance Specifications..................122 Measurement Range......................122 Product Compliance ....................124 Product Standards for Compliance ................124 Product Safety Standards....................124 Electromagnetic Compatibility (EMC) Standards...........124 Manufacturer’s Declaration..................125...
-
Page 7: Chapter 1. Safety Information
The OxiMax pulse oximetry sensor extrapolates from the date and time provided by the Nellcor OxiMax N-600x pulse oximeter when recording the sensor event record to the sensor. The accuracy of the date/time is determined by the date/time setting of the pulse oximetry monitor. - Page 8 Safety Information between oximeters and the sensor event record data will affect the order in which the sensor event record data appear. To eliminate this potential problem, set all oximeters within an institution to the same time. WARNING Explosion hazard—Do not use the OxiMax N-600x pulse oximeter in the presence of flammable anesthetics.
-
Page 9: Cautions
Cautions Cautions Caution When connecting the OxiMax N-600x pulse oximeter to any instrument, verify proper operation before clinical use. Both the pulse oximeter and the instrument connected to it must utilize a grounded outlet. Accessory equipment connected to the pulse oximeter’s data interface must be certified according to IEC Standard 60950 -1: 2005 for data-processing equipment or IEC Standard 60601-1:1988 + A1:1991 + A2:1995 for electromedical equipment. - Page 10 Safety Information Page Left Intentionally Blank Operator’s Manual...
-
Page 11: Chapter 2. General Introduction
This manual contains information for operating the OxiMax N-600x™ pulse oximeter. Before operating the oximeter, thoroughly read the N-600x Operator's Manual. The latest version of this manual is available on the Internet at: www.covidien.com/rms Oximeter Description and Intended Use Description... -
Page 12: List Of Components
General Introduction • Hospital use typically covers such areas as general care floors (GCFs), operating rooms, special procedure areas, intensive and critical care areas within the hospital and in hospital-type facilities. Hospital-type facilities include physician office-based facilities, sleep labs, skilled nursing facilities, surgicenters, and sub-acute centers. -
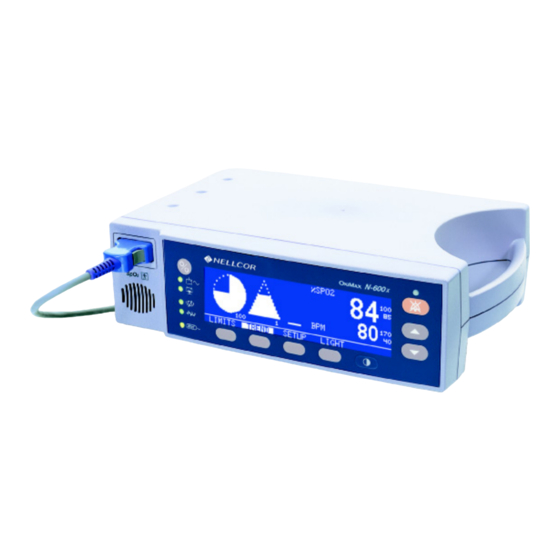
Page 13: Front Panel
Front Panel Front Panel Figure 2. OxiMax N-600x Pulse Oximeter Front Panel Table 2. List of Front Panel Components Sensor Port ADJUST UP & DOWN Keys Low Battery Indicator Pulse Rate (BPM) Upper Limit Value AC Power Indicator Pulse Rate (BPM) Lower Limit Value ON/STANDBY Neonate Mode Icon Battery Fuel Gauge... -
Page 14: Oximeter Visual Indicators
General Introduction messages from the display. It lights continuously when an audible alarm has been silenced. It flashes when the alarm silence duration has been set to OFF. WARNING Pressing ALARM SILENCE will keep ALL alarms from sounding for the alarm silence duration period. - Page 15 Front Panel Data In-Sensor Indicator—Lights to indicate that the attached OxiMax pulse oximetry sensor contains a patient sensor event record. The sensor event record information may be viewed or printed. Battery Fuel Gauge—Displays the battery charge remaining on the oximeter. The battery fuel gauge consists of four bars, each corresponding to approximately 1.5 hours of operating time.
-
Page 16: Monitoring Values
General Introduction SatSeconds Icon—The SatSeconds feature provides alarm management for mild or brief SpO limit violations. When the SatSeconds feature is enabled, the SatSeconds circle icon fills in the clockwise direction as the SatSeconds alarm management system detects SpO readings outside of the limit setting. The SatSeconds icon empties in counterclockwise direction when SpO readings are within limits. -
Page 17: Audible Indicators
Front Panel Audible Indicators Audible indicators include pitched tones and beeps. Caregivers may choose to silence alarms by pressing the ALARM SILENCE key. WARNING Pressing ALARM SILENCE will keep ALL alarms from sounding for the alarm silence duration period. Caution Should the caregiver fail to clear a primary audible alarm within two (2) minutes, a secondary alarm with a unique pitch sounds. -
Page 18: Rear Panel
General Introduction Rear Panel Figure 3. OxiMax N-600x Pulse Oximeter Rear Panel Table 4. Rear Panel Components Equipotential Terminal (Ground) AC Power Connector Data Port Connector Fuse Holder Supply Voltage Selector Switch Rear Panel Symbols and Descriptions Warning! See Instructions for Use Fuse replacement Equipotential terminal (ground) Date of manufacture... -
Page 19: Oximeter Features
Oximeter Features Oximeter Features OxiMax SPD™ Alert Feature The OxiMax SPD™ Alert (SPD) feature detects patterns of desaturation in adults that are indicative of repetitive reductions in airflow through a patient's upper airway into the lungs. Relative reductions in a patient's minute ventilation over a period of time may cause a progressive drop in alveolar partial pressure of oxygen, leading to arterial desaturation. - Page 20 General Introduction limits are set to alarm at specific SpO levels. When the SpO level fluctuates near an alarm limit, the alarm sounds each time it violates the alarm threshold. SatSeconds monitors both degree and duration of desaturation as an index of desaturation severity.
- Page 21 Oximeter Features Figure 6. Second SpO Event: No SatSeconds Alarm Operator’s Manual...
- Page 22 General Introduction Figure 7. Third SpO Event: Triggers SatSeconds Alarm The SatSeconds “Safety Net” is for patients with saturation levels frequently below the limit, but not staying below the limit long enough for the SatSeconds time setting to be reached. When three or more limit violations occur within 60 seconds, an alarm sounds even if the SatSeconds time setting has not been reached.
-
Page 23: Pulse Rate Delay Alarm Management Feature
Oximeter Display View Options Pulse Rate Delay Alarm Management Feature The oximeter monitors pulse rate by determining the number of pleth waves over unit time. With traditional alarm management, upper and lower alarm limits are set for monitoring pulse rate. When the pulse rate fluctuates near an alarm limit, the alarm sounds each time it violates an alarm limit. -
Page 24: Plethysmographic (Pleth) Display
General Introduction Plethysmographic (Pleth) Display Figure 9. Pleth Display View Use this display view for visual monitoring information in waveform. The plethysmographic (pleth) display includes a “wiper bar” plethysmographic waveform, menu bar, and current measured SpO and pulse rate, upper and lower limit settings. - Page 25 Oximeter Display View Options scale selected. The real-time trend display includes SpO and/or pulse rate trend data plots, current measured SpO and pulse rates. It also includes a battery fuel gauge if running on battery power. Each time the oximeter detects a pulse, the heart icon flashes.
- Page 26 General Introduction Page Left Intentionally Blank Operator’s Manual...
-
Page 27: Chapter 3. Setting Up The Oximeter
3 Setting Up the Oximeter Safety Reminders WARNING To ensure patient safety, do not place the OxiMax N-600x pulse oximeter in any position where it might tip or fall on the patient. WARNING As with all medical equipment, carefully route patient cabling to reduce the possibility of patient entanglement or strangulation. -
Page 28: Connecting To An Ac Power Source
Setting Up the Oximeter WARNING In the USA, do not connect the pulse oximeter to an electrical outlet controlled by a wall switch, since this increases the risk of removal of AC power to the pulse oximeter. WARNING Use only Nellcor-approved OxiMax pulse oximetry sensors and pulse oximetry cables when connecting to the OxiMax sensor connector. -
Page 29: Using Battery Power
Using Battery Power Figure 12. Back Panel Supply Voltage Selector and Power Connector 2. Plug the female connector end of the power cord into the power connector on the rear of the oximeter. 3. Plug the male connector of the power cord into a properly grounded AC outlet. 4. -
Page 30: Connecting An Oximax™ Pulse Oximetry Sensor
Setting Up the Oximeter 2. Verify the oximeter is off and the AC Power/Battery Charging indicator is lit. On AC power up, the battery fuel gauge shows empty. The oximeter operates on AC power while the battery is charging. When the oximeter is fully charged, all four bars are lit on the indicator. -
Page 31: Reducing Emi (Electromagnetic Interference)
Reducing EMI (Electromagnetic Interference) 1. Firmly connect a DOC-10 pulse oximetry cable to the oximeter’s SpO Sensor Port. Figure 13. Front Panel Sensor Port Connector 2. Open the plastic latch at the other end of the DOC-10 pulse oximetry cable. Figure 14. - Page 32 Setting Up the Oximeter other incorrect functioning. If this occurs, survey the site of use to determine the source of this disruption, and take the listed actions to eliminate the source. 1. Turn equipment in the vicinity off and on to isolate the offending equipment. 2.
-
Page 33: Chapter 4. Operating The Oximeter
4 Operating the Oximeter Overview WARNING Dispose of internal battery in accordance with local requirements and regulations. This section identifies methods for viewing and collecting patient oxygen saturation data using the OxiMax N-600x™ pulse oximeter. It describes menu navigation, power on/off and display options, parameter ranges, OxiMax™... -
Page 34: Low Battery Indicator
Operating the Oximeter Table 5. Battery Fuel Gauge Levels Level Description Indicates 14-38% (approx. 1-2.5 hours) battery capacity remains. Indicates 1-13% (less than 1 hour) battery capacity remains. The levels in Table 5 are based on a new battery. As a battery is used and recharged over time, it may provide only 75% capacity of a new battery. -
Page 35: Powering The Oximeter
Powering the Oximeter Powering the Oximeter Power Prerequisites Caution If any indicator or display element does not light when the pulse oximeter is turned on, do not use the pulse oximeter. Instead, contact qualified service personnel, your local Nellcor representative, or Nellcor’s Technical Services Department. Caution During POST (immediately after power-up), confirm that all indicators light, all display segments turn on, and the pulse oximeter speaker sounds a sequence of three ascending... -
Page 36: Automatic Shutdown And Power Off
Operating the Oximeter 4. Listen for three ascending tones then a one-second beep, indicating proper operation of the speaker and successful completion of the power-on self-tests. Figure 15. POST Splash Screen Note: The firmware version shown above is only a sample. Check the oximeter for the currently installed firmware version and record it prior to contacting technical assistance. -
Page 37: Using Oximax™ Pulse Oximetry Sensors
Using OxiMax™ Pulse Oximetry Sensors Power Off To turn off the oximeter, hold the ON/STANDBY key until the display darkens and it powers off. Using OxiMax™ Pulse Oximetry Sensors For more information on selecting the right pulse oximetry sensor for the specific patient and situation, see Selecting an OxiMax™... -
Page 38: Sensor Detection Failure
Operating the Oximeter Note: The type of data recorded is only displayed when data are present in the OxiMax pulse oximetry sensor. The oximeter displays zeros in the %SpO and Pulse Rate displays while searching for a valid pulse. For optimal performance, allow the oximeter to search and lock onto a pulse for approximately five to ten seconds. -
Page 39: Managing The View Display
Managing the View Display To turn off the oximeter backlight 1. Press the LIGHT softkey. 2. Then press OFF. Note: Any of the following conditions turns on the backlight: • Pressing any of the softkeys • Pressing and holding the HELP/CONTRAST key •... -
Page 40: Using The Pleth Display
Operating the Oximeter • SPD feature—Use the OxiMax SPD™ Alert (SPD) feature to detect patterns of desaturation in the trend in adults. With the SPD feature enabled, the display view includes both the SatSeconds circle icon and SPD triangle icon and their settings. The SPD alarm sensitivity value appears just below the SPD icon. -
Page 41: Using The Blip Display
Managing the View Display • SPD feature—Use the OxiMax SPD™ Alert (SPD) feature to detect patterns of desaturation in the SpO trend in adults. With the SPD feature enabled, the display view includes both the SatSeconds circle icon and SPD triangle icon and their settings. The SPD alarm sensitivity value appears just below the SPD icon. -
Page 42: Using The Real-Time Trend Display
Operating the Oximeter includes both the SatSeconds circle icon and SPD triangle icon and their settings. The SPD alarm sensitivity value appears just below the SPD icon. When the SPD feature is enabled, the triangle icon fills from the bottom to the top as desaturation patterns develop. - Page 43 Managing the View Display the SatSeconds circle icon and SPD triangle icon and their settings. The SPD alarm sensitivity value appears just below the SPD icon. When the SPD feature is enabled, the triangle icon fills from the bottom to the top as desaturation patterns develop. The triangle icon empties from the top to the bottom as patterns dissipate.
- Page 44 Operating the Oximeter 5. Press any of the trend softkeys (DUAL, SpO , or PULSE). a. DUAL option—Displays both %SpO and BPM trends simultaneously in a split screen. Figure 23. Dual Trend Data Split Screen, 2 hour b. SpO option—Shows just the %SpO trend data.
-
Page 45: Adjusting The Volume Of Audible Tones
Adjusting the Volume of Audible Tones 5. Press the SCALE softkey to cycle the trend amplitude scale display through ±5 points, ±10 points, ±15 points, ±20 points, ±25 points, ±30 points, ±35 points, ±40 points and ±50 points above and below the newest, rightmost trend data point. Note: You can set the trend amplitude scale to AUTO by pressing the AUTO softkey. -
Page 46: Managing Audible Alarms
Operating the Oximeter Managing Audible Alarms To set the alarm silence duration The Alarm Silence Duration display enables you to adjust the alarm silence duration. 1. With the oximeter in the normal monitoring mode, press the ALARM SILENCE key until the alarm silence duration setting displays. -
Page 47: Using Oximeter Softkey Menus
Using Oximeter Softkey Menus Note: Once audible alarms are disabled, the orange LED above the ALARM SILENCE key lights to indicate the disabled alarm state. To select the standby mode Normally, use the standby mode setting for the patient who must temporarily leave the oximeter. - Page 48 Operating the Oximeter 3. EXIT softkey—Exit to the main menu or press BACK until you reach an EXIT menu option. Main Menu The main menu softkey options provide access to several submenus. Figure 29. Main Menu Options 1. LIMITS Menu—Select standard oximeter upper and lower SpO or pulse rate limits and alarm management settings for either adults or neonates.
- Page 49 Using Oximeter Softkey Menus modified from the power-on default values. See Adjusting the Factory Default Settings on page 49. a. Upper and Lower SpO Limits—The neonate default upper limit is 95% and the lower limit is 85%. An alarm sounds each time patient saturation violates these alarm limits.
- Page 50 Operating the Oximeter 1. MONITR Menu—Isolate oxygenation (SpO ) or pulse (PULSE) trend data or view them both together (DUAL) for a specified length of time. Establish trend data parameters for specific time segments and set minimum and maximum trend values. a.
- Page 51 Using Oximeter Softkey Menus adhesive pulse oximetry sensor, the bottom indicator on the left will blink for 60 seconds. a. GRAPH softkey—Display events in reverse chronological order from top to bottom of the display. View previous or next graphs if available. Return to the SENSOR Menu using the BACK softkey.
- Page 52 Operating the Oximeter remains connected. Since a sensor with sensor event record data can be transported from one oximeter to another, having discrepancies in the date/time between oximeters and the sensor event record data will affect the order in which the sensor event record data appear.
- Page 53 Using Oximeter Softkey Menus To change the displayed language setting a. With the oximeter in the normal monitoring mode, press the SETUP softkey. b. Press the NEXT softkey. c. Press the LANG softkey. Figure 32. Displayed Language Selection Screen d. Use the ADJUST UP or ADJUST DOWN keys below the ALARM SILENCE key on the oximeter panel to select the desired language.
- Page 54 Operating the Oximeter 6. NCALL Menu—From the SETUP menu, press the NEXT softkey twice so the NCALL (Nurse Call) menu option is available. Set voltage from +5 VDC to +12 VDC using Norm + or set voltage from -5 VDC to -12 VDC using Norm- when there is no audible alarm. Voltages switch polarity when the audible alarm sounds.
-
Page 55: Adjusting The Factory Default Settings
Using Oximeter Softkey Menus Note: When the oximeter is in the FAST response mode, the oximeter may produce more SpO and pulse rate alarms than expected. The response mode, however, may impact the SPD alarm behavior. d. Use the ADJUST UP or ADJUST DOWN keys below the ALARM SILENCE key on the oximeter panel to select the desired response mode. - Page 56 Operating the Oximeter An attempt to save either of these values as default results in an invalid tone. These limits can be adjusted lower for the current patient, but return to power-on defaults at power-off. Note: The SPD feature automatically sets the SatSeconds value to 100. Operator’s Manual...
- Page 57 Using Oximeter Softkey Menus Changing Adult and Neonate Default Settings Table 7. Adult and Neonate Default Settings Adult Neonate Option Default Settings Default Settings %SpO Lower Alarm Limit %SpO Upper Alarm Limit 100% Alarm Silence Duration 60 Seconds Alarm Silence Duration OFF Setting Disabled Alarm Silence Reminder Enabled...
- Page 58 Operating the Oximeter To set adult or neonatal modes WARNING Supplemental oxygen will attenuate patterns of desaturation. A patient’s respiratory compromise can be proportionally more severe before patterns appear in the saturation trend. Remain vigilant when monitoring a patient on supplemental oxygen. WARNING The SPD feature is for use with adults patients only.
- Page 59 Using Oximeter Softkey Menus value for a particular patient in the limits screen. These values return to the factory or institutional default values after power cycle. Figure 36. Setting Adult Limits Screen To set limits 1. To adjust the upper and lower saturation and pulse rate limits, select the Adult or Neonate Limit display.
-
Page 60: Using The Oximax Spd™ Alert Feature
Operating the Oximeter 5. Use the ADJUST UP or ADJUST DOWN keys below the ALARM SILENCE key on the oximeter panel to increase or decrease the selected limit parameter. 6. Repeat steps as necessary to complete the alarm limits setup. 7. - Page 61 Using Oximeter Softkey Menus The SPD feature qualifies these patterns of desaturation over a period of six (6) minutes. Depending on the sensitivity setting for SPD, patterns that persist may result in an SPD alarm, alerting the caregiver to the condition. Figure 39.
- Page 62 Operating the Oximeter 3. SPD trend data—The trend history captures the SPD patterns and defines periods when the SatSeconds and SPD alarms were activated. Once patterns exceed the SPD limit, the TREND menu option will flash. Caregivers should view the data to examine SatSeconds and SPD patterns in the trend data history.
-
Page 63: Using The Pulse Rate Delay Alarm Management Feature
Using Oximeter Softkey Menus 1. Press the SELECT softkey until highlighting the SPD sensitivity setting. The default setting of one (1) is the most sensitive to patterns of desaturation, but may also lead to more alarms. Figure 42. SPD Sensitivity Setting 2. -
Page 64: Using The Satseconds™ Alarm Management Feature
Operating the Oximeter 4. Press the EXIT softkey to save your selection. Figure 43. Pulse Rate Delay Setting Using the SatSeconds™ Alarm Management Feature How the SatSeconds Feature Works The oximeter monitors the percentage of hemoglobin binding sites saturated with oxygen in the blood. - Page 65 Using Oximeter Softkey Menus SatSeconds Icon When the SatSeconds technology detects an SpO value outside the alarm limit, the SatSeconds circle icon begins to “fill” clockwise. When the SpO value is within the set limits, the SatSeconds icon empties counterclockwise. Figure 44.
- Page 66 Operating the Oximeter 3. Use the ADJUST UP or ADJUST DOWN keys below the ALARM SILENCE key on the oximeter panel to select the limit. The choices are 10, 25, 50, 100 SatSeconds or OFF. A decimal to the lower right indicates it is not a default setting. 4.
-
Page 67: Chapter 5. Managing Oximetry Data
5 Managing Oximetry Data Managing Oximeter Trend Data Trend Data Basics The OxiMax N-600x™ pulse oximeter records trend data. Two types of trend data can be viewed using the trend display option. • Oximeter trend data stored in the oximeter •... -
Page 68: Reading The Trend Data Display
Managing Oximetry Data Reading the Trend Data Display Figure 46. Identifying the components of the trend data display Table 8. Trend Data Display Components Highest and lowest reading at the cursor position. Trend data that is being displayed (%SpO2, BPM, or PAU [pulse amplitude units]). Amount of trend data displayed on the screen. - Page 69 Managing Oximeter Trend Data cursor position (vertical dotted line on the display). See Reading the Trend Data Display, page 62. Figure 47. %SpO2 Trend Data Screen, 12 hour trend To view dual trend data display The dual trend data display shows both oxygen saturation (%SpO ) levels and pulse rate (BPM) trend data.
- Page 70 Managing Oximetry Data To view pulse rate trend display 1. With the oximeter in the normal monitoring mode, press the TREND softkey. 2. Press the MONITR softkey. 3. Press the VIEW softkey. 4. Press the PULSE softkey. The pulse rate trend data displays. Figure 50.
-
Page 71: Storing Trend Data
Managing Oximeter Trend Data 1. With the oximeter in the normal monitoring mode, press the TREND softkey. 2. Press the MONITR softkey. 3. Press the VIEW softkey. 4. Press the NEXT softkey. 5. Press the HIST softkey. The histogram trend data displays. Figure 52. -
Page 72: Clearing Trend Information
Managing Oximetry Data 6. Press the TIME softkey to cycle the displayed trend time scale until you reach the desired interval. The TIME softkey cycles through 48, 36, 12, eight, four, two, and one hour intervals, then 30 minute, 15 minute, 40 second and 20 second intervals. Figure 53. -
Page 73: Managing Oximax™ Pulse Oximetry Sensor Data
Managing OxiMax™ Pulse Oximetry Sensor Data 3. Press the DELETE softkey or press NO and then EXIT to close this function without deleting the trend data. Note: All the trend data clears after pressing the DELETE softkey and the oximeter sounds three beeps 4. - Page 74 Managing Oximetry Data The sensor event record type must be set prior to connecting the OxiMax pulse oximetry sensor to the oximeter. To change the sensor data type setting, refer to Managing the In-Sensor Data Type Feature, page 71. Sensor Condition Messages Sensor condition messages indicate the sensor is functioning properly, but the sensor site or the application method is not optimal for calculating %SpO Sensor condition messages appear in order of importance, with the highest level of...
- Page 75 Managing OxiMax™ Pulse Oximetry Sensor Data • BANDAGE ASSEMBLY • NAIL POLISH • SENSOR TOO TIGHT? • REPOSITION SENSOR • ISOLATE INTERFERENCE SOURCE • CLEAN SENSOR SITE To clear messages, review the listed corrective actions and take appropriate steps to clear the condition, then press the EXIT softkey.
-
Page 76: Using Sensor Event Records
The pulse oximetry sensor extrapolates from the date and time provided by the Nellcor OxiMax N-600x pulse oximeter when recording the sensor event record to the sensor. The accuracy of the date/time is determined by the date/time setting of the pulse oximeter. - Page 77 Managing OxiMax™ Pulse Oximetry Sensor Data Managing the In-Sensor Data Type Feature The In-Sensor Data Type display enables you to adjust the type of patient alarm event trend data to be recorded in an OxiMax pulse oximetry sensor. OxiMax pulse oximetry sensors can be set to record either “SpO ”...
- Page 78 Managing Oximetry Data 2. Select the SENSOR softkey option. 3. View sensor event record in either the graphical form (GRAPH) or in a summary table (TABLE). Note: Once the sensor event record type is setup in the OxiMax pulse oximetry sensor and the event data is stored in the sensor, the sensor event record type cannot be reset.
- Page 79 Managing OxiMax™ Pulse Oximetry Sensor Data 3. Select the ABORT softkey to stop the recording or to access or view additional data. View sensor event records by accessing the TREND/SENSOR menu. The SENSOR EVENT RECORD LED comes on steady when sensor memory is full and stays on until the OxiMax pulse oximetry sensor is disconnected.
- Page 80 Managing Oximetry Data oximetry sensor are shown to the right of the title (example, 2/2). The date and time of the displayed event are shown in the upper center and upper right corner. The type of data displayed in the graph is indicated to the left of the vertical axis (%SpO ).
- Page 81 Managing OxiMax™ Pulse Oximetry Sensor Data history graphs, except the graphs are compressed horizontally to allow both %SpO and pulse rate graphs to be shown for the same event. Figure 66. Sensor Event Graphical History Screen: Screen 1of 5 Figure 67. Sensor Event Graphical History Screen: Screen 4 of 5 Figure 68.
- Page 82 Managing Oximetry Data 3. Press the TABLE softkey to view the data. Figure 69. History Summary Data Screen: January 02 Figure 70. History Summary Data Screen: January 06 The table title is located in the upper left corner. Below the table title is a six-column table with appropriate column headings.
-
Page 83: Data Port Connectivity
Data Port Connectivity Data Port Connectivity Overview Patient data can be output through the data port on the back of the OxiMax N-600x pulse oximeter by connecting it to a PC or serial printer. When connecting the oximeter to a printer or PC, verify proper operation prior to clinical use. - Page 84 Managing Oximetry Data • RS-422 Format—Pins 1, 4, 9, and 12 provide RS-422 format data. When building an RS-422 cable, add a resistor (120 ohms, 1/2 watt, 5%) between pin 1 and pin 9 of the cable and keep cable length to a maximum of 4,000 feet. Plug the end of the cable with the resistor added into the oximeter.
-
Page 85: Data Port Communications
Data Port Connectivity Data Port Communications To establish data port communication 1. Use the Serial Port Setup display to set the baud rate and the protocol of the data port on the OxiMax N-600x pulse oximeter. 2. With the oximeter in the normal monitoring mode, press the SETUP softkey. 3. -
Page 86: Data Output Information
Managing Oximetry Data 6. Press the SELECT softkey. Note: When SPD is enabled, the Clinical and SPDout protocols include SPD information. Results cannot be predicted for host systems without upgrades to support the extra SPD information. See Table 10: Communication Protocol Compatibility and Output, on page 79. 7. - Page 87 Data Port Connectivity Real-Time Output Data Fields Here is an example of real-time data output. Figure 73. Sample Real-Time Data Output (SPD feature not enabled) 1. Column Headings—Every 25th line of the data output consists of a column heading. A column heading appears whenever the value within a column heading changes.
- Page 88 Managing Oximetry Data 3. Firmware Version—The next data field displays the firmware level (Version 2.0.4.0) and a firmware verification number (CRC: XXXX). Neither of these numbers should change during normal operation. Figure 76. Location of Firmware Version in Column Headings Note: The numbers may change if the oximeter is serviced and receives a firmware upgrade.
- Page 89 Data Port Connectivity 8. Patient data—Presented in the chart from left to right. - Time the patient data was recorded - Current %SpO value - Current Pulse Rate (BPM) - Current Pulse Amplitude (PA) - Operating status of the oximeter a.
-
Page 90: Using The Nurse Call Interface
Managing Oximetry Data Table 11. Status Code Definitions Code Definition Low Battery Loss of Pulse with Signal Artifact Loss of Pulse Patient Motion Pulse Rate Upper Limit Alarm Pulse Rate Lower Limit Alarm Pulse Search Saturation Upper Limit Alarm Saturation Lower Limit Alarm Sensor Disconnect Sensor Off Caution... -
Page 91: Setting Nurse Call Rs-232 Polarity
Using the Nurse Call Interface When enabled, audible alarms signal the remote location. If the audible alarm has been turned off or silenced, the nurse call function is also disabled. Pin 11 on the data port is the RS-232 level nurse call signal and pin 5 or 10 is ground (See Figure 71 on page 78). -
Page 92: Calculating The Analog Voltage Output
Managing Oximetry Data Calculating the Analog Voltage Output The OxiMax N-600x pulse oximeter data port provides analog voltage outputs between pins 6, 13, 14, and ground (pin 10), which can be used to calibrate oximeters such as a chart recorder. The voltage represents a specific measured parameter's current value. -
Page 93: Chapter 6. Using Oximax™ Pulse Oximetry Sensors And Accessories
6 Using OxiMax™ Pulse Oximetry Sensors and Accessories Overview WARNING The pulse oximetry sensor extrapolates from the date and time provided by the Nellcor OxiMax N-600x pulse oximeter when recording the sensor event record to the sensor. The accuracy of the date/time is determined by the date/time setting of the pulse oximeter. - Page 94 Using OxiMax™ Pulse Oximetry Sensors and Accessories WARNING Use only Nellcor-approved OxiMax pulse oximetry sensors and pulse oximetry cables when connecting to the OxiMax sensor connector. Connecting any other cable or sensor influences the accuracy of sensor data, which may lead to adverse results. WARNING Do not use a damaged OxiMax pulse oximetry sensor or pulse oximetry cable.
- Page 95 OxiMax™ Pulse Oximetry Sensors When selecting an OxiMax pulse oximetry sensor, consider the patient’s weight and activity level, the adequacy of perfusion, and the available sensor sites, the need for sterility, and the anticipated duration of monitoring. For more information refer to OxiMax™...
-
Page 96: Oximax™ Pulse Oximetry Sensor Features
Several mounting configurations, a carrying case, and a utility basket are offered with the OxiMax N-600x pulse oximeter. Refer to the Nellcor website or contact Nellcor’s Technical Services Department at 1.800.635.5267 or your local Nellcor representative for information about these accessories. www.covidien.com/rms • page 91 GCX Adapter Plate. See •... -
Page 97: Gcx Adapter Plate
Optional Accessories GCX Adapter Plate Order an optional adapter plate from Nellcor. This adapter plate fits standard, commercially available GCX brackets, and securely mounts the oximeter to a wall bracket or a roll stand. The adapter plate attaches to the bottom of the oximeter as shown. For further instructions regarding connecting the adapter plate to GCX brackets, refer to the illustrated Directions for Use included with the GCX adapter plate. -
Page 98: Gcx Wall Mount Arm And Channel
Using OxiMax™ Pulse Oximetry Sensors and Accessories GCX Wall Mount Arm and Channel Order this optional wall mount arm and 19-inch channel from Nellcor. The M-Series wall mount arm attaches to the GCX adapter plate which attaches to the M-Series arm. The arm slides into the wall mount channel. For further details, refer to the illustrated Directions for Use included with the vertical wall mount arm. -
Page 99: Gcx Roll Stand
Optional Accessories GCX Roll Stand Order this optional GCX roll stand with utility basket and handle from Nellcor. The GCX roll stand attaches to the oximeter GCX adapter plate as shown. For further instructions regarding connecting the GCX roll stand, refer to the illustrated Directions for Use included with the GCX roll stand. -
Page 100: Soft-Sided Carrying Case
Using OxiMax™ Pulse Oximetry Sensors and Accessories Soft-Sided Carrying Case Order the optional soft-sided carrying case directly from Nellcor. The padded carrying case protects the oximeter during transport. The carrying case contains two pockets for OxiMax pulse oximetry sensors, cables, and N-600x Operator’s Manual. Figure 89. -
Page 101: Chapter 7. Performance Considerations
7 Performance Considerations Overview WARNING Pulse oximetry readings and pulse signals can be affected by certain ambient environmental conditions, OxiMax pulse oximetry sensor application errors, and certain patient conditions. See the appropriate sections of the manual for specific safety information. •... -
Page 102: Oximetry Considerations
Performance Considerations Oximetry Considerations Pulse Rates The oximeter only displays pulse rates between 20 and 250 bpm. Detected pulse rates above 250 bpm are displayed as 250. Detected pulse rates below 20 are displayed as a zero (0). Saturation The oximeter displays saturation levels between 1% and 100%. Patient Conditions Dysfunctional Hemoglobins Dysfunctional hemoglobins such as carboxyhemoglobin, methemoglobin, and... -
Page 103: Inaccurate Sensor Measurement Conditions
OxiMax™ Pulse Oximetry Sensor Performance Considerations Inaccurate Sensor Measurement Conditions A variety of conditions can cause inaccurate sensor measurements. • Incorrect application of the OxiMax pulse oximetry sensor • Placement of the OxiMax pulse oximetry sensor on an extremity with a blood pressure cuff, arterial catheter, or intravascular line •... - Page 104 Performance Considerations patients and mechanically ventilated patients. During low perfusion conditions, Max-Fast pulse oximetry sensors reflect changes to the SpO up to 60 seconds earlier than digit sensors. If the Max-Fast pulse oximetry sensor is not available, consider using the OxiMax™ Max-R adhesive nasal sensor. It obtains extremely accurate measurements from a nasal artery supplied by the internal carotid that demonstrates less vasoconstriction than the peripheral vessels.
-
Page 105: Chapter 8. Troubleshooting
1.800.635.5267, or your local Nellcor representative. The N-600x Service Manual, used by qualified service personnel, provides additional troubleshooting information. The N-600x Service Manual is available on the Internet at: www.covidien.com/rms On-Screen Help The OxiMax N-600x pulse oximeter is equipped with an on-screen help system which enables you to browse and navigate through multiple help topics. - Page 106 Troubleshooting To access on-screen help topics Access multiple on-screen help topics and select a specific topic to view. Follow the example described below to access the SatSeconds help topic. 1. From the Main menu, press the HELP/CONTRAST key. The HELP MAIN window appears. Figure 90.
- Page 107 Help and Support 4. From page (2 / 2) of the HELP MAIN window, press ADJUST DOWN to select PRDELAY and then press SHOW. The HELP PRDELAY window appears.The SatSeconds help topic contains a total of two (2) consecutive help windows. Press the NEXT softkey to scroll through each window of the selected help topic for the following information: “Pulse Rate Alarm Delay can reduce alarms reported for brief pulse rate limit violations.
- Page 108 Troubleshooting 4. Press SHOW. The HELP LIMITS SELECT window appears. Figure 93. Select Limits Help Screen 5. Press BACK. 6. Press ADJUST DOWN to highlight NEO and then press SHOW. The HELP LIMITS NEO window appears. Figure 94. Neonate Limits Help Screen 7.
-
Page 109: Error Codes
Error Codes Error Codes When the oximeter detects an error condition, it displays “EEE” followed by an error code of up to three digits. Figure 96. Error Condition Screen, Battery Failure When an error code other than the ones listed in appears, turn the Table 17 on page 107 oximeter off and back on again. - Page 110 Troubleshooting 2. Error messages—Error messages provide information. The “Sensor Disconnected” error message leaves any action to the discretion of the user. Advisory messages appear as centered text at the bottom of the screen. Figure 98. Sensor Disconnected Message Screen Table 16. Common Prompts and Error Messages Exit on Time-out Exit on...
- Page 111 Prompts and Error Messages Table 16. Common Prompts and Error Messages Exit on Time-out Exit on Alarm Message in seconds Alarm Silence Displayed Resolution DEFAULTS LOST None If the oximeter Leave the factory default detects that settings, have a qualified power-on settings service technician have been lost.
- Page 112 Troubleshooting Table 16. Common Prompts and Error Messages Exit on Time-out Exit on Alarm Message in seconds Alarm Silence Displayed Resolution READING TRENDS ... None When the Completely retrieve oximeter needs sensor data or select more than ABORT. four to six seconds to retrieve trend data from...
-
Page 113: Primary Speaker Failure
Primary Speaker Failure Table 17. EEE Error Codes Error Code Error Message Corrective Action DEFAULTS LOST The current power-on default settings have been lost and returned to factory defaults. Qualified service personnel can use the N-600x Service Manual to restore the desired power-on default settings. SETTINGS LOST The current settings (for example, alarm limits, alarm and pulse beep volumes, alarm silence duration) have been lost and returned to... - Page 114 Troubleshooting Note: Once the oximeter is silenced, the oximeter sounds a piezo tone every three minutes as a reminder of the primary speaker failure condition. The oximeter also sounds the piezo tone to annunciate low, medium and high priority alarms during this time. Once an oximeter reporting a primary speaker failure is powered off, it cannot be powered on again until repaired.
-
Page 115: Low And Critical Battery Conditions
Low and Critical Battery Conditions Low and Critical Battery Conditions Table 18. Low and Critical Battery Conditions Critical State Battery Battery Power Operation -normal AC/Battery charge LED-on LOW BATTERY LED-off LOW BATTERY message-off Audible alarm-off Error code-none Effect of ALARM SILENCE key-normal Shutdown-N/A normal AC/Battery charge LED-off... - Page 116 Troubleshooting Table 18. Low and Critical Battery Conditions Critical State Battery Battery Power Operation -not displayed AC/Battery charge LED-off LOW BATTERY LED-on (flashing) LOW BATTERY message-on Audible alarm-high priority Error code-displayed and logged Effect of ALARM SILENCE key-none Shutdown-after 10 seconds - displayed.
- Page 117 Low and Critical Battery Conditions Table 19. Common Problems and Resolutions Problem Resolution The Pulse Search Indicator is lit for Check the OxiMax™ pulse oximetry sensor Directions for Use to confirm more than 10 seconds (before any appropriate usage and proper application. Check sensor and pulse oximetry measurements are taken).
-
Page 118: Obtaining Technical Assistance
Troubleshooting Obtaining Technical Assistance For technical information and assistance, to order parts, or to order an N-600x Service Manual, contact Nellcor’s Technical Services Department at 1.800.635.5267 or your local Nellcor representative. The N-600x Service Manual includes block diagrams, schematics, and a parts list required by qualified personnel when servicing the oximeter. -
Page 119: Chapter 9. Oximeter Maintenance
9 Oximeter Maintenance Overview This section describes the steps required to maintain, service, and properly clean your OxiMax N-600x™ pulse oximeter. Follow local governing ordinance and recycling instructions regarding the disposal or recycling of the oximeter and its accessories. Cleaning WARNING Do not spray, pour, or spill any liquid on the OxiMax N-600x pulse oximeter, its accessories, connectors, switches, or openings in the chassis. -
Page 120: Service
Oximeter Maintenance Service WARNING Only qualified service personnel should remove the oximeter cover. There are no user-serviceable parts inside. • The OxiMax N-600x pulse oximeter requires no calibration. • Have a qualified service technician replace the battery at least every 24 months. •... -
Page 121: Chapter 10. Theory Of Operations
10 Theory of Operations Overview This section explains the theory behind OxiMax N-600x™ pulse oximeter operations. Understanding Pulse Oximetry Theoretical Principles The OxiMax N-600x pulse oximeter uses pulse oximetry to measure functional oxygen saturation in the blood. Pulse oximetry works by applying an OxiMax™ pulse oximetry sensor to a pulsating arteriolar vascular bed, such as a finger or toe. -
Page 122: Automatic Calibration
Theory of Operations absorption by pulsatile arterial blood, eliminating the effects of nonpulsatile absorbers such as tissue, bone, and venous blood. Automatic Calibration Because light absorption by hemoglobin is wavelength dependent and because the mean wavelength of LEDs varies, an oximeter must know the mean wavelength of the OxiMax pulse oximetry sensor's red LED to accurately measure SpO During monitoring, the oximeter's software selects coefficients that are appropriate for the wavelength of that individual sensor's red LED;... -
Page 123: Oximeter Features
Oximeter Features variables such as pH, temperature, the partial pressure of carbon dioxide (PCO ), and 2,3-DPG, that shift the relationship between PO and SpO Figure 102. Oxyhemoglobin Dissociation Curve Oximeter Features SatSeconds™ Alarm Management Feature The oximeter monitors hemoglobin saturation with oxygen in the blood. With traditional alarm management, upper and lower alarm limits are set for monitoring levels. -
Page 124: Oximax Spd™ Alert Feature
Theory of Operations Rate Delay feature distinguishes clinically significant events from minor and brief pulse rate limit violations that result in nuisance alarms. To use the Pulse Rate Delay feature, set the traditional alarm management upper and lower pulse rate alarm limits. Then, set the Pulse Rate Delay. The Pulse Rate Delay limit controls the time the pulse rate level crosses either limit before an audible alarm sounds. -
Page 125: Functional Testers And Patient Simulators
Functional Testers and Patient Simulators accuracy information for the oximeter with different Nellcor approved OxiMax pulse oximetry sensors. The OxiMax N-600x pulse oximeter uses the information in the OxiMax pulse oximetry sensor, tailoring messages to better help the clinician troubleshoot client or data issues. - Page 126 Theory of Operations Page Left Intentionally Blank Operator’s Manual...
-
Page 127: Chapter 11. Product Specifications
11 Product Specifications Overview This section contains OxiMax N-600x™ pulse oximeter physical and operational specifications. Ensure all product requirements are met prior to installation of the oximeter. Physical Characteristics Weight 5.8 lbs. (2.6 kg) Dimensions 3.3 in. x 10.4 in. x 6.8 in. (8.4 cm x 26.4 cm x 17.3 cm) Electrical Requirements Power Power Requirements... -
Page 128: Rating Of Nurse Call Relay
Product Specifications Rating of Nurse Call Relay Maximum Input Voltage 30 VAC or VDC (polarity is not important) Load Current 120 mA continuous (peak 300 mA @ 100 ms) Minimum Resistance 26.5 ohms to 50.5 ohms (40.5 ohms typical) during alarms Ground Reference Isolated Ground Electrical Isolation... - Page 129 Adult and Neonate with Motion 20 to 250 bpm ±5 digits Saturation accuracy varies by sensor type. Refer to the Sensor Accuracy Grid at www.covidien.com/rms. Accuracy specifications were validated using measurements of healthy non-smoking adult volunteers during controlled hypoxia studies spanning the specified saturation ranges. Subjects were recruited from the local population and comprised both men and women ranging in age from 18-50 years old, and spanned a range of skin pigmentations.
-
Page 130: Product Compliance
Product Specifications Sensor Power Dissipation Pulse Oximetry Sensor Dissipation OxiMax MAX-A, -AL, -I, -N, -P, -R 52.5 mW OxiMax Durasensor™ DS-100A 52.5 mW OxiMax OxiCliq™ A, I, N, P 52.5 mW OxiMax Dura-Y™ D-YS 52.5 mW OxiMax Max-Fast™ 52.5 mW OxiMax Softcare™... -
Page 131: Manufacturer's Declaration
Manufacturer’s Declaration Manufacturer’s Declaration Basics WARNING The use of accessories, OxiMax sensors, and cables other than those specified may result in inaccurate readings of the OxiMax N-600x pulse oximeter and increased emission of the oximeter. The OxiMax N-600x pulse oximeter is suitable for prescription use only in the specified electromagnetic environments. - Page 132 Product Specifications Table 22. Electromagnetic Immunity Testing IEC 60601-1-2 Compliance Electromagnetic Immunity Test Test Level Level Environment Guidance Electrostatic ± 6 kV contact ± 6 kV contact Floor should be wood, discharge (ESD) concrete, or ceramic tile. If ± 8 kV air ±...
-
Page 133: Sensor And Cable Compliance
Manufacturer’s Declaration Table 23. Recommended Separation Distances Electromagnetic IEC 60601-1-2 Test Environment Immunity Test Level Compliance Level Guidance Equation for Frequency of Separation Transmitter Distance Conducted RF 3 Vrms 3 Vrms distance = 1.2 150 kHz 61000-4-6: 2006 80 MHz Radiated RF 3 V/m 3 V/m... -
Page 134: Safety Tests
Product Specifications Table 24. Cables and Sensors Item Maximum Length Cables Power cord 10.0 ft. (3 m) DOC-10 pulse oximetry cable 10.0 ft. (3 m) Software download cable, 10.0 ft. (3 m) RS-232 serial, 15 to 9 pin “D” Non-terminated cable, 3.3 ft. -
Page 135: Leakage Current
Safety Tests Leakage Current The following tables display the maximum earth and enclosure leakage current allowed, as well as patient leakage. Table 25. Earth and Enclosure Leakage Current Specifications Earth Leakage Current Neutral Condition AC Polarity Line Cord Line Cord IEC 60601-1 UL 60601-1 500 µA... - Page 136 Product Specifications Table 26. Patient Applied and Patient Isolation Risk Current Patient Applied Risk Current Power Line Ground IEC 60601-1 Condition AC Line Polarity Neutral Line Cable UL 60601-1 100 µA Normal Normal Closed Closed 500 µA Single Fault Open Closed Closed Open...
-
Page 137: Chapter 12. Clinical Study
A Clinical Study Overview This section contains data from the clinical study conducted for the Nellcor™ sensors used with the Nellcor™ N-600X Pulse Oximeter. One (1) prospective, controlled hypoxia clinical study was conducted to demonstrate the accuracy of Nellcor™ sensors when used in conjunction with the Nellcor™ N-600X Pulse Oximeter. -
Page 138: Study Population
Clinical Study Study Population Table 27. Demographic Data Type Class Total Male Gender Female Caucasian Hispanic Race African American Asian 19-48 Weight 108-250 Very light Olive Skin pigment Dark olive/Medium black Extremely dark/Blue black Operator’s Manual... -
Page 139: Study Results
Study Results Study Results Accuracy was calculated using the root mean square difference (RMSD). Table 28. SpO Accuracy for Nellcor™ Sensors vs. CO-oximeters MAX-A MAX-N MAX-FAST Data Data Data Decade Arms Arms Arms Points Points Points 60-70 3.05 2.89 2.22 70-80 2.35 2.32... -
Page 140: Adverse Events Or Deviations
Clinical Study Adverse Events or Deviations The study was conducted as expected with no adverse events and no deviations from the protocol. Conclusion The pooled results indicate that for a saturation range of 60-80% for SpO , the acceptance criterion was met for the monitoring system when tested with MAX-A, MAX-N and MAX-FAST sensors. - Page 141 Index Cleaning 113 Symbols Clock 46 Clock Settings Lost 104, 107 %SpO2 9 Confirmation Tone 11 Connecting an OXIMAX Sensor 24 Contrast 33 AC Power Indicator 8 Controls 7 Accessory Alarm Silence 7 GCX Adapter Plate 91 Help/Contrast 8 GCX Roll Stand 93 Current, Leakage (Earth and Enclosure) 129 GCX Vertical Wall Mount Arm 92 Current, Risk (Patient Applied and Isolation) 130...
- Page 142 Index Graphical Sensor Event Record Data 73 Monitor Ground Integrity Specification 128 Performance Considerations 95 Returning 112 Monitor Description 5 Monitor Displays Dashes 32 Help Monitor Trend Data 65, 66 multiple topics 100 Monitoring Values 10 Icon Navigating Menu Options 41 Fast Response Mode 10 Nurse Call Neonate Alarm Limits 10...
- Page 143 Index Setting Institutional Defaults 49 Setting SatSeconds Alarm Limit 59 Settings Lost 107 Reading Trends 106 SH 84 Real-Time Data 80 softkey Real-Time Trend Display 18, 19, 36 menu bar 8 Rear Panel 12 Soft-Sided Carrying Case 94 Rear Panel Components 12 Specifications Rear Panel Symbols 12 Compliance 124...
- Page 144 Index Pulse Rate 64 Scale 65 SpO2 63 Trend Scale 65 Troubleshooting Help 110 Troubleshooting, Error Codes 103 Troubleshooting, Low and Critical Battery Condi- tions 109 Troubleshooting, On-Screen Help 99 Troubleshooting, Oximeter Displays Dashes 32, 83, 85 Troubleshooting, Primary Speaker Failure 107 Troubleshooting, Prompts and Error Messages Troubleshooting, Technical Assistance 112 Turning On the Monitor 29...
- Page 146 Part No. 10074884 Rev C 2014-02 COVIDIEN, COVIDIEN with logo, and Covidien logo are U.S. and internationally registered trademarks of Covidien AG. ™* Trademark of its respective owner. Other brands are trademarks of a Covidien company. ©2014 Covidien. Covidien llc, 15 Hampshire Street, Mansfield, MA 02048 USA.
Need help?
Do you have a question about the Nellcor OxiMax N-600x and is the answer not in the manual?
Questions and answers