Table of Contents
Advertisement
Quick Links
Advertisement
Table of Contents

Related Manuals for DFI FS053


Summary of Contents for DFI FS053
- Page 1 FS053 Embedded SBC 2.5” User’s Manual A45930937...
-
Page 2: Copyright
Copyright FCC and DOC Statement on Class B This publication contains information that is protected by copyright. No part of it may be re- This equipment has been tested and found to comply with the limits for a Class B digital produced in any form or by any means or used to make any transformation/adaptation without device, pursuant to Part 15 of the FCC rules. -
Page 3: Table Of Contents
Table of Contents Front Panel I/O Ports ............15 USB 2.0 OTG Port ............15 Internal I/O Connectors ..........15 Digital I/O Connector ............. 15 Copyright ........... 2 COM (Serial) Port ............16 Front Panel Connector ............ 17 Trademarks ..........2 SATA (Serial ATA) Connector (for i.MX6 Quad only) ... 17 Expansion Slots ............. -
Page 4: Warranty
Warranty Static Electricity Precautions 1. Warranty does not cover damages or failures that arised from misuse of the product, in- It is quite easy to inadvertently damage your PC, system board, components or devices even ability to use the product, unauthorized replacement or alteration of components and prod- before installing them in your system unit. -
Page 5: About The Package
About the Package The package contains the following items. If any of these items are missing or damaged, please contact your dealer or sales representative for assistance. • One FS053 board • One terminal block for RS485 • One heat spreader (Height: 11mm) Optional Items •... -
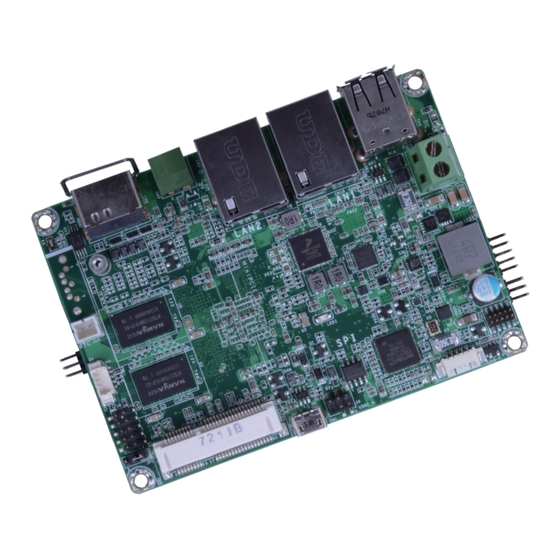
Page 6: Chapter 1 - Introduction
1 x SATA 2.0 (up to 3Gb/s) (Quad processor only) eMMC Supports 8GB, 16GB and 32GB eMMC onboard 1 x Micro SD Slot 1 x 8-bit DIO WATCHDOG TIMER Output & Interval System Reset, Programmable via Software from 1 to 255 Seconds Chapter 1 Introduction www.dfi.com... -
Page 7: Features
When power returns after an AC power failure, the system will power on automatically. • USB The system board supports the USB 2.0 to provide two USB host Type-A ports, one USB OTG port and one internal pin header for one additional USB port. Chapter 1 Introduction www.dfi.com... -
Page 8: Chapter 2 - Hardware Installation
LVDS LCD Panel i.MX6 COM 1 Cortex-A9 1 2 3 4 5 6 7 8 HDMI DDR3L DDR3L DDR3L DDR3L Mini PCIe SATA 2.0 Battery Debug Panel Power Select (for i.MX6 Quad) (JP1) Top View Bottom View Chapter 2 Hardware Installation www.dfi.com... -
Page 9: Block Diagram
USB HOST Front Panel i.MX6 USB 2x USB2517 USB HUB UART TEST USB 2.0 USB 1x 23.21 e.MMC C Bus PCIe x1 Full-size 3.04 USB 2.0 Mini PCIe RS-232/422/485 GPIO 3.3V RS-485 USB 2.0 USB OTG Chapter 2 Hardware Installation www.dfi.com... -
Page 10: System Memory
Before powering-on the system, make sure that the power settings of JP1 match the LCD panel’s specification. Selecting the incorrect voltage will seriously damage the LCD panel. DDR3L DDR3L Debug LED Features • 1GB/2GB SDRAM Memory Down • Single Channel DDR3L 1600MHz Chapter 2 Hardware Installation www.dfi.com... -
Page 11: Boot Mode/Device Select
Boot from the fuses 7 Off, 8 Off Serial downloader 7 On, 8 Off Boot from the board settings (default) 7 Off, 8 On Reserved 7 On, 8 On Boot Device Select eMMC Note Note Chapter 2 Hardware Installation www.dfi.com... -
Page 12: Rear Panel I/O Ports
The rear I/O ports consist of the following: • 1 9~36V DC-in 2-pin terminal block • 2 USB 2.0 ports • 2 LAN ports • 1 serial (RS-485) port • 1 HDMI port • 1 USB 2.0 OTG port Chapter 2 Hardware Installation www.dfi.com... -
Page 13: Graphics Interface
The LAN ports enable the system board to connect to a local area network with a network hub. HDMI Port The HDMI port carries video signals and is used to connect a LCD monitor or a digital TV that has a HDMI port. Chapter 2 Hardware Installation www.dfi.com... -
Page 14: Usb Ports
The serial port provides 2-wire RS485 communication with support of auto flow control. of the system chassis and then insert the USB port cables to a connector. Pin Name Pin Name Pin Name RS485+ RS485- Data- Data+ Chapter 2 Hardware Installation www.dfi.com... -
Page 15: Front Panel I/O Ports
The Digital I/O connector supports 8-bit digital input/output signals to provide powering-on function of the connected devices. The USB 2.0 OTG port is used for USB communication. Pin Name GPIO7 GPIO6 GPIO5 GPIO4 GPIO3 GPIO2 GPIO1 GPIO0 3.3V Chapter 2 Hardware Installation www.dfi.com... -
Page 16: Com (Serial) Port
COM 3 can be selected among RS232, RS422 and RS485. RS485 communication supports auto flow control. The serial port is asynchronous communication ports with 16C550A-compatible UARTs that can be used with modems, serial printers, remote display terminals, and other serial devices. Chapter 2 Hardware Installation www.dfi.com... -
Page 17: Front Panel Connector
The Serial ATA connector is used to connect the Serial ATA device. Connect one end of the Se- Pin Name Pin Name rial ATA data cable to a SATA connector and the other end to your Serial ATA device. Power Button Power LED Standby LED Reset Button Lid Button Chapter 2 Hardware Installation www.dfi.com... -
Page 18: Expansion Slots
The full-size Mini PCIe socket supports PCIe x1 and USB 2.0 signals and is used to install a Mini PCIe card. microSD Socket I2C_Clock The microSD socket allows you to install a microSD card for the expansion of available storage. I2C_DATA Chapter 2 Hardware Installation www.dfi.com... -
Page 19: Lvds Lcd Panel Connector
Part No.: 0110-3221140 Description: Wafer connector, 14 pin, 1.25mm (pitch), White, 3.45mm (height), SMT type, 90 degree 2. DFI board's Panel Backlight/SATA power connector: Manufacturer: E-call Part No.: 0110-3221050 Description: Wafer connector, 5 pin, 1.25mm (pitch), 3.45mm (height), SMT type,... -
Page 20: Debug Connectors
• Danger of explosion if battery incorrectly replaced. UART5_TX JTAG_TDO • Replace only with the same or equivalent type recommended by the manufacturer. JTAG_MOD JTAG_TDI • Dispose of used batteries according to local ordinance JTAG_nTRST JTAG_nRESET Chapter 2 Hardware Installation www.dfi.com... -
Page 21: Chapter 3 - Software User Guide
► Introduction Download Images to eMMC with MFGTool FS053 platform is an embedded system with Yocto 1.8 preloaded on eMMC. Demo images are Set the finger switch SW5 to “Serial Downloader Mode”: pins 7 on and 8 off. supported under Yocto 1.8 and Android 5.1.1 environment. - Page 22 3. Unzip Image package on your PC. 7. After the burning is done, click “Stop“ and turn the power off. 4. Yocto image: execute “\\[core type]\yocto-emmc-fs053-[core type]-all.vbs”. For example, for DualLite CPU, execute “\\DualLite_core\yocto-emmc-fs053-DualLite-all.vbs”. Android image: execute “\\[core type]\android-emmc-fs053-[core type]-all.vbs”. For example, for DualLite CPU, execute “\\DualLite_core\android-emmc-fs053-DualLite-all.vbs”.
-
Page 23: Download Uboot Images To Spi With Mfgtool
“\\[core type]\android-spi-fs053_[core type]-all.vbs”. For example, for Quad CPU, execute “\\Quad\android-spi-fs053_Quad-all.vbs”. 3. Plug in the Micro USB cable to your PC and power-on the FS053. Important: Important: Failure in loading a compatible image (i.e. Rev. A or Rev. B) onto the system may The adapter output voltage is 9~36V for FS053. -
Page 24: Download Images To Sd Card With Mfgtool
Set the finger switch SW5 to “SD Card Download Mode”: pins 1, 3, 6, 7 on and 2, 4, 5, 8 off. 1 2 3 4 5 6 7 8 2. Plug in the Micro USB cable to your PC and power-on the FS053. Important: 1. The adapter output voltage is 9~36V for FS053. - Page 25 7. After all preparation is done, click “Start” to burn the file. Wait until the process ends. 4. Yocto image: execute “\\[core type]\SDBoot\yocto-sdcard-fs053-[core type]-all.vbs”. For example, for Quad CPU, execute “\\Quad_core\SDBoot\yocto-sdcard-fs053-Quad-all.vbs”. Android image: execute “\\[core type]\SDBoot\android-sdcard-fs053-[core type]-all.vbs”. For example, for Quad CPU, execute “\\Quad_core\SDBoot\android-sdcard-fs053-Quad-all.vbs”.
-
Page 26: Software Features
Support Android AOSP launcher support (*). Support Android ADB shell Source code package (support by request) Support Android APK install Android AP/API Support I C, Watchdog, GPIO, Provide support console for i.MX6 platform. LVDS brightness control Chapter 3 Software User Guide www.dfi.com... -
Page 27: Yocto Support
Kernel Version (Quad Only) module. X11 without QT5 build Window System Support Loopback & flow control test, BR 115200 (need DFI Linux user UART1 - RS232 space utility) Support eMMC boot, eMMC v5.1, Linux ext3 file system eMMC Support Loopback test, BR 115200 (need DFI Linux user space utility) UART1 - RS485 Support "ping", "ifconfig"... -
Page 28: Android Support
2. Support Android auto mount USB Mass Storage function (only one USB storage is available at a time. If second USB is plugged-in the USB cable, Support Loopback & flow control test, BR 115200 by DFI Android UART USB 2.0 UART1 - RS232 second USB is not available. - Page 29 Support Android ADB Android Factory Support Reset Android Not support Fastboot Not support Android OTA Not support Android CTS Android GMS/ Not support Not support suspend, set never to suspend by default. Android Suspend Chapter 3 Software User Guide www.dfi.com...
-
Page 30: Appendix A - Compatibility
2. For initial setup, it is strongly suggested that the system is booted from the default boot device as listed below. Board Revision CPU version Default Boot Device Quad eMMC Rev. A DualLite eMMC Quad Rev. B DualLite eMMC Appendix A - Compatibility www.dfi.com... - Page 31 => setenv panel <panel_name> 2. Execute the file panel.sh — please contact your sales representative or DFI FAE per- sonnel for the executable file. When the prompt below shows up, insert either of the verified panels — AM-800480R3TMQW-T31H, or OT070UADDBT-00.
Need help?
Do you have a question about the FS053 and is the answer not in the manual?
Questions and answers