Table of Contents
Advertisement
Quick Links
Advertisement
Table of Contents

Related Manuals for YASKAWA MOTOMAN MYS450L


Summary of Contents for YASKAWA MOTOMAN MYS450L
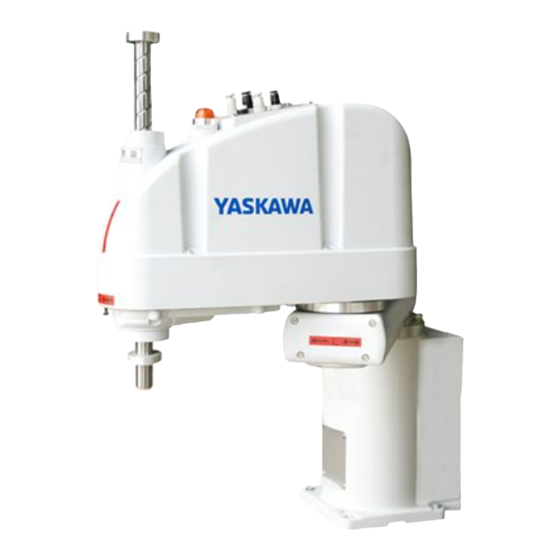
- Page 1 MYS450L Operating and Maintenance Instructions MYS450L Please read these instructions before operation and keep them for later reference. The operating instructions are only for internal use. Part Number: 160353-1CD Revision: 0 E1101000117GB01...
- Page 2 MYS450L Reference list: List of modifications Creation of Modification in the original document Documentnumber original In section On page Date Author document E1101000117DE01 28.12.2010 E1101000117GB01 translation 14.11.2011 E1101000117GB01...
- Page 3 MYS450L WARNING This instruction manual is intended to explain mainly on the mechanical part of the YASKAWA-MYS450L for the application to the actual operation and for proper maintenance and inspection. It describes on safety and handling, details on specifications, necessary items on maintenance and inspection, to explain operating instructions and maintenance procedures.
- Page 4 MYS450L Notes for Safe Operation Read this manual thoroughly before installation, operation, maintenance, or inspection of the YASKAWA-MYS450L. In this manual, the Notes for Safe Operation are classified as “WARNING”, “CAUTION”, “MANDATORY”, or “PROHIBITED”. Indicates a potentially hazardous situation which, if not...
- Page 5 MYS450L WARNING Before operating the manipulator, check that servo power is turned OFF when the emergency stop buttons on the front door of the NX100 and programming pendant are pressed. When the servo power is turned OFF, the SERVO ON LED on the programming pendant is turned OFF.
- Page 6 Definition of Terms Used Often in This Manual The YASKAWA robot is the YASKAWA industrial robot product. The YASKAWA robot usually consists of the controller, the programming pendant, and supply cables. The components are designated as follows in this manual:...
-
Page 7: Table Of Contents
MYS450L Table of Contents Receiving ..........................8 Checking the Scope of Delivery....................8 Location of the serial number ....................9 Transportation ........................10 Transporting Method......................10 Installation ..........................12 Installation for Safeguarding ....................13 Mounting Procedures for robot Base ..................13 Location .......................... -
Page 8: Receiving
MYS450L Receiving CAUTION Check whether the robot and the NX100 have the same article number. Special care must be taken when more than one robot is to be installed. If the numbers do not match, robots may not perform as expected and cause injury or damage. -
Page 9: Location Of The Serial Number
MYS450L Location of the serial number Verify whether the serial number of the programming pendant, the control and the robot matches the information on your delivery note. The serial number can be found on a type plate as shown below. <... -
Page 10: Transportation
MYS450L Transportation CAUTION Sling and crane or forklift operations must be performed by authorized personnel only. Failure to observe this caution may cause injury or damage. Avoid excessive vibration or shock during transportation. The system consists of precision components. Failure to observe this caution may adversely affect performan Transporting Method Check that the eyebolts are securely fastened. - Page 11 MYS450L 2.1.1 Using a Crane As a rule, the robot should be lifted by a crane with two wire ropes when removing it from the package and moving it. Be sure that the Robot is fixed with the shipping bolts and brackets before transport, and lift it in the posture as shown in "Figure 2: Transporting Position".
-
Page 12: Installation
MYS450L Installation WARNING Install the safeguarding. Failure to observe this warning may result in injury or damage. Install the robot in a location where the fully extended arm and tool will not reach the wall, safeguarding, or controller. Failure to observe this warning may result in injury or damage. Do not start the Robot or even turn ON the power before it is firmly anchored. -
Page 13: Installation For Safeguarding
MYS450L Installation for Safeguarding To ensure safe, be sure to install safeguarding. It prevents unforeseen accidents with personnel and damage to equipment. Refer to the quoted clause for your information and guidance. Responsibility for Safeguarding (ISO10218) The user of a robot or robot system shall ensure that safeguards are provided and used in accordance with Sections 6, 7, and 8 of this standard. - Page 14 MYS450L The Robot base is tapped for four mounting holes. securely fix the Robot base to the base plate with four hexagon head bolts M12 (40 mm long is recommended). Next, fix the Robot base to the base plate. Tighten the hexagon head bolts and anchor bolts securely so that they will not work loose during operation Refer to "Figure 3: Mounting the robot".
- Page 15 MYS450L 4 screws M12 x 40 Sprirng washer Flat washer Hole Figure 3:Mounting the robot CAUTION Install the floor mounted Robot with four or more people. The Robot weights are as follows. Be careful not to get hands, fingers, or feet caught and / or have equipment damaged by a fall of the Robot.
- Page 16 MYS450L 4 screws M12 x 40 Sprirng washer Flat washer Hole Figure 4: 2. Using nippers, cut off the wire tie binding the shaft and arm retaining bracket on the bas. screw: M4 X 15 Plane washer: M6 Cable tie Arm mounting bolt: M12 x 20 Eyebolt (Attached at shipment) Figure 5:...
-
Page 17: Location
MYS450L Location When installing a manipulator, it is necessary to satisfy the following environmental conditions: ● Ambient temperature: 0° to +45°C ● Air humidity: 20 to 80% relative humidity (no condensation water) ● Free from dust, soot, or water ● Free from corrosive gas or liquid, or explosive gas ●... -
Page 18: Wiring
MYS450L Wiring WARNING Ground resistance must be 0.1 Ω or less. Failure to observe this warning may result in a fire or an electric shock. Before wiring, make sure to turn OFF the main power supply, and put up a warning sign. (e.g. DO NOT TURN THE POWER ON). Failure to observe this warning may result in a fire or an electric shock. -
Page 19: Robot Cable Connection
MYS450L at least 6.0 mm² Bolt M8 (for grounding), delivered with robot Figure 6: Grounding Method Robot Cable Connection There are two robot cables; an encoder cable and a power cable. (See "Figure 7: Robot Cable Connection" at Page 20) 4.2.1 Connection to the Robot Before connecting the cables to the robot, verify the numbers: X1 and X100 on both the... - Page 20 MYS450L X100 Power supply cable Encoder cable NX100 Robot Figure 7: Robot Cable Connection E1101000117GB01...
- Page 21 MYS450L Power Cable Connection Encoder connector Figure 8: Robot Cable Connection (Robot Side) E1101000117GB01...
-
Page 22: Basic Specifications
MYS450L Basic Specifications Technical data Table 2: Technical data Position MYS450L Configuration Vertical Articulated Arm length 450 mm θ1+θ2 180 mm Weight (not include the weight of cables) 20 kg Driving method All joints AC servo Servomotor Max. operating speed *1 6,440 mm / s θ1+θ2 1,100 mm / s... - Page 23 MYS450L Table 2: Technical data Position MYS450L U allowable moment of rated 0.01 kgm inertia 0.12 kgm Wirst Shaft diameter ø20 (h7) mm Through hole ø14 mm Z down force 150 Nm Installed wire for customer use 24 wires (15-pin + 9+pin: D-sub connector) Installed pneumatic tube for customer us 2 pneumatic tubes (ø6 mm): 0.59 Mpa 1 pneumatic tube (ø4 mm): 0.59 Mpa...
-
Page 24: Part Names And Working Axes
MYS450L Part Names and Working Axes Back View E1101000117GB01... - Page 25 MYS450L Signal cable θ1 Fitting (white) for ø 6 mm pneumatic tube θ1 (rotating) ø 4 mm pneumatic tube Fitting (white) for θ2 (rotating) Fitting (black) for ø 4 mm pneumatic tube θ2 Z (up and down) ø 6 mm pneumatic tube Fitting (black)for Shaft Power cable...
-
Page 26: Dimensions
MYS450L Dimensions Dimensions (mm) E1101000117GB01... -
Page 27: Dimensions And P-Point Maximum Envelope
MYS450L fitting bore (view from the bottom of ø4, 90° conical hole the base) ø 30, 2 x M4, depth 10 ø40 mechanical operation limit ø20 h7 shaft diameter 180 (See note below) Max. ø 14 mm, through hole (*) indicates the stroke margin by mechanical stop. -
Page 28: Motion Range Setting By Mechanical Stops
MYS450L MYS450L 152° 3,5° 147,5° 3° 124,4 134,8 426,6 Figure 11: Dimensions and P-Point Maximum Envelope MYS450L In the range Z: 0 to -230 mm, the area is limited by interference of NOTE the Robot body and the arm Motion Range Setting by Mechanical Stops Mechanical stops physically limit the absolute area that the robot can move. - Page 29 MYS450L Mechanical stop of Z (Lower limit mechanical stop) Do not move the upper limit mechanical stop Mechanical stop of θ2 (adjustable) Mechanical stop of θ1 (fixed) Mechanical stop of θ1 (adjustable) Mechanical stop of θ2 (fixed) Figure 12: Motion Range Setting by Mechanical Stops 5.5.1 Setting the Mechanical Stops of θ1 and θ2 Both θ1 and θ2 have threaded holes in the positions corresponding to the angle for the...
- Page 30 MYS450L Setting Angle +152° +148° +135° +120° +105° +75° +60° Pulse Value 7048761 6932253 6553600 6116694 5679787 4805974 4369067 Setting Angle +30° +20° +5° -5° -20° -30° -60° Pulse Value 3495254 3203983 2767076 2475805 2038898 1747627 873814 Setting Angle -75° -105°...
- Page 31 MYS450L Setting Angle +147,5° +145° +142° +130° +125° +100° Pulse Value 2685156 2639645 2585031 2366578 2275556 1820445 Setting Angle -100° -125° -130° -142° -145° -147,5° Pulse Value -1820445 -2275556 -2366578 -2585031 -2639644 -2685156 θ Figure 14: Joint 2 Mechanical Stops 1.
- Page 32 MYS450L Lower limit mechanical stop, 2 screws M5 x 6 Brake release button Shaft When you press the brake release button, the shaft may lower and rotate due to the weight of the end effector. NOTE Be sure to hold the shaft by hand while pressing the button 3.
- Page 33 MYS450L Measure this distance 6. Firmly tighten two setscrews which are open at a 120 degrees interval so that they do not enter the shaft groove. Recommended tightening torque: 490 Ncm 7. Turn ON the Controller. 8. Move Z to its lower limit while pressing the brake release button, and then check the lower limit position.
-
Page 34: Allowable Load
MYS450L Allowable Load Mounting an end effector Users are responsible for manufacturing their own end effector(s). Observe these guidelines before mounting an end effector CAUTION When using an end effector equipped with a gripper or collet chuck, make sure the cables and/or pneumatic hoses are connected properly in order to prevent the gripper from releasing the workpiece when the robot system is switched off. - Page 35 MYS450L Brake release button The shaft may be lowered by the weight of the gripping device. Be careful of the shaft falling and rotating while the brake release button switch is being pressed because the shaft may be lowered by the weight of the end effector. E1101000117GB01...
-
Page 36: System Application
MYS450L System application Peripheral Equipment Mounts The peripheral equipment mounts are provided on the U-axis (upper arm) as shown in Figure 15: "Installing Peripheral Equipment Mounts" at page 37 for easier installation of the users’ system applications. The following conditions should be observed to attach or install peripheral equipment. - Page 37 MYS450L General dimension 35 20 Units: mm 2 x M4, depth 10 4 x M5, depth 10 2 x M4, depth 8 2 x M5, depth 10 Figure 15: Installing Peripheral Equipment Mounts E1101000117GB01...
-
Page 38: Internal User I/O Wiring Harness & Air Lines
MYS450L Internal User I/O Wiring Harness & Air Lines A wire harness for internal user inputs/outputs (24 wires x 0.211 mm ) and an air hose for driving the additional devices mounted on the upper arm are built in the robot as shown in "Figure 16: Connectors for Internal User I/O Wiring Harness and Air Line". - Page 39 MYS450L 7.2.1 Electric cable Table 3 Internal wiring Current Nominal cross Rated Voltage Leads outside diameter Notice Capacity section AC/DC30 V ø8.3±0.3 mm shielded 0.211 mm Table 4 Connector types Maker Stdandard 15 pin Applicable plug: DA-15PF-N (Solder Type) Clamping hood DA-C8-J10-F2-1 (connection setscrew: #4-40 NC) 9 pin Applicable plug:...
-
Page 40: Electrical Equipment Specification
MYS450L Electrical Equipment Specification Signal cable E1101000117GB01... -
Page 41: Power Cable
MYS450L Power cable E1101000117GB01... -
Page 42: User Cable
MYS450L Table 6: Cable color Code Cable Color Code Cable Color Black pink Brown Green Purple Blue White Light Green yellow Orange User cable E1101000117GB01... - Page 43 MYS450L Table 7: Cable color Code Cable Color Code Cable Color Black Brown Purple Green White Blue yellow E1101000117GB01...
-
Page 44: Maintenance And Inspection
Maintenance and inspections must be performed by specified personnel. Failure to observe this instruction may result in electric shock or injury. For disassembly or repair, contact your YASKAWA Europe GmbH representative. The battery pack must be connected before removing detection connector for maintenance and inspection. -
Page 45: Inspection Schedule
MYS450L Inspection Schedule Inspection points are divided into five stages: daily, monthly, quarterly, semiannual, and annual. The inspection points are added every stage. If the robot is operated for 250 hours or longer per month, the inspection points must be added every 250 hours, 750 hours, 1500 hours, and 3000 hours operation. - Page 46 MYS450L 9.1.1 Inspection While the Power is OFF (Robot is not operating) Table 9: Inspection Position Inspection Position Inspection Place Daily monthly Quarterly half- annually yearly Check looseness or backlash End effector mounting bolts of screws. ...
-
Page 47: Maintenance Procedures
MYS450L 9.1.2 Inspection While the Power is ON (Robot is in operating) Table 10: Inspection Position Inspection Position Inspection Place Dail month Quarterly half- annuall yearly Check motion range Each joint Move the cables back and forth External cables ... - Page 48 MYS450L CAUTION Use meticulous care when handling the lithium battery. Improper handling of the lithium battery as mentioned below is extremely hazardous. It can lead to heat generation, leakage, explosion, or inflammation, and may cause serious safety problems. <Improper Handling> ...
- Page 49 MYS450L Be sure to connect the connector of the new battery before disconnecting the old battery. If the current battery is disconnected before connecting the new battery, the robot will lose the home position data and the calibration must be executed again. Except with announcement of the warning "...
- Page 50 MYS450L 6. If the robot does not move to the points (poses) correctly, perform the calibration of all joints and axes. 9.2.3 Replacing the Battery Board After battery board and parts have been replaced (motors, reduction gear units, brakes, timing belts, ball screw spline unit, etc.), the robot cannot operate properly because a mismatch exists between the origin stored in each motor and its corresponding origin stored in the Controller.
- Page 51 MYS450L Battery plate 6. Loosen the screws securing the battery board and remove the battery board. 2 screws M4 x 10 Battery plate Battery board Installation 1. Mount the new battery board and secure it with screws. 2. Connect the connectors X61, X62, X63, and X64. Battery Board 3.
- Page 52 MYS450L 4. Mount the arm top cover. 5. Turn ON the Controller. 6. Perform the calibration of all joints. E1101000117GB01...
- Page 53 MYS450L 9.2.4 Inspection While the Power is OFF (Robot is not operating) Table 11: Inspection Position Inspection Position Inspection Place Daily monthly Quarterly half- annu yearly ally Check looseness or backlash of End effector mounting screws.
-
Page 54: Greasing
MYS450L 9.2.5 Inspection While the Power is ON (Robot is operating) Table 12: Inspection Position Inspection Position Inspection Place Daily monthly Quarterly half- annually yearly Check motion range Each joint Move the cables back and forth External cables ... -
Page 55: Tightening The Screws
MYS450L Table 13: Greasing Popints Greasing part Greasing Interval Grease Refer to: Reduction gear In the replacement of motor* SK-1A Maintenance: θ1 units 10.1 Replacing the θ1 reduction gear θ2 unit 10.2 Replacing the θ2 reduction gear unit Ball screw First time: after 50 km operation Maintenance: 10.10 Greasing the Ball spline unit... - Page 56 MYS450L Table 15: Tightening torque Set screw Tightening torque 245 Ncm 3920 Ncm We recommend that the bolts aligned on a circumference should be fastened in a crisscross pattern as shown in the figure below. Screw Tightening torque 1 - 8 Bolt hole Do not fasten all bolts securely at one time.
-
Page 57: Layout Of Maintenance Parts
MYS450L Layout of Maintenance Parts 9.5.1 For Floor-Mounted Type Figure 17: Table 16: θ2 speed reducer Z belt Lithium battery and Battery board θ2 motor Arm cover Z brake Brake release button Z motor LED lamp θ1 speed reducer Ball screw spline unit θ1 motor U motor Signal cable... -
Page 58: Spare Parts
It is recommended to keep the parts and components in the following table in stock as spare parts for the YASKAWA-MYS450L. (See "Table 17: Recommended spare parts for YASKAWA MYS450L"). Product performance may not be guaranteed when using spare parts recommended by companies other than YASKAWA Europe GmbH. - Page 59 MYS450L Recommended spare parts for Table 17: YASKAWA MYS450L Part Name Type Product Code Order NO. Qty per Unit Brake Z ERS-135L R13ZA00350100 E149012 Brake release button switch Z AB2M-M1W R13Z702640100 E149012 Recommended spare parts for Table 18: NX100 controller...
- Page 60 MYS450L E1101000117GB01...
- Page 61 MYS450L E1101000117GB01...
- Page 62 YASKAWA in Ihrer Nähe / YASKAWA near You YASKAWA Electric Corporation 2-1, Kuroskai-shiroishi Yahatanishi-ku Kitakyushu-shi 806-0004 +093-645-8801 YASKAWA EU Distributors Yaskawa Europe GmbH BG Kammarton Bulgaria Ltd. Wien +43-1-707-9324-15 Sofia +359-02-926-6060 Yaskawa Czech s.r.o CH Messer Eutectic Castolin Switzerland S.A.
Need help?
Do you have a question about the MOTOMAN MYS450L and is the answer not in the manual?
Questions and answers