Table of Contents
Advertisement
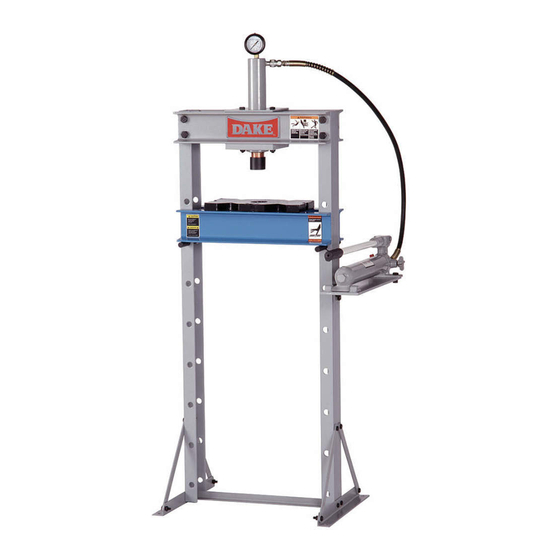
10 & 20 TON UTILITY PRESS
OWNERS MANUAL
BENCH AND FLOOR MODEL PRESSES
10 & 20 Ton single acting manual hydraulic press
FOR YOUR OWN SAFETY AND
OPTIMUM OPERATION READ
INSTRUCTION MANUAL BEFORE
OPERATING PRESS
RETAIN THIS MANUAL FOR
FURTHER REFERENCE.
10 TON BENCH PRESS
10 TON FLOOR PRESS
20 TON FLOOR PRESS
# 972200
#972210
#972220
Advertisement
Table of Contents

Subscribe to Our Youtube Channel
Related Manuals for Dake 972210


Summary of Contents for Dake 972210
- Page 1 10 & 20 Ton single acting manual hydraulic press FOR YOUR OWN SAFETY AND OPTIMUM OPERATION READ INSTRUCTION MANUAL BEFORE OPERATING PRESS RETAIN THIS MANUAL FOR FURTHER REFERENCE. 10 TON BENCH PRESS 10 TON FLOOR PRESS 20 TON FLOOR PRESS # 972200 #972210 #972220...
- Page 2 Distributed by: Trick-Tools 75 Truman Road Pella, IA 50219 Phone:1-877-VAN-SANT E-mail: sales@trick-tools.com Here at Trick Tools we believe that our customers deserve the best value in their tool and equipment purchases. We are constantly at work searching out a variety of high quality, high performance tools to offer at the best prices possible.
-
Page 3: Table Of Contents
TABLE OF CONTENTS • Model specifications & Placement of press page 2 • Safety points page 3 • Warning labels page 4 • Safeguarding page 5 • Assembly instructions page 6 • Assembly instructions page 7 • Assembly instructions page 8 •... -
Page 4: Model Specifications & Placement Of Press
MACHINE SPECIFICATIONS Machine Specifications 10 Ton Bench 10 Ton Floor 20 Ton Floor Press Type Manual 10-ton Bench Manual 10-ton Floor Manual 20-ton floor Cylinder Type Single Acting Single Acting Single Acting Max. Press Capacity 10 Ton 10 Ton 20 Ton Ram Diameter 1- 1/2"... -
Page 5: Safety Points
• SAFETY POINTS BEFORE USE, ALL SAFETY POINTS MUST BE READ AND UNDERSTOOD! Before the PRESS is used, the instruction manual with this machine must be read and understood. This manual offers safe operation instructions. Offered below are safety instructions designed for the press and general safety instructions that apply to most machinery Operation of the press incorrectly, or in a dangerous fashion can result in serious injury or death. -
Page 6: Warning Labels
3. WARNING LABELS: READ AND UNDERSTAND THESE WARNING LABELS PLACED ON THIS MACHINE BEFORE OPERATING. MAKE SURE ALL PERSONS IN THE AREA OF THE PRESS ARE AWARE OF THESE WARNINGS. UNDER NO CIRCUMSTANCES SHOULD THESE LABELS BE REMOVED! Establish solid footing Keep hands away Guard workpiece to To prevent falls... -
Page 7: Safeguarding
ANSI B11.2 – Hydraulic Power Presses Safety Requirements for Construction, Care and Use It is important that Dake press users have a clear understanding of their responsibility involving the care and use of their Dake hydraulic press, including point-of-operation safe guards. -
Page 8: Assembly Instructions
FOR DAKE MODEL MECHANICS UTILITY 10 & 20 TON BENCH AND FLOOR MODEL PRESSES. Your new Dake Press has been packaged in a manner to prevent damage to any critical components, some assembly will be required. All parts in the accessory box are critical to the function of your press. -
Page 9: Assembly Instructions
STEP 2. Floor models: (Bench model skip this step) Install the diagonal support straps. Using 4 M8 x 25mm bolts, nuts and washers. Install the support straps to the inside of the base angles then to the frame as shown. Finger tighten. Diagonal support straps STEP 3:... -
Page 10: Assembly Instructions
STEP 7: With press standing upright and all bolts tightened install the worktable. Insert two table pins in the two lowest holes. Take the worktable and tilt it at a sharp angle and insert it in the uprights. (NOTE: The gussets welded to the table are at slight angles. The narrowest dimension of these gussets go down. -
Page 11: Operation Instructions
Install a nose piece and use table blocks when operating this machine. Nose piece Table block NOTE: System is filled with oil and may take a few pumps to fill all lines. Close the pump valve and pump to check for piston action, and for leaks. -
Page 12: Maintenance
operation on the next part. There is no need to raise the ram all the way to the top each time. If pressing application requires a certain tonnage, press until the gauge reads the appropriate tonnage then stop. Release pressure and repeat operation. NOTE: Never pump the ram down fully and dead head the ram in the cylinder. -
Page 13: Trouble Shooting
7. TROUBLE SHOOTING: Problem Solution Oil leaking around ram. Put ram under full pressure for 1 hour. Bad seal Ram is jerky or sluggish With valve open repeatedly pump the handle to bleed air from lines. Ram does not return fully Open and close valve several times. -
Page 14: Parts List For Bench Press
Hydraulic hose w/Coupling Spare seals should be stored in safe location out of direct sunlight. When ordering, parts have model and date of purchase information ready. For assistance call Dake Customer Service at 1-800-937-3253 or fax to 1-800-846-3253 e-mail to customerservice@dakecorp.com... -
Page 15: Exploded Diagram For Bench Model
10 TON BENCH UTILITY PRESS... -
Page 16: Parts List For Floor Press
Hydraulic hose w/Coupling Spare seals should be stored in safe location out of direct sunlight. When ordering, parts have model and date of purchase information ready. For assistance call Dake Customer Service at 1-800-937-3253 or fax to 1-800-846-3253 e-mail to customerservice@dakecorp.com... -
Page 17: Exploded Diagram For Floor Model
10 TON FLOOR UTILITY PRESS... -
Page 18: Parts List For 20-Ton Floor Press
Stepped nose piece Spare seals should be stored in safe location out of direct sunlight. When ordering, parts have model and date of purchase information ready. For assistance call Dake Customer Service at 1-800-937-3253 or fax to 1-800-846-3253 e-mail to customerservice@dakecorp.com... -
Page 19: Exploded Diagram For 20-Ton Floor Model
DAKE 20 TON FLOOR UTILITY PRESS... -
Page 20: Adding Oil To Pumping Unit
Adding oil to pumping unit. Retract the ram that is connected to the pump. Remove and place the pump so the pump is horizontal as shown. (Do not disconnect ram from the pump) Remove filler plug (small plug on the top) (See below figure 1) also lift the pump unit up 3/8”...
Need help?
Do you have a question about the 972210 and is the answer not in the manual?
Questions and answers