Dentsply Sirona CEREC Omnicam AC Operating Instructions Manual
Hide thumbs
Also See for CEREC Omnicam AC:
- Operating instructions manual (192 pages) ,
- Service manual (134 pages) ,
- Unpacking and installation instructions (16 pages)

Related Manuals for Dentsply Sirona CEREC Omnicam AC


Summary of Contents for Dentsply Sirona CEREC Omnicam AC
- Page 1 05.2019 New as of: CEREC Omnicam AC, Omnicam AC Operating Instructions (valid for USA) English...
-
Page 2: Table Of Contents
Table of contents Dentsply Sirona Operating Instructions CEREC Omnicam AC / Omnicam AC Table of contents General data ......................Dear Customer,.................... Contact data....................General information about these operating instructions ......General conventions and structure of the document ........1.4.1 Structure of the document.............. - Page 3 Dentsply Sirona Table of contents Operating Instructions CEREC Omnicam AC / Omnicam AC Controls and functional elements..............3.3.1 Overview of the front panel ............3.3.2 Overview of the rear panel............. Operating state LED ..................Certification ....................Electromagnetic compatibility ..............3.6.1 Electromagnetic emission ..............
- Page 4 Table of contents Dentsply Sirona Operating Instructions CEREC Omnicam AC / Omnicam AC Maintenance ......................Cleaning, disinfection and sterilization............6.1.1 Cleaning agents and disinfectants ..........6.1.1.1 Cleaning agents............6.1.1.2 Wiping Disinfectants ............. 6.1.1.3 High-level disinfectants..........6.1.2 Uncritical surfaces including monitor ..........
-
Page 5: General Data
Operating Instructions CEREC Omnicam AC / Omnicam AC 1.1 Dear Customer, General data Dear Customer, Thank you for your purchase of this CEREC Omnicam AC / Omnicam ® unit from Dentsply Sirona. The CEREC Omnicam AC enables you to produce computer-assisted dental restorations, e.g. -
Page 6: General Information About These Operating Instructions
1 General data Dentsply Sirona 1.3 General information about these operating instructions Operating Instructions CEREC Omnicam AC / Omnicam AC General information about these operating instructions Observe the Operating Instructions Please familiarize yourself with the unit by reading through these Operating Instructions before putting it into operation. -
Page 7: General Conventions And Structure Of The Document
Dentsply Sirona 1 General data Operating Instructions CEREC Omnicam AC / Omnicam AC 1.4 General conventions and structure of the document General conventions and structure of the document 1.4.1 Structure of the document 1.4.1.1 Identification of the danger levels To prevent personal injury and material damage, please observe the warning and safety information provided in these operating instructions. -
Page 8: Operating Conventions
1 General data Dentsply Sirona 1.4 General conventions and structure of the document Operating Instructions CEREC Omnicam AC / Omnicam AC 1.4.2 Operating conventions Example Meaning Tapping Pressing once and releasing the finger or the left touchpad key on the acquisition unit. -
Page 9: Notes To The Repository
Dentsply Sirona 1 General data Operating Instructions CEREC Omnicam AC / Omnicam AC 1.4 General conventions and structure of the document Edit a 3D model with multi-touch You can edit the 3D model using multi-touch. Item Function ➢ Complete a rotary movement using 2 fingers. -
Page 10: Warranty And Liability
Exclusion of liability If the operator does not meet the obligation to carry out such maintenance or fault messages are ignored, Dentsply Sirona or its authorized dealer does not assume any liability for damage caused. 66 54 656 D3696... -
Page 11: Intended Use
Dentsply Sirona 1 General data Operating Instructions CEREC Omnicam AC / Omnicam AC 1.6 Intended use Intended use The Sirona Dental CAD/CAM System is intended for use in partially or fully edentulous mandibles and maxillae in support of single or multiple- unit cement retained restorations. -
Page 12: Operating Instructions Cerec Omnicam Ac / Omnicam Ac
1 General data Dentsply Sirona 1.6 Intended use Operating Instructions CEREC Omnicam AC / Omnicam AC Manufacturer Name of Implant Implant Size System Platform Diameter Length Biomet 3i Osseotite 3.25 8.5mm – 18mm 3.75 8.5mm – 20mm 7mm – 18mm Certain 3.25... -
Page 13: Operating Instructions Cerec Omnicam Ac / Omnicam Ac
Dentsply Sirona 1 General data Operating Instructions CEREC Omnicam AC / Omnicam AC 1.6 Intended use Manufacturer Name of Implant Implant Size System Platform Diameter Length BioHorizons Tapered 3.0, 3.0/3.4/3.8 9mm – 18mm (Internal Tapered plus Connection) Tapered internal 10.5mm – 15mm Tapered plus 7.5mm –... -
Page 14: Further Use Of Sirona Dental Cad/Cam System
Storage battery pack recycling symbol (see "Disposal of the storage battery pack [→ 86]") The CEREC Omnicam AC / Omnicam AC acquisition unit may con- tain an RF transmitter in the form of a WLAN card or a separate wire- less module. -
Page 15: Operating Instructions Cerec Omnicam Ac / Omnicam Ac
Dentsply Sirona 1 General data Operating Instructions CEREC Omnicam AC / Omnicam AC 1.8 Legend Symbols on the packaging Take note of the following symbols on the packaging: Protect from moisture Fragile; handle with care Temperature during storage and transport... -
Page 16: Safety Instructions
In extreme cases, it will be impossible to establish a wireless connection at all. Dentsply Sirona has selected the best possible configuration for data communication via the wireless interface (CEREC Radio Device) or WLAN, which generally ensures perfect functioning of this connection. -
Page 17: General Safety Information
CAUTION Note on the prevention, recognition, and elimination of unintended electromagnetic effects: The CEREC Omnicam AC / Omnicam AC acquisition unit is Class B equipment (classified according to CISPR 11, EN 60601-1-2: 2015 based on IEC 60601-1-2: 2014). This unit may be used in professional equipment of health services. -
Page 18: Operating Instructions Cerec Omnicam Ac / Omnicam Ac
2 Safety instructions Dentsply Sirona 2.2 Basic safety information Operating Instructions CEREC Omnicam AC / Omnicam AC NOTE Danger posed by broken glass Stress to the glass surfaces of the control console and monitor from strong forces and impacts must be prevented, otherwise there is a risk of the glass breaking. -
Page 19: Movement And Stability Of The Unit
Dentsply Sirona 2 Safety instructions Operating Instructions CEREC Omnicam AC / Omnicam AC 2.2 Basic safety information 2.2.4 Movement and stability of the unit NOTE The unit can overturn or slip away For reasons of tilt stability, the unit must be pulled by its front or rear handle when being moved. -
Page 20: Accessories
In order to ensure product safety, this device may be operated only with original Dentsply Sirona accessories or third-party accessories expressly approved by Dentsply Sirona. In particular, only the power cable also supplied or the corresponding original spare part may be used with the unit. -
Page 21: Operating Instructions Cerec Omnicam Ac / Omnicam Ac
Dentsply Sirona 2 Safety instructions Operating Instructions CEREC Omnicam AC / Omnicam AC 2.3 Safety labels Plug connections of external interfaces CAUTION Adaptation of acquisition unit to external components Additional devices connected to external interfaces must be tested according to the relevant standards, e.g.: EN 60601-1:2006 + Cor.:2010 + A1:2013,... -
Page 22: Electrostatic Charge
2 Safety instructions Dentsply Sirona 2.4 Electrostatic charge Operating Instructions CEREC Omnicam AC / Omnicam AC Heater plate CAUTION Risk of burns due to hot surface! ➢ Never touch the heater plate (A)! Electrostatic charge 2.4.1 ESD warning labels ESD warning label... -
Page 23: About The Physics Of Electrostatic Charges
Dentsply Sirona 2 Safety instructions Operating Instructions CEREC Omnicam AC / Omnicam AC 2.4 Electrostatic charge ESD protective measures ESD protective measures include: ● Procedures for preventing electrostatic charge build-up (e.g. air conditioning, air moistening, conductive floor coverings and non- synthetic clothing) ●... -
Page 24: Wireless Phone Interference With Equipment
2 Safety instructions Dentsply Sirona 2.5 Wireless phone interference with equipment Operating Instructions CEREC Omnicam AC / Omnicam AC Background Integrated circuits (logical circuits and microprocessors) are used to implement a wide variety of functions in dental/X-ray/CAD/CAM systems. The circuits must be miniaturized to a very high degree in order to include as many functions as possible on these chips. -
Page 25: Integration In A Network Or Connection To A Modem
Dentsply Sirona 2 Safety instructions Operating Instructions CEREC Omnicam AC / Omnicam AC 2.6 Integration in a network or connection to a modem Integration in a network or connection to a modem NOTE Observe the following installation regulations The following installation regulations apply to integration of the... -
Page 26: Disposal
2 Safety instructions Dentsply Sirona 2.7 Disposal Operating Instructions CEREC Omnicam AC / Omnicam AC Disposal In accordance with Directive 2012/19/EU and national disposal regulations regarding old electrical and electronic devices, please be advised that such items must be disposed of in a special way within the European Union (EU). -
Page 27: Product Description
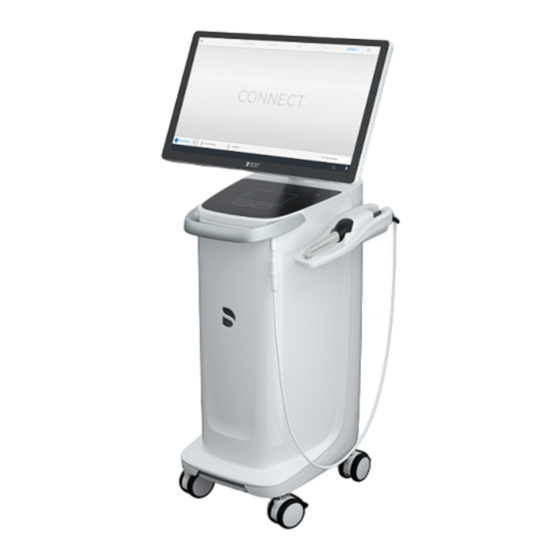
Dentsply Sirona 3 Product description Operating Instructions CEREC Omnicam AC / Omnicam AC 3.1 Technical description Product description Technical description CAD system for high-precision intraoral optical impressions ● High-resolution, heated oral scanner (3D scanner) with removable reflective sleeve ● Integrated image processing ●... -
Page 28: Operating Instructions Cerec Omnicam Ac / Omnicam Ac
3 Product description Dentsply Sirona 3.1 Technical description Operating Instructions CEREC Omnicam AC / Omnicam AC PC hardware Special PC with the following equipment: ® ● Processor: Intel ● RAM: 32GB RAM ● Hard disks: 1x PCIe SSD, 1x SATA HDD ●... -
Page 29: Technical Data
Dentsply Sirona 3 Product description Operating Instructions CEREC Omnicam AC / Omnicam AC 3.2 Technical data Technical data Type designation CEREC Omnicam AC / Omnicam AC Rated line voltage 100 - 240 VAC /50 - 60 Nominal current 5.0 – 2.1 A... -
Page 30: Operating Instructions Cerec Omnicam Ac / Omnicam Ac
3 Product description Dentsply Sirona 3.2 Technical data Operating Instructions CEREC Omnicam AC / Omnicam AC Dimensions and weight Dimensions W x H x D in mm 408 (537) x 1190 x 443 in inches 16.06 (21.14) x 46.85 x 17.44 Weight ●... -
Page 31: Controls And Functional Elements
Dentsply Sirona 3 Product description Operating Instructions CEREC Omnicam AC / Omnicam AC 3.3 Controls and functional elements Controls and functional elements 3.3.1 Overview of the front panel NOTE CEREC Omnicam / Omnicam is calibrated The CEREC Omnicam / Omnicam scanner is calibrated ex works. -
Page 32: Overview Of The Rear Panel
3 Product description Dentsply Sirona 3.3 Controls and functional elements Operating Instructions CEREC Omnicam AC / Omnicam AC 3.3.2 Overview of the rear panel Fuses Power cable holder Main switch On button (operating state I = ON, 0 = OFF... -
Page 33: Operating State Led
Dentsply Sirona 3 Product description Operating Instructions CEREC Omnicam AC / Omnicam AC 3.4 Operating state LED Operating state LED To position the operating state LED, see chapter “Overview of the rear panel [→ 32]”. LED lights up blue: Acquisition unit is connected with the socket. -
Page 34: Certification
3 Product description Dentsply Sirona 3.5 Certification Operating Instructions CEREC Omnicam AC / Omnicam AC Certification CE mark This product bears the CE mark in accordance with the provisions of the Council Directive 93/42/EEC of June 14, 1993 concerning medical devices and their changes. -
Page 35: Electromagnetic Compatibility
EMC aspects. CEREC Omnicam AC / Omnicam AC complies with the requirements for electromagnetic compatibility (EMC) according to EN 60601-1-2: 2015 based on IEC 60601-1-2: 2014. CEREC Omnicam AC / Omnicam AC is hereinafter referred to as "UNIT". 3.6.1 Electromagnetic emission The UNIT is intended for operation in the electromagnetic environment specified below. -
Page 36: Interference Immunity
3 Product description Dentsply Sirona 3.6 Electromagnetic compatibility Operating Instructions CEREC Omnicam AC / Omnicam AC 3.6.2 Interference immunity The UNIT is intended for operation in the electromagnetic environment specified below. The customer or user of the UNIT should make sure that it is used in such an environment. -
Page 37: Operating Instructions Cerec Omnicam Ac / Omnicam Ac
Dentsply Sirona 3 Product description Operating Instructions CEREC Omnicam AC / Omnicam AC 3.6 Electromagnetic compatibility Interference immu- IEC 60601-1-2 Test level Compliance level Electromagnetic environment - nity tests guidelines Conducted RF in- 3 V d= [1.2] √P terference 150 kHz to 80 MHz IEC 61000-4-6 6 ... -
Page 38: Operating Instructions Cerec Omnicam Ac / Omnicam Ac
3 Product description Dentsply Sirona 3.6 Electromagnetic compatibility Operating Instructions CEREC Omnicam AC / Omnicam AC Immunity to interference against high-frequency electromagnetic fields in the direct vicinity of wireless communi- cation devices IEC 61000-4-3 Test frequency Modulation Required immunity test... -
Page 39: Working Clearances
Dentsply Sirona 3 Product description Operating Instructions CEREC Omnicam AC / Omnicam AC 3.6 Electromagnetic compatibility 3.6.3 Working clearances Recommended working clearances The UNIT is intended for operation in an electromagnetic environment, between portable and mobile RF where radiated RF interference is checked. The customer or the user of... -
Page 40: Installation And Startup
Operating Instructions CEREC Omnicam AC / Omnicam AC Installation and startup Transport and unpacking All products from Dentsply Sirona are carefully checked prior to shipment. Please perform an incoming inspection immediately after delivery. 1. Check the delivery note to ensure that the consignment is complete. -
Page 41: Initial Startup
➢ Always place the sensitive scanner in its holder! NOTE Risk of damage posed by pulling on the scanner cable If the CEREC Omnicam AC / Omnicam AC is moved by pulling on the scanner cable, there is a risk of damage to the cable, scanner and device. -
Page 42: Operating Instructions Cerec Omnicam Ac / Omnicam Ac
4 Installation and startup Dentsply Sirona 4.4 Initial startup Operating Instructions CEREC Omnicam AC / Omnicam AC Notes on network installation The network card is installed. The cable with the RJ-45 connectors establishes the network connection or is connected to the CEREC radio module. -
Page 43: Inserting The Battery
Dentsply Sirona 4 Installation and startup Operating Instructions CEREC Omnicam AC / Omnicam AC 4.4 Initial startup 4.4.2 Inserting the battery CAUTION Risk of fire or chemical injury Improper handling of the storage battery used in this unit can lead to a risk of fire or chemical injury. -
Page 44: Operating Instructions Cerec Omnicam Ac / Omnicam Ac
Dentsply Sirona 4.4 Initial startup Operating Instructions CEREC Omnicam AC / Omnicam AC 2. Slide in the storage battery using the guide rails and guide pins up to the stop and screw it in place with 2 fastening screws (C). -
Page 45: Switching The Units On
CAUTION Use only the supplied power cord Use only the power cord supplied by Dentsply Sirona to connect the acquisition unit to the power supply. If the acquisition unit is switched on at the main switch, then it can be switched on at the ON button. -
Page 46: Switching The Units Off
4 Installation and startup Dentsply Sirona 4.4 Initial startup Operating Instructions CEREC Omnicam AC / Omnicam AC 3. Switch the milling unit on (see the Operating Instructions for the milling unit). 4. After loading the operating system, start the CEREC SW / Connect SW application by double-clicking on the CEREC SW / Connect SW icon. -
Page 47: Operation
Dentsply Sirona 5 Operation Operating Instructions CEREC Omnicam AC / Omnicam AC 5.1 Working with the touch monitor Operation Working with the touch monitor 5.1.1 Adjusting the position of the monitor You can guide the touch monitor to a position convenient for you. In doing so, there is the option to adjust the height/tilt position and a lateral pivot. -
Page 48: Touch Functionality
5 Operation Dentsply Sirona 5.1 Working with the touch monitor Operating Instructions CEREC Omnicam AC / Omnicam AC 5.1.2 Touch functionality You can activate the touch function with and without gloves. The following gestures are supported: Edit a 3D model with multi-touch You can edit the 3D model using multi-touch. -
Page 49: Adjusting Touch-Sensitivity And Buzzer Volume
Operating Instructions CEREC Omnicam AC / Omnicam AC 5.2 Scanner warm-up time 5.1.3 Adjusting touch-sensitivity and buzzer volume The CEREC Omnicam AC / Omnicam AC provides you with the following options: ● Adjusting the touch-sensitivity of the touchpad/trackball buttons ● Adjusting the volume for their acoustic feedback 1. -
Page 50: Scanner Setup
5 Operation Dentsply Sirona 5.3 Scanner setup Operating Instructions CEREC Omnicam AC / Omnicam AC Scanner setup You can adjust the CEREC Omnicam / Omnicam scanner in the device configuration. 1. In the software, navigate to the system menu and click on the "Configuration"... -
Page 51: Taking Optical Impressions With The Scanner
Dentsply Sirona 5 Operation Operating Instructions CEREC Omnicam AC / Omnicam AC 5.4 Taking optical impressions with the scanner Taking optical impressions with the scanner CAUTION Hot surface! The coated sapphire glass of the scanner, is preheated in the scanner cradle. -
Page 52: Operating Instructions Cerec Omnicam Ac / Omnicam Ac
5 Operation Dentsply Sirona 5.4 Taking optical impressions with the scanner Operating Instructions CEREC Omnicam AC / Omnicam AC WARNING Risk of injury for those diagnosed with epilepsy For persons who have been diagnosed with epilepsy, there is a risk of epileptic shock through the flashing light of the scanner. -
Page 53: Scanner Guide
Dentsply Sirona 5 Operation Operating Instructions CEREC Omnicam AC / Omnicam AC 5.5 Scanner guide Scanner guide CAUTION After each use Prepare the scanner once again after each patient. ➢ Follow the instructions in the "Scanner [→ 64]" section on cleaning, disinfection and sterilization in order to avoid cross- contamination between patients. -
Page 54: Occlusal Scan
5 Operation Dentsply Sirona 5.5 Scanner guide Operating Instructions CEREC Omnicam AC / Omnicam AC 5.5.1 Occlusal scan Important: Ensure that the distance between the coated sapphire glass of the scanner and the scanned surface is observed. The distance must be between 0 - 1 5 mm (ideally: 5 mm). The scanner does not rest on the teeth or the gums. -
Page 55: Lingual Scan
Dentsply Sirona 5 Operation Operating Instructions CEREC Omnicam AC / Omnicam AC 5.5 Scanner guide 5.5.3 Lingual scan ü The scanner is on the tooth that is positioned next to the preparation in the distal direction. 1. Rotate the scanner from 90° in the buccal direction to around 45° to maximum 90°... -
Page 56: Single And Multiple Buccal Registration
5 Operation Dentsply Sirona 5.5 Scanner guide Operating Instructions CEREC Omnicam AC / Omnicam AC 5.5.5 Single and multiple buccal registration The buccal registration establishes the allocation of jaw exposures. ü The jaw with the preparation is scanned. 1. Scan the occlusal, buccal and lingual view of the antagonist (see the section “Occlusal scan”, “Buccal scan”... -
Page 57: Operating Instructions Cerec Omnicam Ac / Omnicam Ac
Dentsply Sirona 5 Operation Operating Instructions CEREC Omnicam AC / Omnicam AC 5.5 Scanner guide Completing the scanning process 1. Start as indicated above, on the occlusal surface of the right terminal tooth, and scan it occlusally. Tilt the scanner by 45° in a palatinal direction (oral) and guide it from the distal to the mesial. -
Page 58: Operating Instructions Cerec Omnicam Ac / Omnicam Ac
5 Operation Dentsply Sirona 5.5 Scanner guide Operating Instructions CEREC Omnicam AC / Omnicam AC The following scan sequence is implemented for the opposite second (third) quadrant: 1. Start by placing the device on the occlusal surface of a premolar, that has already been scanned, and guide the scanner palatally (orally) at a mesial tilt of up to 90°... -
Page 59: Completing Measurements
Dentsply Sirona 5 Operation Operating Instructions CEREC Omnicam AC / Omnicam AC 5.5 Scanner guide ● When performing this activity, be careful not to accidentally cut out any areas that e.g. are located behind the model or are otherwise cut away from the line. -
Page 60: Software For The Scanner
5 Operation Dentsply Sirona 5.6 Software for the scanner Operating Instructions CEREC Omnicam AC / Omnicam AC Software for the scanner Only use software which is pre-installed on the system. 5.6.1 Cut out model areas With the "Cut" function, you can should be able to cut out model areas. -
Page 61: Maintenance
Some countries have legal regulations which require regular safety inspections of electrical devices or systems by the operator. Dentsply Sirona would like to draw your attention to the fact that a so- called "retest" (repeat test) must be carried out for the CEREC Omnicam AC / Omnicam AC acquisition unit at least every three years. -
Page 62: Cleaning, Disinfection And Sterilization
6 Maintenance Dentsply Sirona 6.1 Cleaning, disinfection and sterilization Operating Instructions CEREC Omnicam AC / Omnicam AC Cleaning, disinfection and sterilization NOTE Approved cleaning agents and disinfectants Use only cleaning and disinfecting agents which have been approved by Dentsply Sirona! 6.1.1... -
Page 63: Uncritical Surfaces Including Monitor
Dentsply Sirona 6 Maintenance Operating Instructions CEREC Omnicam AC / Omnicam AC 6.1 Cleaning, disinfection and sterilization 6.1.2 Uncritical surfaces including monitor NOTE Do not allow liquids to penetrate into the ventilation slots! NOTE Never use corrosive cleaning agents, wax or solvents. -
Page 64: Scanner
6 Maintenance Dentsply Sirona 6.1 Cleaning, disinfection and sterilization Operating Instructions CEREC Omnicam AC / Omnicam AC 6.1.3 Scanner CAUTION Risk of injury An evidently damaged scanner must no longer be used on patients. If the CEREC Omnicam / Omnicam scanner accidentally falls off, check to make sure that the sapphire glass is not damaged. -
Page 65: General Information
Dentsply Sirona 6 Maintenance Operating Instructions CEREC Omnicam AC / Omnicam AC 6.1 Cleaning, disinfection and sterilization 6.1.3.1 General information The CEREC Omnicam / Omnicam is a very sensitive optical device and must therefore be handled with the utmost care. Protect the coated... -
Page 66: Removing The Mirror Sleeve
6 Maintenance Dentsply Sirona 6.1 Cleaning, disinfection and sterilization Operating Instructions CEREC Omnicam AC / Omnicam AC 6.1.3.3 Removing the mirror sleeve If required to remove the mirror sleeve do the following: 1. Press the mirror sleeve against the scanner body. -
Page 67: Refitting The Mirror Sleeve
Dentsply Sirona 6 Maintenance Operating Instructions CEREC Omnicam AC / Omnicam AC 6.1 Cleaning, disinfection and sterilization 6.1.3.4 Refitting the mirror sleeve ➢ Carefully refit the mirror sleeve until it locks in place. NOTE There is a risk of damaging the scanner window or the coated sapphire glass if the mirror sleeve is not pushed straight toward the front. -
Page 68: Preliminary Cleaning Of The Mirror Sleeve
6 Maintenance Dentsply Sirona 6.1 Cleaning, disinfection and sterilization Operating Instructions CEREC Omnicam AC / Omnicam AC 6.1.3.6 Preliminary cleaning of the mirror sleeve Clean the scanner immediately after use as follows: 1. Carefully wipe the mirror sleeve while it is on the scanner so that no dirt whatsoever can remain stuck and can harden on the surface of the mirror sleeve. -
Page 69: High-Level Disinfection Of The Mirror Sleeve
Dentsply Sirona 6 Maintenance Operating Instructions CEREC Omnicam AC / Omnicam AC 6.1 Cleaning, disinfection and sterilization 6.1.3.8 High-level disinfection of the mirror sleeve (with HLD Set) NOTE Dry heat sterilization and high-level disinfection must not be combined. The complete process for high-level disinfection is as follows:... - Page 70 6 Maintenance Dentsply Sirona 6.1 Cleaning, disinfection and sterilization Operating Instructions CEREC Omnicam AC / Omnicam AC 6. Slid the plug into the metal holder. 7. Press the sleeve onto the plug while holding the metal holder in order to ensure that no particle contamination or fluids penetrate the inside of the sleeve.
- Page 71 Dentsply Sirona 6 Maintenance Operating Instructions CEREC Omnicam AC / Omnicam AC 6.1 Cleaning, disinfection and sterilization 9. Insert the metal holder with the sleeve. 10. Place the lid on the container and leave the sleeve at least 12 ®...
- Page 72 Dentsply Sirona 6.1 Cleaning, disinfection and sterilization Operating Instructions CEREC Omnicam AC / Omnicam AC 11. Remove the lid and the holder with the sleeve from the container. 12. Thoroughly rinse the sleeve with tap water of potable water quality that meets Federal Clean Water Standards holding it with its holder (for at least 30 seconds).
- Page 73 Dentsply Sirona 6 Maintenance Operating Instructions CEREC Omnicam AC / Omnicam AC 6.1 Cleaning, disinfection and sterilization 17. Dry the whole surface of the sleeve and also the lower part of the inner surface using a clean soft, lint-free cloth.
-
Page 74: Dry Heat Sterilization Of The Mirror Sleeve
6 Maintenance Dentsply Sirona 6.1 Cleaning, disinfection and sterilization Operating Instructions CEREC Omnicam AC / Omnicam AC 6.1.3.9 Dry heat sterilization of the mirror sleeve NOTE Dry heat sterilization and high-level disinfection must not be combined. The process for dry heat sterilization is as follows: 1. -
Page 75: Using Disposable Sleeves
Dentsply Sirona 6 Maintenance Operating Instructions CEREC Omnicam AC / Omnicam AC 6.1 Cleaning, disinfection and sterilization 6.1.3.10 Using disposable sleeves The CEREC Omnicam / Omnicam scanner can be operated with disposable plastic sleeves in order to ensure maximum infection control. -
Page 76: Calibrating The Scanner
6 Maintenance Dentsply Sirona 6.2 Calibrating the scanner Operating Instructions CEREC Omnicam AC / Omnicam AC Calibrating the scanner The measurement procedure used by the system requires the use of a calibrated scanner. The CEREC Omnicam / Omnicam scanner is calibrated ex works. - Page 77 Dentsply Sirona 6 Maintenance Operating Instructions CEREC Omnicam AC / Omnicam AC 6.2 Calibrating the scanner Calibrating the scanner 1. Remove the protective cap from the calibration set. 2. Mount the calibration set on the tip of the scanner until it locks into place.
- Page 78 6 Maintenance Dentsply Sirona 6.2 Calibrating the scanner Operating Instructions CEREC Omnicam AC / Omnicam AC Measuring the position of the exit window 1. Mount the bottom side of the calibration set to the tip of the scanner. 2. Click on the "OK" button.
-
Page 79: Color Calibration
Dentsply Sirona 6 Maintenance Operating Instructions CEREC Omnicam AC / Omnicam AC 6.3 Color calibration Color calibration General information NOTE Faulty color analysis The color analysis can be negatively impacted due to strong light incidence and it can lead to varying results. - Page 80 6 Maintenance Dentsply Sirona 6.3 Color calibration Operating Instructions CEREC Omnicam AC / Omnicam AC Color-calibrating the scanner NOTE Only use color calibration set with clean, dry CEREC Omnicam / Omnicam scanner In order to achieve optimum results, the CEREC Omnicam / Omnicam scanner must be clean, disinfected and dry before color calibration.
- Page 81 Dentsply Sirona 6 Maintenance Operating Instructions CEREC Omnicam AC / Omnicam AC 6.3 Color calibration Replacing the color calibration set NOTE Regularly replacing the color calibration set In order to achieve optimum results, the color calibration set must be replaced regularly.
-
Page 82: Replacing The Main Fuse
6 Maintenance Dentsply Sirona 6.4 Replacing the main fuse Operating Instructions CEREC Omnicam AC / Omnicam AC Replacing the main fuse DANGER Potentially lethal shock hazard People can be injured or electrical components of the unit destroyed. ➢ Switch off the unit prior to beginning work. -
Page 83: Charging The Battery
Dentsply Sirona 6 Maintenance Operating Instructions CEREC Omnicam AC / Omnicam AC 6.5 Charging the battery Charging the battery NOTE Information on back-up cycles The storage battery is designed for fully cable-free use of Scan, Design and Grinding at a power requirement of 250 W for 60 minutes. -
Page 84: Replacing The Battery
6 Maintenance Dentsply Sirona 6.6 Replacing the battery Operating Instructions CEREC Omnicam AC / Omnicam AC Replacing the battery Service cover 2 guide rails Storage battery 2 guide pins 2 fastening screws 1. Open the service cover on the back panel. -
Page 85: Disposal
Dentsply Sirona 7 Disposal Operating Instructions CEREC Omnicam AC / Omnicam AC Disposal In accordance with Directive 2012/19/EU and national disposal regulations regarding old electrical and electronic devices, please be advised that such items must be disposed of in a special way within the European Union (EU). -
Page 86: Disposal Of The Storage Battery Pack
Send in the replaced storage battery pack to Dentsply Sirona (see the reverse side of these operating instructions for the mailing address). 66 54 656 D3696... -
Page 87: Appendix
Dentsply Sirona 8 Appendix Operating Instructions CEREC Omnicam AC / Omnicam AC 8.1 Making backup copies Appendix Making backup copies To increase the system's data security and protect themselves against data losses, users should make backup copies of the data regularly. -
Page 88: Index
Index Dentsply Sirona Operating Instructions CEREC Omnicam AC / Omnicam AC Index Acquisition unit Heater plate, 31 Overview, 31 HUB, 25 Air pressure Operation, 29 Main fuses, 82 Storage, 29 Main switch, 32, 45 Transport, 29 Maintenance, 19 Ambient temperature Manufacturer's address, 5 Operation, 29 Mirror sleeve, 65 Modem, 25 Building installation, 16 Multi-Touch, 8 Edit a 3D model, 9, 48... - Page 89 Dentsply Sirona Index Operating Instructions CEREC Omnicam AC / Omnicam AC Rated line voltage, 29 Relative humidity Operation, 29 Storage, 29 Transport, 29 Repair, 19 Safety instructions, 7 Sapphire glass, 65 Scanner Warm-up time, 49 Scanner window, 65 Scope of supply, 40 Screen, 8 Service cover, 32 Storage battery, 83 Storage battery pack Disposal, 86...
- Page 90 We reserve the right to make any alterations which may be required due to technical improvements. © Sirona Dental Systems GmbH Sprache: englisch Printed in Germany D3696.201.02.03.02 05.2019 Ä.-Nr.: 127 594 Sirona Dental Systems GmbH 66 54 656 D3696 Fabrikstr. 31 Order No ...
Need help?
Do you have a question about the CEREC Omnicam AC and is the answer not in the manual?
Questions and answers