Table of Contents
Advertisement
Available languages
Available languages
Quick Links
Advertisement
Chapters
Table of Contents

Subscribe to Our Youtube Channel
Related Manuals for Dentsply Sirona CEREC AF


Summary of Contents for Dentsply Sirona CEREC AF
- Page 1 New as of: 03.2021 Nouveau depuis: CEREC AF, CEREC AF Connect CEREC AI, CEREC AI Connect CEREC AI for Rear Operating Instructions (valid for Canada) Notice d’utilisation (valable pour le Canada) English / Français...
- Page 3 Dentsply Sirona CEREC AF, CEREC AF Connect, CEREC AI, CEREC AI Connect, CEREC AI for Rear Operating Instructions (valid for Canada) CEREC AF, CEREC AF Connect, CEREC AI, CEREC AI Connect, CEREC AI for Rear Notice d’utilisation (valable pour le Canada) 66 37 487 D3652 D3652.201.01.21.09...
- Page 5 03.2021 New as of: CEREC AF, CEREC AF Connect CEREC AI, CEREC AI Connect CEREC AI for Rear Operating Instructions (valid for Canada) English...
-
Page 6: Table Of Contents
Table of contents Dentsply Sirona Operating Instructions (valid for Canada) Table of contents Dear Customer,....................... Contact data....................General data ......................Structure of the document................2.1.1 Identification of the danger levels ..........2.1.2 Formats and symbols used............Legend ......................General description.................... - Page 7 Dentsply Sirona Table of contents Operating Instructions (valid for Canada) Installation and startup.................... Transport and unpacking ................Disposal of packaging materials ..............Major components ..................Scope of supply ................... Commissioning .................... 6.5.1 Controls and functional elements........... 6.5.2 Plug connections................6.5.3 Switching the units on ..............
- Page 8 Table of contents Dentsply Sirona Operating Instructions (valid for Canada) 8.1.2.9 High-level disinfection of the mirror sleeve (without HLD Set)............... 8.1.2.10 Dry heat sterilization of the mirror sleeve ..... Calibrating CEREC Omnicam..............Color calibration ................... Disposal ........................66 37 487 D3652...
-
Page 9: Dear Customer
Operating Instructions (valid for Canada) 1.1 Contact data Dear Customer, ® ® Thank you for your purchase of this CEREC AF / CEREC AI (CEREC Acquisition Flexible/CEREC Acquisition Integrated) and the Connect variants unit from Dentsply Sirona. This device enables you to produce dental restorations, e.g. from ceramic material with a natural appearance (CEramic REConstruction). -
Page 10: General Data
2 General data Dentsply Sirona 2.1 Structure of the document Operating Instructions (valid for Canada) General data Please read this document completely and follow the instructions exactly. You should always keep it within reach. Original language of the present document: German. -
Page 11: Formats And Symbols Used
Dentsply Sirona 2 General data Operating Instructions (valid for Canada) 2.2 Legend 2.1.2 Formats and symbols used The formats and symbols used in this document have the following meaning: Prerequisite Requests you to do something. 1. First action step 2. Second action step ➢... - Page 12 2 General data Dentsply Sirona 2.2 Legend Operating Instructions (valid for Canada) Symbols on the packaging Take note of the following symbols on the packaging: Protect from moisture Fragile; handle with care Temperature during storage and transport Relative humidity during storage and transport...
-
Page 13: General Description
Dentsply Sirona 3 General description Operating Instructions (valid for Canada) 3.1 Certification General description Certification CE mark This product bears the CE mark in accordance with the provisions of the Council Directive 93/42/EEC of June 14, 1993 concerning medical devices and their changes. -
Page 14: Intended Use
Intended use In combination with the milling unit, the CEREC AF / CEREC AI / CEREC AF Connect / CEREC AI Connect / CEREC AI for Rear unit is used to manufacture dental restorations, e.g. from a natural-appearing ceramic material. The unit may be operated only by medically trained and qualified personnel. -
Page 15: Safety
Dentsply Sirona 4 Safety Operating Instructions (valid for Canada) 4.1 Basic safety information Safety Basic safety information 4.1.1 Prerequisites NOTE Important information on building installation The building installation must be performed by a qualified expert in compliance with the national regulations. DIN VDE 0100-710 applies in Germany. -
Page 16: General Safety Information
Note on the prevention, recognition, and elimination of unintended electromagnetic effects: CEREC AF / CEREC AI / CEREC AF Connect / CEREC AI Connect / CEREC AI for Rear is Class B equipment (classified according to CISPR 11, EN 60601-1-2:2015 based on IEC 60601-1-2:2014). -
Page 17: Stability Of The Unit
4.1.5 Stability of the unit NOTE The CEREC AF/CEREC AF Connect unit could slip and fall off the table Please ensure that you place the cradle and camera on a flat surface. The round plate upon which the cradle is mounted is equipped with non-slip feet to prevent movement. -
Page 18: Safety Labels
4 Safety Dentsply Sirona 4.2 Safety labels Operating Instructions (valid for Canada) Safety labels Plug connections of external PC interfaces CAUTION Additional devices connected to external interfaces must be tested according to the relevant standards, e.g.: EN 60601-1:2006 + Cor.:2010 + A1:2013, IEC 60601-1 Edition 3.1:2012,... - Page 19 Dentsply Sirona 4 Safety Operating Instructions (valid for Canada) 4.2 Safety labels Heater plate CAUTION Risk of burns due to hot surface! ➢ Never touch the heater plate (A)! 66 37 487 D3652 D3652.201.01.21.02 03.2021...
-
Page 20: Electrostatic Charge
4 Safety Dentsply Sirona 4.3 Electrostatic charge Operating Instructions (valid for Canada) Electrostatic charge 4.3.1 ESD warning labels ESD warning label CAUTION Risk of injury or damage to components from electrostatic discharge For electrical components labeled with an ESD warning label, observe the following instructions. -
Page 21: About The Physics Of Electrostatic Charges
Dentsply Sirona 4 Safety Operating Instructions (valid for Canada) 4.3 Electrostatic charge 4.3.3 About the physics of electrostatic charges What is an electrostatic charge? An electrostatic charge is a voltage field on and in an object (e.g. a human body) which is protected against conductance to ground potential by a nonconductive layer (e.g. -
Page 22: Wireless Phone Interference With Equipment
The use of mobile wireless phones in practice or hospital environments must be prohibited to ensure safe operation of the unit. Data transmission Data communication between the CEREC AF/CEREC AI and the milling unit should preferably be via LAN cable. 66 37 487 D3652... -
Page 23: Technical Information
Dentsply Sirona 5 Technical information Operating Instructions (valid for Canada) 5.1 Technical description Technical information Technical description CAD system for high-precision intraoral optical impressions ● High-resolution, heated oral camera (3D camera) with removable reflective sleeve (reflective sleeve sterilizable with hot air) ●... -
Page 24: Technical Data
Dentsply Sirona 5.2 Technical data Operating Instructions (valid for Canada) Technical data Type designation CEREC AF / CEREC AI / CEREC AF Connect / CEREC AI Connect / CEREC AI for Rear Rated line voltage 100-240 V ~ / 50-60Hz Nominal current 1.0-0.6 A (supplied by... - Page 25 Dentsply Sirona 5 Technical information Operating Instructions (valid for Canada) 5.2 Technical data Dimensions and weight (CEREC AF, CEREC AF Connect) Dimensions of the camera cradle, W x H x D 278 x 102.5 x 73 in mm in inches...
- Page 26 5 Technical information Dentsply Sirona 5.2 Technical data Operating Instructions (valid for Canada) Dimensions of CEREC AI/CEREC AI Connect Recommended distances from cabinet or wall. Center of the floor cut-out/installation area Minimum distance with tray and CEREC AI/CEREC AI Con-...
- Page 27 Dentsply Sirona 5 Technical information Operating Instructions (valid for Canada) 5.2 Technical data 66 37 487 D3652 D3652.201.01.21.02 03.2021...
- Page 28 5 Technical information Dentsply Sirona 5.2 Technical data Operating Instructions (valid for Canada) Dimensions of CEREC AI for rear 66 37 487 D3652 D3652.201.01.21.02 03.2021...
-
Page 29: Electromagnetic Compatibility
Observance of the following information is necessary to ensure safe operation regarding EMC aspects. CEREC AF / CEREC AI / CEREC AF Connect / CEREC AI Connect / CEREC AI for Rear complies with the requirements for electromagnetic compatibility (EMC) according to IEC 60601-1-2:2001 and A1:2004. -
Page 30: Interference Immunity
5 Technical information Dentsply Sirona 5.3 Electromagnetic compatibility Operating Instructions (valid for Canada) 5.3.2 Interference immunity The UNIT is intended for operation in the electromagnetic environment specified below. The customer or user of the UNIT should make sure that it is used in such an environment. - Page 31 Dentsply Sirona 5 Technical information Operating Instructions (valid for Canada) 5.3 Electromagnetic compatibility Interference immu- IEC 60601-1-2 Test level Compliance level Electromagnetic environment – nity tests guidelines Conducted RF in- d= [1.2] √P terference 150 kHz to 80 MHz IEC 61000-4-6...
-
Page 32: Working Clearances
5 Technical information Dentsply Sirona 5.3 Electromagnetic compatibility Operating Instructions (valid for Canada) 5.3.3 Working clearances Recommended working clearances The UNIT is intended for operation in an electromagnetic environment, between portable and mobile RF where radiated RF interference is checked. The customer or the user of... -
Page 33: Installation And Startup
6.1 Transport and unpacking Installation and startup Transport and unpacking All products from Dentsply Sirona are carefully checked prior to shipment. Please perform an incoming inspection immediately after delivery. 1. Check the delivery note to ensure that the consignment is complete. -
Page 34: Major Components
Dentsply Sirona 6.3 Major components Operating Instructions (valid for Canada) Major components CEREC AF The CEREC AF D3652 medical device includes the following main components: ● CEREC Omnicam Camera (for order with camera) 65 34 767 D3652 ● Camera cradle 65 26 565 D3652 ●... - Page 35 6 Installation and startup Operating Instructions (valid for Canada) 6.3 Major components CEREC AF Connect The CEREC AF Connect D3652 medical device includes the following main components: ● CEREC Omnicam Camera (for order with camera) 65 34 767 D3652 ● Camera cradle 65 26 565 D3652...
- Page 36 6 Installation and startup Dentsply Sirona 6.3 Major components Operating Instructions (valid for Canada) CEREC AI Connect The CEREC AI Connect D3652 medical device includes the following main components: ● CEREC Omnicam camera (for order with camera) 65 34 775 D3652 ● Support arm with camera cradle 65 32 050 D3652...
-
Page 37: Scope Of Supply
Omni- Omni- Omni- with without scope of supply Omnicam Omnicam The box labelled CEREC AF/AI contains the following: CEREC Omnicam (delivered in case for CEREC AF and CEREC AF Connect) Calibration set Camera cradle with ta- x (without x (without... - Page 38 Medical power supply unit cable Monitor power cable (optional) *Optional: 0.5 m camera extension cable The box labelled PC CEREC AF/AI contains the following: Sirona restore solution PC test tool Special desktop PC *Optional: Monitor box contains: Monitor (choice of 24" or 19")
-
Page 39: Commissioning
Operating Instructions (valid for Canada) 6.5 Commissioning Commissioning Dentsply Sirona or a Dentsply Sirona authorized dealer will install the system as described and ensure that you are well instructed in how to operate the system. This includes a description of how to switch the system on or off. - Page 40 NOTE Use only the PC supplied by Dentsply Sirona! The PC for CEREC AF / CEREC AI / CEREC AF Connect / CEREC AI Connect / CEREC AI for Rear is supplied in an enclosure that allows it to be placed in most furniture designed for the operation of a PC.
- Page 41 Dentsply Sirona 6 Installation and startup Operating Instructions (valid for Canada) 6.5 Commissioning Dimensions of the PC as of hardware version 5.4.1 Width Height Depth in mm in inches Ventilation slots in the cabinet Cabinet PC power supply unit/PC air...
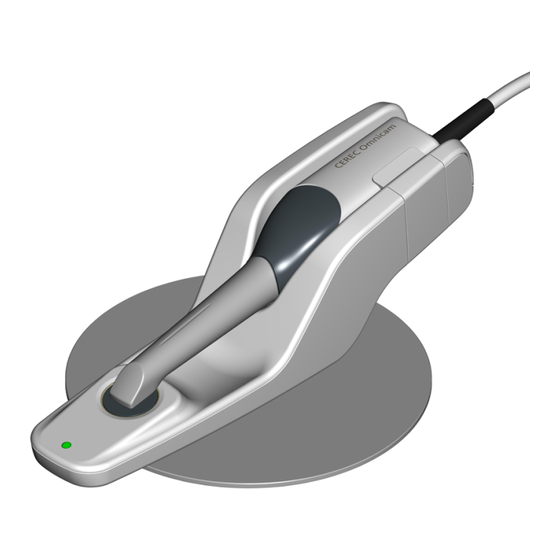
- Page 42 6 Installation and startup Dentsply Sirona 6.5 Commissioning Operating Instructions (valid for Canada) Components of the Omnicam Press detent to release Camera windows Mirror sleeve Calibration set Sapphire glass (coated) NOTE CEREC Omnicam is calibrated The CEREC Omnicam is calibrated ex works (see "Calibrating CEREC Omnicam ...
-
Page 43: Plug Connections
(applies to CEREC AI/CEREC AI Connect). CAUTION Positioning camera cradle The camera cradle for the CEREC AF/CEREC AF Connect must be placed on a flat, horizontal surface either inside or outside of the patient environment. Ensure that the camera cradle cable does not pose a safety risk. - Page 44 ➢ Only use the supplied CEREC Omnicam for CEREC AI/AI Connect/CEREC AI for Rear. Do not use a CEREC Omnicam from a CEREC AC/AC Connect or CEREC AF/AF Connect. 2. Carefully insert the connector of the CEREC Omnicam cable into...
- Page 45 Notes on network installation CEREC AF/AI/AI for Rear and the milling machine must be connected via LAN cable. Your network operator must ensure that LAN cables and provided and installed so that you can connect the PC to the milling machine.
-
Page 46: Switching The Units On
2. Set the monitor to its maximum resolution or the resolution recommended by Windows. 3. Install the CEREC SW software on the CEREC AF /AI PC. For CEREC AF Connect/AI Connect, download the Sirona Connect software from the Sirona homepage. Confirm the firmware update for the CEREC Omnicam with "YES"... - Page 47 Dentsply Sirona 6 Installation and startup Operating Instructions (valid for Canada) 6.5 Commissioning 5. For descriptions of further software actions, online help can be accessed by pressing "F1" or via the Help... menu option. NOTE Internet Explorer V 5.0 or higher must be installed on your system in order to use the online help function.
-
Page 48: Switching The Units Off
6 Installation and startup Dentsply Sirona 6.5 Commissioning Operating Instructions (valid for Canada) 6.5.4 Switching the units off NOTE Proper shutdown procedure The operating system must always be shut down properly to prevent data loss. 1. Exit all programs. 2. Power down the operating system. -
Page 49: Operation
Dentsply Sirona 7 Operation Operating Instructions (valid for Canada) 7.1 Camera warm-up time Operation Make sure that the CEREC Omnicam is already connected when starting "CEREC SW" . Subsequent disconnection and re-connection is then possible without having to restart the "CEREC SW" . -
Page 50: Taking Acquisitions With The Cerec Omnicam
7 Operation Dentsply Sirona 7.3 Taking acquisitions with the CEREC Omnicam Operating Instructions (valid for Canada) Taking acquisitions with the CEREC Omnicam CAUTION Hot surface! The coated sapphire glass of the CEREC Omnicam is preheated in the camera cradle. When removing the CEREC Omnicam from its cradle, the surface temperature of the mirror sleeve can be up to 51°C. - Page 51 Dentsply Sirona 7 Operation Operating Instructions (valid for Canada) 7.3 Taking acquisitions with the CEREC Omnicam WARNING Risk of injury for those diagnosed with epilepsy For persons who have been diagnosed with epilepsy, there is a risk of epileptic shock through the flashing light of the CEREC Omnicam scanner.
-
Page 52: Directing The Camera
7 Operation Dentsply Sirona 7.4 Directing the camera Operating Instructions (valid for Canada) Directing the camera CAUTION After each use Reprocess the camera after each patient. ➢ Follow the instructions in chapter „CEREC Omnicam [→ 57]“ in order to avoid cross-contamination between patients. -
Page 53: Occlusal Scan
Dentsply Sirona 7 Operation Operating Instructions (valid for Canada) 7.4 Directing the camera 7.4.1 Occlusal scan Important: Ensure that the distance between the coated sapphire glass of the CEREC Omnicam and the scanned surface is observed. The distance must be between 0 - 15 mm (ideally: 5 mm). The camera does not rest on the teeth or the gums. -
Page 54: Lingual Scan
7 Operation Dentsply Sirona 7.4 Directing the camera Operating Instructions (valid for Canada) 7.4.3 Lingual scan ü The CEREC Omnicam is on the tooth that is positioned next to the preparation in the distal direction. 1. Rotate the CEREC Omnicam from 90° in the buccal direction to around 45°... -
Page 55: Buccal Registration
Dentsply Sirona 7 Operation Operating Instructions (valid for Canada) 7.4 Directing the camera 7.4.5 Buccal registration A buccal registration can be used to establish contact with the antagonist. ü The jaw with the preparation is scanned. 1. Scan the occlusal, buccal and lingual view of the antagonist (see the section “Occlusal scan ... - Page 56 7 Operation Dentsply Sirona 7.4 Directing the camera Operating Instructions (valid for Canada) Completing the scanning process 1. Start as indicated above, on the occlusal surface of the right terminal tooth, and scan it occlusally. Tilt the camera by 45° in a palatinal direction (oral) and guide it from the distal to the mesial.
- Page 57 Dentsply Sirona 7 Operation Operating Instructions (valid for Canada) 7.4 Directing the camera The following scan sequence is implemented for the opposite second (third) quadrant: 1. Start by placing the device on the occlusal surface of a premolar, that has already been scanned, and guide the camera palatally (orally) at a mesial tilt of up to 90°...
-
Page 58: Completing Measurements
7 Operation Dentsply Sirona 7.4 Directing the camera Operating Instructions (valid for Canada) ● When performing this activity, be careful not to accidentally cut out any areas that e.g. are located behind the model or are otherwise cut away from the line. -
Page 59: Software For The Cerec Omnicam
Dentsply Sirona 7 Operation Operating Instructions (valid for Canada) 7.5 Software for the CEREC Omnicam Software for the CEREC Omnicam Refer to the Operator's Manual for more information on using the CEREC SW and the CEREC Premium SW. You can find additional information on setting the CEREC Omnicam in the "Adjusting the CEREC Omnicam"... -
Page 60: Maintenance
NOTE Annual maintenance performed by trained technical personnel is recommended. Care, cleaning, disinfection and sterilization NOTE Use only chemical products recommended by Dentsply Sirona. 8.1.1 Cleaning and disinfection agents Kerr Corporation ● CaviCide ● Cavi Wipes Patterson ●... -
Page 61: Cerec Omnicam
Dentsply Sirona 8 Maintenance Operating Instructions (valid for Canada) 8.1 Care, cleaning, disinfection and sterilization 8.1.2 CEREC Omnicam CAUTION If the CEREC Omnicam accidentally falls down, check to make sure that the camera windows and coated sapphire glass are not damaged. -
Page 62: Components Of The Omnicam
8 Maintenance Dentsply Sirona 8.1 Care, cleaning, disinfection and sterilization Operating Instructions (valid for Canada) 8.1.2.2 Components of the Omnicam Press detent to release Sapphire glass (coated) Mirror sleeve Camera windows 8.1.2.3 Removing the mirror sleeve If required to remove the mirror sleeve do the following: 1. -
Page 63: Mirror Sleeve Reprocessing Overview
Dentsply Sirona 8 Maintenance Operating Instructions (valid for Canada) 8.1 Care, cleaning, disinfection and sterilization 8.1.2.5 Mirror sleeve reprocessing overview See detailed instructions after summary. Mirror sleeve for CEREC Omnicam Pre-Cleaning process (while mirror sleeve is attached to the camera) 1. -
Page 64: Wipe Disinfection For The Camera And Mirror Sleeve
8 Maintenance Dentsply Sirona 8.1 Care, cleaning, disinfection and sterilization Operating Instructions (valid for Canada) 8.1.2.7 Wipe disinfection for the camera and mirror sleeve NOTE Do not spray the CEREC Omnicam or immerse it in cleaning agents or disinfectants! 1. Carry out a preliminary cleaning process (see "Pre-cleaning of the mirror sleeve"). - Page 65 Dentsply Sirona 8 Maintenance Operating Instructions (valid for Canada) 8.1 Care, cleaning, disinfection and sterilization NOTE It is recommended that you never switch between disinfecting and sterilizing solutions. However if you do, make sure you thoroughly rinse the HLD set before switching.
- Page 66 8 Maintenance Dentsply Sirona 8.1 Care, cleaning, disinfection and sterilization Operating Instructions (valid for Canada) 8. Cautiously fill the HLD container up to the marked level (B) per manufacturer´s instructions. A funnel can be used to assist with filling the liquid (A). Do not spill any disinfectant. If spillage occurs please follow disinfectant´s manufacturer´s safety indications for...
- Page 67 Dentsply Sirona 8 Maintenance Operating Instructions (valid for Canada) 8.1 Care, cleaning, disinfection and sterilization 10. Place the lid on the container and leave the mirror sleeve at least 12 minutes in the disinfectant. While exceeding the recommended immersion time may not cause damage to the mirror sleeve, the mirror sleeve should be removed as soon as possible after the recommended time.
- Page 68 8 Maintenance Dentsply Sirona 8.1 Care, cleaning, disinfection and sterilization Operating Instructions (valid for Canada) 13. Carefully and slowly remove the plug with the holder from the mirror sleeve by downward movement of the holder. Make sure that the mirror sleeve points upwards not to risk any damage by liquids entering the inside of the mirror sleeve.
-
Page 69: High-Level Disinfection Of The Mirror Sleeve (Without Hld Set)
Dentsply Sirona 8 Maintenance Operating Instructions (valid for Canada) 8.1 Care, cleaning, disinfection and sterilization 8.1.2.9 High-level disinfection of the mirror sleeve (without HLD Set) In case the HLD Set is not available NOTE Dry heat sterilization and high-level disinfection must not be combined. - Page 70 8 Maintenance Dentsply Sirona 8.1 Care, cleaning, disinfection and sterilization Operating Instructions (valid for Canada) 6. Cautiously fill the container to a filling level of 20mm - 25mm ( i n - 1 i n) under the small elongated hole (A) of the mirror sleeve when immersed.
-
Page 71: Dry Heat Sterilization Of The Mirror Sleeve
Dentsply Sirona 8 Maintenance Operating Instructions (valid for Canada) 8.1 Care, cleaning, disinfection and sterilization 8.1.2.10 Dry heat sterilization of the mirror sleeve NOTE Dry heat sterilization and high-level disinfection must not be combined. The process for dry heat sterilization is as follows: 1. -
Page 72: Calibrating Cerec Omnicam
8 Maintenance Dentsply Sirona 8.2 Calibrating CEREC Omnicam Operating Instructions (valid for Canada) Calibrating CEREC Omnicam The measurement procedure used by the system requires the use of a calibrated CEREC Omnicam. The CEREC Omnicam is factory- calibrated. Then calibrate the CEREC Omnicam after every reinstallation and after every transport. - Page 73 Dentsply Sirona 8 Maintenance Operating Instructions (valid for Canada) 8.2 Calibrating CEREC Omnicam Calibrate the camera 1. Remove the protective cap from the calibration set. 2. Mount the calibration set on the tip of the camera until it locks into place.
- Page 74 8 Maintenance Dentsply Sirona 8.2 Calibrating CEREC Omnicam Operating Instructions (valid for Canada) Measuring the position of the exit window 1. Mount the bottom side of the calibration set to the tip of the camera. 2. Click on the "OK" button.
-
Page 75: Color Calibration
Dentsply Sirona 8 Maintenance Operating Instructions (valid for Canada) 8.3 Color calibration Color calibration General information NOTE Faulty color analysis The color analysis can be negatively impacted due to strong light incidence and it can lead to varying results. ➢ Set the model CEREC Omnicam up so that it is not located directly in the beam path of an extreme light source (e.g., the... - Page 76 8 Maintenance Dentsply Sirona 8.3 Color calibration Operating Instructions (valid for Canada) Carry out a color calibration also after changing a mirror sleeve. Heavily scratched mirror sleeves may not be used for a color analysis. Storing a color-calibration set The color-calibration set must be stored in its packaging in a dry place which is protected from light.
- Page 77 Dentsply Sirona 8 Maintenance Operating Instructions (valid for Canada) 8.3 Color calibration Color-calibrating the camera 1. Make sure that the CEREC Omnicam is clean, disinfected and dry. 2. Remove the color-calibration set from the packaging. 3. Use the CEREC Omnicam to scan the QR code on the underside of your color-calibration set.
- Page 78 8 Maintenance Dentsply Sirona 8.3 Color calibration Operating Instructions (valid for Canada) Replacing the color calibration set Please note that the color calibration set ● can only be used with CEREC SW software ≥ 4.5 or Sirona Connect SW ≥ 4.5 or CEREC Premium SW ≥ 4.5.
-
Page 79: Disposal
Dentsply Sirona 9 Disposal Operating Instructions (valid for Canada) Disposal In accordance with Directive 2012/19/EU and national disposal regulations regarding old electrical and electronic devices, please be advised that such items must be disposed of in a special way within the European Union (EU). - Page 80 We reserve the right to make any alterations which may be required due to technical improvements. © Sirona Dental Systems GmbH Sprache: englisch Printed in Germany D3652.201.01.21.02 03.2021 Ä.-Nr.: 130 402 Sirona Dental Systems GmbH 66 37 487 D3652 Fabrikstr. 31 Order No ...
- Page 81 03.2021 Nouveau depuis: CEREC AF, CEREC AF Connect CEREC AI, CEREC AI Connect CEREC AI for Rear Notice d’utilisation (valable pour le Canada) Français...
- Page 82 Table des matières Dentsply Sirona Notice d’utilisation (valable pour le Canada) Table des matières Chère cliente, cher client, ..................Coordonnées ....................Indications générales ....................Structure du document................. 2.1.1 Identification des niveaux de danger ..........2.1.2 Mises en page et symboles utilisés ..........
- Page 83 Dentsply Sirona Table des matières Notice d’utilisation (valable pour le Canada) Montage et mise en service ..................Transport et déballage ................. Mise au rebut du matériel d’emballage ............Principaux composants................Étendue de la livraison................. Mise en service .................... 6.5.1 Eléments de commande et de fonctions........
- Page 84 Table des matières Dentsply Sirona Notice d’utilisation (valable pour le Canada) 8.1.2.9 Désinfection de niveau élevé de la douille-miroir (sans kit HLD)................. 8.1.2.10 Stérilisation à l'air chaud..........Calibrer CEREC Omnicam ................Calibrage de la couleur ................Élimination ......................66 37 487 D3652...
-
Page 85: Chère Cliente, Cher Client
Notice d’utilisation (valable pour le Canada) 1.1 Coordonnées Chère cliente, cher client, ® Nous vous remercions de l’achat de votre appareil CEREC AF ® CEREC AI (CEREC Acquisition Flexible / CEREC Acquisition Integrated) de Dentsply Sirona et de sa variante Connect. -
Page 86: Indications Générales
2 Indications générales Dentsply Sirona 2.1 Structure du document Notice d’utilisation (valable pour le Canada) Indications générales Lisez le présent document en entier et observez-le scrupuleusement. Gardez-le toujours à portée de main. Langue de rédaction initiale de ce document : Allemand. -
Page 87: Mises En Page Et Symboles Utilisés
Dentsply Sirona 2 Indications générales Notice d’utilisation (valable pour le Canada) 2.2 Explication des marquages 2.1.2 Mises en page et symboles utilisés Signification des mises en page et des symboles utilisés dans le présent document : Condition à remplir Vous invite à exécuter une tâche. - Page 88 2 Indications générales Dentsply Sirona 2.2 Explication des marquages Notice d’utilisation (valable pour le Canada) Pictogrammes sur l'emballage Tenez compte des pictogrammes suivants sur l'emballage : Haut Protéger contre l'humidité. Fragile, manipuler avec précautions Température de stockage et de transport Humidité relative lors du stockage et du transport Pression atmosphérique lors du stockage et du transport...
-
Page 89: Description Générale
Dentsply Sirona 3 Description générale Notice d’utilisation (valable pour le Canada) 3.1 Certification Description générale Certification Marquage CE Ce produit est muni du marquage CE conformément aux prescriptions de la directive 93/42/CEE du 14 juin 1993 relative aux dispositifs médicaux et à leurs modifications. -
Page 90: Utilisation Conforme
Utilisation conforme En liaison avec l'unité d'usinage, l'appareil CEREC AF / CEREC AI / CEREC AF Connect / CEREC AI Connect / CEREC AI for Rear permet la fabrication assistée par ordinateur de restaurations dentaires, par exemple à partir d'un matériau céramique imitant l'aspect naturel des dents. -
Page 91: Sécurité
Dentsply Sirona 4 Sécurité Notice d’utilisation (valable pour le Canada) 4.1 Consignes de sécurité fondamentales Sécurité Consignes de sécurité fondamentales 4.1.1 Conditions ATTENTION Remarques importantes concernant l'installation du cabinet L’installation du cabinet doit avoir été réalisée par un spécialiste, dans le respect des prescriptions nationales spécifiques. -
Page 92: Consignes De Sécurité Générales
Remarque relative à la prévention, la détection et la suppression d'effets électromagnétiques involontaires : CEREC AF / CEREC AI / CEREC AF Connect / CEREC AI Connect / CEREC AI for Rear est un appareil de classe B (classement selon CISPR 11, EN 60601-1-2:2015 basé sur CEI 60601-1-2:2014). -
Page 93: Stabilité De L'appareil
4.1.5 Stabilité de l'appareil ATTENTION L'appareil CEREC AF / CEREC AF Connect risque de glisser et de tomber de la table Assurez-vous de poser le support et la caméra sur une surface plane. Le disque sur lequel est monté le support de la caméra est doté de pieds antidérapants qui empêchent tout déplacement. -
Page 94: Autocollants De Sécurité
4 Sécurité Dentsply Sirona 4.2 Autocollants de sécurité Notice d’utilisation (valable pour le Canada) Autocollants de sécurité Connecteurs pour interfaces PC externes PRUDENCE Les appareils supplémentaires raccordés aux interfaces externes doivent être contrôlés selon les normes correspondantes, p. ex. : EN 60601-1:2006 + Cor.:2010 + A1:2013, CEI 60601-1 Edition 3.1:2012,... - Page 95 Dentsply Sirona 4 Sécurité Notice d’utilisation (valable pour le Canada) 4.2 Autocollants de sécurité Plaque chauffante PRUDENCE Risque de brûlure causée par la surface chaude ! ➢ Ne touchez jamais la plaque chauffante (A) ! 66 37 487 D3652 D3652.201.01.21.03 03.2021...
-
Page 96: Charge Électrostatique
4 Sécurité Dentsply Sirona 4.3 Charge électrostatique Notice d’utilisation (valable pour le Canada) Charge électrostatique 4.3.1 Etiquettes d'avertissement ESD Étiquette d’avertissement ESD PRUDENCE Risque de blessure ou d'endommagement des composants lié aux décharges électrostatiques Dans le cas de composants munis d'une étiquette d'avertissement ESD, tenez compte des indications suivantes. -
Page 97: À Propos Du Processus Physique D'apparition Des Charges Électrostatiques
Dentsply Sirona 4 Sécurité Notice d’utilisation (valable pour le Canada) 4.3 Charge électrostatique destruction de composants électroniques que peut entraîner un contact par un UTILISATEUR électriquement chargé. Vous trouverez le convenu de la formation dans le paragraphe „A propos du processus physique d’apparition des charges électrostatiques“. -
Page 98: Perturbation Des Appareils Provoquée Par Les Téléphones Mobiles
Transmission de données La communication de données entre CEREC AF / CEREC AI et l'unité d'usinage doit faire appel de préférence à un câble LAN. 66 37 487 D3652... -
Page 99: Informations Techniques
Dentsply Sirona 5 Informations techniques Notice d’utilisation (valable pour le Canada) 5.1 Description technique Informations techniques Description technique Système CAO pour une empreinte optique de haute précision dans la bouche ● Caméra intra-orale (caméra 3D) haute résolution avec contrôle de température et douille-miroir amovible (stérilisable à... -
Page 100: Caractéristiques Techniques
Dentsply Sirona 5.2 Caractéristiques techniques Notice d’utilisation (valable pour le Canada) Caractéristiques techniques Désignation de type CEREC AF / CEREC AI / CEREC AF Connect / CE- REC AI Connect / CE- REC AI for Rear Tension secteur nominale 100-240 V ~ / 50-60 Hz Courant nominal 1,0-0,6 A (fourni par... - Page 101 Dentsply Sirona 5 Informations techniques Notice d’utilisation (valable pour le Canada) 5.2 Caractéristiques techniques Dimensions et poids (CEREC AF, CEREC AF Connect) Dimensions du support de la caméra L x H x P 278 x 102,5 x 73 en mm en pouces Dimensions du disque, L x H x P en mm 184 (diamètre)
- Page 102 5 Informations techniques Dentsply Sirona 5.2 Caractéristiques techniques Notice d’utilisation (valable pour le Canada) Dimensions de CEREC AI / CEREC AI Connect Distances recommandées par rapport à l'armoire ou au mur. Milieu de la percée à travers le sol/zone d'installation...
- Page 103 Dentsply Sirona 5 Informations techniques Notice d’utilisation (valable pour le Canada) 5.2 Caractéristiques techniques 66 37 487 D3652 D3652.201.01.21.03 03.2021...
- Page 104 5 Informations techniques Dentsply Sirona 5.2 Caractéristiques techniques Notice d’utilisation (valable pour le Canada) Dimensions de CEREC AI for Rear 66 37 487 D3652 D3652.201.01.21.03 03.2021...
-
Page 105: Compatibilité Électromagnétique
Le respect des indications suivantes garantit la sécurité de fonctionnement sous l'angle de la compatibilité CEM. CEREC AF / CEREC AI / CEREC AF Connect / CEREC AI Connect / CEREC AI for Rear satisfait aux exigences de compatibilité électromagnétique (CEM) selon CEI 60601-1-2:2001 et A1:2004 CEREC AF / CEREC AI / CEREC AF Connect / CEREC AI Connect / CEREC AI for Rear sera appelé... -
Page 106: Immunité Aux Perturbations
5 Informations techniques Dentsply Sirona 5.3 Compatibilité électromagnétique Notice d’utilisation (valable pour le Canada) 5.3.2 Immunité aux perturbations L’APPAREIL est prévu pour le fonctionnement dans l’environnement électromagnétique décrit ci-après. Le client ou l'utilisateur de l'APPAREIL doit garantir qu'il sera utilisé... - Page 107 Dentsply Sirona 5 Informations techniques Notice d’utilisation (valable pour le Canada) 5.3 Compatibilité électromagnétique Essais d'immunité Niveau d'essai IEC Niveau de conformité Environnement électromagnétique – aux perturbations 60601-1-2 Lignes directrices Perturbations d= [1,2] √P conduites HF 150 kHz à 80 MHz...
-
Page 108: Distances De Protection
5 Informations techniques Dentsply Sirona 5.3 Compatibilité électromagnétique Notice d’utilisation (valable pour le Canada) 5.3.3 Distances de protection Distances de protection recommandées L'APPAREIL est prévu pour une utilisation dans un environnement entre des appareils de communication électromagnétique dans lequel les perturbations HF rayonnées sont HF portables et mobiles et l’APPAREIL... -
Page 109: Montage Et Mise En Service
6.1 Transport et déballage Montage et mise en service Transport et déballage Les appareils Dentsply Sirona sont soigneusement contrôlés avant l’expédition. Immédiatement après la livraison, veuillez procéder à un contrôle de réception. 1. A l’aide du bordereau de livraison, veuillez contrôler que la livraison est complète. -
Page 110: Principaux Composants
Dentsply Sirona 6.3 Principaux composants Notice d’utilisation (valable pour le Canada) Principaux composants CEREC AF Le dispositif médical CEREC AF D3652 comprend les composants principaux suivants : ● Caméra CEREC Omnicam (commande avec caméra) 65 34 767 D3652 ● Support de caméra 65 26 565 D3652 ●... - Page 111 6 Montage et mise en service Notice d’utilisation (valable pour le Canada) 6.3 Principaux composants CEREC AF Connect Le dispositif médical CEREC AF Connect D3652 comprend les composants principaux suivants : ● Caméra CEREC Omnicam (commande avec caméra) 65 34 767 D3652 ● Support de caméra 65 26 565 D3652...
- Page 112 6 Montage et mise en service Dentsply Sirona 6.3 Principaux composants Notice d’utilisation (valable pour le Canada) CEREC AI Connect Le dispositif médical CEREC AI Connect D3652 comprend les composants principaux suivants : ● Caméra CEREC Omnicam (commande avec caméra) 65 34 775 D3652 ●...
-
Page 113: Étendue De La Livraison
Omni- Omni- avec avec sans Omni- Omni- Omnicam Omnicam Carton intitulé CEREC AF / AI conte- nant : CEREC Omnicam (livrée dans le coffret pour CEREC AF et CEREC AF Connect) Kit de calibrage Support de caméra avec x (sans x (sans... - Page 114 Câble de raccordement pour support de la ca- méra. Sélection : 3 m, 5 m ou 10 m (3 m uniquement pour CEREC AF et CE- REC AI for Rear) Bloc d'alimentation mé- dical 24 V Câble LAN du PC Câble USB 2.0 Câble secteur du PC...
-
Page 115: Mise En Service
Notice d’utilisation (valable pour le Canada) 6.5 Mise en service Mise en service Dentsply Sirona ou des revendeurs autorisés par Dentsply Sirona procèdent à l'installation du système conformément à la description et garantissent la fourniture d'instructions appropriées sur l'utilisation du système. - Page 116 ATTENTION Utilisez uniquement le PC fourni par Dentsply Sirona ! Le PC pour CEREC AF / CEREC AI / CEREC AF Connect / CEREC AI Connect / CEREC AI for Rear est fourni dans un boîtier qui peut être placé dans la plupart des meubles prévus pour le fonctionnement d'un 66 37 487 D3652 D3652.201.01.21.03 03.2021...
- Page 117 Dentsply Sirona 6 Montage et mise en service Notice d’utilisation (valable pour le Canada) 6.5 Mise en service Dimensions du PC à partir de la version matérielle 5.4.1 Largeur Hauteur Profondeur en mm en pouces Ouïes d'aération de l'armoire Armoire Bloc d’alimentation du PC /...
- Page 118 6 Montage et mise en service Dentsply Sirona 6.5 Mise en service Notice d’utilisation (valable pour le Canada) Composants de la Omnicam Pour la dépose, appuyer Fenêtre de la caméra sur le cran de verrouillage Douille-miroir Set de calibrage Plaquette en saphir (sur- face revêtue)
-
Page 119: Connexions
PRUDENCE Installation du support de caméra Le support de caméra de CEREC AF / CEREC AF Connect doit être posé sur une surface plane et horizontale à l'intérieur ou à l'extérieur de l'environnement du patient. Assurez-vous que les câbles du support de caméra ne constituent pas un risque pour la sécurité. - Page 120 ➢ Utilisez exclusivement la CEREC Omnicam fournie pour CEREC AI / AI Connect / CEREC AI for Rear. N'utilisez pas la CEREC Omnicam d'un CEREC AC / AC Connect ou d'un CEREC AF / AF Connect. 2. Enfichez avec précaution le connecteur du câble de la CEREC Omnicam dans l'accouplement du plus court des deux câbles du...
- Page 121 Indications relatives à l'installation réseau CEREC AF / AI / AI for Rear et l'unité d'usinage doivent être reliées par un câble LAN. Votre administrateur réseau doit faire en sorte que les câbles LAN nécessaires soient mis à...
-
Page 122: Mise En Marche Des Appareils
2. Réglez sur le moniteur la résolution maximale ou la résolution recommandée par Windows. 3. Installez le logiciel CEREC SW sur le PC de CEREC AF /AI. Pour CEREC AF Connect / AI Connect, téléchargez le logiciel Sirona Connect SW depuis le site Internet de Sirona. Confirmez l'actualisation du firmware de CEREC Omnicam par "OUI"... - Page 123 Dentsply Sirona 6 Montage et mise en service Notice d’utilisation (valable pour le Canada) 6.5 Mise en service 4. Une fois que le système d'exploitation est chargé, démarrez l'application "CEREC SW" en double-cliquant sur le bouton "CEREC SW" . Assurez-vous que la caméra CEREC Omnicam est raccordée lors du démarrage de "CEREC SW"...
-
Page 124: Mettre Les Appareils À L'arrêt
6 Montage et mise en service Dentsply Sirona 6.5 Mise en service Notice d’utilisation (valable pour le Canada) 6.5.4 Mettre les appareils à l'arrêt ATTENTION Quitter le système d'exploitation selon la procédure correcte Afin d'éviter la perte de données, le système d'exploitation doit être mis à... -
Page 125: Manipulation
Dentsply Sirona 7 Manipulation Notice d’utilisation (valable pour le Canada) 7.1 Temps de montée en température de la caméra Manipulation Assurez-vous que la caméra CEREC Omnicam est raccordée lors du démarrage de "CEREC SW" . Il est alors ensuite possible de la débrancher et de la rebrancher sans avoir à... -
Page 126: Prise D'empreinte Avec La Caméra Cerec Omnicam
7 Manipulation Dentsply Sirona 7.3 Prise d'empreinte avec la caméra CEREC Omnicam Notice d’utilisation (valable pour le Canada) Prise d'empreinte avec la caméra CEREC Omnicam PRUDENCE Surface très chaude ! La surface de sortie de la caméra CEREC Omnicam est préchauffée dans le support de caméra. - Page 127 Dentsply Sirona 7 Manipulation Notice d’utilisation (valable pour le Canada) 7.3 Prise d'empreinte avec la caméra CEREC Omnicam PRUDENCE Pour les patients allergiques au nickel Le contact de la douille-miroir du scanner avec la peau peut provoquer une réaction chez les patients allergiques au nickel.
-
Page 128: Guidage De La Caméra
7 Manipulation Dentsply Sirona 7.4 Guidage de la caméra Notice d’utilisation (valable pour le Canada) Guidage de la caméra PRUDENCE Après chaque utilisation Retraiter la caméra après chaque patient. ➢ Suivre les instructions figurant dans le chapitre "CEREC Omnicam [→ 57]" afin d'éviter toute contamination croisée entre les patients. -
Page 129: Balayage Occlusal
Dentsply Sirona 7 Manipulation Notice d’utilisation (valable pour le Canada) 7.4 Guidage de la caméra 7.4.1 Balayage occlusal Important : Respectez la distance entre la surface revêtue de la plaquette en saphir de la caméra CEREC Omnicam et la surface mesurée. La distance doit être comprise entre 0 e t 15 mm (valeur optimale : 5 mm). -
Page 130: Balayage Lingual
7 Manipulation Dentsply Sirona 7.4 Guidage de la caméra Notice d’utilisation (valable pour le Canada) Lors du balayage buccal, veillez à tenir la caméra CEREC Omnicam comme une flûte traversière. Veillez à ne pas la basculer dans le sens vertical par rapport au sens de déplacement. -
Page 131: Recalage Buccal
Dentsply Sirona 7 Manipulation Notice d’utilisation (valable pour le Canada) 7.4 Guidage de la caméra ● Lors de la découpe, veillez à ne pas découper en même temps par mégarde des zones qui se trouvent p. ex. derrière le modèle ou qui sont coupées ailleurs par la ligne. - Page 132 7 Manipulation Dentsply Sirona 7.4 Guidage de la caméra Notice d’utilisation (valable pour le Canada) Effectuer le balayage 1. Commencez, comme indiqué ci-dessus, en position occlusale au- dessus de la dernière dent de droite et prenez son empreinte occlusale. Basculez la caméra de 45° en position palatinale (orale) et déplacez-la dans le sens distal vers mésial.
- Page 133 Dentsply Sirona 7 Manipulation Notice d’utilisation (valable pour le Canada) 7.4 Guidage de la caméra Pour le deuxième (troisième) quadrant, opposé, le balayage suivant s'applique : 1. Commencez par la prise d'empreinte de la surface occlusale d'une prémolaire déjà enregistrée et déplacez la caméra, basculée de jusqu'à...
-
Page 134: Boucler Les Mesures
7 Manipulation Dentsply Sirona 7.4 Guidage de la caméra Notice d’utilisation (valable pour le Canada) ● Lors de la découpe, veillez à ne pas découper en même temps par mégarde des zones qui se trouvent p. ex. derrière le modèle ou qui sont coupées ailleurs par la ligne. -
Page 135: Logiciel Pour La Caméra Cerec Omnicam
Dentsply Sirona 7 Manipulation Notice d’utilisation (valable pour le Canada) 7.5 Logiciel pour la caméra CEREC Omnicam Logiciel pour la caméra CEREC Omnicam Vous trouverez de plus amples informations sur l'utilisation de CEREC SW et du logiciel CEREC Premium SW dans le manuel de l'utilisateur correspondant. -
Page 136: Maintenance
8 Maintenance Dentsply Sirona 8.1 Entretien, nettoyage, désinfection et stérilisation Notice d’utilisation (valable pour le Canada) Maintenance IMPORTANT Si le PC, la caméra CEREC Omnicam, ou d'autres composants sont endommagés, le système doit être immédiatement mis hors service. Contactez le service client de votre revendeur. -
Page 137: Cerec Omnicam
Dentsply Sirona 8 Maintenance Notice d’utilisation (valable pour le Canada) 8.1 Entretien, nettoyage, désinfection et stérilisation 8.1.2 CEREC Omnicam PRUDENCE En cas de chute accidentelle de la CEREC Omnicam, s'assurer que la fenêtre de la caméra ou la surface revêtue de la plaquette en saphir ne sont pas endommagées. -
Page 138: Composants De La Caméra Omnicam
8 Maintenance Dentsply Sirona 8.1 Entretien, nettoyage, désinfection et stérilisation Notice d’utilisation (valable pour le Canada) 8.1.2.2 Composants de la caméra Omnicam Pour la dépose, appuyer Plaquette en saphir (surface sur le cran de verrouillage revêtue) Douille-miroir Fenêtre de la caméra 8.1.2.3... -
Page 139: Vue D'ensemble Du Retraitement De La Douille-Miroir
Dentsply Sirona 8 Maintenance Notice d’utilisation (valable pour le Canada) 8.1 Entretien, nettoyage, désinfection et stérilisation 8.1.2.5 Vue d'ensemble du retraitement de la douille-miroir Voir les consignes détaillées figurant après le récapitulatif. Douille-miroir pour la caméra CEREC Omnicam Procédure de pré-nettoyage (alors que la douille-miroir est fixée à... -
Page 140: Désinfection Par Essuyage De La Caméra Et De La Douille-Miroir
8 Maintenance Dentsply Sirona 8.1 Entretien, nettoyage, désinfection et stérilisation Notice d’utilisation (valable pour le Canada) 8.1.2.7 Désinfection par essuyage de la caméra et de la douille-miroir ATTENTION Ne pas pulvériser de produits de nettoyage ou de désinfection sur la CEREC Omnicam et ne pas l'immerger dans de tels produits ! - Page 141 Dentsply Sirona 8 Maintenance Notice d’utilisation (valable pour le Canada) 8.1 Entretien, nettoyage, désinfection et stérilisation ATTENTION Il est recommandé de ne jamais alterner entre des solutions de désinfection et de stérilisation. Cependant si tel est le cas, assurez- vous de rincer soigneusement le kit HLD avant d'alterner les solutions.
- Page 142 8 Maintenance Dentsply Sirona 8.1 Entretien, nettoyage, désinfection et stérilisation Notice d’utilisation (valable pour le Canada) 8. Remplir soigneusement le récipient HLD jusqu'au repère (B) conformément aux consignes du fabricant. Il est possible d'utiliser un entonnoir pour aider au remplissage du liquide (A). Veiller à ne pas renverser de produit désinfectant.
- Page 143 Dentsply Sirona 8 Maintenance Notice d’utilisation (valable pour le Canada) 8.1 Entretien, nettoyage, désinfection et stérilisation 10. Placer le couvercle sur le récipient et laisser la douille-miroir immergée au moins 12 minutes dans le produit désinfectant. Bien que le dépassement du temps d'immersion recommandé n'entraîne pas de dommages pour la douille-miroir, celle-ci doit être retirée dès...
- Page 144 8 Maintenance Dentsply Sirona 8.1 Entretien, nettoyage, désinfection et stérilisation Notice d’utilisation (valable pour le Canada) 13. Retirer avec précaution et lentement le bouchon et le support de la douille-miroir en déplaçant le support vers le bas. S'assurer que la douille-miroir pointe vers le haut pour éviter que d'éventuels liquides...
-
Page 145: Désinfection De Niveau Élevé De La Douille-Miroir (Sans Kit Hld)
Dentsply Sirona 8 Maintenance Notice d’utilisation (valable pour le Canada) 8.1 Entretien, nettoyage, désinfection et stérilisation 8.1.2.9 Désinfection de niveau élevé de la douille-miroir (sans kit HLD) Si le kit HLD n'est pas disponible ATTENTION Il convient de ne pas combiner les méthodes de stérilisation par chaleur sèche et de désinfection de niveau élevé. - Page 146 8 Maintenance Dentsply Sirona 8.1 Entretien, nettoyage, désinfection et stérilisation Notice d’utilisation (valable pour le Canada) 6. Remplir avec précaution le récipient jusqu'à 20 mm - 25 mm ( in - 1 i n) sous le petit orifice de forme oblongue (A) de la douille-miroir une fois celle-ci immergée.
-
Page 147: Stérilisation À L'air Chaud
Dentsply Sirona 8 Maintenance Notice d’utilisation (valable pour le Canada) 8.1 Entretien, nettoyage, désinfection et stérilisation 8.1.2.10 Stérilisation à l'air chaud ATTENTION Il convient de ne pas combiner les méthodes de stérilisation par chaleur sèche et de désinfection de niveau élevé. -
Page 148: Calibrer Cerec Omnicam
8 Maintenance Dentsply Sirona 8.2 Calibrer CEREC Omnicam Notice d’utilisation (valable pour le Canada) Calibrer CEREC Omnicam Le procédé de mesure utilisé par le système nécessite l'utilisation d'une caméra CEREC Omnicam calibrée. La caméra CEREC Omnicam est calibrée en usine. Calibrez toutefois la caméra CEREC Omnicam après chaque nouvelle installation et chaque transport. - Page 149 Dentsply Sirona 8 Maintenance Notice d’utilisation (valable pour le Canada) 8.2 Calibrer CEREC Omnicam Calibrer la caméra 1. Retirez le capuchon de protection du kit de calibrage. 2. Montez le kit de calibrage jusqu'en butée sur l'extrémité de la caméra.
- Page 150 8 Maintenance Dentsply Sirona 8.2 Calibrer CEREC Omnicam Notice d’utilisation (valable pour le Canada) Mesurer la position de la fenêtre de sortie 1. Montez la partie inférieure du kit de calibrage sur l'extrémité de la caméra. 2. Cliquez sur le bouton "OK" .
-
Page 151: Calibrage De La Couleur
Dentsply Sirona 8 Maintenance Notice d’utilisation (valable pour le Canada) 8.3 Calibrage de la couleur Calibrage de la couleur Remarques générales ATTENTION Analyse des couleurs incorrecte Une exposition à une lumière forte peut altérer défavorablement l'analyse des couleurs et entraîner des divergences dans les résultats. - Page 152 8 Maintenance Dentsply Sirona 8.3 Calibrage de la couleur Notice d’utilisation (valable pour le Canada) Pour obtenir des résultats optimaux, la caméra CEREC Omnicam doit chauffer 20 minutes avant le calibrage. La caméra CEREC Omnicam doit faire l'objet d'un calibrage des couleurs toutes les 2 semaines pour garantir la fiabilité...
- Page 153 Dentsply Sirona 8 Maintenance Notice d’utilisation (valable pour le Canada) 8.3 Calibrage de la couleur Exécuter le calibrage des couleurs de la caméra 1. Assurez-vous que la caméra CEREC Omnicam est propre, désinfectée et sèche. 2. Retirez le kit de calibrage des couleurs de son emballage.
- Page 154 8 Maintenance Dentsply Sirona 8.3 Calibrage de la couleur Notice d’utilisation (valable pour le Canada) Remplacement du kit de calibrage des couleurs Notez que le kit de calibrage des couleurs ● n'est utilisable qu'en liaison avec le logiciel CEREC SW ≥ 4.5 ou Sirona Connect SW ≥...
-
Page 155: Élimination
Dentsply Sirona 9 Élimination Notice d’utilisation (valable pour le Canada) Élimination Sur la base de la directive 2012/19/UE et des prescriptions nationales relatives à l'élimination des appareils électriques et électroniques usagés, nous attirons votre attention sur le fait que ces derniers doivent faire l'objet d'une élimination spéciale au sein de l'union européenne... - Page 156 Sous réserve de modifications dues au progrès technique. © Sirona Dental Systems GmbH Sprache: französisch Printed in Germany D3652.201.01.21.03 03.2021 Ä.-Nr.: 130 402 Imprimé en Allemagne Sirona Dental Systems GmbH 66 37 487 D3652 Fabrikstr. 31 No. de cde. 64625 Bensheim Germany www.dentsplysirona.com...
- Page 158 We reserve the right to make any alterations which may be required due to technical improvements. Sous réserve de modifications dues au progrès technique. © Sirona Dental Systems GmbH Sprache: englisch / französisch Printed in Germany D3652.201.01.21.09 03.2021 Ä.-Nr.: 130 402 Sirona Dental Systems GmbH 66 37 487 D3652 Fabrikstr.
Need help?
Do you have a question about the CEREC AF and is the answer not in the manual?
Questions and answers