Table of Contents
Advertisement
Quick Links
Advertisement
Table of Contents

Subscribe to Our Youtube Channel
Related Manuals for Labnet C0336


Summary of Contents for Labnet C0336
- Page 1 Centrifuge User Manual C0336 C0336R Copyright 2017...
- Page 2 This manual was prepared with special care. LABNET INTERNATIONAL may change the manual at any time and without notice because of improvements, typographical errors, inaccuracies of current information or improvements to facilities.
-
Page 3: Table Of Contents
Increase in temperature (C0336 only) ........ - Page 4 Start delay - of time ............... . . 20 Start delay –...
-
Page 5: Application
1 Application Centrifuges are used for separation samples taken from people’s, animal’s and plant’s components of different densi- ties, under the influence of the centrifugal force, to provide information about their biological state (C0336 – ventilated, C0336R– with cooling). Its construction ensures easy operation, safe work and wide range of applications at laboratories engaged in routine medical analyses, biochemical research works etc. -
Page 6: Installation
Open the package. Remove the box containing the accessories. Take out centrifuge from the container. Keep the box and packing materials in case of service shipping. 3.1 Content of the package name qty (pcs.) centrifuge C0336 complete clamp spanner for the rotor emergency opening of the cover power cord 230V / 120V... -
Page 7: Current Protection
• Do not position the centrifuge so that it is difficult to operate the power switch • Supply voltage given on the rating plate has to be consistent with local supply voltage. LABNET INTERNATIONAL laboratory centrifuges are 1st safety class devices and they are provided with the three-core cable with the plug resistant to dynamic loadings. -
Page 8: Loading The Rotor
4.3 Loading the rotor • Laboratory centrifuge can be operated by laboratory personnel after getting acquainted with user manual. • User manual shall be always held near the centrifuge. • The centrifuge cannot be misused. CORRECT WRONG CORRECT WRONG • It is necessary to insert test tubes symmetrically on the opposite sides. FILLING TUBES •... -
Page 9: Maintenance Conditions
GENERAL HINTS • One must use original rotors, test-tubes and spare parts only. • In case of faulty operation of the centrifuge one shall ask for assistance of service of LABNET INTERNATIONAL company or its authorized representatives. • It is not allowed to switch the centrifuge on if it is not installed properly or rotor is not fitted correctly. -
Page 10: Residual Risk
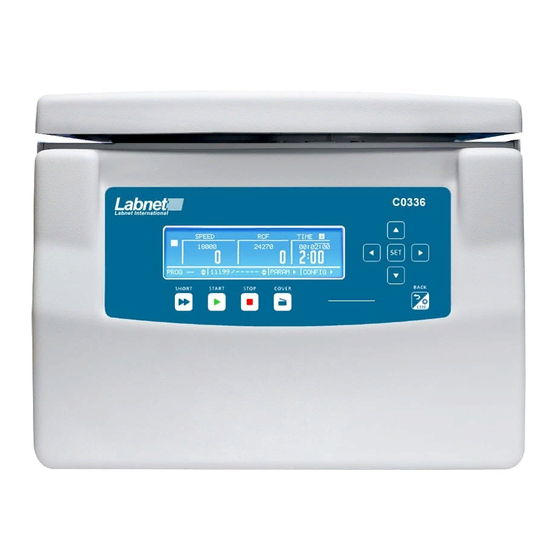
5 Operating 5.1 Centrifuge description New generation of LABNET INTERNATIONAL laboratory centrifuges is provided with state-of-the-art micropro- cessor control systems, very durable and quiet asynchronous brushless motors and accessories consistent with requirements of the present-day user. 5.2 Centrifuge overview Fig.1. -
Page 11: Rotor And Accessories Installation
is locked with two electromagnetic locks blocking possible opening during centrifugation. Rotation chamber casing was made of thick steel sheet. The rotation chamber bowl is made of stainless steel sheet. Rotors and containers are from aluminum, lids from polycarbonate and reductive inserts from the polypropylene. 5.4 Rotor and accessories installation •... -
Page 12: Safety Features
Checking of excessive temperature If temperature in rotation chamber exceeds 50°C (C0336) / 65°C (C0336R) caused by, for example, malfunction of cooling system, drive will be switched off and error message will be displayed. The reboot is only possible after chilling device. -
Page 13: Display
(quickest characteristic). During setting of the parameters, it serves for exiting zones on the primary screen without introducing changes. 6.2 Display The display is located in the centre of the control panel. The main screen variants are presented below. MAIN SCREEN C0336 C0336R SPEED rotor speed assigned/measured... -
Page 14: Centrifuging Notes
centrifuging centrifuging (with automatic cover opening) rotor stopped / closed cover rotor stopped / opened lid stopping rotor fastest decelerating identifying rotor thermal chamber temperature delay time delay drop-down list temporarily disabled locked time counting (blinking) disabled option active option 6.3 Centrifuging notes •... -
Page 15: Setting Up Rpm, Rcf, Time, Temperature
6.4 Setting up RPM, RCF, TIME, temperature On the main screen, it is possible to set: rotating speed - RPM SPEED relative centrifugal force centrifuging time TIME TEMP (R only) centrifuging temperature Exemplary change of SPEED setting: • Press SET (to enter edit mode). •... -
Page 16: User Programs
Exemplary change of TEMP setting: • Press SET (to enter edit mode). • With ▲▼◄► keys mark TEMP fold (blinking). • Press SET. • Set demanded value by pressing ▲▼. • Confirm set value by pressing SET. • Leave edit mode by pressing BACK. Changing parameters during run There is a possibility to change parameters: SPEED, RCF, TIME, TEMP during centrifuging. - Page 17 • Press SET. • With ▲▼◄► keys mark PROG – – zone (blinking). • Press SET. The program list is displayed. • With ▲▼ keys choose demanded program number. (marked by • Confirm by pressing SET - the selection frame is displayed •...
- Page 18 section no. (max. 4) TIME total acceleration time SPEED final RPM ACC:12 characteristic’s no. (10-19) In the first moment, the EXIT field is marked (the message is blinking). Pressing the SET key will cause returning to the PROG → CURVES fold, without making changes in the acceleration characteristics. „1”...
-
Page 19: Programs With User Characteristics
To edit the deceleration characteristics, one should mark the section of characteristics with ▲▼ key (the whole TIME+SPEED line will begin to blink; at this stage, it is only one section, with the number 1) and then press the SET key. The device will proceed to setting the characteristics’ section time (only the set TIME value is blinking). With ▲▼... -
Page 20: Short Mode
6.8 SHORT mode SHORT mode • In SHORT mode the centrifuge is working as long as the ►► (SHORT) key is pressed or when set time is over. • Centrifuging ends when the SHORT key is released. 6.9 Terminating centrifugation STOPPING CENTRIFUGATION CYCLE •... -
Page 21: Initial Cooling During Centrifuging -Fast Cool
7.1 Initial cooling during centrifuging –FAST COOL • The parameters allowable to change at FAST COOL mode: • temperature (lower than current temperature shown by centrifuge) • In order to centrifuge reduced temperature samples (e.g., storage in the external refrigerator) centrifuge chamber, rotor and centrifuge container must be pre-cooling to the predetermined temperature. -
Page 22: Parameters Of Centrifugation
8 Parameters of centrifugation • Press SET. • With ▲▼◄► keys select PARAM. • Press SET. ACCELERATION chosen acc. characteristic (0-the fastest, 9-the slowest) DECELERATION chosen dec. characteristic (0-the fastest, 9-the slowest) RADIUS [mm] current rotor radius [mm] DENSITY (g/cm3) sample density [g/cm3] TEMP. -
Page 23: Temperature Offset
When density is changed, symbol is visible on the screen. Increasing density of the sample above 1,2 g/cm (and limiting of the maximum speed of centrifuging resulting from it) applies until switching off power supply of the centrifuge or setting the device back to 1,2 g/cm 8.4 Temperature offset •... -
Page 24: Automatic Lid Opening
8.6 Automatic lid opening OPEN LID AFTER RUN Automatic lid opening • When centrifuge process is finished, cover will be opened automatically. • When centrifuging is terminated by pressing STOP, opening cover is possible by pressing COVER. • symbol means that OPEN LID AFTER RUN is active. 8.7 Start delay - of time Start centrifuging since prese- STARY DELAY / OF TIME... -
Page 25: Errors
8.9 Errors End of centrifuging – manual mode Centrifuging may be stopped at the any moment via the STOP key. The information message: CYCLE CANCELLED will be displayed. End of centrifuging – normal mode Stopping centrifuging in accordance the set time causes generating multiton audible signals (after stopping the rotor) and displaying the message FINISH OF CENTRIFUGING... -
Page 26: Temporarily Disabled Functions
Emergency messages In case of emergency messages (centrifuge is not working properly) contact the manufacturer’s authorized service center. MESSAGE “OVERHEATING MOTOR!” “INVERTER ERROR!” "INVERTER SERIAL BUS ERROR!" "TEMPERATURE SENSOR ERROR" "PRESSURE CONTROL FAILURE!" "OPENING COVER in RUN!" "SPEED METER ERROR" "I2C BUS ERROR"... -
Page 27: Screen Saver
8.12 Screen saver CONFIG / SCREEN Setting time of screen saver • Press SET. • With ▲▼◄► keys select SCREENSAVER. • Press SET. • With ▲▼ keys select demanded value from 1 to 60 minutes. • Mark selection by pressing SET. •... -
Page 28: Rotating Time
• Via ▲▼ keys select MENU (blinking). • Press SET. • Via◄► keys select CONFIGURATION tab. • Press SET. • Via◄► keys select SCREEN tab. • Press SET. • Via◄► keys select SIMPLIFIED SCREEN tab. • Press SET. • Leave menu Via BACK key. 8.15 Rotating time MENU/CONFIGURATION/ RUNTIME •... -
Page 29: Language Choosing
8.18 Language choosing MENU/CONFIGURATION/ LANGUAGE Changing menu language • Via▲▼ keys choose demanded menu language • Mark it by pressing SET. 8.19 Other Information about the running time of the MENU/CONFIGURATION/ OTHER centrifuge After operating for 2000 hours, after every switching on the centrifuge the error screen is being displayed with information about the necessity to carry out servicing activities. -
Page 30: Password Protection
8.20 Password protection Setting up password MENU / PASSWORD To prevent from an unauthorized use, a PASSWORD can be set. Note: No PASSWORD is set by default. The PASSWORD can be set as follows when the rotor is at a standstill. •... -
Page 31: Total Work Time
8.21 Total work time Total working time of centrifuge CONFIGURATION / CYCLES In the CYCLES menu the following statistics are displayed: • total working (centrifugation) time • working cycles counter 8.22 Diagnostics Information about errors arisen in working of CONFIGURATION / DIAGNOSTICS the centrifuge (service field). -
Page 32: Maintenance
9 Maintenance 9.1 Cleaning of the centrifuge Attention! • Pull the mains plug before cleaning. • Before any cleaning or decontamination process other than that is recommended by the manufacturer, the user has to ask the manufacturer if the planned process does not damage the device. •... -
Page 33: Sterilization
9.3 Sterilization Plastics - legend to abbreviations polystyrene ECTFE ethylene/chlorotrifluoroethylene styrene-acrylonitrile ETFE ethylene/tetrafluoroethylene PMMA polymethyl methacrylate PTFE polytetrafluoroethylene polycarbonate tetrafluoroethylene/perfluoropropylene polyvinyl chloride tetrafluoroethylene/perfluoroalkylvinylether acetal Polyoxymethylenel fluorocarbon rubber PE-LD low density polyethylene EPDM ethylene propylene diene PE-HD high density polyethylene natural rubber polypropylene silicon rubber polymethylpentene... -
Page 34: Chemical Resistance
Chemical resistance of plastics autoclaving autoclaving 121 °C, 20 min 121 °C, 20 min ○ ● ECTFE, ○ ● ETFE PMMA ○ PTFE ● ● FEP, PFA ● ○ ● ● EPDM ● PE-LD ○ ○ PE-HD ○ ● ● ○... -
Page 35: Troubleshooting
Rubber inserts shall be exactly cleaned or possibly replaced. Centrifuges and accessories are made of different materials. Do not use bleach on plastic parts of the rotor. DANGER! Accessories are not biotight. For centrifuging infectious materials it is necessary to use hermetically closed tubes meeting demands of biotightness, in order to prevent germs migration into the centrifuge and beyond it. -
Page 36: Emergency Cover Release
10.1 Emergency cover release EMERGENCY COVER RELEASE In case of e.g. mains failure it is possible to open cover manually. At first, one must be sure that rotor is not in the move (use inspection glass). On the left-hand side of the casing there is a lock. Insert emergency opening key (17642) into the lock and turn it counterclockwise. -
Page 37: Limited Warranty
Limited Warranty Corning Incorporated (Corning) warrants that this product will be free from defects in material and workmanship for a period of two (2) years from date of purchase. This warranty is valid only if the product is used for its intended purpose and within the guidelines specified in the supplied instruction manual. -
Page 38: Nomogram
NOMOGRAM 34 | Centrifuge user manual... - Page 39 Centrifuge user manual | 35...
- Page 40 Corning Incorporated 271 County Route 64 Big Flats, NY 14814 www.labnetinternational.com labnetinfo@corning.com L-C0336/01/2018/I LN181000...
Need help?
Do you have a question about the C0336 and is the answer not in the manual?
Questions and answers