Table of Contents
Advertisement
Quick Links
Download this manual
See also:
Operator's Manual
Megapixel
1280 x 960
software zoom
30 Frames/s
VGA (640 x 480)
10 fps Mega
-22°F to +140°F
Weatherproof
-30°C to +60°C, IP65
no heating necessary
IEEE 802.3af
PoE
network power
even in winter
microphone & speaker
Audio
bi-directional via IP
variable framerates
Video SIP Client
IP-Telephony
alarm notify,
cam remote control
Video motion
multiple windows
precision pixel-based
lip-syncronized audio
Recording
event-ringbuffer
30 cams each 30 fps
Live viewing
30 cams at 30 fps
all on one screen
Backlight
safe using CMOS
without mechanical iris
Wall bracket
with cable cover
for RJ45 wall outlet
Robust
no moving parts
fiber glass housing
M22M
Camera Manual
VGA
30 fps
480 lines
CIF
CIF
30 fps
288 lines
Complete integration for web and security
MOBOTIX AG • Security-Vision-Systems • Made in Germany
www.mobotix.com • sales@mobotix.com • 31.1.2007
Part 1
Mega
10 fps
960 lines
Current PDF File:
www.mobotix.com > Services > Manuals
Security-Vision-Systems
X
MOBOTIX
AG
Advertisement
Table of Contents

Subscribe to Our Youtube Channel
Related Manuals for Mobotix M22M


Summary of Contents for Mobotix M22M
- Page 1 CMOS www.mobotix.com > Services > Manuals without mechanical iris Wall bracket with cable cover for RJ45 wall outlet MOBOTIX AG • Security-Vision-Systems • Made in Germany Robust no moving parts www.mobotix.com • sales@mobotix.com • 31.1.2007 fiber glass housing...
- Page 2 Technical information subject to change without notice! No part of this manual may be reproduced by any means without our written approval! Copyright © MOBOTIX AG, Kaiserslautern, Germany. Note: MOBOTIX offers inexpensive seminars that include a workshop and practical excercises: Basic Seminar 2 days, Advanced Seminar 2 days.
-
Page 3: Table Of Contents
Power Supply of the MOBOTIX M22M Mounting Options and Positioning Dimensions of the MOBOTIX M22M Mounting the MOBOTIX M22M to a Wall or Ceiling 2.7.1 Mounting to a Wall 2.7.2 Mounting to a Ceiling 2.7.3 Converting the Wall Mount to Ceiling Mount 2.7.4 Mounting the Camera over Wall Outlets... - Page 4 3.1.2 Connecting the Camera Overview of the Configuration Settings Connecting the Camera 3.3.1 Power Supply Using MOBOTIX Products (Network Power Adapter) 3.3.2 Power Supply Using PoE Products (Power over Ethernet) 3.3.3 Camera Startup Sequence The First Image of the Camera 3.4.1 Preparing the Ethernet Connection...
- Page 5 4.10 Fast Video Streaming 4.11 Operating Multiple Cameras BASIC CAMERA CONFIGURATION Overview Quick Installation Connection Test Basic Settings Image Controls Logos Exposure Settings Day & Night Modes Managing Settings © MOBOTIX AG • Security-Vision-Systems • Made in Germany www.mobotix.com • sales@mobotix.com • 31.1.2007...
- Page 6 Sample Configurations for IP Telephony via Internet LED Signals of the Phone Functions MOBOTIX CAMERAS ON THE WEB 10.1 Overview 10.2 Displaying Cameras on the Web © MOBOTIX AG • Security-Vision-Systems • Made in Germany www.mobotix.com • sales@mobotix.com • 31.1.2007...
- Page 7 Technical information subject to change without notice! No part of this manual may be reproduced by any means without our written approval! Copyright © MOBOTIX AG, Kaiserslautern, Germany. © MOBOTIX AG • Security-Vision-Systems • Made in Germany www.mobotix.com • sales@mobotix.com • 31.1.2007...
-
Page 8: Introduction
The M22M can be fitted with one of the five M14 high-performance lenses or with CS mount lenses (model M22M-SecureCS). Like all other MOBOTIX cameras, the M22M models are more than “just a camera”; the integrated software features (Secure/IT models) include a multitude of func-... -
Page 9: The Concept Of Mobotix M22M
When recording, MOBOTIX systems easily outperform ana- log systems, since the MOBOTIX cameras store the same resolution and quality with the same frame rates as in the live display. MOBOTIX technology thus allows recording 30 cameras in continuous recording mode on one standard PC at 30 fps... - Page 10 M22M Camera Manual Part 1 Wireless and UMTS/3G Using CF Card (Optional) When using one of the MOBOTIX-installed Wireless or UMTS/3G CF cards for the second CF slot of the M22M, operating the system at hard-to-reach locations becomes easier and a lot more cost-efficient.
- Page 11 Secure and Flexible Installation Using the SecureFlex Mount Covers RJ45 wall outlets The SecureFlex wall mount provides easy mounting of the MOBOTIX M22M to a and conceals the cabling wall or ceiling and also allows positioning the camera into virtually any direction, while the concealed cabling enhances the visual impression of the installation.
-
Page 12: Product Advantages Of Mobotix M22M
• Flexibly positioned with concealed cabling and covered wall outlets thanks to SecureFlex mount. • Free MxViewer for Windows for displaying and managing MOBOTIX cam- eras includes alarm management, background images, etc. • Platform-independent SDK allows developing applications; includes sample applications (MxPlayer, MxPEG-to-MJPEG converter) and the source code. -
Page 13: Feature List
M22M Camera Manual Part 1 Feature List In its factory state, the MOBOTIX camera has the following main features (some features are model-dependent): 1280 x 960 pixels • Live images of up to 1280 x 960 pixels resolution via network, GSM, GPRS, UMTS, wireless up to 30 fps (at 640 x 480 resolution), also adapted for PDAs. - Page 14 To download the update, go to www.mobotix.com and open Services. Chapter 6, Software Update , in the Software Manual , provides more information on the process. © MOBOTIX AG • Security-Vision-Systems • Made in Germany www.mobotix.com • sales@mobotix.com • 31.1.2007...
- Page 15 M22M Camera Manual Part 1 Notes: © MOBOTIX AG • Security-Vision-Systems • Made in Germany www.mobotix.com • sales@mobotix.com • 31.1.2007...
-
Page 16: Important Notes
1.4.1 MOBOTIX M22M—Weatherproof with IP65 MOBOTIX M22M is IP65 weatherproof (absolutely dustproof, resistant against water jets) when used with the MOBOTIX M14 lenses and mounted lens cover. CAUTION: Only use the supplied connection cables and make sure that the supplied rubber plugs have been fitted to seal off both connectors. -
Page 17: Resetting The Camera To Factory Defaults
M22M Camera Manual Part 1 1.4.5 Resetting the Camera to Factory Defaults All settings of the MOBOTIX camera can be reset permanently to the factory default settings. This makes sense if you have, for example, obtained a camera without any information or you would like to reset all settings after testing the camera. In order to perform this procedure, you need to have access to the administration area of the camera (Admin rights). -
Page 18: Browser Hints
MOBOTIX recommends having MOBOTIX cameras installed only by specialists accustomed to installing network devices and having proper respect for the perti- nent regulations regarding lightning protection and fire prevention as well as the current technology for preventing damages from electrical surges. -
Page 19: Additional Information
Another source of information on all dialogs and parameters of the MOBOTIX cam- era is the Reference Manual that you can download from www.mobotix.com. The Reference Manual consists of the MOBOTIX camera's online help in one PDF file. -
Page 20: Mounting The Camera
Mounting the MOBOTIX M22M generally follows these steps: • Checking the Delivered Parts (section 2.2) • Selecting the Power Supply (section 2.4) • Mounting the MOBOTIX M22M to a Wall or Ceiling (section 2.7) 2.2 Delivered Parts of the MOBOTIX M22M Lens (item 1), two lens covers (item 2) -
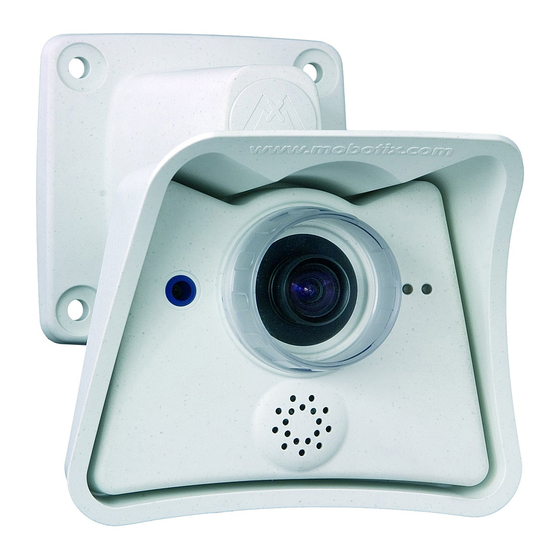
Page 21: Camera Housing And Connectors Of The Mobotix M22M
M22M Camera Manual Part 1 2.3 Camera Housing and Connectors of the MOBOTIX M22M The MOBOTIX M22M consists of two main components, the camera itself and the SecureFlex wall mount. Like the M10 models, the MOBOTIX M22M also features an integrated microphone and a speaker. -
Page 22: Power Supply Of The Mobotix M22M
For smaller installations, the MOBOTIX Network Power Adapter MX-NPA-3-RJ and the external power unit MX-SNT-E01-30-RJ may suffice; larger installations would benefit from one or more MOBOTIX Network Power Racks that are available for supplying power to 4, 8 or 20 cameras ( MX-NPR-4 , 8 or 20 ). Open shop.mobotix.com in the Accessories section to find more information on... - Page 23 M22M Camera Manual Part 1 Notes: © MOBOTIX AG • Security-Vision-Systems • Made in Germany www.mobotix.com • sales@mobotix.com • 31.1.2007...
-
Page 24: Mounting Options And Positioning
To increase the tilt to 70° when mounting the camera to a wall, the vertical tilt joint can be shortened (see dotted red line!) • horizontally: 180° • vertically: 70° © MOBOTIX AG • Security-Vision-Systems • Made in Germany www.mobotix.com • sales@mobotix.com • 31.1.2007... -
Page 25: Dimensions Of The Mobotix M22M
M22M Camera Manual Part 1 2.6 Dimensions of the MOBOTIX M22M The SecureFlex mount enables easy mounting of the MOBOTIX M22M models to a wall or ceiling; the concealed cabling enhances the visual impression of the instal- Elegantly covers wall outlets lation. -
Page 26: Mounting The Mobotix M22M To A Wall Or Ceiling
M22M Camera Manual Part 1 2.7 Mounting the MOBOTIX M22M to a Wall or Ceiling The mount covers RJ45 The wall mount is large enough to mount the camera over a wall outlet (see sec- wall outlets and conceals tion 2.7.4, Mounting the Camera over Wall Outlets ). -
Page 27: Converting The Wall Mount To Ceiling Mount
• First insert the cable, then the turn/tilt unit into the horizontal opening of the mount (all the way to the stop). • Press the cover into the unused opening of the mount. © MOBOTIX AG • Security-Vision-Systems • Made in Germany www.mobotix.com • sales@mobotix.com • 31.1.2007... -
Page 28: Mounting The Camera Over Wall Outlets
If no wall outlet is present, use a suitable extension or an adapter to connect the camera to the net- work. Use silicone Foot Wall outlet MOBOTIX M22M sealant! CAT5 cable © MOBOTIX AG • Security-Vision-Systems • Made in Germany www.mobotix.com • sales@mobotix.com • 31.1.2007... -
Page 29: M14 Fixed Lenses
Without the iris as a mechanical compo- nent, these glass lenses are extremely robust and maintenance- free. The standard lens for the M22M Secure and IT models is the Super Wide Angle lens with a horizontal field of vision of approx. -
Page 30: Cs Mount Version
Vario lenses are not maintenance-free, they are definitely less robust and less reliable in the long run as compared to the MOBOTIX M14 fixed lenses. This is why the vario lenses are typically used in applications where locations are chang- ing frequently, e.g. -
Page 31: Changing Lenses
• Tighten the lock ring by turning it in clockwise direction. This procedure is the same for the M22M-Secure-CSVario and CS/C mount lenses, albeit without the lock ring (not installed). © MOBOTIX AG • Security-Vision-Systems • Made in Germany... -
Page 32: Wiring, Fire Prevention, Lightning And Surge Protection
MOBOTIX recommends having MOBOTIX cameras installed only by specialists accustomed to installing network devices and having proper respect for the perti- nent regulations regarding lightning protection and... - Page 33 This includes surge protectors for 19" racks, add- ing an uninterruptible power supply (UPS) to the MOBOTIX camera and installing surge arresters or similar for routers, switches, servers, etc.
-
Page 34: Operating The Camera
OPERATING THE CAMERA 3.1 General Remarks on Operating the Camera The MOBOTIX camera does not require any software installation; all you need is your preferred browser with JavaScript support to operate the camera. Thus, the MOBOTIX camera is supported by all common operating systems (such as Windows, Macintosh and Linux, ...). - Page 35 M22M Camera Manual Part 1 Note Always use Quick After first booting the new MOBOTIX camera or after resetting to fac- Installation for initial tory defaults, accessing the Administration menu in the browser configuration (Admin Menu button) will automatically start the Quick Installation wizard.
-
Page 36: Overview Of The Configuration Settings
Some of these settings can be changed using the corresponding pull-down menus above the image on the Live screen. • The image settings are already optimized The factory image settings of the MOBOTIX camera deliver excellent images Recommendation: Always use factory image for most of the application scenarios and should not be changed;... - Page 37 If all options are displayed, the Less button appears. Clicking this button will hide the advanced options. Click on the More/Less buttons to show/hide the advanced options © MOBOTIX AG • Security-Vision-Systems • Made in Germany www.mobotix.com • sales@mobotix.com • 31.1.2007...
-
Page 38: Connecting The Camera
For additional information on this topic, see section 4.11, Operating Many Cameras , in the Software Manual . 3.3.1 Power Supply Using MOBOTIX Products (Network Power Adapter) 1) Connect the Camera connector of the Network Power Adapter (NPA) to the NET connector of the camera. -
Page 39: Power Supply Using Poe Products (Power Over Ethernet)
PoE class 0 (12.95 Watts max. power consumption of attached device). Although the M22M only uses 3 Watts and does not require heating even at very low temperatures, this will ensure that devices attached to the USB port of the camera will be properly supplied. -
Page 40: The First Image Of The Camera
• Direct access using a browser (section 3.4.2, The First Image in the Browser ) • Display the camera using MxViewer (free Windows client for MOBOTIX cameras; section 3.4.2, The First Image in MxViewer ) Open the browser-based user interface of the camera to complete the remaining configuration tasks (see section 4.3, The Live Screen in the Browser , in the Software... - Page 41 If you receive an answer from another network device although the camera is not connected, you will have to remove that device until you have reset the MOBOTIX camera to a free IP address. We recommend using the Quick Installation wizard for this task.
-
Page 42: The First Image In The Browser
After entering the camera's IP address in the browser address bar (e.g. http:// 10.1.0.99), you will see the Live screen of the MOBOTIX camera with its user interface controls, such as softbuttons, buttons for the different camera screens, pull-down menus ( Quick Controls ), icons for accessing the online help and the camera status, and status information elements above and below the live image. -
Page 43: Additional Information
Another source of information on all dialogs and parameters of the MOBOTIX cam- era is the Reference Manual that you can download from www.mobotix.com. The Reference Manual consists of the MOBOTIX camera's online help in one PDF file. -
Page 44: Camera Screens In The Browser
M22M Camera Manual Part 1 3.4.4 Camera Screens in the Browser By factory default, the MOBOTIX camera first shows the Live screen. You can set a different entry page in order to prevent others from changing settings; you can assign user names and passwords to prevent unauthorized access or you can restrict access to the current live image only, by setting the Guest screen as entry page. -
Page 45: The First Image In Mxviewer
MxViewer can do quite a bit more than simply display the video and audio data from MOBOTIX cameras. The unique features of MxViewer and the MOBOTIX cam- eras create a full-featured security system: Intelligent alarm handling, manifold possibilities of arranging the cameras on layouts (MultiView screens), ability to dis- play cameras that are sending alarm notifications, and integrated camera man- agement functions. - Page 46 In the Layout options group, select Show video sources in default layout. This will prompt MxViewer to automatically generate a standard layout that comprises all video sources (i.e. cameras) once they have been defined either automatically or manually. © MOBOTIX AG • Security-Vision-Systems • Made in Germany www.mobotix.com • sales@mobotix.com • 31.1.2007...
- Page 47 If MxViewer finds only one subnet, the scanning proc- ess will start automatically. In the first pass, MxViewer searches the selected subnet for MOBOTIX cameras and in the second pass, MxViewer verifies if it can access the cameras. MxViewer then highlights all cameras in the list, which have a status of OK or...
- Page 48 MOBOTIX cameras. • Add: Adds the IP address or DNS name of the MOBOTIX camera you entered to the list. If possible, MxViewer shows the image of the last camera you added in the pre- view window.
- Page 49 Further Information in the Software Manual • Section 4.3.5: JPEG, MxPEG and Audio • Section 4.3.6: Background Information on JPEG, MxPEG and Audio • Section 4.10: Fast Video Streaming © MOBOTIX AG • Security-Vision-Systems • Made in Germany www.mobotix.com • sales@mobotix.com • 31.1.2007...
-
Page 50: Starting The Camera With An Automatic Ip Address (Dhcp)
DHCP server. If this is not the case, the address camera cannot obtain a valid IP address and will fall back to its last known IP address. © MOBOTIX AG • Security-Vision-Systems • Made in Germany www.mobotix.com • sales@mobotix.com • 31.1.2007... -
Page 51: Starting The Camera Using The Factory Ip Address
(see section 1.4.5), the users and be changed! passwords defined in the camera will not be reset if the camera is being booted using the factory IP address. © MOBOTIX AG • Security-Vision-Systems • Made in Germany www.mobotix.com • sales@mobotix.com • 31.1.2007... -
Page 52: Drilling Template M22M (Scale 1:1)
When printing the PDF, make sure that you print two facing PDF pages on one single A4 page in order to obtain a scale 1:1 template. © MOBOTIX AG • Security-Vision-Systems • Made in Germany www.mobotix.com • sales@mobotix.com • 31.1.2007... - Page 53 M22M Camera Manual Part 1 Notes: © MOBOTIX AG • Security-Vision-Systems • Made in Germany www.mobotix.com • sales@mobotix.com • 31.1.2007...
- Page 54 E /- / U /- CF slots (MOBOTIX extensions) Microphone/Speaker External audio (Line-In/Out) Signal Input (only via Cam-IO*) Signal Output (only via Cam-IO*) Concealed cabling On stock Yes (Jul 06) © MOBOTIX AG • Security-Vision-Systems • Made in Germany www.mobotix.com • sales@mobotix.com • 31.1.2007...
- Page 55 Image size Mega Mega Image sensor (color / B/W) Color Color Color & B/W Color & B/W Standard lens for software version L22* L22* Audio support (Microphone/Speaker) © MOBOTIX AG • Security-Vision-Systems • Made in Germany www.mobotix.com • sales@mobotix.com • 31.1.2007...
- Page 56 M22M Camera Manual Part 1 IP65 Certificate © MOBOTIX AG • Security-Vision-Systems • Made in Germany www.mobotix.com • sales@mobotix.com • 31.1.2007...
- Page 57 M22M Camera Manual Part 1 FCC Declaration of Conformity © MOBOTIX AG • Security-Vision-Systems • Made in Germany www.mobotix.com • sales@mobotix.com • 31.1.2007...
- Page 58 M22M Camera Manual Part 1 Declaration of Conformity © MOBOTIX AG • Security-Vision-Systems • Made in Germany www.mobotix.com • sales@mobotix.com • 31.1.2007...
- Page 59 M22M Camera Manual Part 1 MOBOTIX ... the new face of IP video All pictures in this manual are genuine MOBOTIX camera images. Enjoy the image quality! Manufacturer: CEO: MOBOTIX AG Dr. Ralf Hinkel Luxemburger Str. 6 67657 Kaiserslautern Court of Registration:...
- Page 60 CMOS www.mobotix.com > Services > Manuals without mechanical iris Wall bracket with cable cover for RJ45 wall outlet MOBOTIX AG • Security-Vision-Systems • Made in Germany Robust no moving parts www.mobotix.com • sales@mobotix.com • 31.1.2007 fiber glass housing...
Need help?
Do you have a question about the M22M and is the answer not in the manual?
Questions and answers