Advertisement
Quick Links
Variants
Mx-M26A/B*
B036 – B500
*Variant Mx-M26B supports MOBOTIX MxBus modules
Standard Delivery M26
1.2
1.15
1.14
1.13
1.10, 1.11, 1.12
1.9
1.8
Connection and Initial Operation of the M26
For information on connecting the M26, please see the M25 Camera Manual, section «Network and Power Connection, Additional Cables» (PDF, available
on www.mobotix.com > Support > Download Center > Documentation > Manuals).
Please note that the boot options of this camera have changed compared to its predecessor (see «Boot Options of the M26» on page 2) and the camera
only has one key ("R"). Regarding the rest of the initial operation of the M26 please see the M25 Camera Manual in Chapter 3, «Initial Operation»
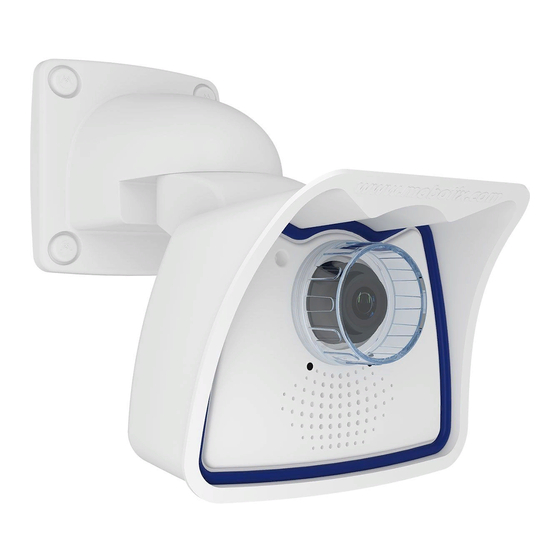
Wall Mount
Microphone
Power/Status
Key R
Mounting Options of the M26
1. Mounting to a Wall
When installing the M26 on a wall, for example, simply affix the pre-installed
and VarioFlex wall mount included in the delivery with the four supplied
screws and washers.
The camera can be turned or tilted 180° horizontally and 110° vertically
(from –90° to +20°).
2. Mounting to a Ceiling
By exchanging the wall mount for the separately supplied ceiling mount,
the M26 is ready to be mounted to ceilings in just a few easy steps thanks
to the VarioFlex system.
The camera can be turned or tilted 360° horizontally and 110° vertically
(from –90° to +20°).
3. Mounting to Poles (With Accessories)
If you want to mount the camera to a pole with a diameter from 60 to 180 mm,
you should consider using the Pole Mount (MX-MH-SecureFlex-ESWS) made
from white powder-coated stainless steel.
Just like when mounting to a wall, the camera can be turned 180° hor-
izontally and tilted 110° vertically (from –90° to +20°).
Installing the M26
1. Drill the holes for the dowels (if required)
Use the drilling template for this step (see
below). Mark the holes for dowels or screws
(blue circles in figure). If required, drill the holes
for the dowels, push them in and cut the cut-
out for the cables. Guide the Ethernet cable
and any other cables that are to be connected
through the cut-out.
2. Connect the cables
If you want to connect additional cables
(USB, MxBus), remove the weatherproof
housing as shown in Section «Removing/
Installing the Weatherproof Housing», con-
nect the cabling as required and again install
the housing. Plug the pre-installed Ether-
net cable into a network socket (e.g., of an
MX-Overvoltage-Protection-Box).
Removing/Installing the Weatherproof Housing
For certain tasks (e.g., connecting additional wires, exchanging the SD card), you need to remove the weatherproof housing and install it again once you
are finished.
1. Remove the fastening screws at the back
Start by removing the two rubber plugs that
protect the fastening screws. Next, unscrew
the two fastening screws of the weatherproof
housing using the supplied Allen wrench 5 mm
(item 1.7), but do not remove the screws
2. Remove camera from weatherproof hous-
ing
Press the camera from the housing by gently
applying pressure on the screws in alternating
fashion from the rear using the long shank of
the Allen wrench. Unscrew the fastening screws
once the camera is free from the housing
Inserting/Exchanging the SD Card
All camera models can use the integrated MicroSD card (SDHC) to record video data. In order to exchange the MicroSD card, please proceed as outlined
in the following instruction. For information on reliable SD cards, please see the MOBOTIX website www.mobotix.com > Support > Download Center >
Documentation > White Lists in the document MicroSD Card Whitelist for MOBOTIX Cameras.
When replacing the SD card, make sure that recording has been deactivated in the browser (Admin Menu > Storage > Storage on External File Server /
Flash Device; activate recording again in the same dialog after exchanging the card).
1. Remove the SD Card
Open the camera (see «Removing/Installing the Weath-
erproof Housing» ), remove all connectors in the cover
of the inner housing, then remove the cover. Remove
the four screws from the back plate and lift off the
back plate. Gently push on the MicroSD card in the
card slot of the camera. The card is released from the
slot and can be removed from the camera.
Mx-M26A/B*
B016
1.3
1.4
1.1
1.5
1.6
1.7
Weatherproof
housing
Lens and lens
cover
Recording
Speaker
Ethernet
USB
M26 Allround
Quick Install
Item
Count
1.1
1
1.2
1
1.3
1
1.4
1
1.5
2
1.6
1
1.7
2
1.8
1
1.9
4
1.10
4
1.11
4
1.12
4
1.13
2
1.14
1
1.15
1
Ethernet
USB
3. Install the camera
Press the wall/ceiling mount and the wall sealing against the mounting
position and align the holes with the holes for the dowels/screws. Insert
the screws with washers and tighten them using a torque of 0.4 Nm. Finally,
press the white covers onto the screw heads.
MxBus
3. Complete the tasks
Follow the procedures for the work inside the
housing as described in the M25 Camera Manual
in Chapter 2, «Installation» (e.g., connecting
additional wires, exchanging the SD card).
4. Insert the camera into the weatherproof housing
Start by inserting the camera into the weath-
erproof housing. Press the camera back into
the housing and take care not to squeeze and
damage any wires inside the housing.
5. Tighten the retaining screws
Affix the camera in the weatherproof housing
using the two retaining screws.
Finally, push in the two rubber plugs that
protect the retaining screws.
2. Insert the SD Card
Push the MicroSD card into the card slot as shown,
until an audible and perceptible click indicates it is in
place. Replace the back plate of the camera housing.
Part Name
Camera in weatherproof housing, incl. VarioFlex wall mount
Ceiling mount
Sealing for wall and ceiling mount
Lens, installed (standard M14 or B016)
Lens cover, 1 installed, 1 replacement (not available for lens
B016, cover for B500 not shown, no replacement cover for B500)
Lens wrench B016 (only for D016/N016)
Allen wrench 5 mm, Allen wrench 2.5 mm
Special Ethernet cable 0.5 m/20", installed
Screw caps for stainless steel fastening screws
Stainless steel wood screws 6x50 mm
Stainless steel washers 6.4 mm dia.
Dowel S8
Cable lock with bayonet catch (Ethernet patch cable, MiniUSB)
MicroSD card installed
MiniUSB plug
Rear (without weatherproof housing)
Mounting to a Wall
+20°
–90°
Mounting to a Ceiling
360°
Pressure vent
MxBus
Retaining screws
Advertisement

Related Manuals for Mobotix M26B


Summary of Contents for Mobotix M26B
- Page 1 All camera models can use the integrated MicroSD card (SDHC) to record video data. In order to exchange the MicroSD card, please proceed as outlined in the following instruction. For information on reliable SD cards, please see the MOBOTIX website www.mobotix.com > Support > Download Center >...
- Page 2 MOBOTIX, the MX logo, MxPEG and MxActivitySensor are trademarks of MOBOTIX AG registered in the Euro- pean Union, the U.S.A., and other countries • Information subject to change without notice • MOBOTIX does not assume any liability for technical or editorial errors or omissions contained herein • All rights reserved •...
Need help?
Do you have a question about the M26B and is the answer not in the manual?
Questions and answers