Table of Contents
Advertisement
Quick Links
Advertisement
Table of Contents

Related Manuals for Xorcom UC912G


Summary of Contents for Xorcom UC912G
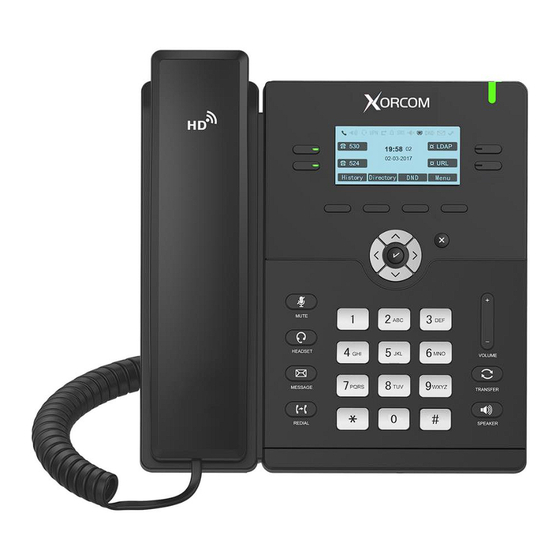
- Page 1 UC912G IP Phone Xorcom UC912G IP Phone User Manual...
-
Page 2: Table Of Contents
UC912G IP Phone Contents INTRODUCTION ............................9 ................................9 OPYRIGHT .............................. 9 AFETY NSTRUCTIONS ................................9 LEANING PACKING LIST ............................10 ASSEMBLY & INSTALLATION ........................12 Attach the Stand ................................ 12 Connect Handset (and optional Headset) ........................13 Connect Network and Power ............................. 13 GETTING TO KNOW YOUR PHONE ...................... - Page 3 UC912G IP Phone Customizing Text Logo using the web interface......................43 Set Wake-Up Screen Saver using the web interface ....................44 Gray Level ..............................44 Changing Gray Level using the phone interface ......................44 Time and Date .............................. 44 Configuring NTP Server .............................. 44 Configuring Time &...
- Page 4 UC912G IP Phone Configuring LDAP Key using the phone interface....................... 64 Searching Contacts ............................64 Searching for a Contact in All Contacts ........................64 Searching for a Contact in Local Contacts ........................64 Search for a Contact in Remote Contacts ........................65 Searching for a Contact in LDAP Contacts ........................
- Page 5 UC912G IP Phone Configuring Programmable Key using the web interface ................... 85 BASIC CALL FEATURES ..........................86 ..............................86 LACING A Making a call in Handset mode ..........................86 Making a call in Headset mode ..........................86 Always use headset to place and answer calls ......................86 Making a call in Hands-Free Speakerphone mode .....................
- Page 6 UC912G IP Phone ................................ 106 Mute phone during a call (including conference call) ....................106 DND ................................107 Enable Do Not Disturb (DND) using the phone interface ..................107 Disable Do Not Disturb (DND) using the phone interface ..................107 ................................
- Page 7 UC912G IP Phone ............................. 128 ROADSOFT ROUP Configuring Broadsoft Group using the phone interface ..................128 Configuring Broadsoft Group using the web interface .................... 128 ..............................129 ONFERENCING Configuring Conference using the phone interface ....................129 Configuring Conference using the web interface ..................... 129 ..............................
- Page 8 UC912G IP Phone ............................. 149 ULTICAST AGING Sending RTP Stream ........................... 149 Configuring a Multicast Paging Key using the hone interface .................. 149 Configuring a Multicast Paging Key using the web interface ................... 149 Sending RTP Stream: ..............................149 Receiving RTP Stream ..........................150 Paging Barge ................................
-
Page 9: Introduction
Copyright Copyright © 2019 Xorcom Ltd. All rights reserved. Xorcom Ltd. owns all the rights to modify and copy this document at any time. All the illustrations and text in this document are copyright protected. Therefore, no parts of this document may be used or reproduced, or transmitted by third parties for any purposes without the express written permission of Xorcom Ltd. -
Page 10: Packing List
UC912G IP Phone 2. Packing List The box contains the following parts: check that all items are present: 1. Phone device 2. Stand 3. Handset Copyright © 2019 Xorcom Ltd. All rights reserved Page 10 of 165... - Page 11 UC912G IP Phone 4. Headset cord 5. Power adapter (Optional) 6. Ethernet cable 7. Quick Reference for UC912G Copyright © 2019 Xorcom Ltd. All rights reserved Page 11 of 165...
-
Page 12: Assembly & Installation
UC912G IP Phone 3. Assembly & Installation Attach the Stand Copyright © 2019 Xorcom Ltd. All rights reserved Page 12 of 165... -
Page 13: Connect Handset (And Optional Headset)
UC912G IP Phone Connect Handset (and optional Headset) Connect Network and Power Copyright © 2019 Xorcom Ltd. All rights reserved Page 13 of 165... - Page 14 UC912G IP Phone If you are using PoE as the power source for your IP phone, make sure that you connect it to the socket marked Ethernet. Copyright © 2019 Xorcom Ltd. All rights reserved Page 14 of 165...
-
Page 15: Getting To Know Your Phone
3. User-configured soft keys 4. Cancel 5. Navigation (OK, right, left, up, and down arrows) 6. Volume control 7. Redial 8. Speaker 9. Transfer 10. Messages 11. Headset Copyright © 2019 Xorcom Ltd. All rights reserved Page 15 of 165... - Page 16 UC912G IP Phone 12. Mute Copyright © 2019 Xorcom Ltd. All rights reserved Page 16 of 165...
-
Page 17: Description Of Keys And Leds
2. Un-mute the audio. Can be configured as functions, such as: 1. Line 2. Speed Dial Line keys 3. BLF 4. BLF List 5. Voice Mail 6. Direct Pickup Copyright © 2019 Xorcom Ltd. All rights reserved Page 17 of 165... - Page 18 34. URL 35. Network Group 36. Multicast Paging 37. Group Call Park 38. Call Park Retrieve 39. Pull Call 40. Shared Line: LED lights status for Shared Line: Copyright © 2019 Xorcom Ltd. All rights reserved Page 18 of 165...
- Page 19 To indicate that the phone is or not in Headset mode. Transfer a call to a third party., or to enable/disable Transfer Forwarding feature for the Home screen. Message Indicates new voice mail. Press to listen to messages Copyright © 2019 Xorcom Ltd. All rights reserved Page 19 of 165...
-
Page 20: Icons
Icon Description Network Registration successful Not registered Speakerphone mode Handset mode Headset mode Mute Forward Do Not Disturb (DND) SRTP Received call Dialed Call Missed call Forwarded call Copyright © 2019 Xorcom Ltd. All rights reserved Page 20 of 165... -
Page 21: Led States
Steady Green Idle status for the monitored line Steady Red Monitored line is calling, or during a call Blinking Red Monitored line is ringing All other unknown status Copyright © 2019 Xorcom Ltd. All rights reserved Page 21 of 165... -
Page 22: Shared Line Led States
Other LEDs Description When used in headset mode, the LED is Headset key steady green or the LED is off Message key Blinking green when there is a new Copyright © 2019 Xorcom Ltd. All rights reserved Page 22 of 165... - Page 23 UC912G IP Phone message Mute key Red when the call is muted Copyright © 2019 Xorcom Ltd. All rights reserved Page 23 of 165...
-
Page 24: User Interfaces
Line Key Overview Key as Send Features Hot Line Anonymous Call History Setting All Contacts Directory Contacts BlackList Local History History Network Call Log Messaging Voice Mail View and Set. Copyright © 2019 Xorcom Ltd. All rights reserved Page 24 of 165... - Page 25 Ring Tone Basic Settings Headset Screensaver User Mode Gray Level Font Size Accounts Network Advanced Settings Phone Setting Auto Provision Factory Function System Restart Others Device Reboot Pcap Feature Copyright © 2019 Xorcom Ltd. All rights reserved Page 25 of 165...
-
Page 26: Line Key Function Overview
Line Key Function Overview Line Speed Dial BLF List Voice Mail Direct Pickup Group Pickup Call Park Intercom DTMF Prefix Local Group XML Group XML Browser LDAP Network Directories Conference Copyright © 2019 Xorcom Ltd. All rights reserved Page 26 of 165... - Page 27 UC912G IP Phone Forward Transfer Hold Redial Call Return Record URL Record Paging Group Listening Public Hold Private Hold Hot Desking Zero Touch Copyright © 2019 Xorcom Ltd. All rights reserved Page 27 of 165...
- Page 28 UC912G IP Phone Network Group Multicast Paging Group Call Park Call Park Retrieve Pull Call Shared Line Broadsoft Group Copyright © 2019 Xorcom Ltd. All rights reserved Page 28 of 165...
-
Page 29: Home Screen
“History”, “Directory”, “DND” and “Menu”. See Programmable for further information Shows the current use account. Use the Right or Left arrow keys 5. Default Account to change the default user account. Copyright © 2019 Xorcom Ltd. All rights reserved Page 29 of 165... -
Page 30: Initialization
The IP Phone will upgrade the firmware if new firmware is found on your server. During this stage, the phone will display the following message on the screen: Copyright © 2019 Xorcom Ltd. All rights reserved Page 30 of 165... -
Page 31: Reboot
By default, the phone will attempt to contact the DHCP server on your network in order to obtain valid network settings, such as IP address, subnet mask, default gateway, and DNS servers. Copyright © 2019 Xorcom Ltd. All rights reserved Page 31 of 165... -
Page 32: Using The Phone Interface
Pressing “0”, allows you to choose any of “ < >(){}[]” Pressing “1’ allows you to choose “:” Pressing “*”,allows you to choose any of “*/”!@$” Pressing “#”, allows you to choose any of “#’%&*|” Copyright © 2019 Xorcom Ltd. All rights reserved Page 32 of 165... -
Page 33: Status
Viewing Phone Status Viewing status using the phone interface 1. Press Menu →Status →Information 2. Press Menu →Status →Network 3. Press Menu →Status →Network→IPV4 4. Press Menu →Status →Network→IPV6 Copyright © 2019 Xorcom Ltd. All rights reserved Page 33 of 165... -
Page 34: Viewing Status Using The Web Interface
UC912G IP Phone 5. Press Menu →Status →Accounts (UC912G supports four accounts). Viewing status using the web interface 1. Login to the web interface (refer to Web Login for details of the login process) 2. View the information of Version, Account Status, Network, IPv4 Setting, Memory, and Up Time. - Page 35 UC912G IP Phone Copyright © 2019 Xorcom Ltd. All rights reserved Page 35 of 165...
-
Page 36: Registration
Pressing “0”, allows you to choose any of “ < >(){}[]” Pressing “1’ allows you to choose “:” Pressing “*”,allows you to choose any of “*/”!@$” Pressing “#”, allows you to choose any of “#’%&*|” Copyright © 2019 Xorcom Ltd. All rights reserved Page 36 of 165... -
Page 37: Registration Using The Web Interface
Profile→ Basic. 2. Enter the Primary SIP Server and other profile information. 3. Select and configure SIP Transport. 4. Click SaveSet to save the configuration. 5. Click Account→ Basic. Copyright © 2019 Xorcom Ltd. All rights reserved Page 37 of 165... - Page 38 6. Select Yes for Account Active. 7. Select the desired Profile. 8. Enter the SIP User ID, Authenticate ID, Authenticate Password and other account information. 9. Click SaveSet to save the configuration. Copyright © 2019 Xorcom Ltd. All rights reserved Page 38 of 165...
-
Page 39: Configuring Basic Features
Menu →Status→ Information 2. Input the IP Address in the web browser 3. Input the user name (default is admin), password (default is admin) 4. Login successfully Copyright © 2019 Xorcom Ltd. All rights reserved Page 39 of 165... -
Page 40: Administrator Password
Changing Password using the phone interface 1. Press Menu → Settings → Advanced Setting → password (default admin) → Phone Setting → Set Password Copyright © 2019 Xorcom Ltd. All rights reserved Page 40 of 165... -
Page 41: Changing Password Using The Web Interface
When you use the web interface, the initial defaults are user name: admin password: admin Language The default phone interface language is English. Changing Language using the phone interface 1. Press Menu → Settings → Basic Setting → Language. Copyright © 2019 Xorcom Ltd. All rights reserved Page 41 of 165... -
Page 42: Screen Saver
1. Press Menu → Settings → Basic Setting → Screensaver... 2. Press Right arrow, Left arrow, Switch soft key to set the time-out as Off, and press the Save Copyright © 2019 Xorcom Ltd. All rights reserved Page 42 of 165... -
Page 43: Enabling Screen Saver Using The Web Interface
Setting→ Preference. 2. Select the appropriate value for Screen Time Out 3. Enter the desired value in the Text Logo field. 4. Click SaveSet to save the configuration. Copyright © 2019 Xorcom Ltd. All rights reserved Page 43 of 165... -
Page 44: Set Wake-Up Screen Saver Using The Web Interface
2. Press Left arrow or Right arrow key or Info/Switch soft key to change the Time zone. 3. Enter details of the NTP server1, NTP Server2, and Daylight Saving. 4. Press OK or Save soft key to save the configuration. Copyright © 2019 Xorcom Ltd. All rights reserved Page 44 of 165... -
Page 45: Configuring Time & Date Manually Using The Phone Interface
1. Login to the web interface (refer to Web Login for details of the login process) and click Setting → Date &Time →NTP Server 2. Enter details of NTP servers 3. Click SaveSet to save the configuration Copyright © 2019 Xorcom Ltd. All rights reserved Page 45 of 165... -
Page 46: Changing Time Zone And Date Display Format Using Web Interface
Changing Time Zone and Date Display Format using web interface 1. Setting → Date &Time 2. Select a value from the drop-down list 3. Press SaveSet to save the configuration Copyright © 2019 Xorcom Ltd. All rights reserved Page 46 of 165... -
Page 47: Changing Sip Date Override Time Using The Web Interface
Setting → Date &Time→ SIP Date Override Time 2. Select Yes or No for SIP Date Override Time 3. Click SaveSet to save the configuration Copyright © 2019 Xorcom Ltd. All rights reserved Page 47 of 165... -
Page 48: Changing The Account Using The Web Interface
Setting → Date &Time→ Daylight Saving Time 2. Check Disable, Enable, or Auto for Daylight Saving Time 3. Click SaveSet to save the configuration Copyright © 2019 Xorcom Ltd. All rights reserved Page 48 of 165... -
Page 49: Daylight Saving Time
Many countries have used the DST at various times, details vary by location. The DST can be adjusted automatically from the time zone configuration. Typically, there is no need to change this setting. Copyright © 2019 Xorcom Ltd. All rights reserved Page 49 of 165... -
Page 50: Led Status Setting
1. Press Menu →Features → Key as Send 2. Press Left arrow or Right arrow key or press Info/Switch soft key to disable choice 3. Press OK or Save soft key to save the configuration Copyright © 2019 Xorcom Ltd. All rights reserved Page 50 of 165... -
Page 51: Network Settings
UC912G IP Phone Network Settings Xorcom IP phone support IPv4, IPv6. And IPv4&IPv6. They have three mode of Network: DHCP, Static, and PPPoE. The default mode is DHCP, it will obtain IP address and other information automatically. If your phone cannot contact a DHCP server for any reason, you need to configure a static IP address manually. -
Page 52: Configuring Dhcp Using The Phone Interface
1. Press Menu→ Settings→ Advanced Setting (password: admin) → Network→ WAN Port → PPPoE mode. 2. Enter the User ID and password 3. Click Save and restart the phone Copyright © 2019 Xorcom Ltd. All rights reserved Page 52 of 165... -
Page 53: Configuring Network Using The Web Interface
If you set IP Mode to IPv6, phone will use IPv6 addressing. IPv6 has two network modes: DHCP, Static Configuring IPv6 using the phone interface 1. Press Menu→ Settings→ Advanced Setting (password: admin) → Network→ WAN Port → IP Port Mode Copyright © 2019 Xorcom Ltd. All rights reserved Page 53 of 165... -
Page 54: Configuring Ipv6 Using The Web Interface
IPv6 → Static mode. 2. Enter the parameters: IP, IPV6 Prefix, Gateway, Pri. DNS (primary DNS), Sec. DNS (secondary DNS) in the corresponding fields. 3. Click Save and restart the phone. Copyright © 2019 Xorcom Ltd. All rights reserved Page 54 of 165... -
Page 55: Configuring Network Using The Web Interface
1. Press Menu→ Settings→ Advanced Setting (password: admin) → Network→ WAN Port → IP Port Mode. 2. Press Left arrow or Right arrow key to change the IP Port Mode 3. Press OK or Save soft key to save the configuration Copyright © 2019 Xorcom Ltd. All rights reserved Page 55 of 165... -
Page 56: Configuring Ipv4 & Ipv6 Using The Web Interface
1. Press Menu→ Settings→ Advanced Setting (password: admin) → Network→ PC Port → Router mode. 2. Enter the IP, Netmask and DHCP server 3. Click Save and restart the phone Copyright © 2019 Xorcom Ltd. All rights reserved Page 56 of 165... -
Page 57: Configuring Bridge Using The Web Interface
Network→ PC Port 2. Select As Router 3. Enter the IP address and other necessary information. 4. Click SaveSet and restart the phone Copyright © 2019 Xorcom Ltd. All rights reserved Page 57 of 165... -
Page 58: Contact Settings
3. Press Option soft key → Add to Contacts 4. Edit the necessary information, such as Name, Phone number, etc. 5. Press Save soft key or OK to add the contacts. Copyright © 2019 Xorcom Ltd. All rights reserved Page 58 of 165... -
Page 59: Adding Contacts Using The Web Interface
6. Enter the added Group, then press Add soft key 7. Enter the information, such as Name, Phone number, etc. 8. Press Save soft key or OK to add the contacts. Copyright © 2019 Xorcom Ltd. All rights reserved Page 59 of 165... -
Page 60: Creating Blacklist From History Using The Phone Interface
3. Click Import Csv to import the contact list Exporting a CSV file of Contact List using the web interface 1. Click on Directory → Directory 2. Click Export Csv to export the contact list Copyright © 2019 Xorcom Ltd. All rights reserved Page 60 of 165... -
Page 61: Remote Phonebook
2. Enter the path of the remote file in the Phone Book URL field 3. For example, could look something like this: http://192.168.0.106/Phonebook/Remote_Phonebook/remotephonebook.xml 4. Enter the Name and then click SaveSet to save the configuration Copyright © 2019 Xorcom Ltd. All rights reserved Page 61 of 165... -
Page 62: Checking The Contacts Using The Phone Interface
7. Enter LDAP Display Name: the display name of the contact record displayed on the LCD screen. 8. Enter the relative value and then click SaveSet to save the settings. Following is an example of the screenshot for the configuration. Copyright © 2019 Xorcom Ltd. All rights reserved Page 62 of 165... -
Page 63: Configuring Ldap Key
Function Keys→ Line key→ choose Line key 2 (for example) 2. Select LDAP in the Type field 3. Click SaveSet to save the configuration Copyright © 2019 Xorcom Ltd. All rights reserved Page 63 of 165... -
Page 64: Configuring Ldap Key Using The Phone Interface
4. Click the Search soft key, you can enter the desired part of name or part of number. 5. Search content matching the contact will be automatically displayed on the LCD within 5 seconds. Copyright © 2019 Xorcom Ltd. All rights reserved Page 64 of 165... -
Page 65: Search For A Contact In Remote Contacts
2. Enter the first character or more of contact’s name. 3. Select the desired the remote contact and click Enter soft key. 4. Then IP Phone will display the relevant contacts automatically. Copyright © 2019 Xorcom Ltd. All rights reserved Page 65 of 165... -
Page 66: Call History Settings
2. Press to select the desired entry 3. Press the Option soft key, and then select Detail from the prompt list 4. The detailed information of the entry appears on the LCD screen Copyright © 2019 Xorcom Ltd. All rights reserved Page 66 of 165... -
Page 67: Deleting Call History Entry Using The Phone Interface
Web Login for details of the login process) and click Directory→ Call History Click Dialed List, Missed List, Received List, Forwarded List to see the relevant history list Copyright © 2019 Xorcom Ltd. All rights reserved Page 67 of 165... -
Page 68: Dialing From Call History Using The Web Interface
Dialing from Call History using the phone interface Press History soft key or press Menu → History → Local History 2. Press Up or Down arrows to select an item Copyright © 2019 Xorcom Ltd. All rights reserved Page 68 of 165... - Page 69 UC912G IP Phone 3. Press the Send soft key, or OK, or , or the corresponding line key. Copyright © 2019 Xorcom Ltd. All rights reserved Page 69 of 165...
-
Page 70: Audio Settings
3. Press Detail soft key to edit the contact 4. Press Left arrow or Right arrow to select the wanted Ring Tone for the contact 5. Press Save soft key to save the contact. Copyright © 2019 Xorcom Ltd. All rights reserved Page 70 of 165... -
Page 71: Configuring Distinctive Ring Tone Using The Web Interface
Adjusting Ring tone Volume using the phone interface Option 1: Press the Volume Control on the home screen Option 2: Press the Volume Control while the call is ringing. Copyright © 2019 Xorcom Ltd. All rights reserved Page 71 of 165... -
Page 72: Adjusting Handset Volume Using The Phone Interface
This option can set whether to play the beep for phone's voice mail 1. Click the Setting → Preference 2. Select On or Off for Voice Mail Tone. 3. Click SaveSet to save the setting. Copyright © 2019 Xorcom Ltd. All rights reserved Page 72 of 165... -
Page 73: Play Hold Tone
When you hold the phone. How many seconds to play beep? 1. Click the Setting Preference 2. Set Enable or Disable for Play Hold Tone Delay. 3. Click SaveSet to save the setting. Copyright © 2019 Xorcom Ltd. All rights reserved Page 73 of 165... -
Page 74: System Settings
Web Login for details of the login process) and click Account →Basic →Dial Plan. 2. Enter the value in dial plan field. 3. Click SaveSet to save the configuration. Copyright © 2019 Xorcom Ltd. All rights reserved Page 74 of 165... -
Page 75: Dial-Now Timeout
2. Enter the blank or Dial-Now Timeout: for example 5 (seconds). (A value of 0 means to dial out immediately). 3. Click the SaveSet button to save the configuration Copyright © 2019 Xorcom Ltd. All rights reserved Page 75 of 165... -
Page 76: No Key Entry Timeout
Setting→ Features→ Phone Lock 2. Enter the emergency services number in the Emergency field 3. Click SaveSet to save the configuration. Copyright © 2019 Xorcom Ltd. All rights reserved Page 76 of 165... -
Page 77: Label Scroll
Setting → Preference 2. Select Yes or No for Show Missed Calls. 3. Click the SaveSet button to save the configuration Copyright © 2019 Xorcom Ltd. All rights reserved Page 77 of 165... -
Page 78: Auto Logout Time
1. Click the Setting Preference 2. Set Direct Mode or Select Mode for Redial Mode. 3. Click the SaveSet button to save the configuration Copyright © 2019 Xorcom Ltd. All rights reserved Page 78 of 165... -
Page 79: Keypad Lock
3. To Enter the Phone Unlock Pin and Auto Lock Time-Out 4. Enter the Emergency number: when the phone is locked, only the Emergency Number can be dialed. 5. Click SaveSet to save the configuration. Copyright © 2019 Xorcom Ltd. All rights reserved Page 79 of 165... -
Page 80: Disabling Keypad Lock Using The Web Interface
If this option is enabled, the server needs to be authenticated before the phone agrees to synchronize. 1. Click the Setting Preference 2. Set Enable or Disable for Check-Syn With Authenticate. 3. Click the SaveSet button to save the configuration Copyright © 2019 Xorcom Ltd. All rights reserved Page 80 of 165... -
Page 81: Other Features Settings
Configuring Action URL using the web interface 1. Click Setting→ Action URL 2. Enter the required value 3. Click SaveSet to save the setting. Click Action URL for more information for this setting. Copyright © 2019 Xorcom Ltd. All rights reserved Page 81 of 165... - Page 82 UC912G IP Phone Copyright © 2019 Xorcom Ltd. All rights reserved Page 82 of 165...
-
Page 83: Softkey Layout
Disable key to Enable field. moves the Enable key, and it will back to Disable field. 6. Click to change to position or each feature. 7. Click SaveSet to save the configuration. Copyright © 2019 Xorcom Ltd. All rights reserved Page 83 of 165... - Page 84 When there more than 5 items in the Enable field, the last soft key will display More, and last two item will show in the next page of the soft keys. Copyright © 2019 Xorcom Ltd. All rights reserved Page 84 of 165...
-
Page 85: Programmable Keys
2. Select a key to set. 3. Click SaveSet to save the setting. 4. By clicking Reset to Default, all setting of the keys will be set back to default. Copyright © 2019 Xorcom Ltd. All rights reserved Page 85 of 165... -
Page 86: Basic Call Features
1. Click webpage Setting → Preference 2. HeadSet Priority → Enable 3. Ringer Device For HeadSet → User Headset 4. Click SaveSet to save the setting. 5. Press Copyright © 2019 Xorcom Ltd. All rights reserved Page 86 of 165... -
Page 87: Making A Call In Hands-Free Speakerphone Mode
2. Press Hold soft key and then press New Call soft key. 3. Dial another phone number, 4. Press the Send soft key, or OK, then make the second call. Copyright © 2019 Xorcom Ltd. All rights reserved Page 87 of 165... -
Page 88: Ending A Call
Ending a call in Hands-Free Speakerphone mode Press the End Call soft key or press , or press the Cancel button During the conference, to end the call is same as mentioned above. Copyright © 2019 Xorcom Ltd. All rights reserved Page 88 of 165... -
Page 89: Receiving Calls
1. Press the Reject soft key to reject the call. Or press the Cancel button to reject the current call. 2. Press Forward soft key to forward to another phone. 3. Press Silence soft key, and then the call will keep silent, no ring tone display. Copyright © 2019 Xorcom Ltd. All rights reserved Page 89 of 165... -
Page 90: Incoming Call Show Mode
Set Incoming Call Show Mode using the web interface 1. Click Setting→ Preference 2. Select the desired mode for the incoming calls 3. Click SaveSet to save the setting. Copyright © 2019 Xorcom Ltd. All rights reserved Page 90 of 165... -
Page 91: Auto Answer
Disabling Auto Answer using the web interface 1. To Click Profile → Advanced 2. To choose No for the Auto Answer. 3. To click SaveSet to save the configuration. Copyright © 2019 Xorcom Ltd. All rights reserved Page 91 of 165... -
Page 92: Call Hold
2. Press Resume soft key to resume the call on hold. Holding a call in Speaker mode: 1. Press Hold soft key to hold the current call. 2. Press Resume soft key to resume the call on hold. Copyright © 2019 Xorcom Ltd. All rights reserved Page 92 of 165... -
Page 93: Call Transfer
1. Press the Transfer soft key during the conversation: the call is on hold now. 2. Enter the number transfer to, and then press or OK (now you can hear the ring tone.) Copyright © 2019 Xorcom Ltd. All rights reserved Page 93 of 165... -
Page 94: Blf Transfer
Conference soft key then A, B and C will establish a meeting. 3. A presses the End Call soft key or on-hook to exit the meeting during a conversation. Copyright © 2019 Xorcom Ltd. All rights reserved Page 94 of 165... -
Page 95: Transfer To New Call Using The Web Interface
If the person that wanted to be spoken to does not want to answer the call, then the person that answered the incoming call could use this function. Copyright © 2019 Xorcom Ltd. All rights reserved Page 95 of 165... -
Page 96: Transfer Release Trigger
2. 2xx response of REFER. The phone will not release the call until it receives a 2xx response from the server to the phone's REFER request. 3. BYE for the call. The phone will not release the call until receiving BYE from the server. Copyright © 2019 Xorcom Ltd. All rights reserved Page 96 of 165... -
Page 97: Conference Call
The conference feature is not available on all servers. For more information, contact your system administrator. Copyright © 2019 Xorcom Ltd. All rights reserved Page 97 of 165... -
Page 98: Call Forwarding
3. Enter the Forward To number. 4. Press OK or Save soft key to save the configuration. Configuring No Answer Forward Incoming calls are forwarded if not answered after some time. Copyright © 2019 Xorcom Ltd. All rights reserved Page 98 of 165... -
Page 99: Configuring Forward Using The Web Interface
2. Press Left arrow or Right arrow key or press Info/Switch soft key to select or disable choice 3. Press OK or Save soft key to save the configuration. Copyright © 2019 Xorcom Ltd. All rights reserved Page 99 of 165... -
Page 100: Cancelling Call Forwarding Using The Web Interface
If the programmable key or line key is set as BLF, when an incoming call rings, press this BLF key directly to activate dynamic forwarding. You can choose a desired forward number from the Directory when you press the Forward key Copyright © 2019 Xorcom Ltd. All rights reserved Page 100 of 165... -
Page 101: Dial Last Caller
1. Click Function keys → Line Key. 2. Select the desired Line Key and select Call Return in the Type. 3. Click the SaveSet button to save the configuration. Copyright © 2019 Xorcom Ltd. All rights reserved Page 101 of 165... -
Page 102: Call Back
If you press the callback, the phone will dial the Callback phone number. Configuring Call Back using the web interface 1. Click Setting →Features →Callback . 2. Enter the Callback phone number. 3. Click SaveSet to save the configuration. Copyright © 2019 Xorcom Ltd. All rights reserved Page 102 of 165... -
Page 103: Call Waiting Tone
2. Select Call Waiting: On and Call Waiting Tone: On Changing Call Waiting Tone Time using the web interface 1. 1. Click Setting → Tones 2. Change the Tone Time as you want (for example 3s) Copyright © 2019 Xorcom Ltd. All rights reserved Page 103 of 165... -
Page 104: Hide Caller Id
2. Press Left arrow or Right arrow key or press Info/Switch soft key to select the disable choice in the Anonymous Call field. 3. Press OK or Save soft key to save the configuration. Copyright © 2019 Xorcom Ltd. All rights reserved Page 104 of 165... -
Page 105: Reject Anonymous
2. Press Left arrow or Right arrow key or press Info/Switch soft key to select your choice in Rejection field. 3. Press OK or Save soft key to save the configuration. Copyright © 2019 Xorcom Ltd. All rights reserved Page 105 of 165... -
Page 106: Call Mute
Mute phone during a call (including conference call) 1. Press the Mute key , then the Mute key glows green, and the LCD display Mute Icon. 2. To disable the mute function, press again. Copyright © 2019 Xorcom Ltd. All rights reserved Page 106 of 165... -
Page 107: Dnd
Press the DND soft key when the phone is idle, and then DND icon shown on the LCD. Disable Do Not Disturb (DND) using the phone interface Press the DND soft key again, and then there is no DND icon on the LCD. Copyright © 2019 Xorcom Ltd. All rights reserved Page 107 of 165... -
Page 108: Hot Line
2. Enter the number in the Hotline Number and Hotline Time-out. 3. Click SaveSet to save the configuration. 4. Delete the hotline number and save the configuration, now the Hotline auto dial is cancelled. Copyright © 2019 Xorcom Ltd. All rights reserved Page 108 of 165... -
Page 109: Auto Redial
3. Enter the number 1~300 seconds for the Auto Redial Interval. 4. Enter the number 1~300 times for the Auto Redial Times. 5. Click SaveSet to save the configuration. Copyright © 2019 Xorcom Ltd. All rights reserved Page 109 of 165... -
Page 110: Function Keys Features Settings
1. Click Function keys → Line Key. 2. Select a key and set as Line 3. Select an Account 4. Click the SaveSet button to save the configuration. Copyright © 2019 Xorcom Ltd. All rights reserved Page 110 of 165... -
Page 111: Speed Dial
2. Select a Line key and set as Speed Dial. 3. Enter the desired phone number in the Value field. 4. Select an Account 5. Click the SaveSet to save the configuration. Copyright © 2019 Xorcom Ltd. All rights reserved Page 111 of 165... -
Page 112: Blf
2. Select the desired Line key and select BLF in the Type. 3. Enter the monitored phone number in the Value field. 4. Select an Account 5. Enter the Extension. 6. Click SaveSet to save the configuration. Copyright © 2019 Xorcom Ltd. All rights reserved Page 112 of 165... - Page 113 If the Programmable key or line key is set as BLF, when an incoming call rings, press this BLF key activate dynamic call forwarding You can choose a desired forward number from the Directory when you press the Forward key Copyright © 2019 Xorcom Ltd. All rights reserved Page 113 of 165...
-
Page 114: Blf List
4. Cick→ Function Keys→ Line Key 5. Select the BLF List in the Type Field. Select an Account 7. Click SaveSet to save the configuration and then restart the Phone. Copyright © 2019 Xorcom Ltd. All rights reserved Page 114 of 165... -
Page 115: Voice Messages
4. Enter the Value. 5. Press Left arrow or Right arrow key to select the Account ID. 6. Press OK or Save soft key to save the configuration Copyright © 2019 Xorcom Ltd. All rights reserved Page 115 of 165... -
Page 116: Leaving A Voice Mail
Before listening to voice mails, make sure the voice mail access code has been configured on your phone When all new voice mails are retrieved, the voice mail indicator LED will go out Copyright © 2019 Xorcom Ltd. All rights reserved Page 116 of 165... -
Page 117: Direct Pickup
2. Select the wanted Line key and set as Direct Pickup. 3. Enter the desired phone number in the Value field. 4. Select the Account 5. Click the SaveSet button to save the configuration. Copyright © 2019 Xorcom Ltd. All rights reserved Page 117 of 165... -
Page 118: Group Pickup
3. Enter the group pickup code or the direct pickup code followed the desired phone number in the Value field. 4. Select an Account. 5. Click the SaveSet to save the configuration. Copyright © 2019 Xorcom Ltd. All rights reserved Page 118 of 165... -
Page 119: Call Parking
2. Select the desired Line key and select Call Park in the Type. 3. Enter the call park code in the Value field. 4. Select an Account. 5. Click the SaveSet button to save the configuration. Copyright © 2019 Xorcom Ltd. All rights reserved Page 119 of 165... -
Page 120: Intercom
2. Select the desired profile from the pull-down list of Profile in the Profile field. 3. Click Advanced 4. Enable Allow Auto Answer By Call-Info 5. Click the SaveSet button to save the configuration. Copyright © 2019 Xorcom Ltd. All rights reserved Page 120 of 165... -
Page 121: Intercom Barge
2. Set On or Off for Intercom Barge. 3. Click SaveSet button to save the configuration This feature is not available on all servers. For more information, contact your system administrator. Copyright © 2019 Xorcom Ltd. All rights reserved Page 121 of 165... -
Page 122: Dtmf
2. Select a Line key and select DTMF in the Type. 3. Enter the value with the DTMF number. 4. Click the SaveSet button to save the configuration. Copyright © 2019 Xorcom Ltd. All rights reserved Page 122 of 165... -
Page 123: Prefix
2. Select the desired Line key and select Prefix in the Type. 3. Enter a value. 4. Click the SaveSet button to save the configuration. 5. When you press this key, the set value is input directly. Copyright © 2019 Xorcom Ltd. All rights reserved Page 123 of 165... -
Page 124: Local Group
3. Click the SaveSet button to save the configuration. 4. Now you can press the Local Group key to access the pre-defined contact group in the local directory. Copyright © 2019 Xorcom Ltd. All rights reserved Page 124 of 165... -
Page 125: Xml Group
Configuring XML Group using the web interface 1. Click Function keys → Line Key. 2. Select a key and select XML Group in the Type. 3. Click the SaveSet button to save the configuration. Copyright © 2019 Xorcom Ltd. All rights reserved Page 125 of 165... -
Page 126: Ldap
Configuring LDAP using the web interface 1. Click Function keys → Line Key. 2. Select a key and select LDAP in the Type. 3. Click the SaveSet button to save the configuration. Copyright © 2019 Xorcom Ltd. All rights reserved Page 126 of 165... -
Page 127: Xml Browser
2. Select a key and select Xml Browser in the Type. 3. Enter the access URL for xml browser (e.g.: http://192.168.0.62/xmlbrowser/text.xml) 4. Click SaveSet button to save the configuration. Copyright © 2019 Xorcom Ltd. All rights reserved Page 127 of 165... -
Page 128: Broadsoft Group
Configuring Broadsoft Group using the web interface 1. Click Function keys → Line Key. 2. Select a key and select Broadsoft Group in the Type. 3. Click the SaveSet button to save the configuration. Copyright © 2019 Xorcom Ltd. All rights reserved Page 128 of 165... -
Page 129: Conferencing
Configuring Conference using the web interface 1. Click Function keys →Line Key. 2. Select a key and select Conference in the Type. 3. Click the SaveSet button to save the configuration. Copyright © 2019 Xorcom Ltd. All rights reserved Page 129 of 165... -
Page 130: Call Forwarding
2. Select a key and select Forward in the Type. 3. Enter the Value with the number you want to forward to. 4. Click the SaveSet button to save the configuration. Copyright © 2019 Xorcom Ltd. All rights reserved Page 130 of 165... -
Page 131: Transfer
2. Select a key and select Transfer in the Type. 3. Enter the Value with the number that wanted transfer to 4. Click the SaveSet button to save the configuration. Copyright © 2019 Xorcom Ltd. All rights reserved Page 131 of 165... -
Page 132: Hold
Configuring Hold using the web interface 1. Click Function keys →Line Key. 2. Select a key and select Hold in the Type. 3. Click the SaveSet button to save the configuration. Copyright © 2019 Xorcom Ltd. All rights reserved Page 132 of 165... -
Page 133: Group Listening
Configuring Group Listening using the web interface 1. Click Function keys →Line Key. 2. Select a key and select Group Listening in the Type. 3. Click the SaveSet button to save the configuration. Copyright © 2019 Xorcom Ltd. All rights reserved Page 133 of 165... -
Page 134: Dnd
Press the DND soft key when the phone is idle status: DND icon will be shown on the LCD display. Disabling DND feature Press the DND soft key again: no DND icon is displayed on the LCD. Copyright © 2019 Xorcom Ltd. All rights reserved Page 134 of 165... -
Page 135: Redial
2. Select a Key and select Redial in the Type. 3. Enter the Label to be displayed on LCD. 4. Click the SaveSet button to save the configuration. Copyright © 2019 Xorcom Ltd. All rights reserved Page 135 of 165... -
Page 136: Sms
4. Select the Account in the From field (from which account the SMS will be sent) 5. Enter the target number in the To field (where the SMS will be sent to) 6. Press the Send button. Copyright © 2019 Xorcom Ltd. All rights reserved Page 136 of 165... -
Page 137: Set Sms Line Key
Configuring SMS using the web interface 1. Click Function keys →Line Key. 2. Select a key and select SMS in the Type. 3. Click the SaveSet button to save the configuration. Copyright © 2019 Xorcom Ltd. All rights reserved Page 137 of 165... -
Page 138: Call Recording
2. Select a Line key and select Record in the Type. 3. Click the SaveSet button to save the configuration. Please check with your system administrator whether your system supports this feature Copyright © 2019 Xorcom Ltd. All rights reserved Page 138 of 165... -
Page 139: Url Call Recording
1. Click Function keys → Line Key. 2. Select a Line key and select URL Record in the Type. 3. Enter a Value. 4. Click the SaveSet button to save the configuration. Copyright © 2019 Xorcom Ltd. All rights reserved Page 139 of 165... -
Page 140: Paging
2. Select a Line key and select Paging in the Type. 3. Enter the paging code followed the number. 4. Select the Account. 5. Click the SaveSet button to save the configuration. Copyright © 2019 Xorcom Ltd. All rights reserved Page 140 of 165... -
Page 141: Shared Line
6. Press OK or Save soft key to save the configuration Configuring Line Key as line using the web interface 1. Click Function keys → Line Key. 2. Select a Line key and select Line in the Type. Copyright © 2019 Xorcom Ltd. All rights reserved Page 141 of 165... - Page 142 5. Select the Account 6. Click the SaveSet button to save the configuration and then restart This feature is not available on all servers. For more information, contact your system administrator Copyright © 2019 Xorcom Ltd. All rights reserved Page 142 of 165...
-
Page 143: Public Hold
Configuring Public Hold using the web interface 1. Click Function keys →Line Key. 2. Select a key and select Public Hold in the Type. 3. Click the SaveSet button to save the configuration. Copyright © 2019 Xorcom Ltd. All rights reserved Page 143 of 165... -
Page 144: Private Hold
Configuring Private Hold using the web interface 1. Click Function keys →Line Key. 2. Select a key and select Private Hold in the Type. 3. Click the SaveSet button to save the configuration. Copyright © 2019 Xorcom Ltd. All rights reserved Page 144 of 165... -
Page 145: Hot Desking
1. Press the Hot Desking key when the IP Phone is idle. 2. Enter the Extension number and Password 3. Click Save soft key 4. You can now see the account information, which has changed. Copyright © 2019 Xorcom Ltd. All rights reserved Page 145 of 165... - Page 146 UC912G IP Phone This feature is not available on all servers. For more information, contact your system administrator Copyright © 2019 Xorcom Ltd. All rights reserved Page 146 of 165...
-
Page 147: Acd
4. Select an account from the pull-down list of Account field. 5. Click the SaveSet button to save the configuration. This feature is not available on all servers. For more information, contact your system administrator. Copyright © 2019 Xorcom Ltd. All rights reserved Page 147 of 165... -
Page 148: Zero Touch
5. When you finish the setting, you can press the OK to accept the changes. This feature is not available on all servers. For more information, contact your system administrator. Copyright © 2019 Xorcom Ltd. All rights reserved Page 148 of 165... -
Page 149: Multicast Paging
RTP on the preconfigured multicast address (IP:Port). For both sending and receiving of the multicast RTP, there is no SIP signaling involved. 3. The multicast paging key LED illuminates steady green. Copyright © 2019 Xorcom Ltd. All rights reserved Page 149 of 165... -
Page 150: Receiving Rtp Stream
Configuring Multicast Codec Key using the web interface 1. Click Directory ->Multicast Paging: 2. Select a codec from the pull-down list of Multicast Codec 3. Click the SaveSet button to save the configuration. Copyright © 2019 Xorcom Ltd. All rights reserved Page 150 of 165... -
Page 151: Configuring Multicast Listening Addresses Using The Web Interface
Both the multicast paging sender and receiver’s phones play a warning tone when establishing a multicast paging call. Listening to Multicasting addresses can be configurable using the web interface only. Copyright © 2019 Xorcom Ltd. All rights reserved Page 151 of 165... -
Page 152: Upgrading
2. Press OK soft key in the warning page. Factory Reset using the web interface 1. Click Management → Upgrade 2. Click Reset to Factory and then confirm the setting. Copyright © 2019 Xorcom Ltd. All rights reserved Page 152 of 165... -
Page 153: Pcap Feature
1. Click Management→ Tools 2. Click Start and then operation the phone 3. When finish the operation, click Stop and then click Export. 4. Now you will get the Pacp captures. Copyright © 2019 Xorcom Ltd. All rights reserved Page 153 of 165... -
Page 154: System Log
To Download System Log using the web interface 1. Click Management→ Configuration 2. Click Download in the system log dialog 3. You will receive a file named syslog.tgz Copyright © 2019 Xorcom Ltd. All rights reserved Page 154 of 165... -
Page 155: Upgrade
4. Enter the HTTP server’s username and password (optional). 5. Click the SaveSet button to save the configuration. 6. Restart your IP phone. The IP phone will automatically get firmware files from the HTTP server. Copyright © 2019 Xorcom Ltd. All rights reserved Page 155 of 165... -
Page 156: Upgrading Manually Using The Web Interface
1. Click Management → Upgrade 2. Click Management → Upgrade 3. Click Choose file or the blank. 4. Select the firmware (e.g. fw912G.rom ) and then click Upgrade Copyright © 2019 Xorcom Ltd. All rights reserved Page 156 of 165... - Page 157 UC912G IP Phone Copyright © 2019 Xorcom Ltd. All rights reserved Page 157 of 165...
-
Page 158: Backup And Restore
2. Select the xxx.bin or xxx.xml file, and then click the Restore Xml Configuration or Restore Bin Configuration. 3. When the upload is complete, the phone will reboot. Copyright © 2019 Xorcom Ltd. All rights reserved Page 158 of 165... - Page 159 UC912G IP Phone Copyright © 2019 Xorcom Ltd. All rights reserved Page 159 of 165...
-
Page 160: 10.Troubleshooting
Click Setting→ Tones Define the dial tone, ringing, busy tone… For the tones, you can check with your system administrator. For more Click Tone Notes. Copyright © 2019 Xorcom Ltd. All rights reserved Page 160 of 165... -
Page 161: How To Download Xml Configuration
UC912G IP Phone How to download XML Configuration? Click Management→ Configuration→ Download Xml File How to Import Trusted CA certificate? Click Management→ Trusted CA Copyright © 2019 Xorcom Ltd. All rights reserved Page 161 of 165... -
Page 162: How To Import Server Ca Certificate
UC912G IP Phone How to Import Server CA certificate? Click Management→ Server CA How to use Vlan? For Vlan information, please click VLAN Note Copyright © 2019 Xorcom Ltd. All rights reserved Page 162 of 165... -
Page 163: How To Use Lldp
How to make a Ringtone? Click How to Make Ringtone How to use OpenVPN? Click Open VPN note Provisioning Guide on FreePBX Click Set Auto Provision on FreePBX Copyright © 2019 Xorcom Ltd. All rights reserved Page 163 of 165... -
Page 164: Redundancy Server
Redundancy Server Click Redundancy Server How to Use Auto Provision Phonebook? Click About AP Phonebook All Documents Click Documents Guide, you can get all tech files. Copyright © 2019 Xorcom Ltd. All rights reserved Page 164 of 165... -
Page 165: 11.Regulatory Information
Connect the equipment into an outlet on a circuit different from that to which the receiver is connected Consult the dealer or an experienced radio/TV technician for help Copyright © 2019 Xorcom Ltd. All rights reserved Page 165 of 165...
Need help?
Do you have a question about the UC912G and is the answer not in the manual?
Questions and answers