ESAB A2 Instruction Manual
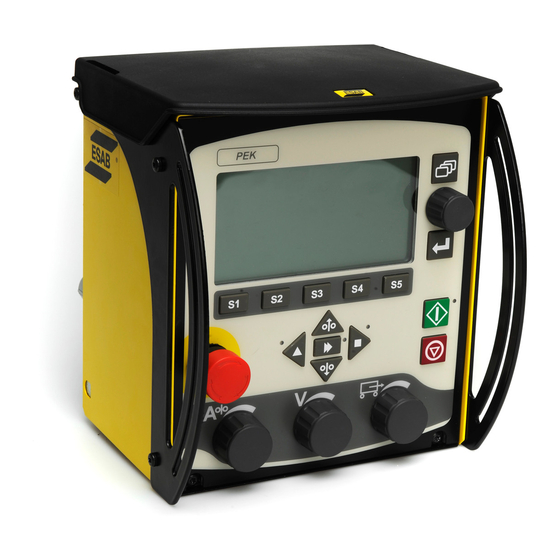
Pek control panel
Hide thumbs
Also See for A2:
- Instruction manual and spare parts list (66 pages) ,
- Instruction manual (60 pages) ,
- Instruction manual (44 pages)

Related Manuals for ESAB A2


Summary of Contents for ESAB A2
- Page 1 A2, A6 PEK Control Panel Instruction manual 0460 949 274 GB 20151222 Valid for: from program version 4.10A...
-
Page 2: Table Of Contents
Wire feed speed....................25 Cold wire feed speed (ICE)................25 Cold wire start delay (ICE)................. 25 Travel speed ....................... 26 6.10 Welding direction ....................26 6.11 AC frequency...................... 26 6.12 AC balance......................26 0460 949 274 © ESAB AB 2015... - Page 3 Quality data log to file..................42 8.2.3 Soft key configuration..................42 8.2.4 Auto save mode ....................44 Machine configuration..................44 8.3.1 Product code ....................44 8.3.2 Wire feed axis ....................45 8.3.3 Cold wire axis (ICE) ..................45 0460 949 274 © ESAB AB 2015...
- Page 4 Quality functions....................65 9.7.1 Store quality data ..................... 66 Calendar......................67 User accounts ....................67 9.10 Unit information ....................69 MENU STRUCTURE....................70 WIRE DIMENSION.....................75 ORDERING NUMBERS .....................76 Rights reserved to alter specifications without notice. 0460 949 274 © ESAB AB 2015...
-
Page 5: Introduction
Knob for setting the welding current / wire feed speed in the measurements menu, in other menus to increase or decrease the set values (settings knob) Emergency stop Manual wire feed upwards 0460 949 274 - 5 - © ESAB AB 2015... -
Page 6: Keys And Knobs
Key for travel motion in the direction of welding where the symbol is indicated on the weld equipment. To stop travel motion press or The LED illuminates during travel motion. 0460 949 274 - 6 - © ESAB AB 2015... -
Page 7: First Step
This menu appears when the machine is first started: The control panel is set to English on delivery. To select your language, proceed as follows: Press Menu to access the main menu. 0460 949 274 - 7 - © ESAB AB 2015... - Page 8 Position the cursor on the LANGUAGE row. Press ENTER to bring up a list of the languages that are available in the control panel. Position the cursor on the row for your language and press ENTER. 0460 949 274 - 8 - © ESAB AB 2015...
-
Page 9: Unit Of Measurements
Position the cursor on the CONFIGURATION row, using the positioning knob. Press ENTER to confirm the selection. Position the cursor on the GENERAL CONFIGURATION row. Press ENTER to confirm the selection. 0460 949 274 - 9 - © ESAB AB 2015... -
Page 10: Display
The cursor is displayed in the instruction manual with bold text Text boxes At the bottom of the display are five boxes containing text that describes the current function of the five soft keys below the display. 0460 949 274 - 10 - © ESAB AB 2015... -
Page 11: Symbols In The Display
If you want to choose another option instead, position the cursor on the correct row by scrolling up or down using the positioning knob. Then press ENTER. If you want to exit the list without making a selection, press QUIT. 0460 949 274 - 11 - © ESAB AB 2015... -
Page 12: Quit And Enter
QUIT returns you to the previous menu or image. • Pressing ENTER entails the execution of a selected choice in a menu or a list. The key is called ENTER in this manual. 0460 949 274 - 12 - © ESAB AB 2015... -
Page 13: Menus
Start-up screen Main Menu In the MAIN MENU, you can change welding process, method, wire type, control method, wire dimension etc. You can access other sub menus from this menu. 0460 949 274 - 13 - © ESAB AB 2015... -
Page 14: Configuration Menu
Machine configuration. 2.1.2 Tools menu Main menu → Tools In the TOOLS menu you can transfer files, view quality and production statistics, event logs, etc. 0460 949 274 - 14 - © ESAB AB 2015... -
Page 15: Weld Data Setting Menu
In the weld data setting menu, SET, it is possible to change different welding parameters. The menu has different appearances depending on which welding process is selected. Another example of the menu: 0460 949 274 - 15 - © ESAB AB 2015... -
Page 16: Measurements Menu
The measured values remain in the display even after welding has been completed. You can move to different menus without losing the measurement values. The settings knobs can be used to change the welding parameters in the measurement display. 0460 949 274 - 16 - © ESAB AB 2015... -
Page 17: Weld Data Memory Menu
In the WELD DATA MEMORY menu you can store, recall, delete and copy various set weld data. The weld data sets can be stored in 255 different memory positions. For further information, see “MEMORY MANAGEMENT”, page 30. 0460 949 274 - 17 - © ESAB AB 2015... -
Page 18: Fast Mode Menu
Configuration menu. The number of the selected memory position is displayed in the top right corner. For further information, see “Fast mode soft keys”, page 41. 0460 949 274 - 18 - © ESAB AB 2015... -
Page 19: Submerged Arc Welding
0 - 99.0 s 0.1 s Start type Direct or Scrape Direct Wire creep start Auto or Set speed Auto Wire creep start speed 0 - 1000 cm/min 1 cm/min 20 cm/min 0460 949 274 - 19 - © ESAB AB 2015... - Page 20 Setting limits Measure limits The setting range is dependent on the product used. The menu shows the settings that belong to the selected regulation type. Applies only to Aristo 1000 power sources 0460 949 274 - 20 - © ESAB AB 2015...
-
Page 21: Gas Metal Arc Welding
OFF or ON Crater filling time 0 - 10 s 0.01 s Burnback time 0 - 10 s 0.01 s Stop phases OFF or ON Dynamic regulation Auto or Set value Auto 0460 949 274 - 21 - © ESAB AB 2015... - Page 22 4 GAS METAL ARC WELDING Settings Setting range In steps of Value after resetting Setting limits Measure limits *) The setting range is dependent on the product used. 0460 949 274 - 22 - © ESAB AB 2015...
-
Page 23: Gouging
Air post-flow 0 - 99.0 s 0.1 s Crater filling OFF or ON Crater filling time 0 - 10 s 0.01 s Burnback time 0 - 10 s 0.01 s 0460 949 274 - 23 - © ESAB AB 2015... - Page 24 In steps of Value after resetting Stop phases OFF or ON Dynamic regulation Auto or Set value Auto Setting limits Measure limits *) The setting range is dependent on the product used. 0460 949 274 - 24 - © ESAB AB 2015...
-
Page 25: Function Explanations
Cold wire start delay is used to indicate how long (s) after welding start cold wire feed can start. • Cold wire start delay is set in the weld data setting menu. 0460 949 274 - 25 - © ESAB AB 2015... -
Page 26: Travel Speed
• Scrape start, means that the travel speed starts at the same time as wire feed. • Start type is selected in the weld data setting menu under start data. 0460 949 274 - 26 - © ESAB AB 2015... -
Page 27: Wire Creep Start
Air post-flow (Gouging) This controls the time during which air flows after the arc is extinguished. • Air post-flow is set in the weld data setting menu under stop data. 0460 949 274 - 27 - © ESAB AB 2015... -
Page 28: Crater Filling
Inductance - Higher values give a wider weld pool and less spatter. Lower values produce a stable, concentrated arc and a harsher sound. • Control parameters are selected in the weld data setting menu. 0460 949 274 - 28 - © ESAB AB 2015... -
Page 29: Setting Limits
6 FUNCTION EXPLANATIONS 6.29 Setting limits For information about setting limits see “Setting limit editor”, page 63. 6.30 Measure limits For information about measurement parameters see “Measure limits editor”, page 63. 0460 949 274 - 29 - © ESAB AB 2015... -
Page 30: Memory Management
It is possible to store up to 255 sets of weld data in the control panel. Each set is given a number from 1 to 255. You can also delete, copy, change and name data sets and recall a set of weld data to the working memory. 0460 949 274 - 30 - © ESAB AB 2015... -
Page 31: Store
The following screen appears in the display. The weld data set is now stored as number 5. Parts of the content of weld data set number 5 are presented at the bottom of the display. 0460 949 274 - 31 - © ESAB AB 2015... -
Page 32: Recall
YES or NO. Return to the memory menu using NO. Recall We are going to recall a stored data set: Mark the row using the positioning knob. Press RECALL. 0460 949 274 - 32 - © ESAB AB 2015... -
Page 33: Delete
The icon in upper right corner of the measurement display shows which memory position number has been recalled. Delete It is possible to delete one or more data sets in the memory menu. Deleting a data set. Select the data set. Press DELETE. 0460 949 274 - 33 - © ESAB AB 2015... -
Page 34: Copy
Press YES to confirm that you want to delete. Copy To copy the content of a weld data set to a new memory position, proceed as follows: Press 2ND FUNCT. 0460 949 274 - 34 - © ESAB AB 2015... - Page 35 Select memory position 1 and scroll through using one of the settings knobs to the selected memory position; in this case, position 50.Press YES. Weld data number 5 has now been copied to memory position 50. 0460 949 274 - 35 - © ESAB AB 2015...
-
Page 36: Name
Press DONE. Enter a complete text string with a maximum of 40 characters in this way. • Press DONE to store. The alternative you have named can now be seen in the list. 0460 949 274 - 36 - © ESAB AB 2015... -
Page 37: Edit
Part of the main menu is displayed and the menu shows the symbol which means that you are in an editing mode. Press SET and make the relevant changes. 7 0460 949 274 - 37 - © ESAB AB 2015... - Page 38 Select the welding current and scroll through to 500 using one of the settings knobs. Press QUIT twice. The setting for weld data number 5 has now been edited and stored. 0460 949 274 - 38 - © ESAB AB 2015...
-
Page 39: Configuration Menu
When you are in the measure screen or the fast mode menu and the code lock is deactivated, you can exit these menus without restrictions by press QUIT or MENU in order to go to the main menu. 0460 949 274 - 39 - © ESAB AB 2015... -
Page 40: Specify/Edit Lock Code
Quality data log to file, see “Quality data log to file”, page 42 • Setting soft keys, see “Soft key configuration”, page 42 • Automatic weld data storage, see “Auto save mode”, page 44 • Unit of length, see “Unit of measurements”, page 9 0460 949 274 - 40 - © ESAB AB 2015... -
Page 41: Fast Mode Soft Keys
Selected the desired weld data number using the setting knobs. Press STORE to save. To delete the stored set, press DELETE. 0460 949 274 - 41 - © ESAB AB 2015... -
Page 42: Quality Data Log To File
Used when welding with two welding heads. • Cold wire (ICE) Used when a non-live wire is fed into the weld pool and the cold wire speed is to be shown in the display. 0460 949 274 - 42 - © ESAB AB 2015... - Page 43 ENTER. You can allocate new functions to the other keys in the same way, by pairing a key number in the left-hand column with a function in the right-hand column. 0460 949 274 - 43 - © ESAB AB 2015...
-
Page 44: Auto Save Mode
When selecting product code, the correct motor type and gear ratio for the used gearbox in the relevant product are selected automatically. 0460 949 274 - 44 - © ESAB AB 2015... -
Page 45: Wire Feed Axis
The following options can be selected: • A2TFJ1 A2 tractor automatic welding machine for Submerged Arc Welding (SAW) • A2TGJ1 A2 tractor automatic welding machine for Gas-Shielded Metal Arc Welding (GMAW) • A6TFF1 A6 tractor automatic welding machine for Submerged Arc Welding (SAW) • MTW600 A6 tractor automatic welding machine for Submerged Arc Welding (SAW) •... -
Page 46: Travel Axis
High manual speed 200 cm/min 200 cm/min 200 cm/min Frequency ratio 85:50 85:50 85:50 Motor 2000 rpm 2000 rpm 2000 rpm Weld diameter 1000 mm 1000 mm Roller diameter 1000 mm 0460 949 274 - 46 - © ESAB AB 2015... -
Page 47: Tandem For Laf And Taf Power Sources
NOTE!Ensure that both control units have the same settings for WELD HEAD OFFSET and specify the same travel speed. The ”Master” control unit must be allocated HEAD and the ”Slave” control unit TAIL. Travel motion is always controlled from ”Master”. 0460 949 274 - 47 - © ESAB AB 2015... - Page 48 Welding head 1 stops welding but continues travelling. • Welding head 2 stops welding once it reaches the point where equipment1 stopped welding (the distance given in WELD HEAD OFFSET. • Welding is complete. 0460 949 274 - 48 - © ESAB AB 2015...
- Page 49 Welding head 1 stops welding but travel motion continues. • Welding head 2 stops welding when it has reached the point where equipment1 stopped welding (the distance that is given in WELD HEAD OFFSET). • Welding is complete. 0460 949 274 - 49 - © ESAB AB 2015...
-
Page 50: Tandem For Aristo 1000 Power Source
If ON is selected it means that one only need start the control unit for the front welding head. The rear one is started automatically. If OFF is selected all the welding heads must be started using the relevant control unit. 0460 949 274 - 50 - © ESAB AB 2015... -
Page 51: Parallel Power Sources (Applies Only To Aristo 1000 Power Sources)
To be able to setup two power sources in parallel, only the two power sources that are to be connected should have power on and be active on the CAN2 bus. 0460 949 274 - 51 - © ESAB AB 2015... -
Page 52: Ice Wire Feed
Ice wire feed The option ICE WIRE FEED (ON) can be selected in the machine configuration menu. If ice wire feed is selected, the option ICE WIRE FEED AXIS appears. 0460 949 274 - 52 - © ESAB AB 2015... -
Page 53: Polarity (Applies Only To Aristo 1000 Power Source)
To weld with positive polarity on the welding wire and negative polarity on the work piece, select "positive" polarity. • To weld with negative polarity on the welding wire and positive polarity on the work piece, select "negative" polarity. 0460 949 274 - 53 - © ESAB AB 2015... -
Page 54: Node Id Settings (Applies Only To Aristo 1000 Power Source)
This function is active during the start process before the power source has received a measurement value that it can regulate at. If ”Max OCV” has been selected this function is inactive. 0460 949 274 - 54 - © ESAB AB 2015... -
Page 55: Maintenance
54 is displayed in the error log. When TOTAL RUNNING TIME LIMIT is selected instead of the number of starts, an authorised ESAB service technician is contacted. Measure–values filter factor Main menu → Configuration menu → Measure–values filter factor This menu provides a filter factor for the measurement values of the welding current. -
Page 56: Tools
Up to 99 error messages can be saved. If the error log becomes full, i.e. if 99 error messages have been saved, the oldest message is automatically deleted when the next fault occurs. 0460 949 274 - 56 - © ESAB AB 2015... -
Page 57: Active Errors
Note! The unit IDs specified above apply to LAF and TAF power sources, and constitutes an example of unit IDs for Aristo 1000, as the nodes in an Aristo 1000 application may have different ID numbers depending on the configuration of the equipment. 0460 949 274 - 57 - © ESAB AB 2015... -
Page 58: Description Of Fault Management Codes
Lost contact with the unit Lost contact with a unit. Action: Check wiring and the connector between the control unit and power source. If the error persists, send for a service technician. 0460 949 274 - 58 - © ESAB AB 2015... -
Page 59: Export/Import
The following information can be transferred: • Weld data sets Export / Import • System setting Export / Import • Setting limits Export / Import • Measure limits Export / Import • Error log Export 0460 949 274 - 59 - © ESAB AB 2015... -
Page 60: File Manager
If you have selected a file, the options RENAME, COPY or PASTE will be added if you have previously copied a file. 0460 949 274 - 60 - © ESAB AB 2015... -
Page 61: Delete A File/Folder
The file/folder is now removed. In order to delete a folder it must be empty, i.e. first delete the files contained in the folder. 9.3.2 Rename a file/folder Select the file or folder that is to be renamed and press ALT. Select RENAME and press ENTER. 0460 949 274 - 61 - © ESAB AB 2015... -
Page 62: Create New Folder
Position the cursor in the folder in which the copied file is to be located and press ALT. Select PASTE and press ENTER. The copy is saved as Copy of plus the original name, e.g. Copy of WeldData.awd. 0460 949 274 - 62 - © ESAB AB 2015... -
Page 63: Setting Limit Editor
50 storage points. Select the row for an empty storage point and press ENTER. Select process by pressing ENTER and select the welding process using the positioning knob and press ENTER. 0460 949 274 - 63 - © ESAB AB 2015... - Page 64 With the AUTO soft key, the parameters are set automatically according to the most recently used measurement values. When asked if the measurement values are to be set automatically, press NO or YES and then STORE if the setting is to be retained. 0460 949 274 - 64 - © ESAB AB 2015...
-
Page 65: Production Statistics
The number of welds since the most recent reset is displayed in the row at the bottom. Information can be stored about a maximum of 100 welds. In the event of more than 100 welds, the first one is overwritten. 0460 949 274 - 65 - © ESAB AB 2015... -
Page 66: Store Quality Data
The entire set of quality data (information about the 100 most recent welds) that is stored in the control panel is now saved on the USB memory. The file is in a folder called QData. QData is created automatically when you insert a USB memory. 0460 949 274 - 66 - © ESAB AB 2015... -
Page 67: Calendar
ENTER. There is space for 16 user accounts. In the quality data files it will be evident which users have executed a particular weld. 0460 949 274 - 67 - © ESAB AB 2015... - Page 68 If you choose not to have this function, but instead want the power source and control panel to be unlocked for all users, select USER ACCOUNTS OFF. 0460 949 274 - 68 - © ESAB AB 2015...
-
Page 69: Unit Information
Node ID (regarding node IDs specified below, see “Unit IDs”, page 57) 2 = power source 6 = wire feed and travel motion (motor board) 8 = control panel • Software version 0460 949 274 - 69 - © ESAB AB 2015... -
Page 70: Menu Structure
MENU STRUCTURE MENU STRUCTURE 1) The setting range is dependent on the product used. 2) The menu shows the settings that belong to the selected regulation type. 0460 949 274 - 70 - © ESAB AB 2015... - Page 71 MENU STRUCTURE GMAW * The setting range is dependent on the product used. 0460 949 274 - 71 - © ESAB AB 2015...
- Page 72 MENU STRUCTURE GOUGING * The setting range is dependent on the product used. 0460 949 274 - 72 - © ESAB AB 2015...
- Page 73 • ice wire feed • polarity • node ID settings • system information Cable lengths Maintenance • contact tip change interval • total running time limit Measure–values filter factor 0460 949 274 - 73 - © ESAB AB 2015...
- Page 74 • measure limits • error log • quality function log • production statistics File manager Setting limit editor Measure limit editor Production statistics Quality functions Calendar User accounts Unit information 0460 949 274 - 74 - © ESAB AB 2015...
-
Page 75: Wire Dimension
0.8 1.0 1.2 1.6 2.0 2.4 Al Solid 0.8 1.0 1.2 1.6 2.0 2.4 Al Flux Cored 0.8 1.0 1.2 1.6 2.0 2.4 Gouging with constant ampere (CA) Electrode dimension (mm) 8.0 9.5 13.0 0460 949 274 - 75 - © ESAB AB 2015... -
Page 76: Ordering Numbers
Instruction manual LV 0460 949 291 Instruction manual SI 0460 949 292 Instruction manual LT 0460 949 293 Instruction manual CN Instruction manuals are available on the Internet at www.esab.com 0460 949 274 - 76 - © ESAB AB 2015... - Page 77 ORDERING NUMBERS 0460 949 274 - 77 - © ESAB AB 2015...
- Page 78 ESAB subsidiaries and representative offices Europe NORWAY North and South America SOUTH KOREA AS ESAB ESAB SeAH Corporation AUSTRIA Larvik ARGENTINA Kyungnam ESAB Ges.m.b.H Tel: +47 33 12 10 00 CONARCO Tel: +82 55 269 8170 Vienna-Liesing Fax: +47 33 11 52 03...
Need help?
Do you have a question about the A2 and is the answer not in the manual?
Questions and answers