Dentsply Sirona Intego Brief Operating Instructions
Not valid for usa
Hide thumbs
Also See for Intego:
- Operating instructions manual (350 pages) ,
- Installation manual (74 pages) ,
- Brief operating instructions (32 pages)
Table of Contents
Advertisement
Advertisement
Table of Contents

Related Manuals for Dentsply Sirona Intego


Summary of Contents for Dentsply Sirona Intego
- Page 1 Intego/Intego Pro Brief operating instructions (not valid for USA)
-
Page 2: Table Of Contents
Instruments. Your Intego Team Content Overview of Intego .............. 3 Overview of Intego Pro ............4 Power switch ................5 User interface of the dentist element ......6 User interface of the assistant element ..... 11 Programming chair programs ........12 Pneumatic foot switch ............ -
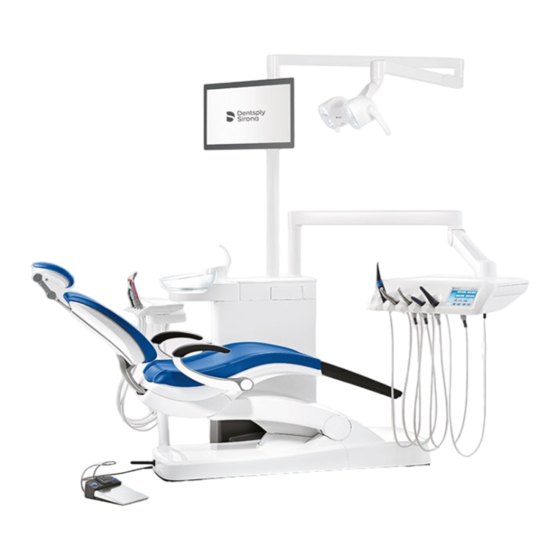
Page 3: Overview Of Intego
Overview of Intego A Patient chair Compact assistant element Flat headrest Compact water unit C Pneumatic foot switch G Power switch and external device connection D TS dentist element * Maximum load exerted by patient and accessories:: 140kg, 185 kg... -
Page 4: Overview Of Intego Pro
Overview of Intego Pro A Patient chair Comfort assistant element Double-jointed head support Comfort water unit C C+ electronic foot control G Power switch and external device connection D CS dentist element * *Maximum load from patient and accessories: 185 kg... -
Page 5: Power Switch
This switches off the air and water supply as well as all electronic components. It then no longer consumes any energy. Dentsply Sirona... -
Page 6: User Interface Of The Dentist Element
C Fixed keys (membrane keyboard) D Favorite key pad (membrane keyboard) EasyTouch comfort user interface A Touchscreen (pressure-sensitive user interface) Fixed keys (membrane keyboard) For an overview of touch-screen programs, see the end of this quick reference guide. Dentsply Sirona... - Page 7 0:45 Operating light Switches the operating light on, to the composite function, or off. The composite function is used to prevent premature curing of composite materials. With the LED light, brightness is set using the no-touch sensor. Dentsply Sirona...
- Page 8 Chair program S Mouth rinsing position with last-position memory function (programmable) Chair program 0 Entry/exit position (programmable) Chair programs 1 and 2 (programmable) Backrest tilt Moves the seat and backrest without any compression or stretching effects for the patient Dentsply Sirona...
- Page 9 With instruments in place: changing the user profile 10:45:03 Endo / Purge Purge Endo With the motor removed: switching the Endo function of the motor on/off With the ultrasound handpiece removed: switching the endo mode on/off (limiting power) Endo Dentsply Sirona...
- Page 10 3 sec Pressing > 3 s again reactivates the treat- ment unit. This protects from interference from an external HF device and when cleaning the surface by ensuring that no functions can be accidentally triggered. Dentsply Sirona...
-
Page 11: User Interface Of The Assistant Element
Tumbler filling on/off Flushing the cuspidor on/off Operating light / Composite function Press the key repeatedly to set the following switching positions: 1. Switched on 2. Composite function 3. Switched off Fn key Starts and stops the timer. Dentsply Sirona... -
Page 12: Programming Chair Programs
Press and hold the desired program key (S, 0, 1 or 2) (> 2s). An acoustic signal sounds. Your settings are now stored under the desired program key. Note: Chair programs S and 0 can also be programmed on the assistant element side. Dentsply Sirona... -
Page 13: Pneumatic Foot Switch
Chip blower With the chip blower, an air jet comes out of the bur. Take an instrument and press the right button. The chip blower remains switched on as long as the button is pressed. Dentsply Sirona... -
Page 14: C+ Electronic Foot Control
Press the right button. The chip blower remains switched on as long as the button is pressed. When the intraoral camera is removed, it is possible to toggle between single image and quad image in Si Video. Dentsply Sirona... - Page 15 An electric motor is removed from the holder. Slide the 4-way foot switch plate to the left. The clockwise/counterclockwise rota- tion of the electric motor is activated. Dentsply Sirona...
-
Page 16: 4-Way Foot Control
Always remove the spray aspirator from the patient's mouth before switching it off. 3-way standard and Sprayvit E syringe = air button = water button Available option: Sprayvit E with reverse key assignment Dentsply Sirona... -
Page 17: High-Speed Handpiece / Air Motor / Other Air-Driven Instruments
EasyPad display. Press the foot switch to start the high-speed handpiece. EasyTouch user interface When the highspeed handpiece is removed from the holder, a highspeed handpiece signal appears on the touchscreen. 10:45:03 Dentsply Sirona... -
Page 18: Electric Motor
Electric motor The brushless motors BL E and BL ISO E are available as electric motors. The speed range of the motors for Intego / Intego Pro is between 1,200 and 40,000 rpm. If the treatment center features the eControl option, the motor can be down-regulated to 100 rpm. - Page 19 When counterclockwise rotation is switched on, the Counterclockwise status display lights up on the EasyPad, the Counterclockwise key is marked orange on the EasyTouch. Move the 4-way foot control plate to the left again to reverse the rotational direction. Dentsply Sirona...
-
Page 20: Endo Function
Endo function. The basic functionality of the Endo func- tion is described below. For more informa- tion, please refer to your complete Intego Operating Instructions. Switching on the Endo function The Endo function is assigned to the burr drive removed from the holder. - Page 21 During calibration, increasing speeds are set on the motor. When the burr drive is calibrated, a "c" is displayed on the EasyPad display. With the EasyTouch, the key is continually highlighted in orange. Calibration is then completed. Dentsply Sirona...
- Page 22 The torque and speed can also be increased or reduced by moving the 4-way switch plate of the C+ electronic foot control up or down. On the favorite keys 1, 2 and 3, torque values for the steps of the endodontic Dentsply Sirona...
- Page 23 (>2 s) or touch the AutoRev key. Auto The AutoReverse function is switched on/off. On the EasyPad display, a hori- zontal bar appears above the display Burr drive calibrated Burr drive not calibrated. With the EasyTouch, the key is highlighted orange. Dentsply Sirona...
-
Page 24: Apex Locator (Only With Easytouch)
• For measurement during treatment with the motor, without electronic torque limitation Stop 2700 Distance display in the Motor program • For manual measurement using a file clamp Auto Aqua Apex Dist Setup Distance display in the Start sub-screen Dentsply Sirona... - Page 25 The tip of the root canal file has pierced the physiological apex. The instrument over- shoot is displayed. In addition to the graphical distance display on the touchscreen, the position of the file in the root canal can also be indi- cated as an acoustic signal. Dentsply Sirona...
- Page 26 – and + keys. The preset motor stop position is displayed as a black triangle to the right of the distance display under the text "Stop". For more details, please refer to your complete Intego Operating Instructions. Dentsply Sirona...
-
Page 27: Sirosonic L
From 1 to 5% = 1% increments From 5 to 50% = 5% increments From 50 to 100% = 10% increments The speed can also be increased or reduced by moving the 4-way switch plate of the C+ electronic foot switch up or down. Dentsply Sirona... - Page 28 Setup intensity (En 1 to En 5). By pressing the Endo / Purge Endo again, the user is returned to ultrasonic mode. The intensity settings cannot be saved on the favorite keys in Endo mode. Dentsply Sirona...
-
Page 29: Mini L.e.d
Sec. Pulse curing mode The Mini L.E.D. runs at full power in "Pulse" mode (1 s on, 0.25 s off). Sec. 12.5 "Soft start" mode Soft start in 10 s, then full power for 10 s Sec. Dentsply Sirona... -
Page 30: Sirocam F/Af/Af
"Switching on/off the foot control function for intraoral camera focus" for Easy Pad [ 39], for EasyTouch [ 40]. Focusing the SiroCam F In the SiroCam F, focusing is set for the close-up range. The (B) key has no func- tion. Dentsply Sirona... - Page 31 The display switches from live to still image. Press the foot pedal again. The live image is displayed again. If the treatment center is equipped with an autofocus camera and the C+ electronic foot control, it can be configured in setup Dentsply Sirona...
- Page 32 EasyTouch using the Sivison dialog buttons. Selecting the next quadrant In single image mode, the still image in the Purge next quadrant is displayed. In quad image mode, the next quadrant is highlighted. Dentsply Sirona...
- Page 33 If the treatment center is equipped with an autofocus camera and the C+ electronic foot control, it can be configured in setup that the camera image can be focused with the foot switch. If this function is switched Dentsply Sirona...
- Page 34 C+ elec- tronic foot control or press the Endo / Purge Purge key on the EasyPad. An acoustic signal sounds. The still image is displayed in an additional Sidexis window and saved in the patient database. Dentsply Sirona...
-
Page 35: Sivision Program
Touch the Sivison dialog key on the touchscreen. If intraoral images are desired: Remove the intraoral camera from the holder. The Sidexis or Si Video PC application starts immediately. The Sivision dialog is displayed on the touchscreen. Dentsply Sirona... - Page 36 Sivision Connect". There it can also be defined which file folder the File Selection screen should access for each PC applica- tion. The following overview shows the keys available for configuring the Sidexis and Media Player PC applications. Dentsply Sirona...
- Page 37 Undo Zoom in/out Restore orig- inal image Rotate image Close current 90° left/right media window Rotate image Close all media 180° windows Contrast opti- mization filter Media Player Previous/ Mute next title Stop playback Adjust volume Start/interrupt playback Dentsply Sirona...
-
Page 38: Configuration Of The Treatment Center (Setup)
Favorites field. Setup The following Setup settings can be performed: Setting the time and date Presetting the timer Switching the key sound on/off Coupling suction to the 4-way foot switch Switching the water heater on/off Dentsply Sirona... - Page 39 You can adapt the basic settings of the treatment center in three sub-screens. The selected function is highlighted by an orange frame. Setting the time and date Setting the date 15 04 14 Setting the time Switching 12/24 hour display 12 h Dentsply Sirona...
- Page 40 Adjust cleaning agent mixture for suction hose cleaning (with the chemical option) chem Switching the water heater on/off Configuring the network connection For more information, please refer to your complete Intego Operating Instructions or the Installation Instructions. DHCP 192.168.50.50 Subnet (24) 255.255.255.0...
- Page 41 Dentsply Sirona...
-
Page 42: Overview Of The Touchscreen Dialog
Overview of the touchscreen dialog 10:45:03 0:15 Auto Aqua Apex Dist Setup 10:45:03 Clean 3 sec 10:45:03 10:45:03 0:45 now in LEDview Plus Dentsply Sirona... - Page 43 10:45:03 10:45:03 20000 10:45:03 Endo Apex Dist 10:45:03 Stop Endo Endo 3 1.00 Endo 3 Dentsply Sirona...
- Page 44 Dentsply Sirona Sirona Dental Systems GmbH Fabrikstrasse 31 64625 Bensheim Germany dentsplysirona.com...
Need help?
Do you have a question about the Intego and is the answer not in the manual?
Questions and answers