
Related Manuals for Tunstall Universal Sensor


Summary of Contents for Tunstall Universal Sensor
- Page 1 Universal Sensor Installation Guide Insert a brief description here, to provide the reader with a brief summary about the product. t: 01977 661234 f: 01977 660562 e: enquiries@tunstall.co.uk w: tunstall.co.uk Version: V2.7...
-
Page 2: Table Of Contents
Gas Detector ........................34 Smoke Detector ......................35 Bed Occupancy Sensor ....................36 How to reset the Universal Sensor ................40 3. How to program to the Tunstall Home Unit ............41 4. Notes and Warnings ..................42 Service Information......................42 Changing the battery ....................42 5. -
Page 3: Features And Introduction
Programmed using the built-in buttons and LCD screen the Universal Sensor is easily set to send a message to the home unit identifying which type of device it is linked to. -
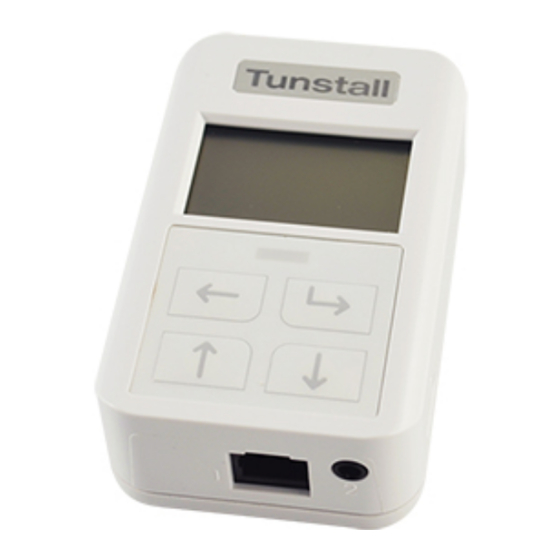
Page 4: Universal Sensor Illustration
Universal Sensor Illustration... - Page 5 Illustration Legend Universal Sensor LCD Screen Back Button Up Button RJ11 Input 3.5mm Input Down Button Reed Switch Select Button Red LED...
-
Page 6: Getting Started
The Universal Sensor should be installed in a clean, dry environment and for optimum radio performance should be mounted away from metallic surfaces. The Universal Sensor can be fastened to the wall etc. by a variety of methods – integral keyhole slots, sticky pads, Velcro etc. The installer should determine the most appropriate method. -
Page 7: Unlocking The Universal Sensor
Whilst still pressing the ‘Select Button’, press and hold the “Up Button” until ‘Change Settings’ appears on the display. Press the “Select Button” to confirm you want to unlock the sensor. The Universal Sensor is now unlocked and can now be configured. -
Page 8: Language Selection
Language Selection The Default language for a new Universal Sensor is English (UK). You can change the language setting on the Universal Sensor if it is incorrect or if you have accidentally changed the language to a language you do not understand. - Page 9 Navigate this list using the “Up Button” and the “Down Button” and use the “Select Button” to choose the new language. The Universal Sensor will confirm on screen that the newly selected language has been set. Once completed the Universal Sensor will...
-
Page 10: Configuration Menu
Configuration Menu unlocking the Universal Senor The “Configuration Menu” is accessed after contains a list of the options used to set up the Universal Sensor. Select Mode: Used to select which predefined sensor type the Universal Sensor should operate as. -
Page 12: Select Mode
Select Mode “Select Mode” is used to select which sensor type the Universal Sensor should operate as. After unlocking the Universal Sensor, the “Configuration Menu will be displayed. The “Select Mode” menu will be selected when first opening the “Configuration Menu” press the “Select Button” to enter “Select... - Page 13 The Universal Sensor can be configured to transmit to a Tunstall Telecare enabled solution as the following device types: Virtual Bed The Virtual Bed sensor sends an event call if a client has got in or out of bed (or a chair).
- Page 14 Telecare Overlay System to enable care to be delivered quickly. Bed Occupancy Sensor The bed/chair absence sensor generates an alarm if a client has got out of bed (or chair) during a monitoring time window (e.g. night) The bed/chair absence sensor works like the conventional bed/chair occupancy sensor, generating an alarm if a client has got out of bed (or chair) during a monitoring time window (e.g.
-
Page 15: Advanced Mode
“Advanced” Menu and press the “Select Button”. The “Advanced Menu” options depend on the configuration of the Universal Sensor. The Input type and the Contact Channel can be changed for all configurations and passage time can be configured. Also the ability to set the times associated when used in Bed... -
Page 16: Passage Time
Passage time is used in Door Contact Mode. Using Passage Time; it is possible to stop the Universal Sensor from sending door events to the Tunstall Lifeline or Telecare Overlay System for a maximum of 120 seconds, (this time is definable in the “Advanced... -
Page 17: Monitoring Deactivated
After 60 minutes the Universal Sensor will start to send radio messages to the Tunstall Lifeline or Telecare Overlay System. Whilst the Universal Sensor is assigned and operating as a Bed Occupancy Sensor or Door Guard press and hold the “Select Button” and the “Back Button” together for 3 seconds. - Page 18 To activate monitoring press and hold the “Select Button” and the “Back Button” together for 3 seconds. The Universal Sensor will confirm that monitoring is activated and will raise an alarm via the Tunstall Home Unit.
-
Page 19: Battery
The “Select Mode” menu will be selected when first opening the “Configuration Menu” Press the “Down Button” twice to navigate to the “Battery” Menu and press the “Select Button”. The Battery Menu” has 3 options; ALB, and Status. The Universal Sensor will only operate in ALB or AP Mode. -
Page 20: Alb - Auto Low Battery
Using the “Status” menu it is possible to check the status of the internal battery. The battery will either report “Normal” or “Low”. When “Low” is displayed the battery should be replaced and at this stage the Universal Sensor will have sent an ALB alarm to the monitoring centre. -
Page 21: Send Message
Send Message Once configured it is recommended to test the connection of the Universal Sensor to the Tunstall Lifeline or Telecare System; this can be done using the “Send Message” menu. After unlocking the Universal Sensor, the “Configuration Menu will be displayed. - Page 22 After pressing the “Select Button” the Universal Sensor will send the radio message to the Tunstall Lifeline or Telecare Overlay System. Once the radio message has been sent by the Universal Sensor; it will confirm the status on screen. If configured...
-
Page 23: Setup Summary
Setup Summary After unlocking the Universal Sensor, the “Configuration” Menu will be displayed. The “Select Mode” menu will be selected when first opening the “Configuration Menu” Press the “Down Button” five times to navigate to the “Setup Summary” Menu and press the “Select Button”. -
Page 24: About
“About” Menu and press the “Select Button”. After displaying the installed firmware version and the RSID and the reset count number; the Universal Sensor will timeout of the “About Menu” after 5 seconds will return to the “Configuration” Menu. -
Page 25: Virtual Bed
Mode”. Contact Type Input Channel 1 Cable Connection RJ11 The Universal Sensor can now be connected to a Bed/ Chair Pad (sold separately) and the Tunstall Lifeline or Telecare System. Tunstall recommends completing a test call before leaving the property. -
Page 26: Virtual Bed - Attaching A Pad
Virtual Bed – attaching a pad. Bed Pad Installation The bed pad should be positioned: - Across the bed • At around 1/3 of the distance between the head and foot of the bed. • On a firm base – if the bed frame is not solid, then the sensor pad should be •... -
Page 27: Door Contact
Cable Connection Using the included magnetic contact Passage Time Dependent on clients walking speed. The Universal Sensor can now be used with the magnetic contacts (included in the box) and the Tunstall Home unit. Tunstall recommends completing a test call before... -
Page 28: Enuresis Sensor
“Up Button” and or “Down Button” When “Enuresis” is highlighted press the “Select Button” The Universal Sensor will confirm it is now configured to be used with a 3 party device as an Enuresis Sensor. -
Page 29: Enuresis Sensor - Attaching The Moisture Sensing Mat
3. The Universal Sensor should be located in a convenient place nearby, ensuring the cable is safely routed. It is important that the Universal Sensor is not placed in a position where it may become wet. For optimum radio performance the Universal Sensor should be mounted away from metallic surfaces. -
Page 30: Pendant
“Up Button” and or “Down Button” When “Pendant” is highlighted press the “Select Button” The Universal Sensor will confirm it is now configured to be used with a 3 party device as a Pendant. Suggested Configuration: this can be changed using “Advanced... -
Page 31: Epilepsy Sensor
“Up Button” and or “Down Button” When “Epilepsy” is highlighted press the “Select Button” The Universal Sensor will confirm it is now configured to be used with a 3 part device as an Epilepsy Sensor. -
Page 32: Co Detector
Input Channel 1 Cable Connection RJ11 The Universal Sensor can now be connected to a CO Detector with a normally closed relay (sold separately) and to the Tunstall Home unit. Tunstall recommends completing a test call before leaving the property. -
Page 33: Door Guard
Using the included magnetic contact and RJ11 Monitoring Deactivated Monitoring can be disabled for 60 mins The Universal Sensor can now be used with the magnetic contacts (included in the box) and the Tunstall Home unit. Tunstall recommends completing a test call before... -
Page 34: Gas Detector
Input Channel 1 Cable Connection RJ11 The Universal Sensor can now be connected to a Gas Detector with a normally open relay (sold separately) and to the Tunstall Home unit. Tunstall recommends completing a test call before leaving the property. -
Page 35: Smoke Detector
Input Channel 1 Cable Connection RJ11 The Universal Sensor can now be connected to a Smoke Detector with a normally closed relay (sold separately) and to the Tunstall Home unit. Tunstall recommends completing a test call before leaving the property. -
Page 36: Bed Occupancy Sensor
“Up Button” and or “Down Button” When “Bed Occupancy” is highlighted press the “Select Button” The Universal Sensor will confirm it is now configured as a Bed Occupancy Sensor. The Universal Sensor will now prompt you to set the current time and date. - Page 37 Using the “Up Button” and “Down Button” set the current minute. (00-59) and press the “Select Button” to confirm. Using the “Up Button” and “Down Button” set the current day. (00- 31) and press the “Select Button” to confirm. Using the “Up Button” and “Down Button” set the current month. (01-12) and press the “Select Button”...
- Page 38 Not Out Bed - the time when a client should be out of Daylight Saving - On Monitoring Deactivated Monitoring can be disabled for 60 mins The Universal Sensor can now be connected to a Bed Pad with a normally closed Tunstall Home unit. Tunstall recommends relay (sold separately) and to the completing a test call before leaving the property.
- Page 39 Bed Occupancy Sensor – attaching the Pad Bed Pad Installation The bed pad should be positioned: - Across the bed • At around 1/3 of the distance between the head and foot of the bed. • On a firm base – if the bed frame is not solid, then the sensor pad should be •...
-
Page 40: How To Reset The Universal Sensor
How to reset the Universal Sensor A reset sets all the settings on the Universal Sensor back to factory default. The Universal Sensor will then need to be programmed before it can be deployed. With the LCD activated press and hold the “Up Button” and “Down Button”... -
Page 41: How To Program To The Tunstall Home Unit
Universal Sensor by activating the device to which it is connected (e.g. door contacts, bed sensor mat). 1. Press and hold the cancel button on the Tunstall home unit until it beeps (some units will announce ‘programming mode’). -
Page 42: Notes And Warnings
4. Notes and Warnings Service Information The Universal Sensor contains no user serviceable parts. It contains a EVE ER14505V 3.6V battery with up to 5 years (typical usage). This battery is user-replaceable and when it has expired it should be disposed of according to current local regulations. -
Page 43: Compliance And Standards
EN 300 220-2 Design, Manufacture Installation and Service: ISO 9001:2008 Declaration of conformity Tunstall declare that the radio equipment is in compliance with Directive 2014/53/EU. The full text of the EU declaration of conformity is available at the following address: uk.tunstall.com/approvals... - Page 44 01977 661234 f: 01977 660562 e: enquiries@tunstall.co.uk w: tunstall.co.uk Version: IL1117...
Need help?
Do you have a question about the Universal Sensor and is the answer not in the manual?
Questions and answers