Table of Contents
Advertisement
Quick Links
For complete Digitalinx IP Deployment Guide go to www.libav.com or use a
Important notice:
• Do not attempt to disassemble or alter the housing. There are no user-serviceable parts
inside the unit. Doing so will void your warranty.
• To minimize the possibility of equipment damage from electrostatic discharge (ESD), all source and destination
equipment must be powered off during installation.
• Do not connect the device to a telecommunication outlet wired to unrelated equipment. Doing so may
damage the unit or any connected equipment. Ensure all connected twisted pair cabling is straight-through (point-
to-point).
• Allow proper ventilation to reduce the risk of thermal failure.
Rev 180122
IPEX2000 Series Quick
Install Guide
This guide is for quick installation only.
QR reader to access the manual via QR code below.
Scan QR Code with your Smart-phone or Tablet
11675 Ridgeline Dr.
Colorado Springs, CO 80921
Toll-Free: 800-530-8998
Fax: 719-260-0075
supportlibav@libav.com
Advertisement
Table of Contents

Subscribe to Our Youtube Channel
Related Manuals for DigitaLinx IPEX2001


Summary of Contents for DigitaLinx IPEX2001
- Page 1 IPEX2000 Series Quick Install Guide This guide is for quick installation only. For complete Digitalinx IP Deployment Guide go to www.libav.com or use a QR reader to access the manual via QR code below. Scan QR Code with your Smart-phone or Tablet Important notice: •...
-
Page 3: Important Safety Instructions
IPEX2000 Series Quick Install Guide Important Safety Instructions 1. Read these instructions – All the safety and operating instructions should be read before this product is operated. 2. Keep these instructions – The safety and operating instructions should be retained for future reference. 3. - Page 4 IPEX2000 Series Quick Install Guide 26. When the apparatus is not in use or during its relocation, take care of the power cord and plugs; e.g. tie up the power cord with cable tie or similar. The tie must be free from sharp edges and the like that might cause abrasion of the power cord.
-
Page 5: Product Overview
Hz. The IPEX2001 outputs two video streams: one large IP stream at the native content resolution and a smaller video stream at 352x288 at 5 Hz to easily view a preview of the content on the Digitalinx IP Control software for Windows and iPad. -
Page 6: Front And Rear Panels
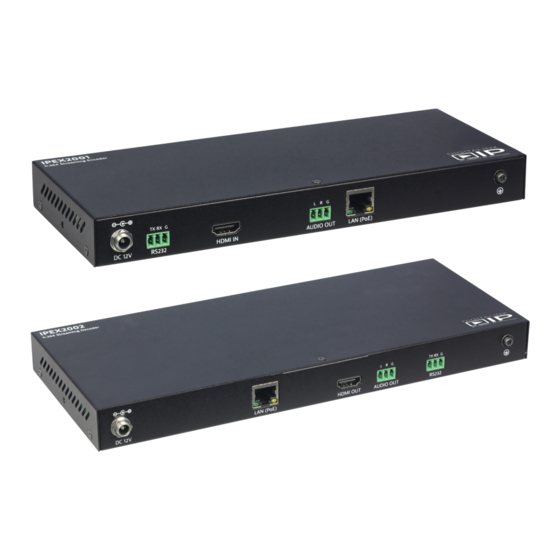
IPEX2000 Series Quick Install Guide Front and Rear Panels IPEX2001 Front Panel Power indicator Status indicator IPEX2001 Rear Panel 12V DC power input RS232 Connection HDMI input Analog audio output LAN connection with PoE support Ground screw... - Page 7 IPEX2000 Series Quick Install Guide IPEX2002 Front Panel Power indicator Status indicator IPEX2002 Rear Panel 12V DC power input HDMI input Local HDMI output Analog audio output RS232 connection Ground screw...
-
Page 8: System Considerations
CBR is Constant Bit Rate. In a CBR h.264 stream, the encoder uses the same amount of bits for every second of video. If you set the IPEX2001 to CBR at 10 megabits per second, every second of video will use 10 megabits per second of bandwidth regardless of the content. -
Page 9: System Control
The IPEX2002 can turn on and turn off connected displays via CEC. This technology has been a part of the HDMI specification for years. The Digitalinx IP Control software for Windows and iPad can turn on and off the displays for easy end user control. -
Page 10: Installation Instructions
Display Audio Output Connections To use the analog audio outputs of the IPEX2001 or IPEX2002, connect the L, R, and ground wires to the removable 3-pole terminal block. Connect the other end of the cable to an audio amplifier. IPEX2001 or... - Page 11 IPEX2000 Series Quick Install Guide...
-
Page 12: General Operation
The video configurations and signal routes can be easily changed through the Digitalinx IP Control software for Windows and iPad or through a third party controller. Please see the Digitalinx IP Deployment Guide for configuring this functionality. - Page 13 IPEX2000 Series Quick Install Guide IPEX2001 Technical Specifications Input/Output Connections HDMI Input One (1) HDMI Type A Receptacle One (1) 8P8C port (Shielded RJ45) Power One (1) 5.5 mm OD, 2.6 mm ID Threaded Barrel RS232 Port One (1) 3-pin Removable Terminal Block Connector...
- Page 14 Installation Guide, Power Supply with US, UK, EU, and UK adapters, 3-pin Removable Screw Terminal (2 ea), Mounting Ears (2 ea) IP Controller IPEXCB Compatible Encoder IPEX2001 Distances and picture quality may be affected by cable grade, cable quality, source and destination equipment, RF and electrical interference, and cable patches.
- Page 16 Digitalinx IP is a brand of: 11675 Ridgeline Drive Colorado Springs, Colorado 80921 USA Phone: 719-260-0061 Fax: 719-260-0075 Toll-Free: 800-530-8998 Email: supportlibav@libav.com...
Need help?
Do you have a question about the IPEX2001 and is the answer not in the manual?
Questions and answers