Gilson PIPETMAX 268 User Manual
Hide thumbs
Also See for PIPETMAX 268:
- Setup manual (40 pages) ,
- User manual (44 pages) ,
- Installation qualification/operational qualification procedures (8 pages)
Table of Contents
Advertisement
Quick Links
PIPETMAX® 268
User's Guide
Gilson, Inc.
| PO Box 620027 | Middleton, WI 53562-0027, USA
Tel: 608-836-1551 or 800-445-7661 | Fax: 608-831-4451
Gilson S.A.S.
| 19, avenue des Entrepreneurs | BP 145 | F-95400 Villiers-le-bel, FRANCE
www.gilson.com
| sales@gilson.com | service@gilson.com | training@gilson.com
LT255519-07
©2018 Gilson, Inc. | All rights reserved.
Advertisement
Table of Contents

Related Manuals for Gilson PIPETMAX 268


Summary of Contents for Gilson PIPETMAX 268
- Page 1 | PO Box 620027 | Middleton, WI 53562-0027, USA Tel: 608-836-1551 or 800-445-7661 | Fax: 608-831-4451 Gilson S.A.S. | 19, avenue des Entrepreneurs | BP 145 | F-95400 Villiers-le-bel, FRANCE www.gilson.com | sales@gilson.com | service@gilson.com | training@gilson.com LT255519-07 ©2018 Gilson, Inc. | All rights reserved.
-
Page 3: Table Of Contents
Unit End-of-Life ................1-7 Gilson PIPETMAX® 268 User’s Guide... - Page 4 Log Out..................2-28 Table of Contents-2 Gilson PIPETMAX® 268 User’s Guide...
- Page 5 Miscellaneous................. . A-3 Gilson PIPETMAX® 268 User’s Guide...
- Page 7 The PIPETMAX 268 has been certified to safety standards required in Canada, Europe, and the United States. Refer to the instrument rear panel label and the Declaration of Conformity document for the current standards to which the instrument has been found compliant.
-
Page 8: Safety
Access to the rear panel is necessary because the instrument must be detached from all voltage sources before service, repair, or exchange of parts. Operate the instrument using the approved power supply provided and only at the voltage specified on the rear panel label of the instrument. Safety-2 Gilson PIPETMAX® 268 User’s Guide... -
Page 9: Safety Interlocks
When the instrument is installed in the hood, the external sensor must face the door of the hood and be located within 15 cm (6 in) of the door. PIPETMAX 268 Configured with External Safety Interlock Sensor and Placed in Hood Pipette Heads The instrument is capable of generating significant forces that could cause potential injury to the user. -
Page 10: Liquids
Be sure to use only replacement parts specified in this user’s guide. Do not repair or change parts which are not listed in this user’s guide. If it is necessary to change parts not listed, please contact your local Gilson representative. -
Page 11: Sécurité
à se conformer à ces exigences. Le PIPETMAX 268 a été certifié conformément aux normes de sécurité en vigueur au Canada, en Europe et aux Etats-Unis. Merci de vous reporter aux indications mentionnées sur le panneau arrière de l'instrument ainsi qu’au document de Déclaration de Conformité... -
Page 12: Tension
L'accès au panneau arrière doit être libre car l'instrument doit pouvoir être déconnecté de sa source d’alimentation avant toute opération d’entretien, de réparation ou de remplacement de pièces. Ne faîtes fonctionner l'appareil qu’en utilisant le bloc d'alimentation fourni et uniquement à la tension indiquée sur l'étiquette située à l'arrière de l'instrument. Sécurité-2 Gilson PIPETMAX® 268 User’s Guide... -
Page 13: Dispositifs De Sécurité
Lorsque l'appareil est installé sous une hotte, le capteur externe doit faire face à la porte de la hotte et être positionné à 15 cm de cette porte. PIPETMAX 268 Configuration sous hotte où le dispositif de sécurité est un capteur externe Têtes de pipetage L'instrument est capable de générer des forces importantes, susceptibles d'entraîner des blessures à... -
Page 14: Plateau
Assurez-vous de n’utiliser exclusivement que les pièces détachées préconisées dans ce guide. Ne tentez pas de réparer ou remplacer des pièces ne figurant pas dans ce guide. Si le remplacement de pièces ne figurant pas dans ce guide s’avérait nécessaire, merci de contacter votre représentant Gilson local. -
Page 15: Introduction
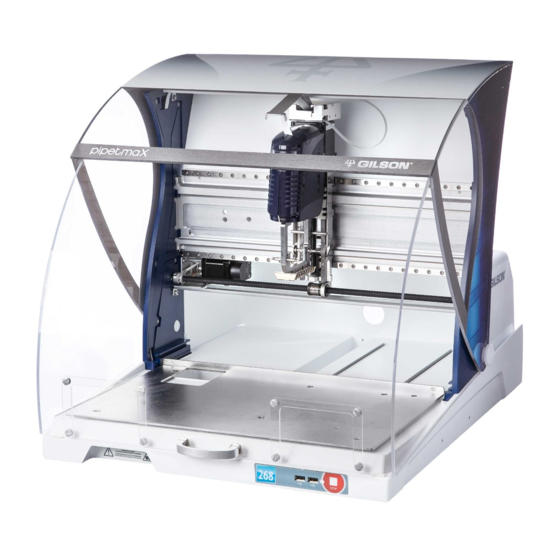
The PIPETMAX® 268 is a small footprint personal pipetting station used to perform repetitive, precise, pipetting actions. This chapter provides information on the following topics: • Unpacking • Technical Specifications • Customer Service • Repair and Return Policies PIPETMAX® 268 with optional riser for off-bed tip disposal Gilson PIPETMAX® 268 User’s Guide... -
Page 16: Unpacking
PIPETMAX® 268 with alignment head, dual eight-channel tip ejector foot, and rotating cover or external safety interlock sensor installed • USB Cable • Tip Reload Block • Tip Disposal Bin • USB Drive • Plug for Outlet on the Rear Panel • Power Supply • Power Cords Gilson PIPETMAX® 268 User’s Guide... -
Page 17: Accessories
Declaration of Conformity • Quality Control (QC) Checklist • Items Included Checklist • Setup Guide • Gilson Quality Control Report Pipette Head (one for each pipette head) Protocols • Alignment Protocol • Standard Liquid Handling Protocols with Documentation Accessories Required Some accessories are required, but are ordered separately. -
Page 18: Technical Specifications
Please be aware of the following before operating the PIPETMAX® 268. Changes or modifications to this device not expressly approved by Gilson could void the warranty. The instrument complies with part 15 of the FCC Rules. Operation is subject to the following two conditions: (1) This instrument may not cause harmful interference, and (2) this instrument must accept any interference received, including interference that may cause undesired operation. - Page 19 550 mm/sec 350 mm/sec Acceleration Speed Value 4000 mm/sec 900 mm/sec Default Power 100% Speed 1 mm/sec 140 mm/sec 120 mm/sec Acceleration Speed Value 4000 mm/sec 650 mm/sec PIPETMAX® 268 Technical Specifications (Page 2 of 2) Gilson PIPETMAX® 268 User’s Guide...
-
Page 20: Customer Service
Introduction Customer Service Gilson, Inc. and its worldwide network of authorized representatives provide customers with the following types of assistance: sales, technical support, applications, and instrument repair. If you need assistance, please contact your local Gilson representative. Specific contact information can be found at www.gilson.com. -
Page 21: Repair And Return Policies
Units covered under warranty will be repaired and returned to you at no charge. If you have any questions about applicability, contact your local Gilson representative. Non-Warranty Repair For out-of-warranty repairs, contact your local Gilson representative who will discuss service options with you and can assist in making arrangements to return the equipment, if necessary. Return Procedure Contact your local Gilson representative to obtain authorization before returning any Gilson equipment. -
Page 23: Setup/Operation
Setup/Operation The PIPETMAX® 268 and its components should be set up in the order described in this chapter. Gilson TRILUTION® micro provides software control of the PIPETMAX® 268 during setup and operation as described in this chapter. For more information about TRILUTION®... -
Page 24: Placement
• Refer to the instructions provided with the rack to modify the tray to allow for rack placement. • The orbital shaker can only be placed in the front row, left or right positions ONLY. Gilson PIPETMAX® 268 User’s Guide... -
Page 25: Installation
3 mm Allen wrench and gentle pressure to adjust the spacers on either side of the fixed tray (see figures). Spacers should just barely contact the removable tray. Remove and then replace the removable tray to ensure there is not any significant interference. Gilson PIPETMAX® 268 User’s Guide... -
Page 26: Connections
Rear Panel Diagrams PIPETMAX® 268 Rear Panel PIPETMAX® 268 Rear Panel Connections Input/Output USB host (Not Supported) USB host Ethernet (Not Supported) USB device RS-232 (Not Supported) HDMI (Not Supported) Power receptacle Power switch (MAINS) Gilson PIPETMAX® 268 User’s Guide... - Page 27 2-conductor cable (22–30 gauge for each wire) • wire insulation stripper A 6-foot piece of suitable cable (part number 709910206) is available for purchase from Gilson. To make connections with the 2-conductor cable: Cut the cable into pieces of appropriate length.
-
Page 28: Drain Connection (Optional)
AC power source. Drain Connection (Optional) The PIPETMAX bed includes a drain. Optionally, connect a 1/8" NPT fitting and drain tubing. Ensure that the waste container is lower than the bed of PIPETMAX. drain Gilson PIPETMAX® 268 User’s Guide... -
Page 29: Front Panel Diagram
(heater/chiller, barcode scanner, or shaker, for example). STOP In a situation where an emergency stop is required, pressing the STOP button stops PIPETMAX immediately. The protocol stops and results are displayed (after touching OK on the notification). Gilson PIPETMAX® 268 User’s Guide... -
Page 30: Power On And Start Up
Start TRILUTION® micro (PC users only). TRILUTION® micro starts automatically on the tablet. • Click the Start button and then select All Programs > Gilson Applications > TRILUTION micro > TRILUTION micro x.x. Close the rotating cover or hood door. PIPETMAX will not operate with the cover or hood door open. -
Page 31: User Management
“User name” may not be modified for the logged in user. • For the default administrator (admin), only “Password” and “Feature permissions” may be modified. Select Save to save, or Back to return to the previous screen without saving. Gilson PIPETMAX® 268 User’s Guide... -
Page 32: Add Users (Administrators Only)
Select a user from the list. Select Delete. A message will appear asking if you wish to delete the user. Select Yes to delete the user. Or, select No to close the message without deleting the user. 2-10 Gilson PIPETMAX® 268 User’s Guide... -
Page 33: Touchscreen Tablet Overview
To view the options to shut down the tablet and/or TRILUTION® micro, select • Touch Shut down to close TRILUTION micro and shut down the tablet. • Touch Restart TRILUTION micro to restart only the software, and not the tablet. • Touch Cancel to go back. Gilson PIPETMAX® 268 User’s Guide 2-11... -
Page 34: Run Alignment Protocol
Run the Alignment Protocol to ensure proper alignment. It is only necessary to run this protocol when setting up the instrument for the first time, or if instructed to do so by your local Gilson representative. Prepare to Run Alignment Protocol Pass the end of the alignment cable cord with pre-wired connector through the outlet at the back of PIPETMAX. -
Page 35: Run Alignment Protocol
Select Skip setup on the “Labware setup guide” screen. Select Run protocol. Wait approximately 3 minutes while the Alignment Protocol runs. A notification appears when the Alignment Protocol is complete. Select Continue. Gilson PIPETMAX® 268 User’s Guide 2-13... -
Page 36: Run Application Protocol
When prompted, scan the barcode on the pipette head. • Enter the values from the Gilson Quality Control Report supplied with each pipette head. • Using the optional barcode scanner (ordered separately), select Scan, and then scan the barcode on the pipette head. -
Page 37: Run Application Protocol
Select Skip setup to skip setup instructions and go to the “Wizard complete” screen. Initial volumes will be set to the default values or the values used the last time the protocol was run. Gilson PIPETMAX® 268 User’s Guide 2-15... - Page 38 Select Pipette Head Serial Number) • Review Initial Volumes • Run Protocol Gather Materials (Materials List) Gather the materials in the Materials list and a tip reload block for each rack, and then select Next. 2-16 Gilson PIPETMAX® 268 User’s Guide...
- Page 39 Remove the tip ejector foot. Slide the tip ejector foot for eight and one channel onto the ejector leg. Use the supplied 3/32" hex wrench to start threading the shoulder screw, but do not fully tighten. Gilson PIPETMAX® 268 User’s Guide 2-17...
- Page 40 If using a MAX8x20 or MAX8x200 pipette head, skip to the next step (Select Pipette Head Serial Number). Manually move the tip ejector foot down to the bottom, and while holding it down, tighten the shoulder screw. 2-18 Gilson PIPETMAX® 268 User’s Guide...
- Page 41 When prompted, scan the barcode on the pipette head. • Enter the values from the Gilson Quality Control Report supplied with each pipette head. • Using the optional barcode scanner (ordered separately), select Scan, and then scan the barcode on the pipette head.
- Page 42 To remove the tip rack from the removable tray: Loosen the thumbscrew for each clip. Rotate each clip away from the tip reload block. Lift the tip rack off the removable tray. Remove the tip pack from the tip reload block. 2-20 Gilson PIPETMAX® 268 User’s Guide...
- Page 43 Review Initial Volumes Review initial volumes, make any desired, allowable changes, and then select Next. Run Protocol Select Run protocol. When prompted, it is recommended to simulate if this is the first time running the protocol. Gilson PIPETMAX® 268 User’s Guide 2-21...
- Page 44 Select a rack to go to the “Labware setup” screen. Review Initial Volumes Review initial volumes, make any desired, allowable changes, and then select Next. Wizard Complete On the “Wizard complete” screen, select Run protocol. When prompted, it is recommended to simulate. 2-22 Gilson PIPETMAX® 268 User’s Guide...
-
Page 45: Pause Or Stop A Running Protocol
When prompted, select Continue to resume the run, or Stop to end the run and view the results. STOP To stop PIPETMAX immediately, press the red STOP button on the front of PIPETMAX. Gilson PIPETMAX® 268 User’s Guide 2-23... -
Page 46: View Results
The top of the screen shows the status, the name of the protocol, the time it took to run or simulate the protocol and generate the results, and the time of execution for the last step. 2-24 Gilson PIPETMAX® 268 User’s Guide... -
Page 47: Labware View
The top of the screen shows the status, the name of the protocol, the time it took to run or simulate the protocol and generate the results, and the time of execution for the last step. Tip Rack Source Destination Tip Waste Gilson PIPETMAX® 268 User’s Guide 2-25... -
Page 48: Volume View
The top of the screen shows the status, the name of the protocol, the time it took to run or simulate the protocol and generate the results, and the time of execution for the last step. 2-26 Gilson PIPETMAX® 268 User’s Guide... -
Page 49: Run Report
Browse for and select the USB drive, name the file (or accept the default name, which is the name of the protocol), and then select Save. The Run Report is saved to the location. Open the file on a PC. Gilson PIPETMAX® 268 User’s Guide 2-27... -
Page 50: Export Protocol
The protocol is saved to the location with a .SQLITE extension. Log Out Select to go to the “Home” screen. Select Return to TRILUTION micro. Select Log out to allow another user to log in to the software. 2-28 Gilson PIPETMAX® 268 User’s Guide... -
Page 51: Messages
TRILUTION® micro will display a message if a known error is encountered. This chapter describes some of the more common errors and how to prevent or resolve them. This chapter includes: • Communication • Simulation • Hood Open • Insufficient Volume/Excessive Volume • Refill Tip Rack Gilson PIPETMAX® 268 User’s Guide... -
Page 52: Communication
The preferred way to stop a run is via the on-screen pause button. In an emergency, press the STOP button on the front panel of PIPETMAX. For more information, refer to Pause or Stop a Running Protocol on page 2-23. On-screen pause button Gilson PIPETMAX® 268 User’s Guide... -
Page 53: Insufficient Volume/Excessive Volume
Continue. Note: Use two hands and lift carefully when removing the empty tip pack from the tip reload block. Jarring movements could cause spillage of liquids from other racks. Gilson PIPETMAX® 268 User’s Guide... -
Page 55: Maintenance
Maintenance PIPETMAX is designed to require a minimum level of maintenance. This chapter includes information about: • Cleaning • Add Pipette Heads • Replace Pipette Heads • Convert Blank Head into Alignment Head Gilson PIPETMAX® 268 User’s Guide... -
Page 56: Cleaning
Align the bracket on the blank head as shown in the illustration. Pull down on the bracket to lock it in place. Gilson PIPETMAX® 268 User’s Guide... -
Page 57: Replacement Parts
Part Number Description 32100000 PIPETMAX 268 WITH STANDARD COVER 32100001 PIPETMAX 268 WITH COVER CUTOUTS 32100002 PIPETMAX 268 W EXTERNAL SAFETY INTERLOCK TRILUTION® micro Software Part Number Description 32000302 TRILUTION® MICRO INSTALLED ON TOUCHSCREEN TABLET 32000285 TRILUTION® MICRO ON USB DRIVE FOR PC INSTALL... -
Page 58: Tip Ejector Feet
Appendix Tip Ejector Feet Part Number Description 32000146 PIPETMAX TIP EJECTOR FOOT DUAL 8 CH 32000284 PIPETMAX 268 EJECTOR FOOT KIT 8 & 1 CH Tips Part Number Description F172210 DIAMOND BLISTER, DSL10, 960 AUTO TIPS F172211 DIAMOND BLISTER, DSL10ST, 960 AUTO TIPS... -
Page 59: Racks
HAND HELD MICROSCAN 2D BARCODE READER 32000241 TABLET HOLDER Miscellaneous Part Number Description 54210001 PIPETMAX 268 PLUG FOR BACK COVER 32000174 PIPETMAX ALIGNMENT HEAD 32000275 PIPETMAX 268 PIPETTE HEAD NUT (QTY 5) SET 32000012 USB A MALE-B MALE 2M BLK Gilson PIPETMAX® 268 User’s Guide...
Need help?
Do you have a question about the PIPETMAX 268 and is the answer not in the manual?
Questions and answers