Gilson PIPETMAX 268 Setup Manual
Hide thumbs
Also See for PIPETMAX 268:
- User manual (59 pages) ,
- User manual (44 pages) ,
- Installation qualification/operational qualification procedures (8 pages)

Related Manuals for Gilson PIPETMAX 268


Summary of Contents for Gilson PIPETMAX 268
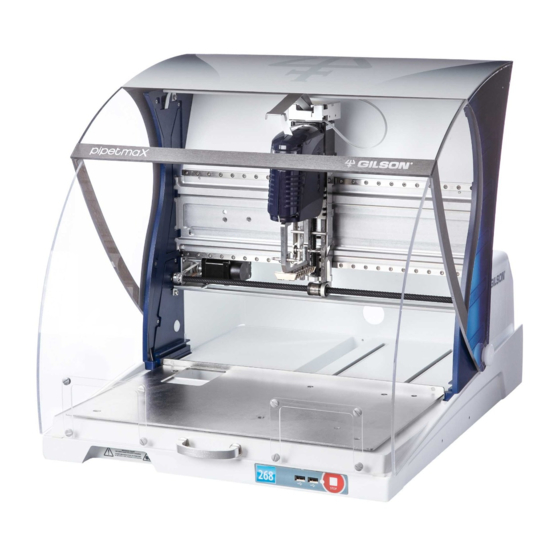
- Page 1 OVERVIEW Unpacking Install Removable Tray Make Connections and Power On Run PIPETMAX Alignment Utility Prepare to Run Protocol Run Protocol PIPETMAX® 268 Setup Guide gilson.com/contactus...
- Page 2 UNPACKING PIPETMAX is delivered with most major components already assembled. Keep the original packaging if PIPETMAX must be returned to the factory. Installation Site Requirements Accessories and Documentation ● Allen wrench Power Requirements (External Power Supply) (for removing shipping bracket) Voltage Input ●...
- Page 3 Instructions These instructions assume that you have already cut the shipping straps and tape and have cut open the box. Remove the open-ended cardboard box. Remove the box of accessories and open it. Lift the printed, outer cardboard box up to remove. It is recommended that two people lift PIPETMAX out of the box as it weighs approximately CAUTION 24.9 kg (55 lbs.).
- Page 4 Place PIPETMAX with cover on a lab bench. PIPETMAX is configured with one of two safety interlocks. One interlock is internal to the rotating cover installed on the instrument, and the other interlock is an external sensor used when the instrument is located in a hood. The safety interlocks prevent the instrument from operating when the rotating cover or hood door is open.
- Page 5 Remove the shipping screws and bracket using the tool provided and then store the shipping screws and bracket in the rear panel for future use if PIPETMAX needs to be shipped or transported. Remove the shipping brace from the rear panel by loosening the thumb screws securing the shipping brace to PIPETMAX.
- Page 6 II INSTALL REMOVABLE TRAY A removable tray for placement of labware and tip racks is required. There are two removable tray options: ● 9-position removable tray (microplate footprints, but not for 384-well microplates) ● 9-position removable tray for 384-well microplates While holding the handles on the sides of the tray, lower the removable tray onto the fixed tray.
- Page 7 If it seems that the removable tray is shifting position on the fixed tray, use a 3 mm Allen wrench and gentle pressure to adjust the spacers on either side of the fixed tray. Spacers should just barely contact the removable tray. Remove and then place the removable tray again to ensure there is not any significant interference.
- Page 8 III MAKE CONNECTIONS AND POWER ON PIPETMAX® Rear Panel Connections Input/Output 2. USB host (Not Supported) 3. USB host 4. Ethernet (Not Supported) 5. USB device 6. RS-232 (Not Supported) HDMI (Not Supported) 8. Power receptacle 9. Power switch (MAINS)
- Page 9 Use the USB cable supplied in the accessory package to make the connection between the USB device port on PIPETMAX and a USB port on the supplied tablet or PC. The connection from the external power supply to PIPETMAX uses a connector with a locking collar.
- Page 10 Run the PIPETMAX Alignment Utility to ensure proper alignment. It is only necessary when setting up the instrument for the first time, or if instructed to do so by your local Gilson representative. If your PIPETMAX does not have a rotating...
- Page 11 The clips to secure the tip racks on the tray can interfere with the alignment. Ensure that the clips ( ) are positioned as shown in the diagram below, and that the thumbscrews have been tightened. Clip Locations Close the rotating cover or the fume hood door.
- Page 12 Start Start the PIPETMAX Alignment Utility. On the PC or tablet, select the button and then select (All apps) > Gilson Applications > PIPETMAX Alignment Utility.
- Page 13 Start Alignment. A message box appears: Select...
- Page 14 Select to start running the utility. Wait approximately six minutes while the alignment runs. If the rotating cover or fume hood door is opened while running, the alignment is canceled. NOTE A notification appears when the alignment is complete. Remove the alignment head.
- Page 15 Remove the alignment head by disconnecting the terminal block connector from the rear panel, and then removing the thumb nuts securing it to the upper pipette head assembly. Alignment Head Removal...
- Page 16 Cover the hole on the rear panel from the exterior using the black plug supplied in the accessory package. black plug...
- Page 17 If your PIPETMAX does not have a rotating cover, it requires an external safety interlock. The external safety interlock was disconnected prior to running the alignment. Reconnect the BOTTOM terminal block connector to the input/output ports on the rear panel. Close the PIPETMAX Alignment Utility.
- Page 18 Set the serial number. If the serial number is not entered, then the software will not be able to communicate with PIPETMAX. The serial number is set on the tablet by Gilson. PC installations require the user to enter the serial number.
- Page 19 Next, select in the upper right corner to close the software. Select when asked to confirm Start and then restart the software. (Select the button and then select (All apps) > Gilson Applications > TRILUTION micro x.x.)
- Page 20 Build a protocol list. Import Protocol or Create Protocol or Labware...
- Page 21 Do either of the following: a. Import a protocol that was created in Protocol Builder. If your protocol file is on a USB drive, connect it to a USB on the PC, one of the USB ports on the front of PIPETMAX, or the middle USB host port on the rear panel. (The top USB port on the rear panel is not supported.) Select Import, then browse for and select a PIPETMAX protocol file (.sqlite).
- Page 22 When prompted, scan the barcode on the pipette head. ● Enter the values from the Gilson Quality Control Report supplied with each pipette head. ● Using the optional barcode scanner (ordered separately), select...
- Page 24 On the Protocol Selection screen, select a protocol in the list. It will highlight when selected. Select Next. The Scanning dialog appears while the software checks that the PIPETMAX is connected. If connected, the software goes to the next screen, which is the Run setup screen. If not connected, a message appears notifying you that you are not connected and asking if you want to simulate or check your cabling connections and try again to run.
- Page 25 VI RUN PROTOCOL If the there are variable(s) in the selected protocol without a default value, a screen with a list of variables is displayed automatically or you can modify the variable values by selecting Variables. The Variables screen displays a list of variables that must be satisfied before running the protocol.
- Page 26 Close the rotating cover or hood door. PIPETMAX will not operate with the cover or hood door open. Install pipette heads. Select Head setup to go to the screen for selecting or adding pipette heads. Select Head setup Pipette Heads Selected Do Not Match Pipette Heads Used in Protocol...
- Page 27 to close the Configure heads warning message. Select Open the rotating cover or fume hood door.
- Page 28 Install the tip ejector foot. If using a MAX8x20 or MAX8x200 pipette head, skip this step. If using the MAX1000 or MAX4x1200 pipette head, you ordered a tip ejector foot kit specific to the pipette head. screw foot Tip Ejector Foot Components...
- Page 29 Tip Ejector Foot Installation a. Using the supplied 3/32" hex wrench, remove the shoulder screw in the installed tip ejector foot. b. Remove the tip ejector foot. Slide the tip ejector foot onto the channel in the ejector leg. d. Use the supplied 3/32" hex wrench to start threading the shoulder screw, but do not fully tighten.
- Page 30 Install the pipette head(s) on the upper pipette head assembly using the thumb nuts. Ensure proper alignment of the pipette head against the upper pipette head assembly before tightening the thumb nuts. Pipette Head Installation...
- Page 31 Finish tip ejector foot installation on a MAX1000 or MAX4x1200 pipette head. Manually move the tip ejector foot down to the bottom, and while holding it down, tighten the shoulder screw. Tighten Shoulder Screw to Finish Tip Ejector Foot Installation...
- Page 32 Select the serial number of each installed pipette head. From the drop-down list below each pipette head image, select the serial number of the pipette head installed in each position (left and/or right). The software automatically filters pipette heads that have been added by type. Close the rotating cover or the fume hood door and then select Back.
- Page 33 configuration. The tray image in the upper left identifies location of each tip rack Select and all labware. a. Each tip rack consists of a rack of PIPETMAN® DIAMOND Tips and a tip reload block. To assemble the tip rack, first open the sealed BLISTER REFILL, lift the rack of tips out, and then set the rack of tips on the tip reload block.
- Page 34 b. Remove the cover, if applicable. Tip racks can only be placed in positions with installed clips. To install the tip rack, first loosen the thumbscrew for each clip, and then place the tip rack on the removable tray with the beveled corner in the back left corner.
- Page 35 d. Rotate each clip so that it will effectively secure the tip rack on the tray as shown in the image below. Clips Rotated Into Position to Secure Tip Rack on Tray e. Tighten the thumbscrew for each clip. Ensure that the illustration on-screen in TRILUTION micro matches your tip setup. The colors indicate the following information: White - Missing tips Pink - Tips...
- Page 36 g. Select in the Tips missing, left or Tips missing, right field and then specify the number of missing tips. The software will indicate missing tips starting from the bottom left corner for Tips missing, left. The software will indicate missing tips starting from the bottom right corner for Tips missing, right.
- Page 37 Setup. The tip waste bin is displayed. The tray image in the upper left identifies the Select location of the bed elements. Labware Setup Screen Next Back Select to advance to the next bed element that is not a tip box. Select to return to the previously selected bed element.
- Page 38 a. Ensure that the illustration matches your bed setup. When a bed element is selected, the tray image in the upper left identifies the current, selected bed element. If a well/tube is selected, it is highlighted red in the plate/rack image. ●...
- Page 39 Select Run. When prompted, it is recommended to simulate if this is the first time running the protocol. Run - Tray View...
- Page 40 LT255518-06 gilson.com/contactus...
Need help?
Do you have a question about the PIPETMAX 268 and is the answer not in the manual?
Questions and answers