Oracle Database Appliance X6-2-HA Owner's Manual
Hide thumbs
Also See for Database Appliance X6-2-HA:
- Manual (254 pages) ,
- Service manual (300 pages) ,
- Deployment and user's manual (473 pages)
Table of Contents
Advertisement
Quick Links
Advertisement
Chapters
Table of Contents

Related Manuals for Oracle Database Appliance X6-2-HA


Summary of Contents for Oracle Database Appliance X6-2-HA
- Page 1 Oracle Database Appliance Owner's Guide Part No: E83414-03 March 2017...
- Page 3 Oracle. Oracle Corporation and its affiliates will not be responsible for any loss, costs, or damages incurred due to your access to or use of third-party content, products, or services, except as set forth in an applicable agreement between you and Oracle.
- Page 4 Oracle Corporation et ses affiliés déclinent toute responsabilité ou garantie expresse quant aux contenus, produits ou services émanant de tiers, sauf mention contraire stipulée dans un contrat entre vous et Oracle. En aucun cas, Oracle Corporation et ses affiliés ne sauraient être tenus pour responsables des pertes subies, des coûts occasionnés ou des dommages causés par l’accès à...
-
Page 5: Table Of Contents
2 Overview of Oracle Database Appliance ............ 11 Supported Components and Capabilities ............ 11 Oracle Database Appliance X6-2 Series Components and Capabilities ..... 12 Oracle Database Appliance Version 1 and Models X3-2, X4-2 and X5-2 Components and Capabilities .............. 15 Oracle Database Appliance X6-2S/X6-2M/X6-2L Front and Back Panels .... 19 Oracle Database Appliance X6-2S/X6-2M Front Panel ......... - Page 6 Inserting Oracle Database Appliance Into a Rack .......... 62 Inserting Oracle Database Appliance X6-2S/X6-2M/X6-2L Into a Rack ... 63 Inserting Oracle Database Appliance X3-2/X4-2/X5-2 and X6-2-HA Into a Rack .................... 65 Inserting Oracle Database Appliance Version 1 Into a Rack ...... 92 Index ........................ 113 Oracle Database Appliance Owner's Guide • March 2017...
-
Page 7: Preface
Documentation Link All Oracle products http://docs.oracle.com Oracle Database Appliance http://www.oracle.com/goto/oda/docs Oracle Integrated Lights Out Manager (Oracle ILOM) http://www.oracle.com/goto/ilom/docs Provide feedback on this documentation: http://www.oracle.com/goto/docfeedback Change History The following lists the release history of this documentation set: February 2017. Initial publication. - Page 8 Oracle Database Appliance Owner's Guide • March 2017...
-
Page 9: Oracle Database Appliance Setup Tasks
1 ♦ ♦ ♦ C H A P T E R 1 Oracle Database Appliance Setup Tasks This chapter describes the tasks you must complete when setting up Oracle Database Appliance. Task Checklist Step Task Refer to Access the online product documentation for your http://www.oracle.com/goto/oda/docs... - Page 10 Oracle Database Appliance Owner's Guide • March 2017...
-
Page 11: Overview Of Oracle Database Appliance
♦ ♦ ♦ C H A P T E R 2 Overview of Oracle Database Appliance This chapter describes Oracle Database Appliance features. There are several versions of Oracle Database Appliance and this document covers all versions: Oracle Database Appliance X6-2-HA (High Availability) ■... -
Page 12: Oracle Database Appliance X6-2 Series Components And Capabilities
Supported Components and Capabilities Oracle Database Appliance X6-2 Series Components and Capabilities The following table lists supported components and capabilities for the Oracle Database Appliance X6-2 series systems. Component Oracle Database Appliance Oracle Database Appliance Oracle Database Appliance Oracle Database Appliance... - Page 13 ■ PCIe slot 3: Dual-port External 12Gb/s SAS3 host bus adapter ■ PCIe slot 4: Dual-port Internal 12Gb/s SAS3 host bus adapter Cluster One integrated cluster device device with node-to-node interconnection is provided Chapter 2 • Overview of Oracle Database Appliance...
- Page 14 Oracle Database Appliance Owner's Guide • March 2017...
-
Page 15: Oracle Database Appliance Version 1 And Models X3-2, X4-2 And X5-2 Components And Capabilities
Oracle Database Appliance Version 1 and Models X3-2, X4-2 and X5-2 Components and Capabilities The following table lists supported components and capabilities for the Oracle Database Appliance Version 1, Oracle Database Appliance X3-2, Oracle Database Appliance X4-2 and Oracle Database Appliance X5-2. - Page 16 Gen-3 slots for each server Gen-3 slots for each server Gen-3 slots for each server contain: node. They contain: node. They contain: node. They contain: ■ PCIe slot 1: Dual Port QDR InfiniBand M3 Oracle Database Appliance Owner's Guide • March 2017...
- Page 17 Note - Optionally, you can purchase the Sun Dual 10GbE SFP+ PCIe 2.0 Low Profile Adapter as a replacement for the standard InfiniBand adapter if an Ethernet fiber connection Chapter 2 • Overview of Oracle Database Appliance...
- Page 18 Each power supply (server Each power supply (server node and storage shelf) has node and storage shelf) has node and storage shelf) has its own cooling fans. its own cooling fans. its own cooling fans. Oracle Database Appliance Owner's Guide • March 2017...
-
Page 19: Oracle Database Appliance X6-2S/X6-2M/X6-2L Front And Back Panels
Oracle Database Appliance X6-2S/X6-2M Front Panel Oracle Database Appliance X6-2S and Oracle Database Appliance X6-2M servers each occupy 1RU. The following figure shows the components on the front panel of an Oracle Database Appliance X6-2S/X6-2M. Chapter 2 • Overview of Oracle Database Appliance... -
Page 20: Oracle Database Appliance X6-2S/X6-2M Back Panel
Power/OK LED: green 17 - 18 HDD filler Power button DVD filler Oracle Database Appliance X6-2S/X6-2M Back Panel The following figure shows the components on the back panel of an Oracle Database Appliance X6-2S/X6-2M. Oracle Database Appliance Owner's Guide • March 2017... -
Page 21: Oracle Database Appliance X6-2L Front Panel
SAS storage. Oracle Database Appliance X6-2L Front Panel The Oracle Database Appliance X6-2L server occupies 2RU. The following figure shows the components on the front panel of an Oracle Database Appliance X6-2L. Chapter 2 • Overview of Oracle Database Appliance... -
Page 22: Oracle Database Appliance X6-2L Back Panel
System Over Temperature Warning LED: amber SP OK LED: green USB 2.0 connectors (2) Oracle Database Appliance X6-2L Back Panel The following figure shows the components on the Oracle Database Appliance X6-2L back panel. Oracle Database Appliance Owner's Guide • March 2017... -
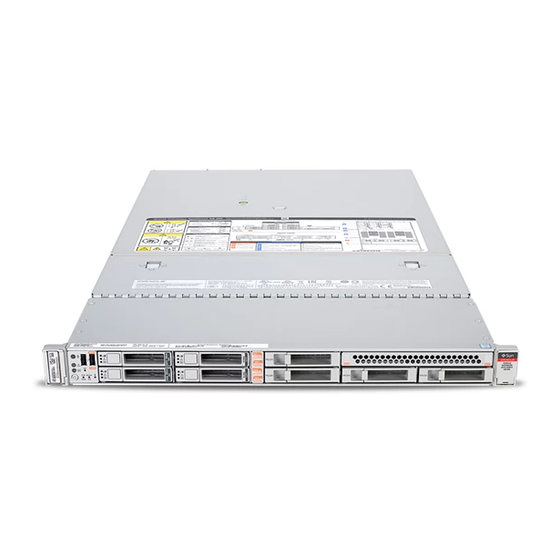
Page 23: Oracle Database Appliance X6-2-Ha Front And Back Panels
RJ-45 connectors card Oracle Database Appliance X6-2-HA Front and Back Panels This section describes Oracle Database Appliance X6-2-HA front and back panels. If you have Oracle Database Appliance X6-2S/X6-2M/X6-2L, see “Oracle Database Appliance Chapter 2 • Overview of Oracle Database Appliance... -
Page 24: Oracle Database Appliance X6-2-Ha Front Panel
Oracle DE3-24C storage shelf. The entire unit occupies 6RU. The optional storage expansion shelf requires an additional 4RU, increasing the total to 10RU. The following figure shows the front of Oracle Database Appliance X6-2-HA with an optional storage expansion shelf. - Page 25 Server node 0 Storage shelf (DE3-24C) Optional storage expansion shelf (DE3-24C) Server Node Front Panel Features The following figure shows the components on the front panel of an Oracle Database Appliance X6-2-HA server node. Chapter 2 • Overview of Oracle Database Appliance...
- Page 26 Power button DVD filler When contacting Oracle Support Services, use the Top Level Identifier (TLI) instead of Note - the serial number. You can find the TLI by looking at the top of either server node or on the top of the storage shelf.
-
Page 27: Oracle Database Appliance X6-2-Ha Back Panel
Drive fault indicator Drive power/activity indicator Oracle Database Appliance X6-2-HA Back Panel This section describes the back panel features for Oracle Database Appliance X6-2-HA. The following figure shows the Oracle Database Appliance X6-2-HA. Chapter 2 • Overview of Oracle Database Appliance... - Page 28 Server node 0 Storage shelf (DE3-24C) Optional storage expansion shelf (DE3-24C) Server Node Back Panel Features The following figure shows the components on the Oracle Database Appliance X6-2-HA server node back panel. Oracle Database Appliance Owner's Guide • March 2017...
- Page 29 Oracle Database Appliance X6-2-HA Front and Back Panels Callout Description Callout Description Power Supply (PS) 0 with fan module NET MGT port. Service processor 10/100/1000Base-T network interface port with RJ-45 connector used to connect to Oracle Integrated Lights Out Manager...
- Page 30 Storage Shelf Back Panel Features The following figure shows the Oracle Database Appliance X6-2-HA storage shelf back panel features. Caution - The network ports on the storage shelf are intended for use by service engineers only.
-
Page 31: Oracle Database Appliance X5-2 Front And Back Panels
SAS I/O module 0 Power Supply with Fan Module 1 Oracle Database Appliance X5-2 Front and Back Panels This section describes Oracle Database Appliance X5-2 front and back panels. If you have Oracle Database Appliance X6-2 series, see “Oracle Database Appliance X6-2S/X6-2M/X6-2L Front and Back Panels”... - Page 32 Server node 0 Storage shelf (DE2-24C) Optional storage expansion shelf (DE2-24C) Server Node Front Panel Features The following figure shows the components on the front panel of an Oracle Database Appliance X5-2 server node. Oracle Database Appliance Owner's Guide • March 2017...
- Page 33 Power button DVD filler When contacting Oracle Support Services, use the Top Level Identifier (TLI) instead of Note - the serial number. You can find the TLI by looking at the top of either server node or on the top of the storage shelf.
-
Page 34: Oracle Database Appliance X5-2 Back Panel
Drive power/activity indicator Drive fault indicator Oracle Database Appliance X5-2 Back Panel This section describes the back panel features for Oracle Database Appliance X5-2. The following figure shows the Oracle Database Appliance X5-2. Oracle Database Appliance Owner's Guide • March 2017... - Page 35 Server node 1 Server node 0 Storage shelf (DE2-24C) Optional storage expansion shelf (DE2-24C) Server Node Back Panel Features The following figure shows the components on the Oracle Database Appliance X5-2 server node back panel. Chapter 2 • Overview of Oracle Database Appliance...
- Page 36 Oracle Database Appliance X5-2 Front and Back Panels Callout Description Callout Description Power Supply (PS) 0 with fan module NET MGT port. Service processor 10/100/1000Base-T network interface port with RJ-45 connector used to connect to Oracle Integrated Lights Out Manager...
- Page 37 Oracle Database Appliance X5-2 Front and Back Panels Storage Shelf Back Panel Features The following figure shows the Oracle Database Appliance X5-2 storage shelf back panel features. The network ports on the storage shelf are intended for use by service engineers only.
-
Page 38: Oracle Database Appliance X3-2/X4-2 Front And Back Panels
Oracle Database Appliance X3-2/X4-2 includes two server nodes (either two Sun Server X3- 2's, or two Sun Server X4-2's) and an Oracle DE2-24P storage shelf. The entire unit occupies 4RU. The optional DE2-24P storage expansion shelf requires an additional 2RU, increasing the total to 6RU. - Page 39 Server node 0 Storage shelf (DE2-24P) Optional storage expansion shelf (DE2-24P) Server Node Front Panel Features The following figure shows the components on the front panel of an Oracle Database Appliance X3-2/X4-2 server node. Chapter 2 • Overview of Oracle Database Appliance...
- Page 40 Power Supply (PS) Fault LED: amber HDD filler When contacting Oracle Support Services, use the Top Level Identifier (TLI) instead of Note - the serial number. You can find the TLI by looking at the top of either server node or on the top of the storage shelf.
-
Page 41: Oracle Database Appliance X3-2/X4-2 Back Panel
This section describes the back panel features for Oracle Database Appliance X3-2/X4-2. The following figure shows the Oracle Database Appliance X4-2. The Oracle Database Appliance X3-2 and Oracle Database Appliance X4-2 are identical except for the network card in PCIe slot 1 (see “Server Node Back Panel Features”... - Page 42 Server node 0 Storage shelf (DE2-24P) Optional storage expansion shelf (DE2-24P) Server Node Back Panel Features The following figure shows the components on the Oracle Database Appliance X3-2/X4-2 server node back panel. Oracle Database Appliance Owner's Guide • March 2017...
- Page 43 Oracle Database Appliance X3-2/X4-2 Front and Back Panels Callout Description Callout Description Power Supply (PS) 0 with fan module NET MGT port. Service processor 10/100BASE-T network interface port with RJ-45 connector used to connect to Oracle Integrated Lights Out Manager (ILOM)
- Page 44 Storage Shelf Back Panel Features The following figure shows the Oracle Database Appliance X3-2/X4-2 storage shelf back panel features. The network ports on the storage shelf are intended for use by service engineers only.
-
Page 45: Oracle Database Appliance Version 1 Front And Back Panels
■ Oracle Database Appliance Version 1 Front Panel Oracle Database Appliance Version 1 includes two server nodes, SN0 and SN1. SN0 is on the bottom and SN1 is on the top. Server nodes are also called system controllers. The following figure shows Oracle Database Appliance Version 1 front panel and describes its components. - Page 46 Oracle Database Appliance Version 1 Front and Back Panels The system has two each of items 1 through 8; one for each server node. It has only one Note - RFID, product serial number tag, and, drive map. Callout Description...
-
Page 47: Oracle Database Appliance Version 1 Back Panel
Oracle Database Appliance Version 1 Front and Back Panels Oracle Database Appliance Version 1 Back Panel The following figure shows Oracle Database Appliance Version 1 back panel and identifies the components on SN0. The components on SN1 are identical. Callout... -
Page 48: Oracle Database Appliance Specifications
“Physical Specifications” on page 48 ■ “Electrical Specifications” on page 50 ■ “Environmental Specifications” on page 51 ■ Physical Specifications This section describes the physical specifications for the various versions of Oracle Database Appliance. Oracle Database Appliance Owner's Guide • March 2017... - Page 49 Oracle Database Appliance Specifications Physical Specifications for Oracle Database Appliance X6-2 Series Item Oracle Database Oracle Database Oracle Database Oracle Database Appliance X6-2S Appliance X6-2M Appliance X6-2L Appliance X6-2-HA Height 42.6 mm (1.7 in) 42.6 mm (1.7 in) 87.6 mm (3.5 in) 42.6 mm (1.7 in) per...
-
Page 50: Electrical Specifications
Oracle Database Appliance Specifications Electrical Specifications This section describes the electrical specifications for the various versions of Oracle Database Appliance. Electrical Specifications for Oracle Database Appliance X6-2 Series Item Oracle Database Oracle Database Oracle Database Oracle Database Appliance X6-2S Appliance X6-2M... -
Page 51: Environmental Specifications
■ Maximum: 699W Storage shelf ■ Typical: 469W ■ Maximum: 699W ■ Typical: 325W Environmental Specifications This section describes the environmental specifications for a single, non-racked Oracle Database Appliance. Environmental Specifications for Oracle Database Appliance X6-2 Series Item Oracle Database... - Page 52 ° ° ° ° ° ° Nonoperating C to 70 C (-40 F to 158 C to 70 C (-40 F to 158 C to 70 C (-40 F to 158 temperature Oracle Database Appliance Owner's Guide • March 2017...
-
Page 53: Technical Support
(LwAd: 1 B=10 dB) (LwAd: 1 B=10 dB) 7.0 Bels A-weighted idling Technical Support For technical support, go to: https://support.oracle.com When requesting technical support for Oracle Database Appliance, report the following to Oracle Support Services: Chapter 2 • Overview of Oracle Database Appliance... - Page 54 For Oracle Database Appliance X3-2, Oracle Database Appliance X4-2, Oracle Database 1 or Oracle Database Appliance X6-2S/X6- Appliance X5-2 and Oracle Database Appliance X6-2-HA, report the Top Level Identifier 2M/X6-2L, report the serial number located (TLI). To see the TLI, look on the Customer Information Sheet or look at the top of a server on the front panel of the system, the top of node or storage shelf on the left-hand side towards the front.
-
Page 55: Site Preparation
3 ♦ ♦ ♦ C H A P T E R 3 Site Preparation This chapter describes the tasks you must complete before installing Oracle Database Appliance into a rack and cabling it. Preparing Your Site Use the following procedure to prepare your site for Oracle Database Appliance installation:... - Page 56 Caution - system. Do not mix components from different shipments; this could cause the system to fail. It should contain: Oracle Database Appliance Version 1 and Models X6- Oracle Database Appliance X3-2/X4-2/X5-2 and X6-2-HA 2S/X6-2M/X6-2L ■ The server nodes include: ■...
-
Page 57: Installing The System Into A Rack
These procedures describe how to insert the system into a rack. For cabling instructions, Note - refer to the appropriate Deployment and User's Guide for the Oracle Database Appliance X6 series or the Getting Started Guide for the Oracle Database Appliance X3-2/X4-2/X5-2 or Version 1. -
Page 58: Optional Component Installation
The following optional components can be ordered separately: DIMM memory kits: ■ For Oracle Database Appliance X6-2S, you have the option of ordering memory ■ expansion to 384 GB. Memory kits come in sets of 8 x 32 GB DIMMs. -
Page 59: Safety Precautions When Rackmounting
Other optional configurations: ■ For Oracle Database Appliance X5-2, you have the option of ordering two Sun Dual 10GbE SFP+ PCIe 2.0 Low Profile Adapters to replace the two standard InfiniBand adapters (one in each server node) to support an Ethernet fiber connection to the data center or public network (it cannot be used for the appliance private node-to-node connection). -
Page 60: Esd Precautions
Two-post racks are not Two-post racks are not compatible. compatible. compatible. Space available Must have 1RU (rack Must have 2RU of space 6RU without optional units) of space available. available. storage expansion shelf. Oracle Database Appliance Owner's Guide • March 2017... - Page 61 Series” on page 49 Storage shelf dimensions “Physical Specifications for Oracle Database Appliance X6-2 Series” on page 49 For Oracle Database Appliance Version 1 and Oracle Database Appliance X3-2/X4-2/X5-2: Feature Oracle Database Oracle Database Oracle Database Appliance Version 1 Appliance X3-2/X4-2...
-
Page 62: Inserting Oracle Database Appliance Into A Rack
Inserting Oracle Database Appliance Into a Rack This section describes how to install an Oracle Database Appliance into a rack as follows: “Inserting Oracle Database Appliance X6-2S/X6-2M/X6-2L Into a Rack” on page 63 ■... -
Page 63: Inserting Oracle Database Appliance X6-2S/X6-2M/X6-2L Into A Rack
2M/X6-2L Into a Rack This section describes how to install Oracle Database Appliance X6-2S/X6-2M/X6-2L server into a rack. If you are installing an Oracle Database Appliance X3-2, Oracle Database Appliance X4-2, or Oracle Database Appliance X5-2, see “Inserting Oracle Database Appliance X3-2/X4-2/X5-2 and X6-2-HA Into a Rack”... - Page 64 Installing the Server Node Into a Rack Use the instructions in this section to install Oracle Database Appliance X6-2 series server node in the rack. Oracle Database Appliance Owner's Guide • March 2017...
-
Page 65: Inserting Oracle Database Appliance X3-2/X4-2/X5-2 And X6-2-Ha Into A Rack
Stabilize the Rack for Installation The links in the following table take you to instructions outside of the Oracle Database Note - Appliance library to the Oracle Server X6-2 or Oracle Server X6-2L documentation libraries. Use your browser's Back button to return to the Oracle Database Appliance library. -
Page 66: Contents Of The Shipping Pallet
Contents of the Shipping Pallet Oracle Database Appliance X3-2, Oracle Database Appliance X4-2, Oracle Database Appliance X5-2 and Oracle Database Appliance X6-2-HA are shipped with the entire system on a single pallet. It includes all server nodes, storage shelves, mounting hardware, cables, and labels. -
Page 67: Tools And Equipment Needed
Check to ensure that all components have the same TLI numbers (a TLI part number and TLI serial number). Tools and Equipment Needed Obtain the following tools and equipment before beginning the installation of Oracle Database Appliance X3-2, Oracle Database Appliance X4-2, Oracle Database Appliance X5-2, or Oracle Database Appliance X6-2-HA. -
Page 68: Applying Labels
Oracle Database Appliance X3-2, Oracle Database Appliance X4-2, Oracle Database Appliance X5-2 and Oracle Database Appliance X6-2-HA are shipped with a label kit that provides four labels, to be applied to the front of each server node and storage shelf. - Page 69 Storage expansion shelf (optional): Apply this label to the bottom storage shelf, if one is ■ present [4]. Callout Description Oracle Database Appliance X3-2 and Oracle Database Appliance X4-2 Oracle Database Appliance X5-2 and Oracle Database Appliance X6-2-HA Server node 1 Server node 0 Chapter 4 • Installing the System Into a Rack...
-
Page 70: Installing The Storage Shelves Into A Rack
Oracle Database Appliance X3-2, Oracle Database Appliance X4-2, Oracle Database Appliance X5-2 and Oracle Database Appliance X6-2-HA require one storage shelf and might include a second storage shelf, called the storage expansion shelf. Both are installed in the same way, with the following caveats: If you have a storage expansion shelf, install it first. - Page 71 Install the Oracle Database Appliance X6-2-HA DE3-24C Storage Shelf Into a Rack Open the storage shelf rail kit box and find the cage nut packets included with the kit, and confirm if your rack uses square or round holes. The cage nut packets include a special template for either round or square hole racks for positioning the cage nuts.
- Page 72 Install the Oracle Database Appliance X6-2-HA DE3-24C Storage Shelf Into a Rack a. Orient the rail so that the stamped label (LEFT or RIGHT) is facing the inside of the rack. b. Adjust the rail length to fit the front and rear of the rack.
- Page 73 Install the Oracle Database Appliance X6-2-HA DE3-24C Storage Shelf Into a Rack Install one screw through the rack and into the rear of each rail. Install the front cage nuts. Chapter 4 • Installing the System Into a Rack...
- Page 74 Install the Oracle Database Appliance X6-2-HA DE3-24C Storage Shelf Into a Rack Installing the storage shelf without the front cage nuts will cause the storage shelf to Caution - be unstable. You would then need to remove the storage shelf from the rack to install the cage nuts.
- Page 75 Install the Oracle Database Appliance X6-2-HA DE3-24C Storage Shelf Into a Rack a. Use the template [2] to determine cage nut placement. b. Retrieve a cage nut and hook one lip of the nut into the appropriate rail hole [1].
- Page 76 Install the Oracle Database Appliance X6-2-HA DE3-24C Storage Shelf Into a Rack Secure the front of the shelf using the four captive securing screws [1 - 4]. Oracle Database Appliance Owner's Guide • March 2017...
- Page 77 Install the Oracle Database Appliance X5-2 DE2-24C Storage Shelf Into a Rack The Oracle Storage Drive Enclosure DE2-24C requires four standard mounting units (4RU) of vertical space in the cabinet. Starting at the bottom of the cabinet, locate the appropriate rack unit (RU) height.
- Page 78 Install the Oracle Database Appliance X5-2 DE2-24C Storage Shelf Into a Rack Ensure that your site meets the requirements in “Oracle Database Appliance ■ Specifications” on page 48 Ensure that the rack meets the requirements in “Rack Compatibility ■ Requirements” on page 60 Observe all precautions in “Safety Precautions When Rackmounting”...
- Page 79 Install the Oracle Database Appliance X5-2 DE2-24C Storage Shelf Into a Rack Round-hole unthreaded cabinet: Install two screws through the rack and into the front of ■ each rail. Do not install into the cage nut in the rack, or the clip nut on the rail.
- Page 80 Install the Oracle Database Appliance X5-2 DE2-24C Storage Shelf Into a Rack Tighten the two locking screws in the rails. Oracle Database Appliance Owner's Guide • March 2017...
- Page 81 Install the Oracle Database Appliance X5-2 DE2-24C Storage Shelf Into a Rack Using a mechanical lift or three people, one at each side of the storage shelf and one in front, carefully lift and rest the shelf on the bottom ledge of the left and right rails.
- Page 82 Install the Oracle Database Appliance X3-2/X4-2 DE2-24P Storage Shelf Into a Rack The Oracle Storage Drive Enclosure DE2-24P requires two standard mounting units (2RU) of vertical space in the cabinet. The storage shelf rack-mount kit contains two rack rails, long and short M6 screws, and a 10mm wrench.
- Page 83 Install the Oracle Database Appliance X3-2/X4-2 DE2-24P Storage Shelf Into a Rack Ensure that the rack meets the requirements in “Rack Compatibility ■ Requirements” on page 60 Observe all precautions in “Safety Precautions When Rackmounting” on page 59 ■ Install the rails in the rack.
- Page 84 Install the Oracle Database Appliance X3-2/X4-2 DE2-24P Storage Shelf Into a Rack c. Insert and loosely tighten one screw through the back of the rack and into the back of the rails [4]. Callout Description Location pegs Rail flange and label...
- Page 85 Install the Oracle Database Appliance X3-2/X4-2 DE2-24P Storage Shelf Into a Rack a. Use the T20 Torx driver to remove the rail location pegs from the front and rear of the rails [1]. b. Use a 10mm wrench (supplied) to insert the pins into the ends of the rails where you removed the location pegs [1].
- Page 86 Install the Oracle Database Appliance X3-2/X4-2 DE2-24P Storage Shelf Into a Rack Mechanical failure. When installing a storage shelf in a threaded rack, be sure to use Caution - the screws with the partially unthreaded shaft. Before threading them into the rails, be sure to thread them through the rack until the threads clear the rack and the screws turn freely.
- Page 87 Install the Oracle Database Appliance X3-2/X4-2 DE2-24P Storage Shelf Into a Rack Callout Description Front mounting screw e. Adjust the rail lengths to fit, and locate the rear pins inside the corresponding rear rack holes [1]. f. Insert and loosely tighten one screw through the back of the rack and into the back of the rails [2].
- Page 88 Install the Oracle Database Appliance X3-2/X4-2 DE2-24P Storage Shelf Into a Rack Number Description Pins (replace location pegs) Rear mounting screw Carefully slide the storage shelf onto the shelf rails until it is fully seated in the rack. Equipment damage. Do not lift the storage shelf using the handles on the power Caution - supply/fan module.
- Page 89 Install the Oracle Database Appliance X3-2/X4-2 DE2-24P Storage Shelf Into a Rack Slide the storage shelf back into the rack and check to ensure that it is resting securely on the rails. Remove the front end caps that cover the ears on the front of the storage shelf [1].
- Page 90 Install the Oracle Database Appliance X3-2/X4-2 DE2-24P Storage Shelf Into a Rack Use one short screw per rail to secure the rear of the storage shelf to threaded hole on the rail. Repeat these steps if you have an additional storage shelf to install.
- Page 91 Add a Storage Expansion Shelf Into an Existing System Add a Storage Expansion Shelf Into an Existing System This task assumes that you are adding a storage expansion shelf to an already running Oracle Before You Begin Database Appliance X3-2, Oracle Database Appliance X4-2, Oracle Database Appliance X5-2, or Oracle Database Appliance X6-2-HA (must already have a fully populated storage shelf).
-
Page 92: Inserting Oracle Database Appliance Version 1 Into A Rack
Cable Trough Inserting Oracle Database Appliance Version 1 Into a Rack This section describes inserting Oracle Database Appliance Version 1 into a rack. If you are installing an Oracle Database Appliance X6-2S/X6-2M/X6-2L, see “Inserting Oracle Database Appliance X6-2S/X6-2M/X6-2L Into a Rack” on page 63. - Page 93 Rackmount Kit Contents The Rackmount Kit contains the hardware required to install Oracle Database Appliance Version 1 into a supported rack. The Rackmount Guide and Alignment Template is shipped with the system in the shipping kit.
- Page 94 Two sets of four adapter brackets, one set for round-hole racks, and one set for square-hole racks. Four M6 cage nuts. Note - The cage nuts are not used. You can recycle them. Oracle Database Appliance Owner's Guide • March 2017...
- Page 95 Required only if you remove system components. Removing Components to Reduce System Weight Before installing Oracle Database Appliance Version 1 into a rack, you can remove components to reduce the weight of the system so that two persons can lift the system into the rack.
- Page 96 Install Rackmount Hardware Into a Rack Install Rackmount Hardware Into a Rack Oracle Database Appliance Version 1 rack-mounting hardware consists of shelf rails, front and rear adapter brackets, rear braces, and screws. Personal injury or equipment damage. Use a mechanical lift to install...
- Page 97 Install Rackmount Hardware Into a Rack The system ships with two sets of adapter brackets: one set [1] for racks with square holes and one set [2] for racks with round holes. The adapter brackets are labeled to indicate whether they are for square-hole racks or round- hole racks.
- Page 98 For a threaded round-hole rack, use two M6 x 12 mm screws or two 10-32 shoulder ■ screws per adapter bracket. The following figure shows the rear adapter brackets being attached to a round-hole rack. Oracle Database Appliance Owner's Guide • March 2017...
- Page 99 Install Rackmount Hardware Into a Rack The following figure shows the rear adapter brackets being attached to a square-hole rack. Attach rear braces to the rear rack posts and to the adapter brackets. a. Position the rear braces so that the tops of the braces [1] align with the 4U mark on each rear rack post.
- Page 100 System failure. Orient the shelf rails properly, with the shelf facing inward and the Caution - gap toward the front of the rack; otherwise, the system might fall. a. Expand the shelf rails [1] to fit between the front and rear rack posts. Oracle Database Appliance Owner's Guide • March 2017...
- Page 101 Install Rackmount Hardware Into a Rack b. Insert the rear hooks of the shelf rails into the slots on the rear adapter brackets [2 and 3] first. Push down on the rail to engage the hooks. Chapter 4 • Installing the System Into a Rack...
- Page 102 Install Rackmount Hardware Into a Rack c. Insert the front hooks of the shelf rails into the slots on the front adapter bracket. Push down on the rails to engage the hooks. Oracle Database Appliance Owner's Guide • March 2017...
- Page 103 “Install the System Into a Rack” on page 103 See Also Install the System Into a Rack Before you begin installing your Oracle Database Appliance Version 1 into a rack, perform the Before You Begin steps in “Install Rackmount Hardware Into a Rack” on page Raise the system to slightly above the shelf surfaces.
- Page 104 The shelf rails do not safely support the system until it is more than 12 inches (305 mm) inside the rack. Oracle Database Appliance Owner's Guide • March 2017...
- Page 105 Install the System Into a Rack Chapter 4 • Installing the System Into a Rack...
- Page 106 To adjust the rear braces, do the following: Loosen the screws on the rear braces [1]. a. b. Slide the rear braces down until they rest firmly on top of the system [2]. Oracle Database Appliance Owner's Guide • March 2017...
- Page 107 If you removed components from the system, replace them. For instructions, see the Service Manual, which is part of the product documentation. Installing Shipping Brackets This section includes the following information about installing the shipping brackets for Oracle Database Appliance Version 1: “Transportation Kit Contents” on page 108.
- Page 108 ■ placing the system into service. For instructions, see the Oracle Database Appliance Service Manual. Transportation Kit Contents The following figure shows the hardware that is included in the Oracle Database Appliance Version 1 transportation kit. Callout Description Front shipping bracket.
- Page 109 Rear shipping bracket. Install Shipping Brackets If you plan to move or ship Oracle Database Appliance Version 1 in a rack to another location, you need to install the shipping brackets. Remove the two short screws that fasten the bottom of the system to the rack.
- Page 110 Insert the short screws into the four empty storage holes on the front shipping bracket. Store the screws so they can be used when the shipping bracket is removed. Remove the bottom two screws that hold the rear adapter brackets in place. Oracle Database Appliance Owner's Guide • March 2017...
- Page 111 Install Shipping Brackets Equipment damage. Do not remove the bottom screws unless you are certain that at Caution - least one upper screw is in place; otherwise, the system might fall. Insert the rear shipping bracket [2] under the back of the system with the side panels facing up.
- Page 112 Equipment damage. To prevent damage to the system during shipping, the bottom Caution - shipping bracket must be positioned firmly against the bottom of the system. Oracle Database Appliance Owner's Guide • March 2017...
-
Page 113: Index
Index acclimatization of hardware before installation, 55 cluster antistatic grounding strap, 60 supported connection, 11 compatibility appliance components Oracle Database Appliance X3-2/X4-2/X5-2 and X6-2-HA, 66 with rack systems, 60 back panel CPUs features configurations supported, 11 Oracle Database Appliance Version 1, 47 Oracle Database Appliance X3-2/X4-2, 42 Oracle Database Appliance X5-2, 35 Oracle Database Appliance X6-2-HA, 28... -
Page 114: Oracle Database Appliance Owner's Guide • March
Oracle Database Appliance Version 1, 96 Oracle Database Appliance X3-2/X4-2/X5-2 and management software X6-2-HA, 91 supported, 11 Oracle Database Appliance X6-2S/X6-2M/ memory X6-2L, 64 installing optional components, 58 installing shipping brackets supported, 11 Oracle Database Appliance Version 1, 107 Oracle Database Appliance Owner's Guide • March 2017... - Page 115 Oracle Database Appliance X3-2/X4-2/X5-2 and features, 11 X6-2-HA, 67 shipping brackets Oracle Database Appliance X6-2S/ installing X6-2M/X6-2L, 64 Oracle Database Appliance Version 1, 107 Oracle Database Appliance X5-2 and X6-2- HA, 91 Oracle Database Appliance X6-2S/X6-2M/ X6-2L, 64 shipping components supported, 11 accessory kit, 55 serial management (SerMgt) port, 11...
- Page 116 Oracle Database Appliance X6-2-HA, 24 support for product, 53 technical support See support TLI (Top Level Identifier) label location Oracle Database Appliance X3-2/X4-2/X5-2 and X6-2-HA, 66 tools required for racking Oracle Database Appliance Version 1, 95 Oracle Database Appliance Owner's Guide • March 2017...
Need help?
Do you have a question about the Database Appliance X6-2-HA and is the answer not in the manual?
Questions and answers