Table of Contents
Advertisement
Advertisement
Table of Contents

Related Manuals for Oracle Talari E100


Summary of Contents for Oracle Talari E100
- Page 1 Oracle Talari E100 Hardware Guide Publication Date: August 2020...
- Page 2 If you use this software or hardware in dangerous applications, then you shall be responsible to take all appropriate fail-safe, backup, redundancy, and other measures to ensure its safe use. Oracle Corporation and its affiliates disclaim any liability for any damages caused by use of this software or hardware in dangerous applications.
-
Page 3: Table Of Contents
Table of Contents About This Document .............................. 5 Reference Documents ............................5 Request for Comments ............................5 Hardware and Software Requirements........................6 About the Appliance ..............................7 Talari APN Overview ............................. 7 Front Panel Configuration ........................... 8 Rear Panel Configuration ............................. 8 NIC Indicator Codes ............................ -
Page 4: About This Document
A representative at Customer Access Support (CAS) can assist you with My Oracle Support registration. Call the CAS main number at 1-800-223-1711 (toll-free in the US), or call the Oracle Support hotline for your local country from the list at http://www.oracle.com/us/support/contact/index.html. - Page 5 You are connected to a live agent who can assist you with My Oracle Support registration and opening a support ticket. My Oracle Support is available 24 hours a day, 7 days a week, 365 days a year. Emergency Response...
-
Page 6: Reference Documents
A list of the entire documentation set for the selected product and release appears. 5. To download a file to your location, right-click the PDF link, select Save target as (or similar command based on your browser), and save to a local folder. Reference Documents The following documents are available: ... -
Page 7: Hardware And Software Requirements
Oracle Talari E100 Hardware Guide Hardware and Software Requirements Talari E100 APN Appliances (APNAs) have the following hardware and software requirements: Hardware: E100 APNAs require a standard 19 inch (480mm) two post rack for mounting. Software: The APNA Web Console is supported in latest versions of the following web browsers: ... -
Page 8: About The Appliance
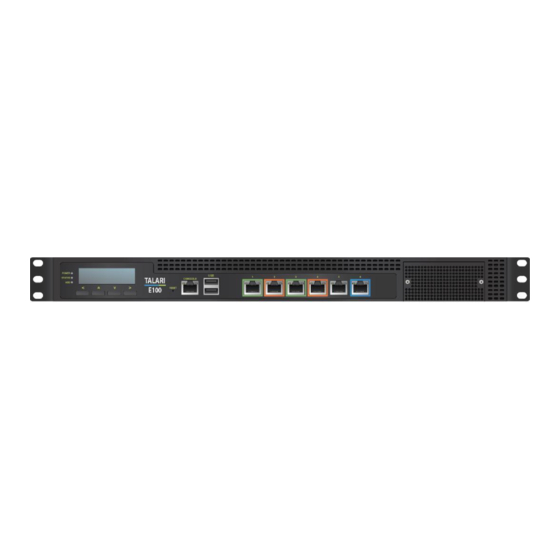
Oracle Talari E100 Hardware Guide About the APN Appliance Designed to bring reliability and bandwidth to branch locations, the 1U rack-mountable E100 APN Appliance (APNA) affordably delivers up to 100 Mbps across 8 WAN links and connects up to 32 sites, complementing Talari’s higher-capacity APNA models. -
Page 9: Front Panel Configuration
Oracle Talari E100 Hardware Guide Front Panel Configuration Status Indicators Front LED Codes Description Power If the LED is on it indicates that the system is powered on. If it is off, it indicates that the system is powered off. - Page 10 Oracle Talari E100 Hardware Guide Ethernet Ports Port Description User defined; Fail-To-Block by Default, configurable as a Bypass pair with Port 2 as Fail-To-Wire. User defined; Fail-To-Block by Default, configurable as a Bypass pair with Port 1 as Fail-To-Wire. User defined; Fail-To-Block by Default, configurable as a Bypass pair with Port 4 as Fail-To-Wire.
-
Page 11: Rear Panel Configuration
Oracle Talari E100 Hardware Guide NIC Indicator Codes Ethernet ports on the front panel have indicator lights for information on network activity and link status. Status Ethernet Link Ethernet Activity Status LED = 10 Mbps Flashing Amber = Network Activity... -
Page 12: Hardware Specifications
Oracle Talari E100 Hardware Guide Hardware Specifications The E100 APNA has the following are the hardware specifications. Specification Power 100-240V, 50-60 Hz, 3-1.5 Amp Max, 200W Physical Dimensions EIA RS-310 standards 1U Height 1.7” (44mm) Width 16.9” (431mm) Depth 12.0” (305mm) - Page 13 Oracle Talari E100 Hardware Guide Installing the APN Appliance Rack Installation Prior to installing the system in a rack, adhere to the following rack installation guidelines: Ensure that there is adequate airflow in the rack. Improper installation or restricted airflow can damage the equipment.
- Page 14 Oracle Talari E100 Hardware Guide The E100 APNA uses 120-240 V AC. Important Note About Cabling and Bypass Mode If your APNA is operating in bypass mode, logic used by the appliance represents the functionality provided by a crossover cable. This may cause a loss of the link between the APNA and older network devices that do not support auto-mdix when straight- through cables are used to connect the LAN and WAN ports of the APNA.
- Page 15 Oracle Talari E100 Hardware Guide Bypass Configuration using the LCD The bypass configurable option on the LCD will appear once the unit is initially powered on and will last for 30 seconds. If the user selects “Yes” on the LCD, this will set the device to Inline mode (interfaces in Fail-to-Wire), allowing traffic to pass.
- Page 16 Oracle Talari E100 Hardware Guide Configuring the E100 APN Appliance APN Easy 1st Install Method Site Deployment Criteria: Internet, DHCP, and DNS connectivity are required at the site. Pre-Deployment (NCN) Requirements: The network administrator must have an Active Client package for this site created and running on the NCN.
- Page 17 Oracle Talari E100 Hardware Guide Inline Mode Option (Interfaces in Fail-to-Wire) 10. Connect the green Enterprise LAN (Port 1) cable to the E100 port 1 with the other end of the cable connected to a LAN switch. 11. Connect the orange WAN 1 (Port 2) cable to the E100 port 2 with the other end of the cable connected to the upstream WAN device.
- Page 18 Oracle Talari E100 Hardware Guide Open a web browser and go to Talari web console (192.168.0.2). The username is talariuser and the default password is talari. We strongly recommend changing the default password as soon as possible. Select Manage Appliance > Local Network Settings from the pull-down menu.
- Page 19 Oracle Talari E100 Hardware Guide Front Panel Configuration Link/Speed Power Status Future Option Activity SSD Status Front LED Codes Description Link/Speed Green = 100Mbps; Amber = 1000Mbps Activity Flashing Amber = Network Activity Power Status Green = Power On Future Option...
- Page 20 Oracle Talari E100 Hardware Guide Port Description Gigabit Ethernet (Bypass pair with Port 2) Gigabit Ethernet (Bypass pair with Port 1) Gigabit Ethernet (Non-bypass). Used for Manual Installation. Dedicated management port. Console RJ45 console port (115200/8-N-1). Used for service and maintenance.
- Page 21 Oracle Talari E100 Hardware Guide Operating Temperature 32°F to 104°F (0° to 40°C) Storage Temperature -40°F to 158°F (-40°C to 70°C) Humidity Range 5% to 90% (non-condensing) operating environment Capacity 4 individual Gigabit Ethernet Ports User interfaces 2 USB 2.0 ports...
-
Page 22: Installing The Talari Appliance
Oracle Talari E100 Hardware Guide Installing the Talari Appliance Unpacking and Inspection Remove E50 appliance and accessories from box. Remove E50 from plastic wrapping. Inspect appliance for signs of damage. Ensure all accessories are included. Rack Mounting The E50 does not ship with hardware for rack mounting by default. If the appliance needs to be rack mounted, there are two options available: 1. -
Page 23: Lan/Wan Connections
Oracle Talari E100 Hardware Guide LAN/WAN Connections When connecting each Ethernet cable (LAN, WAN) to the appropriate connector on the E50: Position the cables carefully, so that they do not put strain on the connectors. Organize cables in bundles such that cables do not intertwine. -
Page 24: Network Deployment Options
Oracle Talari E100 Hardware Guide Network Deployment Options Before getting started it is important to determine how the E50 will be deployed. When considering deployment options for the E50, please note that all bypass pairs will default to Fail-To-Block until configured otherwise. -
Page 25: Deploying The E50 Apn Appliance
Oracle Talari E100 Hardware Guide Deploying the E50 APN Appliance Easy 1st Install Site Deployment Criteria: NCN: Easy 1 Install can be used once the Network Control Node (NCN) has been set up for your network. Active Appliance Package: The NCN must be running an active configuration which includes the E50 for the site being installed. -
Page 26: Manual Install
Oracle Talari E100 Hardware Guide Manual Install Site Deployment Criteria: Manual (Legacy) Install requires physical access to the appliance. The end user will require a PC which can be connected directly to the AUX port of the Talari Appliance via an Ethernet cable. - Page 27 Oracle Talari E100 Hardware Guide 7. Click Activate Staged to complete the process. You may now restore the original network settings on your PC.
- Page 28 2755604 2389404 222896 /run/media/oracle/USBBoot In this example, the second partition of /dev/sdd is mounted and must be unmounted. In your case there may be no mounts on the USB or more. 4. To unmount the partition on the drive, run the command: umount /run/media/oracle/USBBoot.
- Page 29 8. Burn the image, copy the USB raw image file to the USB device. In the example, the USB device is identified as dev/sdd. This command requires root access and is prefixed with “sudo”. sudo cp d6000v1_OS_7_0_1_0_0_GA_02282020_OS_52_GA_05022019_R8_2_1_0_0_GA_01282020 .raw /dev/sdd 9. The USB burn process on a USB3 device can take 15 minutes. It may take a longer time if the device or port is USB2.
- Page 30 Creating a Bootable USB Drive on Windows Before starting this process, ensure that the capacity of your USB drive is at least 4 GB. To create a bootable USB drive on Windows: 1. Download the E50 or E100 image from MOS. 2.
- Page 31 The USB burn process on a USB3 device can take 15 minutes. It may take longer if the device or port is USB2. After the process is complete, you can remove the USB. It is ready for use.
- Page 32 Reimaging of the E100 1. Connect a serial cable to the Console port. It will be configured at 115200 baud. 2. Insert the USB flash drive into the USB port and power cycle the unit. The E50 shown in the image above also has the management port connected in the LAN4 port.
- Page 33 Note: For the E100, use the ESC key instead. 4. Type the password and press Enter. The E50 BIOS password is “talari”. 5. Use the Right Arrow to position to the Boot screen/page once you are on the Main BIOS screen In the middle of the Boot screen is “FIXED BOOT ORDER Priorities”.
- Page 34 6. Use the Up and Down keys to select Boot Option #1 and press Enter. You are presented with a pop-up of available boot devices 7. Use the UP and DOWN keys to select the USB Device and press ENTER.
- Page 35 Your screen should appear as below, with Boot Option #1 as the USB Device. If Boot Option #2 is not the “Hard Disk”, repeat the process on Boot Option #2, to set it to “Hard Disk” 8. Use the RIGHT arrow key and select the Save and Exit screen. Select Save Changes and Exit, press Enter, and press Enter again at the pop-up screen.
- Page 36 The appliance will now boot up from the USB flash device. You will see the following GRUB screen, press ENTER to continue. 9. At the login prompt, login as root when you see the standard Linux boot; there is no password. The Linux boot should take less than 1 minute.
- Page 37 Immediately upon login, the checksums of each script and data file on the USB are verified. If this validation fails, the files on the stick were corrupted and you cannot continue. The verification will take less than 1 minute. After validation, the appliance will be identified, and its model is verified against the files on the USB.
- Page 39 Setting the IP Address You have the option to set the IP address of the appliance now, as opposed to setting it after installation. If you want to defer this setup, hit Enter when asked for “IP4 address” and ‘y’ that the configuration is correct; this will configure DHCP on the MGT port. Otherwise, enter the IP4 address with mask width and optionally the gateway.
- Page 40 When the reboot and second stage install is complete (which may take around 5 minutes) you can login to the appliance. The appliance is ready for use.
-
Page 41: Troubleshooting
Oracle Talari E50 Hardware Guide Troubleshooting Appliance Troubleshooting Basics Problem Resolution Cannot ping the E50 APN appliance Make sure the appliance has power. Confirm the device has a Management IP address assigned. Verify the Management port has link on the Talari and switch.
Need help?
Do you have a question about the Talari E100 and is the answer not in the manual?
Questions and answers