Table of Contents
Advertisement
kÉï=~ë=çÑW=
`bob`=P
léÉê~íáåÖ=fåëíêìÅíáçåë
This product is covered by one or more of the following US patents:
• US5661519
• US6485305
• US6885464
• US7010150
• US6427352
• US645629
• US6394880
MOKOMMV
• US6614538
• US6953883
• US6702649
• US7367801
• US7178731
• US7163443
CEREC 3
båÖäáëÜ
START
STOP
Advertisement
Table of Contents

Related Manuals for Sirona CEREC 3


Summary of Contents for Sirona CEREC 3
- Page 1 This product is covered by one or more of the following US patents: • US5661519 • US6614538 • US6485305 • US6953883 • US6885464 • US6702649 • US7010150 • US7367801 • US6427352 • US7178731 • US645629 • US7163443 • US6394880 CEREC 3 START STOP...
- Page 2 Sirona Dental Systems GmbH Operating Instructions CEREC 3 58 35 595 D 3329 D 3329.201.01.20.02 02.2009...
-
Page 3: Table Of Contents
Sirona Dental Systems GmbH Contents Operating Instructions CEREC 3 Contents Dear Customer............General information ........... Structure of the documents ......2.1.1 Legend .............. Note PC / Acquisition Unit ........ Warranty ............Disposal ............2.4.1 Additional note on disposal ....... General description............ - Page 4 Sirona Dental Systems GmbH Contents Operating Instructions CEREC 3 Repacking ............Scope of supply ..........Storage ............. Operation ..............Setting the acquisition unit to scanner (onl with integrated scanner) .......... Calibrating the unit ........... 6.2.1 Calibrating the milling unit .........
- Page 5 Sirona Dental Systems GmbH Contents Operating Instructions CEREC 3 Appendix ..............Procedure in case of problems downloading via the DECT radio interface ........Procedure in case of problems downloading via the Höft&Wessel radio interface ......Procedure in case of problems downloading with the supplied serial cable .........
-
Page 6: Dear Customer
Sirona Dental Systems GmbH Operating Instructions CEREC 3 Dear Customer ® Thank you for purchasing your CEREC 3 from Sirona. This device enables you to produce dental restorations, e.g. from ceramic material with a natural appearance (CEramic REConstruction). Improper use and handling can create hazards and cause damage. Please read and follow these operating instructions carefully and always keep them within easy reach. -
Page 7: General Information
2 General information Sirona Dental Systems GmbH Structure of the documents Operating Instructions CEREC 3 General information CAUTION: Be sure to observe all warnings! Please observe the warning and safety information provided to prevent personal injury and material damage. Any such information is highlighted by a signal word, i.e. -
Page 8: Note Pc / Acquisition Unit
2 General information Sirona Dental Systems GmbH Note PC / Acquisition Unit Operating Instructions CEREC 3 Note PC / Acquisition Unit When a PC is described in this document, this refers to a PC for the acquisition unit (if present). The PC is represented symbolically. -
Page 9: General Description
3 General description Sirona Dental Systems GmbH Certification Operating Instructions CEREC 3 General description Certification CE mark This product bears the CE mark in accordance with the provisions of Council Directive 73/23/EEC of February 19, 1973 concerning electrical equipment designed for use within certain voltage limits. -
Page 10: Safety
The maintenance and repair of this unit may be performed only by Sirona or by agencies authorized by Sirona. Components which have failed and influence the safety of the unit must be replaced with original (OEM) spare parts. -
Page 11: Milling Unit
4 Safety Sirona Dental Systems GmbH Milling unit Operating Instructions CEREC 3 Milling unit 4.2.1 Safety information for the scanner (option) Safety information for the scanner This milling unit complies with Laser Class 1. It poses no hazard whatsoever. The Laser itself is a Class 2 laser device and can injure a person's skin or eyes. -
Page 12: Wireless Phone Interference With Equipment
4 Safety Sirona Dental Systems GmbH Wireless phone interference with equipment Operating Instructions CEREC 3 Wireless phone interference with equipment The use of mobile wireless phones in practice or hospital environments must be prohibited to ensure safe operation of the unit. -
Page 13: Installation And Startup
Installation and startup Transport and unpacking Transport and unpacking All products from Sirona are carefully checked prior to shipment. Please perform the incoming inspection immediately after delivery. Check the delivery note to ensure that the consignment is complete. Check whether the product shows any visible signs of damage. -
Page 14: Only With Integrated Scanner (Option)
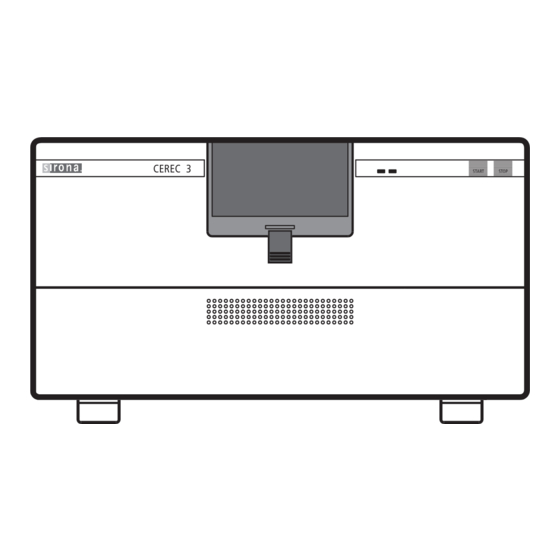
Observe the software installation instructions! 5.4.1 Controls and functional elements Overview of the front panel CEREC 3 START STOP Fig. 5-1 Front view of CEREC 3 milling unit Milling chamber START button Catch for STOP button Milling chamber door LEDs... -
Page 15: Information On The Start/Stop Button
5 Installation and startup Sirona Dental Systems GmbH Initial startup Operating Instructions CEREC 3 Ports on the back side Ports on the back side Fig. 5-2 Rear side Fuse cover Power connection Main switch Serial port I = ON, 0 = OFF 5.4.2... -
Page 16: Description Of Leds
5 Installation and startup Sirona Dental Systems GmbH Initial startup Operating Instructions CEREC 3 5.4.3 Description of LEDs NOTE: Table also available as label The following table is also available as a label affixed to the inside of the front flap. -
Page 17: Installation
5 Installation and startup Sirona Dental Systems GmbH Initial startup Operating Instructions CEREC 3 Open the flap on the front panel of the unit. To open the front flap, pull it on both sides. Press the tank catch upward and carefully pull out the water tank toward the front of the unit. - Page 18 5 Installation and startup Sirona Dental Systems GmbH Initial startup Operating Instructions CEREC 3 Fig. 5-6 Connecting the milling unit with the interface cable Use the supplied interface cable to connect the milling unit to the RS 232 interface of the PC (COM1, COM2).
- Page 19 5 Installation and startup Sirona Dental Systems GmbH Initial startup Operating Instructions CEREC 3 Connecting the DECT radio module to the PC Plug the connectors of the RS-232 cable into the radio module and into the RS-232 interface of the PC (COM1, COM2) and screw them tight.
-
Page 20: Switching The Units On
5 Installation and startup Sirona Dental Systems GmbH Initial startup Operating Instructions CEREC 3 5.4.5.2 Connecting the milling unit to the power supply NOTE: Grounded power outlet The milling unit must be connected to a grounded power outlet. Connect the milling unit to the power supply with the power cable included in delivery. - Page 21 5 Installation and startup Sirona Dental Systems GmbH Initial startup Operating Instructions CEREC 3 5.4.6.1 Download via the DECT radio interface Preparations Preparations For this installation step, place your PC as close as possible to the milling unit. Switch on the PC. The milling unit must be switched off.
- Page 22 5 Installation and startup Sirona Dental Systems GmbH Initial startup Operating Instructions CEREC 3 Calibrating CEREC 3 Calibrating the milling unit and Calibrate the milling unit (see "Calibrating the milling unit"). scanner, if necessary If scanner is installed: Calibrate the scanner (see "Calibrating the scanner").
- Page 23 5 Installation and startup Sirona Dental Systems GmbH Initial startup Operating Instructions CEREC 3 Click "Add Device". In the next dialog box, place a checkmark in front of "Scanner", in front of "inLab gearhead installed" and, if one is installed, in front of "Large watertank", depending on your system configuration.
- Page 24 5 Installation and startup Sirona Dental Systems GmbH Initial startup Operating Instructions CEREC 3 5.4.6.3 Download using the serial cable supplied Preparations Switch on the PC. The milling unit must be switched off. Performing a download, Hu.W, cable, new Downloading the milling program Fig.
-
Page 25: Repacking
Check the unit for completeness according to the scope of supply! Pack the unit securely. Scope of supply The exact scope of supply is specified in the document "Checklist CEREC 3". Storage CAUTION: Only drained units may be stored! Drain the unit! See chapter on "Removing water from the unit". [ 47] Store the unit in a closed and dry room at a temperature of -10°C to 50°C for... -
Page 26: Operation
Calibrate the milling unit only with the supplied calibration pins and the corresponding calibration phantom. Keeping the calibration phantom clean, inLab/CEREC 3 CAUTION: Scanner failure or calibration error If you do not keep the calibration phantom clean, proper calibration cannot be performed. -
Page 27: Calibrating The Milling Unit
6 Operation Sirona Dental Systems GmbH Calibrating the unit Operating Instructions CEREC 3 6.2.1 Calibrating the milling unit Performing calibration Performing calibration Fig. 6-1 Tools Block changing tool Torque wrench The block changing tool, torque wrench and calibration phantom are ready-to-hand. - Page 28 6 Operation Sirona Dental Systems GmbH Calibrating the unit Operating Instructions CEREC 3 Fig. 6-2 Calibrate the milling unit Calibration phantom Torque wrench Catch Calibration pin Setscrew in the workpiece spindle Loosen the milling instruments with the torque wrench and pull them out manually.
- Page 29 Sirona Dental Systems GmbH Calibrating the unit Operating Instructions CEREC 3 Milling instruments suitable for CEREC 3 CAUTION: Use only suitable milling instruments! Do not use CEREC 2 milling instruments with chuck (1.2 mm) or 2.0 mm milling instruments in this milling unit.
- Page 30 6 Operation Sirona Dental Systems GmbH Calibrating the unit Operating Instructions CEREC 3 Fig. 6-3 Changing milling instruments Select the milling instrument that you inserted in the left gearing from the "Left" list and the milling instrument that you inserted in the right gearing from the"Right"...
-
Page 31: Calibrating The Scanner (Only With Integrated Scanner)
6 Operation Sirona Dental Systems GmbH Calibrating the unit Operating Instructions CEREC 3 6.2.2 Calibrating the scanner (only with integrated scanner) Calibrating the inLab_CEREC3 scanner The block changing tool and calibration phantom are ready-to-hand. The milling unit and PC are switched on. -
Page 32: Starting The Scanning Process (Only With Integrated Scanner)
6 Operation Sirona Dental Systems GmbH Starting the scanning process (only with integrated scanner) Operating Instructions CEREC 3 Starting the scanning process (only with integrated scanner) Starting the scanning process The acquisition system must be set to "Scanner", see "Setting the acquisition system to scanner". - Page 33 6 Operation Sirona Dental Systems GmbH Starting the scanning process (only with integrated scanner) Operating Instructions CEREC 3 CAUTION: The calibration phantom must remain free of dirt and grime Make sure that the scanner window, the reference point, the circular segment areas and the milling chamber door are kept free from drops of cooling water, lime and milling dust deposits.
-
Page 34: Start The Milling Process
6 Operation Sirona Dental Systems GmbH Start the milling process Operating Instructions CEREC 3 Start the milling process Start the milling process Start the milling process Load or design a restoration (see Operator's Manual, Chapter on "Design"). Start the milling process by clicking the "Mill" icon. - Page 35 6 Operation Sirona Dental Systems GmbH Start the milling process Operating Instructions CEREC 3 NOTE: Canceling the milling process You can cancel the milling process at any time by pressing the "Stop" button. Removing the restoration Removing the restoration When the milling process has been completed, open the milling chamber door.
-
Page 36: Preparing Optical Scanning (Only With Integrated Scanner)
6 Operation Sirona Dental Systems GmbH Preparing optical scanning (only with integrated scanner) Operating Instructions CEREC 3 Preparing optical scanning (only with integrated scanner) 6.5.1 Information on preparing models for implants NOTE: Prerequisites This information applies only under the following conditions:... -
Page 37: Creating A Model
6 Operation Sirona Dental Systems GmbH Preparing optical scanning (only with integrated scanner) Operating Instructions CEREC 3 6.5.2 Creating a model NOTE: KwikkModel as modeling compound ® The following instructions are based on the use of KwikkModel as modeling compound An impression with alginate, hydrocolloid or polyether is made (see operating instructions for casting materials). -
Page 38: Preparing For Scanning Of The Veneer Model
6 Operation Sirona Dental Systems GmbH Preparing optical scanning (only with integrated scanner) Operating Instructions CEREC 3 Valid scan range of the model: The lowest area must not lie more than 2 mm below the center line of the model holder. -
Page 39: Maintenance
7 Maintenance Sirona Dental Systems GmbH Changing the water Operating Instructions CEREC 3 Maintenance Maintenance, 1st note NOTE: Observe national regulations! Some countries have legal regulations which require regular safety inspections of electrical devices or systems by the operator. Maintenance, 2nd note... -
Page 40: Changing The Water
7 Maintenance Sirona Dental Systems GmbH Changing the water Operating Instructions CEREC 3 CAUTION: Damage to surfaces! DENTATEC milling additive etches plastic surfaces in undiluted form and can cause discoloration. Do not place DENTATEC on the unit. Do not spill DENTATEC. - Page 41 7 Maintenance Sirona Dental Systems GmbH Changing the water Operating Instructions CEREC 3 Open the water tank and rinse it out. Check the water tank and the filter for dirt and contamination. If the water tank or the filter is dirty, clean it thoroughly under running water.
-
Page 42: Milling Instruments
7 Maintenance Sirona Dental Systems GmbH Milling instruments Operating Instructions CEREC 3 Milling instruments 7.2.1 Overview of materials and milling instruments The following table shows the two pairs of milling instruments, the positions where they must be inserted and the materials that can be milled with each... -
Page 43: Changing Milling Instruments (Burs)
Loosen the worn out/defective milling instrument with the torque key and unscrew it counterclockwise by hand. Milling instruments suitable for CEREC 3 CAUTION: Use only suitable milling instruments! Do not use CEREC 2 milling instruments with chuck (1.2 mm) or 2.0 mm milling instruments in this milling unit. - Page 44 7 Maintenance Sirona Dental Systems GmbH Milling instruments Operating Instructions CEREC 3 Fig. 7-2 a defective milling instrument Select the milling instrument(s) you have inserted on the PC and click "Start" (also refer to Operator's Manual). CAUTION: Cleaning cooling water nozzles The cooling water nozzles in the milling chamber always must be kept free of lime and milling dust deposits.
-
Page 45: Care And Cleaning Agents
Order No.: 59 70 905 Cleaning surfaces CAUTION: Care and cleaning agents Use only cleaning and care agents which have been approved by Sirona, see Cleaning and care agents [ 45]. CAUTION: Do not allow liquids to run into the ventilation slots! 7.4.1... -
Page 46: Replacing The Main Fuses
7 Maintenance Sirona Dental Systems GmbH Replacing the main fuses Operating Instructions CEREC 3 Replacing the main fuses Warning: main fuse WARNING: Electric shock Disconnect the power plug at the unit end before replacing the fuses. CAUTION: Fuse type Use only fuses of the same type in the fuse holder! Fig. -
Page 47: Removing Water From The Unit
7 Maintenance Sirona Dental Systems GmbH Removing water from the unit Operating Instructions CEREC 3 Removing water from the unit You must remove the water from the unit if you will not be using it for a longer period of time or wish to transport it. -
Page 48: Technical Description
Process-controlled milling motors Positioning step size: 12,5 μm Milling repeatability: +/- 30 μm Milling speed: approx. 0.4-0.6 mm/min Technical description of CEREC 3 burrs Milling instruments (performance-monitored, backlash-free bearing) Grain size: 64 μm Speed: 40.000 rpm Step Bur 10 included in the scope of... -
Page 49: Technical Data
8 Technical description Sirona Dental Systems GmbH Milling unit Operating Instructions CEREC 3 8.2.1 Technical data Type designation Milling unit CEREC 3 Rated line voltage 100V - 230V AC Rated power frequency 50/60 Hz Rated current 1.5 - 3.5 A... -
Page 50: Scanner For Optical Measurement Of The Preparation (Option)
8 Technical description Sirona Dental Systems GmbH Milling unit Operating Instructions CEREC 3 8.2.2 Scanner for optical measurement of the preparation (option) Technical data of scanner Noncontact optical measurement Digital control of the axes for fast measurement Measuring speed: approx. 2 mm/min... -
Page 51: Radio Module (Optional)
8 Technical description Sirona Dental Systems GmbH Radio module (optional) Operating Instructions CEREC 3 Radio module (optional) European/US radio interface (Höft & Wessel) Transmission speed: 115.2 kBaud Range: up to 60m indoors, up to 300m outdoors Data interface; RS-232 Operating temperature 0°C to +55°C... -
Page 52: Appendix
9 Appendix Sirona Dental Systems GmbH Procedure in case of problems downloading via the DECT radio interface Operating Instructions CEREC 3 Appendix Procedure in case of problems downloading via the DECT radio interface See “Download via the DECT radio interface“... -
Page 53: Procedure In Case Of Problems Downloading With The Supplied Serial Cable
9 Appendix Sirona Dental Systems GmbH Procedure in case of problems downloading with the supplied serial cable Operating Instructions CEREC 3 Procedure in case of problems downloading with the supplied serial cable See “Download using the serial cable supplied“ Shut down the PC and switch it off. Switch the milling unit off. Restore all cable connections and test these. -
Page 54: Index
Sirona Dental Systems GmbH Index Operating Instructions CEREC 3 Index Block changing tool Building installation Calibration phantom Calibration pin Calibration tools Calibration phantom Calibration pins Storage Care and cleaning agents CE mark change Milling instruments Cooling water nozzles Dimensions Disinfection... - Page 55 Sirona Dental Systems GmbH Index Operating Instructions CEREC 3 Laser class Class 1 Class 2 LEDs Maintenance Regulations Measuring technique Milling chamber Milling chamber door Catch Milling instruments Changing a defective instrument Milling speed Milling unit Overview Mode of operation...
- Page 56 Sirona Dental Systems GmbH Index Operating Instructions CEREC 3 Setscrew START button STOP button Tank catch Temperature range Torque wrench Transport Type designation Unpacking Warranty water Water tank Changing the water Filling Odors Removing water from the unit Water change...
- Page 57 Sirona Dental Systems GmbH Index Operating Instructions CEREC 3 58 35 595 D 3329 D 3329.201.01.20.02 02.2009...
- Page 58 tÉ=êÉëÉêîÉ=íÜÉ=êáÖÜí=íç=ã~âÉ=~åó=~äíÉê~íáçåë=ïÜáÅÜ=ã~ó=ÄÉ=êÉèìáêÉÇ=ÇìÉ=íç=íÉÅÜåáÅ~ä=áãéêçîÉãÉåíëK «=páêçå~=aÉåí~ä=póëíÉãë=dãÄe=OMMV péê~ÅÜÉW=ÉåÖäáëÅÜ= mêáåíÉÇ=áå=dÉêã~åó a=PPOVKOMNKMNKOMKMO MOKOMMV ûKJkêKW= NNN=NMS fãéêáã¨=Éå=^ääÉã~ÖåÉ páêçå~=aÉåí~ä=póëíÉãë=dãÄe áå=íÜÉ=rp^W RU=PR=RVR=a=PPOV c~Äêáâëíê~≈É=PN páêçå~=aÉåí~ä=póëíÉãë=ii` lêÇÉê=kç SQSOR=_ÉåëÜÉáã QUPR=páêçå~=aêáîÉI=pìáíÉ=NMM dÉêã~åó `Ü~êäçííÉI=k`=OUOTP ïïïKëáêçå~KÅçã...
Need help?
Do you have a question about the CEREC 3 and is the answer not in the manual?
Questions and answers