Panasonic AW-RP50E Operating Instructions Manual
Remote camera controller
Hide thumbs
Also See for AW-RP50E:
- Operating instructions manual (284 pages) ,
- Operating instructions manual (140 pages) ,
- Operating instructions manual (56 pages)
Advertisement
Available languages
Available languages
Quick Links
SAMPLE
Operating Instructions
<Basics>
Remote Camera Controller
AW-RP50E
Model No.
Before operating this product, please read the instructions carefully and save this manual for future use.
For instructions on how to operate this Remote Camera Controller and
how to establish its settings, refer to the "Operations and Settings" manual
(PDF file) which can be found on the CD-ROM supplied with the camera.
3TR006516AAA
Advertisement
Chapters

Related Manuals for Panasonic AW-RP50E


Summary of Contents for Panasonic AW-RP50E
- Page 1 SAMPLE Operating Instructions <Basics> Remote Camera Controller AW-RP50E Model No. Before operating this product, please read the instructions carefully and save this manual for future use. For instructions on how to operate this Remote Camera Controller and how to establish its settings, refer to the “Operations and Settings” manual (PDF file) which can be found on the CD-ROM supplied with the camera.
-
Page 2: English Version
ENGLISH VERSION Safety precautions DO NOT REMOVE PANEL COVERS BY CAUTION: UNSCREWING. TO REDUCE THE RISK OF FIRE OR SHOCK To reduce the risk of electric shock, do not remove HAZARD AND ANNOYING INTERFERENCE, USE the covers. No user serviceable parts inside. THE RECOMMENDED ACCESSORIES ONLY. - Page 3 A replacement fuse cover can be purchased from your How to replace the fuse local Panasonic Dealer. 1. Open the fuse compartment with a screwdriver. IF THE FITTED MOULDED PLUG IS UNSUITABLE FOR THE SOCKET OUTLET IN YOUR HOME THEN THE FUSE SHOULD BE REMOVED AND THE PLUG CUT OFF AND DISPOSED OF SAFELY.
-
Page 4: Table Of Contents
Contents Before use ................4 Basic operations of the unit ..........14 Overview ................4 Basic operations for the menus ........15 Concerning the Operating Instructions ......4 Network settings ...............16 Trademarks and registered trademarks ......4 Setting the unit ...............16 About copyright and licence ..........4 Concerning the ratings display .........4 Connections ..............18 Disclaimer of warranty............4... -
Page 5: Before Use
MODIFICATION OF THE PRODUCT BY THE USER; Instructions INCONVENIENCE OR ANY LOSS ARISING WHEN For the purposes of these instructions, AW-RP50E is IMAGES ARE NOT DISPLAYED, DUE TO ANY REASON OR CAUSE INCLUDING ANY FAILURE OR referred to as “AW-RP50”. -
Page 6: Characteristics
Characteristics Compact design Function for linkup with the switcher using IP The unit features a compact design with its half-rack connection By linking the unit with one AW-HS50 compact live size width (210 mm [8-1/4˝]) and its 4RU size (177 mm [6-15/16˝]) depth. -
Page 7: Pan-Tilt Heads And Cameras Supported
Pan-tilt heads and cameras supported Remote cameras supported (cameras integrated with a pan-tilt head) AW-HE100, AW-HE50 Pan-tilt heads supported AW-PH360, AW-PH405, AW-PH650, AW-PH400 (AW-IF400 required) Cameras supported (must be combined with the pan-tilt head supported) AW-HE870, AW-E860, AW-E750, AW-E650, AW-E350, AK-HC1500, AK-HC1800 Notes ... -
Page 8: Required Personal Computer Environment
Required personal computer environment Run the software that is provided with the switcher on a host computer which satisfies the following specifications. ® Intel Core 2 DUO 2.4 GHz or faster recommended ® Memory Windows 512 MB or more ® ®... -
Page 9: Installation Precautions
Installation precautions In addition to heeding the points presented in the “Safety precautions”, observe the following precautions as well. Be absolutely sure to ask your dealer to do the jobs of installing and connecting the unit. Connecting the power supply Handle carefully! ... -
Page 10: Operating Precautions
Operating precautions In addition to heeding the points presented in the “Safety precautions”, observe the following precautions as well. When the product is to be discarded Handle carefully. When the product is to be discarded at the end of its service Do not drop the product, or subject it to strong shock or life, ask a specialized contractor to dispose of it properly in vibration. -
Page 11: Parts And Their Functions
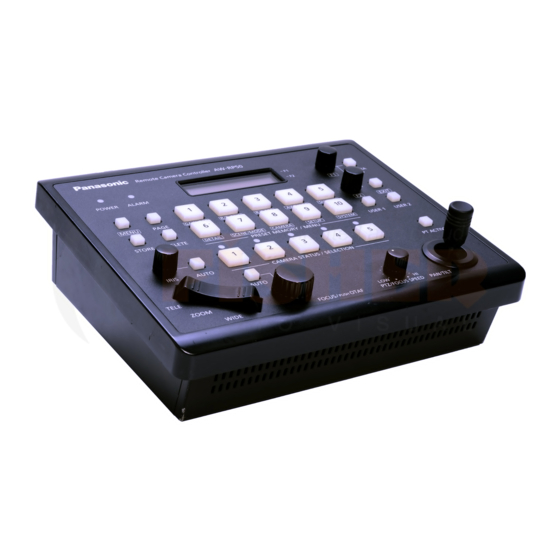
Parts and their functions Control panel POWER ALARM CAMERA MENU PAGE GAIN/PED R/B GAIN R/B PED AWB/ABB SHUTTER EXIT STORE DELETE DETAIL SCENE/MODE CAMERA SETUP SYSTEM USER1 USER2 PRESET MEMORY / MENU IRIS AUTO PT ACTIVE CAMERA STATUS / SELECTION AUTO TELE ZOOM... - Page 12 Parts and their functions CAMERA OSD button [CAMERA OSD] DELETE button [DELETE] When the CAMERA OSD button is held down, its Press this to delete the preset memory data for the indicator lights, and the on-screen menu of the selected currently selected remote camera.
- Page 13 Parts and their functions Auto focus button [AUTO] PTZ/FOCUS SPEED dial [PTZ/FOCUS SPEED] Press this to control the focus automatically. Use this dial to adjust the speed at which the operations Button indicator ON: (pan, tilt, zoom, focus) of the remote cameras are Auto focusing controlled.
-
Page 14: Rear Panel
Parts and their functions Rear panel SIGNAL GND POWER TO PAN/TILT HEAD 12V IN TALLY/GPI BOOT DC IN socket [12V IN] (DC 12 V) POWER switch [POWER] The AC adapter provided with the unit is connected to When the POWER switch is set to the ON position, this socket. -
Page 15: Basic Operations Of The Unit
Basic operations of the unit Turn on the unit’s power. Adjust the lens iris. Set the POWER switch to the ON position. Use the IRIS dial to adjust the lens iris. While the lens iris is being adjusted, a level meter is Power is now supplied to the unit, and the POWER indicator lights. -
Page 16: Basic Operations For The Menus
Basic operations for the menus Set the MENU button to ON. Press the EXIT button to return the menu to its Press the MENU button and light its indicator. previous hierarchical level. When the down arrow “” is displayed for a setting Select the target menu. -
Page 17: Network Settings
Network settings This section describes how the unit’s network are set. Turn the F2 dial, and select the setting. 2. S U B N E T M A S K Setting the unit 25 5 2 5 5 . 2 5 5 . 00 0 The unit’s settings are established using the [SYSTEM] menu. - Page 18 Network settings Setting the IP address Setting the default gateway On the [SYSTEM] menu, select the [NETWORK] menu, and On the [SYSTEM] menu, select the [NETWORK] menu, and display [IP ADDRESS]. display [GATEWAY]. Then operate the F2 dial to set the IP address. Then operate the F2 dial to set the gateway.
-
Page 19: Connections
Connections Example of IP connections Connections with the AW-HE50 and AW-HS50 AW-HE50S AW-HE50S Monitor 2 LAN cable SDI video signal Monitor 1 Switching hub LAN cable Monitor Monitor AW-HS50 AW-RP50 Connecting a multiple number of the units with the AW-HE50 units ... -
Page 20: Example Of Serial Connections
Connections Example of serial connections Connection with the AW-HE50 AW-HE50 Remote camera control signal LAN cable AW-RP50 SIGNAL GND POWER TO PAN/TILT HEAD 12V IN TALLY/GPI BOOT Monitor 1: Use straight cables (category 5 or above) for these connections. 2: The multi-interface cable (AW-CA20T6G) is required for the serial connection with the AW-HE50. - Page 21 Connections Connections with the AW-PH400 and camera Camera model: AW-HE870, AW-E860, AW-E750, AW-E650, AW-E350, AK-HC1500 or AK-HC1800 LAN cable Zoom lens max. 1000 m max. 500 m AW-RP50 AW-PH400 SIGNAL GND POWER TO PAN/TILT HEAD 12V IN TALLY/GPI BOOT Protocol Converter...
- Page 22 Connections Connection with the AW-PH650 MULTI POWER AW-PH650 RJ-45 relay adapter LAN cable AW-RP50 SIGNAL GND POWER TO PAN/TILT HEAD 12V IN TALLY/GPI BOOT G/L input Monitor : Use straight cables (category 5 or above) for these connections. 21 (E)
-
Page 23: Settings For Connection With The Remote Cameras
Connections IP connection Settings for connection with the remote cameras Select “Network” as the setting for the target camera number. Either serial connection “Serial” or IP connection “Network” 2.C AM 2 can be selected for the connections between the unit and Net wo rk the remote cameras for camera numbers CAM1 to CAM100. -
Page 24: Setting The Ip Addresses Automatically (Auto Ip Setting)
Connections Setting the IP addresses automatically (auto IP setting) When “Auto IP setting” is initiated, the IP addresses are set [Switcher settings] On the [SYSTEM] menu, in [SW CTL], if the [SW] item is automatically for the remote cameras and the switcher which are connected within the same subnet. - Page 25 Connections On the [SYSTEM] menu, select [AUTO SET Turn the F2 dial, select “Yes,” and then press IP], and display [AUTO SETUP]. Then select the F2 dial. RENEW, and press the F2 dial. This starts the “Auto IP setting” process. When “Auto IP setting”...
- Page 26 Connections When introducing additional remote Setting the IP address from the unit cameras or a switcher into an environment where similar existing [Remote camera settings] devices are already in use The unit sets the IP addresses for the remote cameras that have been detected by associating them with camera Even when additional remote cameras or switcher are numbers whose connection setting is set to “NoAsign”.
- Page 27 Connections Connect the additional remote cameras and Turn the F2 dial, select “Yes,” and then press the switcher to be introduced and the unit to the F2 dial. the network within the same subnet. This starts the “Auto IP setting” process. When “Auto IP setting”...
- Page 28 Connections Changing the IP address on the unit to match the IP Connect the additional remote cameras and address of the remote camera or switcher the switcher to be introduced and the unit to the network within the same subnet. [Remote camera settings] The unit sets the IP addresses for the remote cameras On the [SYSTEM] menu, select [AUTO SET...
-
Page 29: Changing The Ip Addresses Of The Remote Cameras
Connections Changing the IP addresses of Turn the F2 dial, select “Yes,” and then press the F2 dial. the remote cameras This starts the “Auto IP setting” process. When “Auto IP setting” has been initiated, the progress Setting the IP addresses ... -
Page 30: Changing The Camera Numbers
Connections Changing the camera numbers Changing the IP address of the switcher The camera numbers which have been set by “Auto IP setting” can be changed. The IP address of the switcher which was set by “Auto IP They are changed by replacing the IP addresses of the setting”... -
Page 31: Selecting The Remote Cameras To Be Operated
Selecting the remote cameras to be operated Up to five remote cameras to be operated can be selected The statuses of the remote cameras assigned to CAMERA using the CAMERA STATUS/SELECTION buttons. STATUS/SELECTION buttons 1 to 5 can be identified by the When one of the CAMERA STATUS/SELECTION buttons lighting statuses of the indicators above the buttons. -
Page 32: Maintenance
Maintenance Carry out the maintenance described below at periodic intervals to ensure the safety and performance of the unit. Disconnect the power plug, and wipe the unit’s surfaces WARNING with a dry cloth. Before proceeding with maintenance, disconnect the To remove stubborn dirt, soak the cloth in a diluted power plug from the power outlet, and allow the unit solution of kitchen detergent (neutral), wring it out well,... -
Page 33: Appearance
Appearance Unit: mm POWER ALARM CAMERA MENU PAGE GAIN/PED R/B GAIN R/B PED AWB/ABB SHUTTER EXIT STORE DELETE DETAIL SCENE/MODE CAMERA SETUP SYSTEM USER1 USER2 PRESET MEMORY / MENU IRIS AUTO PT ACTIVE CAMERA STATUS / SELECTION AUTO TELE ZOOM WIDE FOCUS/ OTAF... -
Page 34: Specifications
Specifications Power requirements: DC 12 V 10 % (AC adapter provided) Power consumption: DC 12 V, 0.5 A indicates safety information. AC adapter GENERAL Input: Ambient operating temperature: AC 100 V to 240 V, 1.5 A, 50/60 Hz 0 °C to +40 °C Output: Allowable humidity ranges:... - Page 35 Memo...
- Page 36 DEUTSCHE AUSGABE (GERMAN VERSION) Sicherheitshinweise Öffnen nicht Gerät durch VORSICHT: Abschrauben von Gehäuseteilen. EMPFOHLENE ZUBEHÖR Zur Vermeidung von elektrischem Schlag darf das VERWENDEN, UM DIE GEFAHR VON FEUER UND Gehäuse nicht geöffnet werden. Im Geräteinneren ELEKTRISCHEM SCHLAG SOWIE STÖRUNGEN befinden sich keine Teile, die vom Benutzer gewartet AUSZUSCHALTEN.
- Page 37 Benutzerinformationen zur Entsorgung von elektrischen und elektronischen Geräten (private Haushalte) Dieses Symbol auf Produkten und/oder begleitenden Dokumenten bedeutet, dass verbrauchte elektrische und elektronische Produkte nicht mit gewöhnlichem Haushaltsabfall vermischt werden sollen. Bringen Sie zur ordnungsgemäßen Behandlung, Rückgewinnung und Recycling diese Produkte zu den entsprechenden Sammelstellen, wo sie ohne Gebühren entgegengenommen werden.
- Page 38 Inhalt Before use ................4 Basic operations of the unit ..........14 Overview ................4 Basic operations for the menus ........15 Concerning the Operating Instructions ......4 Network settings ...............16 Trademarks and registered trademarks ......4 Setting the unit ...............16 About copyright and licence ..........4 Concerning the ratings display .........4 Connections ..............18 Disclaimer of warranty............4...
-
Page 39: Overview
MODIFICATION OF THE PRODUCT BY THE USER; Instructions INCONVENIENCE OR ANY LOSS ARISING WHEN For the purposes of these instructions, AW-RP50E is IMAGES ARE NOT DISPLAYED, DUE TO ANY REASON OR CAUSE INCLUDING ANY FAILURE OR referred to as “AW-RP50”. -
Page 40: Characteristics
Characteristics Compact design Function for linkup with the switcher using IP The unit features a compact design with its half-rack connection By linking the unit with one AW-HS50 compact live size width (210 mm [8-1/4˝]) and its 4RU size (177 mm [6-15/16˝]) depth. -
Page 41: Pan-Tilt Heads And Cameras Supported
Pan-tilt heads and cameras supported Remote cameras supported (cameras integrated with a pan-tilt head) AW-HE100, AW-HE50 Pan-tilt heads supported AW-PH360, AW-PH405, AW-PH650, AW-PH400 (AW-IF400 required) Cameras supported (must be combined with the pan-tilt head supported) AW-HE870, AW-E860, AW-E750, AW-E650, AW-E350, AK-HC1500, AK-HC1800 Notes ... -
Page 42: Required Personal Computer Environment
Required personal computer environment Run the software that is provided with the switcher on a host computer which satisfies the following specifications. ® Intel Core 2 DUO 2.4 GHz or faster recommended ® Memory Windows 512 MB or more ® ®... -
Page 43: Installation Precautions
Installation precautions In addition to heeding the points presented in the “Sicherheitshinweise”, observe the following precautions as well. Be absolutely sure to ask your dealer to do the jobs of installing and connecting the unit. Connecting the power supply Handle carefully! ... -
Page 44: Operating Precautions
Operating precautions In addition to heeding the points presented in the “Sicherheitshinweise”, observe the following precautions as well. When the product is to be discarded Handle carefully. When the product is to be discarded at the end of its service Do not drop the product, or subject it to strong shock or life, ask a specialized contractor to dispose of it properly in vibration. -
Page 45: Parts And Their Functions
Parts and their functions Control panel POWER ALARM CAMERA MENU PAGE GAIN/PED R/B GAIN R/B PED AWB/ABB SHUTTER EXIT STORE DELETE DETAIL SCENE/MODE CAMERA SETUP SYSTEM USER1 USER2 PRESET MEMORY / MENU IRIS AUTO PT ACTIVE CAMERA STATUS / SELECTION AUTO TELE ZOOM... - Page 46 Parts and their functions CAMERA OSD button [CAMERA OSD] DELETE button [DELETE] When the CAMERA OSD button is held down, its Press this to delete the preset memory data for the indicator lights, and the on-screen menu of the selected currently selected remote camera.
- Page 47 Parts and their functions Auto focus button [AUTO] PTZ/FOCUS SPEED dial [PTZ/FOCUS SPEED] Press this to control the focus automatically. Use this dial to adjust the speed at which the operations Button indicator ON: (pan, tilt, zoom, focus) of the remote cameras are Auto focusing controlled.
-
Page 48: Rear Panel
Parts and their functions Rear panel SIGNAL GND POWER TO PAN/TILT HEAD 12V IN TALLY/GPI BOOT DC IN socket [12V IN] (DC 12 V) POWER switch [POWER] The AC adapter provided with the unit is connected to When the POWER switch is set to the ON position, this socket. -
Page 49: Basic Operations Of The Unit
Basic operations of the unit Turn on the unit’s power. Adjust the lens iris. Set the POWER switch to the ON position. Use the IRIS dial to adjust the lens iris. While the lens iris is being adjusted, a level meter is Power is now supplied to the unit, and the POWER indicator lights. -
Page 50: Basic Operations For The Menus
Basic operations for the menus Set the MENU button to ON. Press the EXIT button to return the menu to its Press the MENU button and light its indicator. previous hierarchical level. When the down arrow “” is displayed for a setting Select the target menu. -
Page 51: Network Settings
Network settings This section describes how the unit’s network are set. Turn the F2 dial, and select the setting. 2. S U B N E T M A S K Setting the unit 25 5 2 5 5 . 2 5 5 . 00 0 The unit’s settings are established using the [SYSTEM] menu. - Page 52 Network settings Setting the IP address Setting the default gateway On the [SYSTEM] menu, select the [NETWORK] menu, and On the [SYSTEM] menu, select the [NETWORK] menu, and display [IP ADDRESS]. display [GATEWAY]. Then operate the F2 dial to set the IP address. Then operate the F2 dial to set the gateway.
-
Page 53: Connections
Connections Example of IP connections Connections with the AW-HE50 and AW-HS50 AW-HE50S AW-HE50S Monitor 2 LAN-Kabel SDI-Videosignal Monitor 1 Switching-Hub LAN-Kabel Monitor Monitor AW-HS50 AW-RP50 Connecting a multiple number of the units with the AW-HE50 units ... -
Page 54: Example Of Serial Connections
Connections Example of serial connections Connection with the AW-HE50 AW-HE50 Remote camera control signal LAN-Kabel AW-RP50 SIGNAL GND POWER TO PAN/TILT HEAD 12V IN TALLY/GPI BOOT Monitor 1: Use straight cables (category 5 or above) for these connections. 2: The multi-interface cable (AW-CA20T6G) is required for the serial connection with the AW-HE50. - Page 55 Connections Connections with the AW-PH400 and camera Camera model: AW-HE870, AW-E860, AW-E750, AW-E650, AW-E350, AK-HC1500 or AK-HC1800 LAN-Kabel Zoomobjektiv max. 1000 m max. 500 m AW-RP50 AW-PH400 SIGNAL GND POWER TO PAN/TILT HEAD 12V IN TALLY/GPI BOOT Protokollkonverter AW-IF400G ...
- Page 56 Connections Connection with the AW-PH650 MULTI POWER AW-PH650 RJ-45-Kupplung LAN-Kabel AW-RP50 SIGNAL GND POWER TO PAN/TILT HEAD 12V IN TALLY/GPI BOOT G/L-Eingang Monitor : Use straight cables (category 5 or above) for these connections. 21 (G)
-
Page 57: Settings For Connection With The Remote Cameras
Connections IP connection Settings for connection with the remote cameras Select “Network” as the setting for the target camera number. Either serial connection “Serial” or IP connection “Network” 2.C AM 2 can be selected for the connections between the unit and Net wo rk the remote cameras for camera numbers CAM1 to CAM100. -
Page 58: Setting The Ip Addresses Automatically (Auto Ip Setting)
Connections Setting the IP addresses automatically (auto IP setting) When “Auto IP setting” is initiated, the IP addresses are set [Switcher settings] On the [SYSTEM] menu, in [SW CTL], if the [SW] item is automatically for the remote cameras and the switcher which are connected within the same subnet. - Page 59 Connections On the [SYSTEM] menu, select [AUTO SET Turn the F2 dial, select “Yes,” and then press IP], and display [AUTO SETUP]. Then select the F2 dial. RENEW, and press the F2 dial. This starts the “Auto IP setting” process. When “Auto IP setting”...
- Page 60 Connections When introducing additional remote Setting the IP address from the unit cameras or a switcher into an environment where similar existing [Remote camera settings] devices are already in use The unit sets the IP addresses for the remote cameras that have been detected by associating them with camera Even when additional remote cameras or switcher are numbers whose connection setting is set to “NoAsign”.
- Page 61 Connections Connect the additional remote cameras and Turn the F2 dial, select “Yes,” and then press the switcher to be introduced and the unit to the F2 dial. the network within the same subnet. This starts the “Auto IP setting” process. When “Auto IP setting”...
- Page 62 Connections Changing the IP address on the unit to match the IP Connect the additional remote cameras and address of the remote camera or switcher the switcher to be introduced and the unit to the network within the same subnet. [Remote camera settings] The unit sets the IP addresses for the remote cameras On the [SYSTEM] menu, select [AUTO SET...
-
Page 63: Changing The Ip Addresses Of The Remote Cameras
Connections Changing the IP addresses of Turn the F2 dial, select “Yes,” and then press the F2 dial. the remote cameras This starts the “Auto IP setting” process. When “Auto IP setting” has been initiated, the progress Setting the IP addresses ... -
Page 64: Changing The Camera Numbers
Connections Changing the camera numbers Changing the IP address of the switcher The camera numbers which have been set by “Auto IP setting” can be changed. The IP address of the switcher which was set by “Auto IP They are changed by replacing the IP addresses of the setting”... -
Page 65: Selecting The Remote Cameras To Be Operated
Selecting the remote cameras to be operated Up to five remote cameras to be operated can be selected The statuses of the remote cameras assigned to CAMERA using the CAMERA STATUS/SELECTION buttons. STATUS/SELECTION buttons 1 to 5 can be identified by the When one of the CAMERA STATUS/SELECTION buttons lighting statuses of the indicators above the buttons. -
Page 66: Maintenance
Maintenance Carry out the maintenance described below at periodic intervals to ensure the safety and performance of the unit. Disconnect the power plug, and wipe the unit’s surfaces WARNING with a dry cloth. Before proceeding with maintenance, disconnect the To remove stubborn dirt, soak the cloth in a diluted power plug from the power outlet, and allow the unit solution of kitchen detergent (neutral), wring it out well,... - Page 67 Aussehen Einheit: mm POWER ALARM CAMERA MENU PAGE GAIN/PED R/B GAIN R/B PED AWB/ABB SHUTTER EXIT STORE DELETE DETAIL SCENE/MODE CAMERA SETUP SYSTEM USER1 USER2 PRESET MEMORY / MENU IRIS AUTO PT ACTIVE CAMERA STATUS / SELECTION AUTO TELE ZOOM WIDE FOCUS/ OTAF...
-
Page 68: Technische Daten
Technische daten 12 V Gleichspannung 10 % Quellenspannung: (mitgeliefertes Netzgerät) Leistungsaufnahme: 12 V Gleichspannung, 0,5 A ist die Sicherheitsinformation . Netzgerät ALLGEMEINES Eingäng: Betriebstemperatur: 100 V bis 240 V Wechselstrom, 1,5 A, 50/60 Hz 0 °C bis +40 °C Ausgänge: Zulässige Luftfeuchtigkeitsbereiche: 12 V Gleichspannung, 2,5 A, 30 W... - Page 69 Notizen...
- Page 70 VERSION FRANÇAISE (FRENCH VERSION) Consignes de sécurité Ne pas dévisser le couvercle. ATTENTION: Pour réduire tout risque d’électrocution, ne pas retirer POUR ÉVITER TOUT RISQUE D’INCENDIE, DE le couvercle. Il ne se trouve à l’intérieur aucune pièce CHOCS ÉLECTRIQUES OU D’INTERFÉRENCES, qui puisse être réparée par l’utilisateur.
- Page 71 Informations relatives à l’évacuation des déchets, destinées aux utilisateurs d’appareils électriques et électroniques (appareils ménagers domestiques) Lorsque ce symbole figure sur les produits et/ou les documents qui les accompagnent, cela signifie que les appareils électriques et électroniques ne doivent pas être jetés avec les ordures ménagères. Pour que ces produits subissent un traitement, une récupération et un recyclage appropriés, envoyez-les dans les points de pré-collecte désignés, où...
- Page 72 Table des matières Before use ................4 Basic operations of the unit ..........14 Overview ................4 Basic operations for the menus ........15 Concerning the Operating Instructions ......4 Network settings ...............16 Trademarks and registered trademarks ......4 Setting the unit ...............16 About copyright and licence ..........4 Concerning the ratings display .........4 Connections ..............18 Disclaimer of warranty............4...
-
Page 73: Overview
MODIFICATION OF THE PRODUCT BY THE USER; Instructions INCONVENIENCE OR ANY LOSS ARISING WHEN For the purposes of these instructions, AW-RP50E is IMAGES ARE NOT DISPLAYED, DUE TO ANY REASON OR CAUSE INCLUDING ANY FAILURE OR referred to as “AW-RP50”. - Page 74 Caractéristiques Compact design Function for linkup with the switcher using IP The unit features a compact design with its half-rack connection By linking the unit with one AW-HS50 compact live size width (210 mm [8-1/4˝]) and its 4RU size (177 mm [6-15/16˝]) depth.
-
Page 75: Pan-Tilt Heads And Cameras Supported
Pan-tilt heads and cameras supported Remote cameras supported (cameras integrated with a pan-tilt head) AW-HE100, AW-HE50 Pan-tilt heads supported AW-PH360, AW-PH405, AW-PH650, AW-PH400 (AW-IF400 required) Cameras supported (must be combined with the pan-tilt head supported) AW-HE870, AW-E860, AW-E750, AW-E650, AW-E350, AK-HC1500, AK-HC1800 Notes ... -
Page 76: Required Personal Computer Environment
Required personal computer environment Run the software that is provided with the switcher on a host computer which satisfies the following specifications. ® Intel Core 2 DUO 2.4 GHz or faster recommended ® Memory Windows 512 MB or more ® ®... -
Page 77: Installation Precautions
Installation precautions In addition to heeding the points presented in the “Consignes de sécurité”, observe the following precautions as well. Be absolutely sure to ask your dealer to do the jobs of installing and connecting the unit. Connecting the power supply Handle carefully! ... -
Page 78: Operating Precautions
Operating precautions In addition to heeding the points presented in the “Consignes de sécurité”, observe the following precautions as well. When the product is to be discarded Handle carefully. When the product is to be discarded at the end of its service Do not drop the product, or subject it to strong shock or life, ask a specialized contractor to dispose of it properly in vibration. -
Page 79: Parts And Their Functions
Parts and their functions Control panel POWER ALARM CAMERA MENU PAGE GAIN/PED R/B GAIN R/B PED AWB/ABB SHUTTER EXIT STORE DELETE DETAIL SCENE/MODE CAMERA SETUP SYSTEM USER1 USER2 PRESET MEMORY / MENU IRIS AUTO PT ACTIVE CAMERA STATUS / SELECTION AUTO TELE ZOOM... - Page 80 Parts and their functions CAMERA OSD button [CAMERA OSD] DELETE button [DELETE] When the CAMERA OSD button is held down, its Press this to delete the preset memory data for the indicator lights, and the on-screen menu of the selected currently selected remote camera.
- Page 81 Parts and their functions Auto focus button [AUTO] PTZ/FOCUS SPEED dial [PTZ/FOCUS SPEED] Press this to control the focus automatically. Use this dial to adjust the speed at which the operations Button indicator ON: (pan, tilt, zoom, focus) of the remote cameras are Auto focusing controlled.
-
Page 82: Rear Panel
Parts and their functions Rear panel SIGNAL GND POWER TO PAN/TILT HEAD 12V IN TALLY/GPI BOOT DC IN socket [12V IN] (DC 12 V) POWER switch [POWER] The AC adapter provided with the unit is connected to When the POWER switch is set to the ON position, this socket. -
Page 83: Basic Operations Of The Unit
Basic operations of the unit Turn on the unit’s power. Adjust the lens iris. Set the POWER switch to the ON position. Use the IRIS dial to adjust the lens iris. While the lens iris is being adjusted, a level meter is Power is now supplied to the unit, and the POWER indicator lights. -
Page 84: Basic Operations For The Menus
Basic operations for the menus Set the MENU button to ON. Press the EXIT button to return the menu to its Press the MENU button and light its indicator. previous hierarchical level. When the down arrow “” is displayed for a setting Select the target menu. -
Page 85: Network Settings
Network settings This section describes how the unit’s network are set. Turn the F2 dial, and select the setting. 2. S U B N E T M A S K Setting the unit 25 5 2 5 5 . 2 5 5 . 00 0 The unit’s settings are established using the [SYSTEM] menu. - Page 86 Network settings Setting the IP address Setting the default gateway On the [SYSTEM] menu, select the [NETWORK] menu, and On the [SYSTEM] menu, select the [NETWORK] menu, and display [IP ADDRESS]. display [GATEWAY]. Then operate the F2 dial to set the IP address. Then operate the F2 dial to set the gateway.
-
Page 87: Connections
Connections Example of IP connections Connections with the AW-HE50 and AW-HS50 AW-HE50S AW-HE50S Moniteur 2 Câble LAN Signal vidéo SDI Concentrateur de Moniteur 1 commutation Câble LAN Moniteur Moniteur AW-HS50 AW-RP50 Connecting a multiple number of the units with the AW-HE50 units ... -
Page 88: Example Of Serial Connections
Connections Example of serial connections Connection with the AW-HE50 AW-HE50 Remote camera control signal Câble LAN AW-RP50 SIGNAL GND POWER TO PAN/TILT HEAD 12V IN TALLY/GPI BOOT Moniteur 1: Use straight cables (category 5 or above) for these connections. 2: The multi-interface cable (AW-CA20T6G) is required for the serial connection with the AW-HE50. - Page 89 Connections Connections with the AW-PH400 and camera Camera model: AW-HE870, AW-E860, AW-E750, AW-E650, AW-E350, AK-HC1500 or AK-HC1800 Câble LAN Objectif zoom 1000 mètres max. 500 mètres max. AW-RP50 AW-PH400 SIGNAL GND POWER TO PAN/TILT HEAD 12V IN TALLY/GPI BOOT Convertisseur de...
- Page 90 Connections Connection with the AW-PH650 MULTI POWER AW-PH650 Adaptateur de relais RJ-45 Câble LAN AW-RP50 SIGNAL GND POWER TO PAN/TILT HEAD 12V IN TALLY/GPI BOOT Entrée G/L Moniteur : Use straight cables (category 5 or above) for these connections. 21 (F)
-
Page 91: Settings For Connection With The Remote Cameras
Connections IP connection Settings for connection with the remote cameras Select “Network” as the setting for the target camera number. Either serial connection “Serial” or IP connection “Network” 2.C AM 2 can be selected for the connections between the unit and Net wo rk the remote cameras for camera numbers CAM1 to CAM100. -
Page 92: Setting The Ip Addresses Automatically (Auto Ip Setting)
Connections Setting the IP addresses automatically (auto IP setting) When “Auto IP setting” is initiated, the IP addresses are set [Switcher settings] On the [SYSTEM] menu, in [SW CTL], if the [SW] item is automatically for the remote cameras and the switcher which are connected within the same subnet. - Page 93 Connections On the [SYSTEM] menu, select [AUTO SET Turn the F2 dial, select “Yes,” and then press IP], and display [AUTO SETUP]. Then select the F2 dial. RENEW, and press the F2 dial. This starts the “Auto IP setting” process. When “Auto IP setting”...
- Page 94 Connections When introducing additional remote Setting the IP address from the unit cameras or a switcher into an environment where similar existing [Remote camera settings] devices are already in use The unit sets the IP addresses for the remote cameras that have been detected by associating them with camera Even when additional remote cameras or switcher are numbers whose connection setting is set to “NoAsign”.
- Page 95 Connections Connect the additional remote cameras and Turn the F2 dial, select “Yes,” and then press the switcher to be introduced and the unit to the F2 dial. the network within the same subnet. This starts the “Auto IP setting” process. When “Auto IP setting”...
- Page 96 Connections Changing the IP address on the unit to match the IP Connect the additional remote cameras and address of the remote camera or switcher the switcher to be introduced and the unit to the network within the same subnet. [Remote camera settings] The unit sets the IP addresses for the remote cameras On the [SYSTEM] menu, select [AUTO SET...
-
Page 97: Changing The Ip Addresses Of The Remote Cameras
Connections Changing the IP addresses of Turn the F2 dial, select “Yes,” and then press the F2 dial. the remote cameras This starts the “Auto IP setting” process. When “Auto IP setting” has been initiated, the progress Setting the IP addresses ... -
Page 98: Changing The Camera Numbers
Connections Changing the camera numbers Changing the IP address of the switcher The camera numbers which have been set by “Auto IP setting” can be changed. The IP address of the switcher which was set by “Auto IP They are changed by replacing the IP addresses of the setting”... -
Page 99: Selecting The Remote Cameras To Be Operated
Selecting the remote cameras to be operated Up to five remote cameras to be operated can be selected The statuses of the remote cameras assigned to CAMERA using the CAMERA STATUS/SELECTION buttons. STATUS/SELECTION buttons 1 to 5 can be identified by the When one of the CAMERA STATUS/SELECTION buttons lighting statuses of the indicators above the buttons. -
Page 100: Maintenance
Maintenance Carry out the maintenance described below at periodic intervals to ensure the safety and performance of the unit. Disconnect the power plug, and wipe the unit’s surfaces WARNING with a dry cloth. Before proceeding with maintenance, disconnect the To remove stubborn dirt, soak the cloth in a diluted power plug from the power outlet, and allow the unit solution of kitchen detergent (neutral), wring it out well,... - Page 101 Aspect extérieur Unité: mm POWER ALARM CAMERA MENU PAGE GAIN/PED R/B GAIN R/B PED AWB/ABB SHUTTER EXIT STORE DELETE DETAIL SCENE/MODE CAMERA SETUP SYSTEM USER1 USER2 PRESET MEMORY / MENU IRIS AUTO PT ACTIVE CAMERA STATUS / SELECTION AUTO TELE ZOOM WIDE FOCUS/...
- Page 102 Fiche technique Source d’alimentation: 12 V CC 10 % (Adaptateur secteur fourni) Puissance consommée: 12 V CC, 0,5 A Informations concernant la sécurité . Adaptateur secteur Données générales Entrée: Température de fonctionnement ambiante: 100 V à 240 V CA, 1,5 A, 50/60 Hz 0 °C à...
- Page 103 Notes...
- Page 104 VERSIONE ITALIANA (ITALIAN VERSION) Precauzioni per la sicurezza NON TOGLIERE IL COPERCHIO SVITANDOLO. PRECAUZIONE: Per ridurre i pericoli di scosse elettriche, non togliere il RIDURRE PERICOLI D’INCENDIO coperchio. All’interno non ci sono parti riparabili Dl SCOSSE ELETTRICHE E Dl FASTIDIOSE dall’utente.
- Page 105 Informazioni per gli utenti sullo smaltimento di apparecchiature elettriche ed elettroniche obsolete (per i nuclei familiari privati) Questo simbolo sui prodotti e/o sulla documentazione di accompagnamento significa che i prodotti elettrici ed elettronici usati non devono essere mescolati con i rifiuti domestici generici. Per un corretto trattamento, recupero e riciclaggio, portare questi prodotti ai punti di raccolta designati, dove verranno accettati gratuitamente.
- Page 106 Sommario Before use ................4 Basic operations of the unit ..........14 Overview ................4 Basic operations for the menus ........15 Concerning the Operating Instructions ......4 Network settings ...............16 Trademarks and registered trademarks ......4 Setting the unit ...............16 About copyright and licence ..........4 Concerning the ratings display .........4 Connections ..............18 Disclaimer of warranty............4...
-
Page 107: Overview
MODIFICATION OF THE PRODUCT BY THE USER; Instructions INCONVENIENCE OR ANY LOSS ARISING WHEN For the purposes of these instructions, AW-RP50E is IMAGES ARE NOT DISPLAYED, DUE TO ANY REASON OR CAUSE INCLUDING ANY FAILURE OR referred to as “AW-RP50”. - Page 108 Caratteristiche Compact design Function for linkup with the switcher using IP The unit features a compact design with its half-rack connection By linking the unit with one AW-HS50 compact live size width (210 mm [8-1/4˝]) and its 4RU size (177 mm [6-15/16˝]) depth.
-
Page 109: Pan-Tilt Heads And Cameras Supported
Pan-tilt heads and cameras supported Remote cameras supported (cameras integrated with a pan-tilt head) AW-HE100, AW-HE50 Pan-tilt heads supported AW-PH360, AW-PH405, AW-PH650, AW-PH400 (AW-IF400 required) Cameras supported (must be combined with the pan-tilt head supported) AW-HE870, AW-E860, AW-E750, AW-E650, AW-E350, AK-HC1500, AK-HC1800 Notes ... -
Page 110: Required Personal Computer Environment
Required personal computer environment Run the software that is provided with the switcher on a host computer which satisfies the following specifications. ® Intel Core 2 DUO 2.4 GHz or faster recommended ® Memory Windows 512 MB or more ® ®... -
Page 111: Installation Precautions
Installation precautions In addition to heeding the points presented in the “Precauzioni per la sicurezza”, observe the following precautions as well. Be absolutely sure to ask your dealer to do the jobs of installing and connecting the unit. Connecting the power supply Handle carefully! ... -
Page 112: Operating Precautions
Operating precautions In addition to heeding the points presented in the “Precauzioni per la sicurezza”, observe the following precautions as well. When the product is to be discarded Handle carefully. When the product is to be discarded at the end of its service Do not drop the product, or subject it to strong shock or life, ask a specialized contractor to dispose of it properly in vibration. -
Page 113: Parts And Their Functions
Parts and their functions Control panel POWER ALARM CAMERA MENU PAGE GAIN/PED R/B GAIN R/B PED AWB/ABB SHUTTER EXIT STORE DELETE DETAIL SCENE/MODE CAMERA SETUP SYSTEM USER1 USER2 PRESET MEMORY / MENU IRIS AUTO PT ACTIVE CAMERA STATUS / SELECTION AUTO TELE ZOOM... - Page 114 Parts and their functions CAMERA OSD button [CAMERA OSD] DELETE button [DELETE] When the CAMERA OSD button is held down, its Press this to delete the preset memory data for the indicator lights, and the on-screen menu of the selected currently selected remote camera.
- Page 115 Parts and their functions Auto focus button [AUTO] PTZ/FOCUS SPEED dial [PTZ/FOCUS SPEED] Press this to control the focus automatically. Use this dial to adjust the speed at which the operations Button indicator ON: (pan, tilt, zoom, focus) of the remote cameras are Auto focusing controlled.
-
Page 116: Rear Panel
Parts and their functions Rear panel SIGNAL GND POWER TO PAN/TILT HEAD 12V IN TALLY/GPI BOOT DC IN socket [12V IN] (DC 12 V) POWER switch [POWER] The AC adapter provided with the unit is connected to When the POWER switch is set to the ON position, this socket. -
Page 117: Basic Operations Of The Unit
Basic operations of the unit Turn on the unit’s power. Adjust the lens iris. Set the POWER switch to the ON position. Use the IRIS dial to adjust the lens iris. While the lens iris is being adjusted, a level meter is Power is now supplied to the unit, and the POWER indicator lights. -
Page 118: Basic Operations For The Menus
Basic operations for the menus Set the MENU button to ON. Press the EXIT button to return the menu to its Press the MENU button and light its indicator. previous hierarchical level. When the down arrow “” is displayed for a setting Select the target menu. -
Page 119: Network Settings
Network settings This section describes how the unit’s network are set. Turn the F2 dial, and select the setting. 2. S U B N E T M A S K Setting the unit 25 5 2 5 5 . 2 5 5 . 00 0 The unit’s settings are established using the [SYSTEM] menu. - Page 120 Network settings Setting the IP address Setting the default gateway On the [SYSTEM] menu, select the [NETWORK] menu, and On the [SYSTEM] menu, select the [NETWORK] menu, and display [IP ADDRESS]. display [GATEWAY]. Then operate the F2 dial to set the IP address. Then operate the F2 dial to set the gateway.
-
Page 121: Connections
Connections Example of IP connections Connections with the AW-HE50 and AW-HS50 AW-HE50S AW-HE50S Monitor 2 Segnale video Cavo LAN Hub di Monitor 1 commutazione Cavo LAN Monitor Monitor AW-HS50 AW-RP50 Connecting a multiple number of the units with the AW-HE50 units ... -
Page 122: Example Of Serial Connections
Connections Example of serial connections Connection with the AW-HE50 AW-HE50 Remote camera control signal Cavo LAN AW-RP50 SIGNAL GND POWER TO PAN/TILT HEAD 12V IN TALLY/GPI BOOT Monitor 1: Use straight cables (category 5 or above) for these connections. 2: The multi-interface cable (AW-CA20T6G) is required for the serial connection with the AW-HE50. - Page 123 Connections Connections with the AW-PH400 and camera Camera model: AW-HE870, AW-E860, AW-E750, AW-E650, AW-E350, AK-HC1500 or AK-HC1800 Cavo LAN Obiettivo zoom 1000 metri max. 500 metri max. AW-RP50 AW-PH400 SIGNAL GND POWER TO PAN/TILT HEAD 12V IN TALLY/GPI BOOT Convertitore protocollo...
- Page 124 Connections Connection with the AW-PH650 MULTI POWER AW-PH650 Scheda di rinvio RJ-45 Cavo LAN AW-RP50 SIGNAL GND POWER TO PAN/TILT HEAD 12V IN TALLY/GPI BOOT Ingresso G/L Monitor : Use straight cables (category 5 or above) for these connections. 21 ( I )
-
Page 125: Settings For Connection With The Remote Cameras
Connections IP connection Settings for connection with the remote cameras Select “Network” as the setting for the target camera number. Either serial connection “Serial” or IP connection “Network” 2.C AM 2 can be selected for the connections between the unit and Net wo rk the remote cameras for camera numbers CAM1 to CAM100. -
Page 126: Setting The Ip Addresses Automatically (Auto Ip Setting)
Connections Setting the IP addresses automatically (auto IP setting) When “Auto IP setting” is initiated, the IP addresses are set [Switcher settings] On the [SYSTEM] menu, in [SW CTL], if the [SW] item is automatically for the remote cameras and the switcher which are connected within the same subnet. - Page 127 Connections On the [SYSTEM] menu, select [AUTO SET Turn the F2 dial, select “Yes,” and then press IP], and display [AUTO SETUP]. Then select the F2 dial. RENEW, and press the F2 dial. This starts the “Auto IP setting” process. When “Auto IP setting”...
- Page 128 Connections When introducing additional remote Setting the IP address from the unit cameras or a switcher into an environment where similar existing [Remote camera settings] devices are already in use The unit sets the IP addresses for the remote cameras that have been detected by associating them with camera Even when additional remote cameras or switcher are numbers whose connection setting is set to “NoAsign”.
- Page 129 Connections Connect the additional remote cameras and Turn the F2 dial, select “Yes,” and then press the switcher to be introduced and the unit to the F2 dial. the network within the same subnet. This starts the “Auto IP setting” process. When “Auto IP setting”...
- Page 130 Connections Changing the IP address on the unit to match the IP Connect the additional remote cameras and address of the remote camera or switcher the switcher to be introduced and the unit to the network within the same subnet. [Remote camera settings] The unit sets the IP addresses for the remote cameras On the [SYSTEM] menu, select [AUTO SET...
-
Page 131: Changing The Ip Addresses Of The Remote Cameras
Connections Changing the IP addresses of Turn the F2 dial, select “Yes,” and then press the F2 dial. the remote cameras This starts the “Auto IP setting” process. When “Auto IP setting” has been initiated, the progress Setting the IP addresses ... -
Page 132: Changing The Camera Numbers
Connections Changing the camera numbers Changing the IP address of the switcher The camera numbers which have been set by “Auto IP setting” can be changed. The IP address of the switcher which was set by “Auto IP They are changed by replacing the IP addresses of the setting”... -
Page 133: Selecting The Remote Cameras To Be Operated
Selecting the remote cameras to be operated Up to five remote cameras to be operated can be selected The statuses of the remote cameras assigned to CAMERA using the CAMERA STATUS/SELECTION buttons. STATUS/SELECTION buttons 1 to 5 can be identified by the When one of the CAMERA STATUS/SELECTION buttons lighting statuses of the indicators above the buttons. -
Page 134: Maintenance
Maintenance Carry out the maintenance described below at periodic intervals to ensure the safety and performance of the unit. Disconnect the power plug, and wipe the unit’s surfaces WARNING with a dry cloth. Before proceeding with maintenance, disconnect the To remove stubborn dirt, soak the cloth in a diluted power plug from the power outlet, and allow the unit solution of kitchen detergent (neutral), wring it out well,... -
Page 135: Appearance
Appearance Unit: mm POWER ALARM CAMERA MENU PAGE GAIN/PED R/B GAIN R/B PED AWB/ABB SHUTTER EXIT STORE DELETE DETAIL SCENE/MODE CAMERA SETUP SYSTEM USER1 USER2 PRESET MEMORY / MENU IRIS AUTO PT ACTIVE CAMERA STATUS / SELECTION AUTO TELE ZOOM WIDE FOCUS/ OTAF... - Page 136 Dati tecnici Tensione di alimentazione: C.c. 12 V 10 % (Alimentatore c.a. in dotazione) Assorbimento di corrente: C.c. 12 V, 0,5 A sono le informazioni sulla sicurezza . Alimentatore c.a. Generali Ingresso: Temperatura d’esercizio: C.a. 100 V - 240 V, 1,5 A, 50/60 Hz 0 °C - +40 °C Uscita: Gamme di umidità...
- Page 137 Appunti...
- Page 138 VERSIÓN ESPAÑOLA (SPANISH VERSION) Precauciones de seguridad NO QUITE LA CUBIERTA DESATORNILLÁNDOLA. PRECAUCIÓN: No quite la tapa para evitar el riesgo de sacudidas PARA REDUCIR EL RIESGO DE INCENDIOS, eléctricas. Las piezas del interior no requieren SACUDIDAS ELÉCTRICAS E INTERFERENCIAS mantenimiento por parte del usuario.
- Page 139 Información sobre la eliminación para los usuarios de equipos eléctricos y electrónicos usados (particulares) La aparición de este símbolo en un producto y/o en la documentación adjunta indica que los productos eléctricos y electrónicos usados no deben mezclarse con la basura doméstica general. Para que estos productos se sometan a un proceso adecuado de tratamiento, recuperación y reciclaje, llévelos a los puntos de recogida designados, donde los admitirán sin coste alguno.
- Page 140 Índice Before use ................4 Basic operations of the unit ..........14 Overview ................4 Basic operations for the menus ........15 Concerning the Operating Instructions ......4 Network settings ...............16 Trademarks and registered trademarks ......4 Setting the unit ...............16 About copyright and licence ..........4 Concerning the ratings display .........4 Connections ..............18 Disclaimer of warranty............4...
-
Page 141: Before Use
MODIFICATION OF THE PRODUCT BY THE USER; Instructions INCONVENIENCE OR ANY LOSS ARISING WHEN For the purposes of these instructions, AW-RP50E is IMAGES ARE NOT DISPLAYED, DUE TO ANY REASON OR CAUSE INCLUDING ANY FAILURE OR referred to as “AW-RP50”. -
Page 142: Characteristics
Characteristics Compact design Function for linkup with the switcher using IP The unit features a compact design with its half-rack connection By linking the unit with one AW-HS50 compact live size width (210 mm [8-1/4˝]) and its 4RU size (177 mm [6-15/16˝]) depth. -
Page 143: Pan-Tilt Heads And Cameras Supported
Pan-tilt heads and cameras supported Remote cameras supported (cameras integrated with a pan-tilt head) AW-HE100, AW-HE50 Pan-tilt heads supported AW-PH360, AW-PH405, AW-PH650, AW-PH400 (AW-IF400 required) Cameras supported (must be combined with the pan-tilt head supported) AW-HE870, AW-E860, AW-E750, AW-E650, AW-E350, AK-HC1500, AK-HC1800 Notes ... -
Page 144: Required Personal Computer Environment
Required personal computer environment Run the software that is provided with the switcher on a host computer which satisfies the following specifications. ® Intel Core 2 DUO 2.4 GHz or faster recommended ® Memory Windows 512 MB or more ® ®... -
Page 145: Installation Precautions
Installation precautions In addition to heeding the points presented in the “Precauciones de seguridad”, observe the following precautions as well. Be absolutely sure to ask your dealer to do the jobs of installing and connecting the unit. Connecting the power supply Handle carefully! ... -
Page 146: Operating Precautions
Operating precautions In addition to heeding the points presented in the “Precauciones de seguridad”, observe the following precautions as well. When the product is to be discarded Handle carefully. When the product is to be discarded at the end of its service Do not drop the product, or subject it to strong shock or life, ask a specialized contractor to dispose of it properly in vibration. -
Page 147: Parts And Their Functions
Parts and their functions Control panel POWER ALARM CAMERA MENU PAGE GAIN/PED R/B GAIN R/B PED AWB/ABB SHUTTER EXIT STORE DELETE DETAIL SCENE/MODE CAMERA SETUP SYSTEM USER1 USER2 PRESET MEMORY / MENU IRIS AUTO PT ACTIVE CAMERA STATUS / SELECTION AUTO TELE ZOOM... - Page 148 Parts and their functions CAMERA OSD button [CAMERA OSD] DELETE button [DELETE] When the CAMERA OSD button is held down, its Press this to delete the preset memory data for the indicator lights, and the on-screen menu of the selected currently selected remote camera.
- Page 149 Parts and their functions Auto focus button [AUTO] PTZ/FOCUS SPEED dial [PTZ/FOCUS SPEED] Press this to control the focus automatically. Use this dial to adjust the speed at which the operations Button indicator ON: (pan, tilt, zoom, focus) of the remote cameras are Auto focusing controlled.
-
Page 150: Rear Panel
Parts and their functions Rear panel SIGNAL GND POWER TO PAN/TILT HEAD 12V IN TALLY/GPI BOOT DC IN socket [12V IN] (DC 12 V) POWER switch [POWER] The AC adapter provided with the unit is connected to When the POWER switch is set to the ON position, this socket. -
Page 151: Basic Operations Of The Unit
Basic operations of the unit Turn on the unit’s power. Adjust the lens iris. Set the POWER switch to the ON position. Use the IRIS dial to adjust the lens iris. While the lens iris is being adjusted, a level meter is Power is now supplied to the unit, and the POWER indicator lights. -
Page 152: Basic Operations For The Menus
Basic operations for the menus Set the MENU button to ON. Press the EXIT button to return the menu to its Press the MENU button and light its indicator. previous hierarchical level. When the down arrow “” is displayed for a setting Select the target menu. -
Page 153: Network Settings
Network settings This section describes how the unit’s network are set. Turn the F2 dial, and select the setting. 2. S U B N E T M A S K Setting the unit 25 5 2 5 5 . 2 5 5 . 00 0 The unit’s settings are established using the [SYSTEM] menu. - Page 154 Network settings Setting the IP address Setting the default gateway On the [SYSTEM] menu, select the [NETWORK] menu, and On the [SYSTEM] menu, select the [NETWORK] menu, and display [IP ADDRESS]. display [GATEWAY]. Then operate the F2 dial to set the IP address. Then operate the F2 dial to set the gateway.
-
Page 155: Connections
Connections Example of IP connections Connections with the AW-HE50 and AW-HS50 AW-HE50S AW-HE50S Monitor 2 Señal de vídeo Cable LAN Concentrador de Monitor 1 conmutación Cable LAN Monitor Monitor AW-HS50 AW-RP50 Connecting a multiple number of the units with the AW-HE50 units ... -
Page 156: Example Of Serial Connections
Connections Example of serial connections Connection with the AW-HE50 AW-HE50 Remote camera control signal Cable LAN AW-RP50 SIGNAL GND POWER TO PAN/TILT HEAD 12V IN TALLY/GPI BOOT Monitor 1: Use straight cables (category 5 or above) for these connections. 2: The multi-interface cable (AW-CA20T6G) is required for the serial connection with the AW-HE50. - Page 157 Connections Connections with the AW-PH400 and camera Camera model: AW-HE870, AW-E860, AW-E750, AW-E650, AW-E350, AK-HC1500 or AK-HC1800 Cable LAN Objetivo zoom máximo de 1000 metros máximo de 500 metros AW-RP50 AW-PH400 SIGNAL GND POWER TO PAN/TILT HEAD 12V IN TALLY/GPI BOOT...
- Page 158 Connections Connection with the AW-PH650 MULTI POWER AW-PH650 Adaptador de relé RJ-45 Cable LAN AW-RP50 SIGNAL GND POWER TO PAN/TILT HEAD 12V IN TALLY/GPI BOOT Entrada G/L Monitor : Use straight cables (category 5 or above) for these connections. 21 (S)
-
Page 159: Settings For Connection With The Remote Cameras
Connections IP connection Settings for connection with the remote cameras Select “Network” as the setting for the target camera number. Either serial connection “Serial” or IP connection “Network” 2.C AM 2 can be selected for the connections between the unit and Net wo rk the remote cameras for camera numbers CAM1 to CAM100. -
Page 160: Setting The Ip Addresses Automatically (Auto Ip Setting)
Connections Setting the IP addresses automatically (auto IP setting) When “Auto IP setting” is initiated, the IP addresses are set [Switcher settings] On the [SYSTEM] menu, in [SW CTL], if the [SW] item is automatically for the remote cameras and the switcher which are connected within the same subnet. - Page 161 Connections On the [SYSTEM] menu, select [AUTO SET Turn the F2 dial, select “Yes,” and then press IP], and display [AUTO SETUP]. Then select the F2 dial. RENEW, and press the F2 dial. This starts the “Auto IP setting” process. When “Auto IP setting”...
- Page 162 Connections When introducing additional remote Setting the IP address from the unit cameras or a switcher into an environment where similar existing [Remote camera settings] devices are already in use The unit sets the IP addresses for the remote cameras that have been detected by associating them with camera Even when additional remote cameras or switcher are numbers whose connection setting is set to “NoAsign”.
- Page 163 Connections Connect the additional remote cameras and Turn the F2 dial, select “Yes,” and then press the switcher to be introduced and the unit to the F2 dial. the network within the same subnet. This starts the “Auto IP setting” process. When “Auto IP setting”...
-
Page 164: Changing The Ip Addresses Of The Remote Cameras
Connections Changing the IP address on the unit to match the IP Connect the additional remote cameras and address of the remote camera or switcher the switcher to be introduced and the unit to the network within the same subnet. [Remote camera settings] The unit sets the IP addresses for the remote cameras On the [SYSTEM] menu, select [AUTO SET... - Page 165 Connections Changing the IP addresses of Turn the F2 dial, select “Yes,” and then press the F2 dial. the remote cameras This starts the “Auto IP setting” process. When “Auto IP setting” has been initiated, the progress Setting the IP addresses ...
-
Page 166: Changing The Camera Numbers
Connections Changing the camera numbers Changing the IP address of the switcher The camera numbers which have been set by “Auto IP setting” can be changed. The IP address of the switcher which was set by “Auto IP They are changed by replacing the IP addresses of the setting”... -
Page 167: Selecting The Remote Cameras To Be Operated
Selecting the remote cameras to be operated Up to five remote cameras to be operated can be selected The statuses of the remote cameras assigned to CAMERA using the CAMERA STATUS/SELECTION buttons. STATUS/SELECTION buttons 1 to 5 can be identified by the When one of the CAMERA STATUS/SELECTION buttons lighting statuses of the indicators above the buttons. -
Page 168: Maintenance
Maintenance Carry out the maintenance described below at periodic intervals to ensure the safety and performance of the unit. Disconnect the power plug, and wipe the unit’s surfaces WARNING with a dry cloth. Before proceeding with maintenance, disconnect the To remove stubborn dirt, soak the cloth in a diluted power plug from the power outlet, and allow the unit solution of kitchen detergent (neutral), wring it out well,... -
Page 169: Appearance
Apariencia Unidad: mm POWER ALARM CAMERA MENU PAGE GAIN/PED R/B GAIN R/B PED AWB/ABB SHUTTER EXIT STORE DELETE DETAIL SCENE/MODE CAMERA SETUP SYSTEM USER1 USER2 PRESET MEMORY / MENU IRIS AUTO PT ACTIVE CAMERA STATUS / SELECTION AUTO TELE ZOOM WIDE FOCUS/ OTAF... -
Page 170: Specifications
Especificaciones 12 V CC 10 % Alimentación: (Adaptador de CA suministrado) Consumo: 12 V CC, 0,5 A indica información de seguridad . Adaptador de CA GENERAL Entrada: Temperatura ambiental de funcionamiento: 100 V a 240 V CA, 1,5 A, 50/60 Hz 0 °C a +40 °C Salida: Gamas de humedad permitidas:... - Page 171 Apuntes...
- Page 172 РУССКАЯ ВЕРСИЯ (RUSSIAN VERSION) Меры предосторожности НЕ ОТВИНЧИВАЙТЕ КРЫШКИ ПАНЕЛЕЙ. ОСТОРОЖНО: Для снижения риска удара электрическим током не ДЛЯ СНИЖЕНИЯ РИСКА ВОЗНИКНОВЕНИЯ снимайте панели. Внутри устройства нет деталей, ПОЖАРА ИЛИ УДАРА ЭЛЕКТРИЧЕСКИМ ТОКОМ подлежащих обслуживанию пользователем. И ВОЗНИКНОВЕНИЯ ПОМЕХ ИСПОЛЬЗУЙТЕ...
- Page 173 Содержание Before use ................4 Basic operations of the unit ..........14 Overview ................4 Basic operations for the menus ........15 Concerning the Operating Instructions ......4 Network settings ...............16 Trademarks and registered trademarks ......4 Setting the unit ...............16 About copyright and licence ..........4 Concerning the ratings display .........4 Connections ..............18 Disclaimer of warranty............4...
- Page 174 Как составлены инструкции по эксплуатации данной модели Руководство по данной Remote Camera Controller (в дальнейшем “устройство”) подразделяется на две инструкции: <Основные положения> (данное руководство) и <Операции и установки> (CD-ROM). Перед установкой устройства обязательно прочтите <Основные положения> для обеспечения правильности установки. ...
-
Page 175: Overview
MODIFICATION OF THE PRODUCT BY THE USER; Instructions INCONVENIENCE OR ANY LOSS ARISING WHEN For the purposes of these instructions, AW-RP50E is IMAGES ARE NOT DISPLAYED, DUE TO ANY REASON OR CAUSE INCLUDING ANY FAILURE OR referred to as “AW-RP50”. - Page 176 Характеристики Compact design Function for linkup with the switcher using IP The unit features a compact design with its half-rack connection By linking the unit with one AW-HS50 compact live size width (210 mm [8-1/4˝]) and its 4RU size (177 mm [6-15/16˝]) depth.
-
Page 177: Pan-Tilt Heads And Cameras Supported
Pan-tilt heads and cameras supported Remote cameras supported (cameras integrated with a pan-tilt head) AW-HE100, AW-HE50 Pan-tilt heads supported AW-PH360, AW-PH405, AW-PH650, AW-PH400 (AW-IF400 required) Cameras supported (must be combined with the pan-tilt head supported) AW-HE870, AW-E860, AW-E750, AW-E650, AW-E350, AK-HC1500, AK-HC1800 Notes ... -
Page 178: Required Personal Computer Environment
Required personal computer environment Run the software that is provided with the switcher on a host computer which satisfies the following specifications. ® Intel Core 2 DUO 2.4 GHz or faster recommended ® Memory Windows 512 MB or more ® ®... -
Page 179: Installation Precautions
Installation precautions In addition to heeding the points presented in the “Меры предосторожности”, observe the following precautions as well. Be absolutely sure to ask your dealer to do the jobs of installing and connecting the unit. Connecting the power supply Handle carefully! ... -
Page 180: Operating Precautions
Operating precautions In addition to heeding the points presented in the “Меры предосторожности”, observe the following precautions as well. When the product is to be discarded Handle carefully. When the product is to be discarded at the end of its service Do not drop the product, or subject it to strong shock or life, ask a specialized contractor to dispose of it properly in vibration. -
Page 181: Parts And Their Functions
Parts and their functions Control panel POWER ALARM CAMERA MENU PAGE GAIN/PED R/B GAIN R/B PED AWB/ABB SHUTTER EXIT STORE DELETE DETAIL SCENE/MODE CAMERA SETUP SYSTEM USER1 USER2 PRESET MEMORY / MENU IRIS AUTO PT ACTIVE CAMERA STATUS / SELECTION AUTO TELE ZOOM... - Page 182 Parts and their functions CAMERA OSD button [CAMERA OSD] DELETE button [DELETE] When the CAMERA OSD button is held down, its Press this to delete the preset memory data for the indicator lights, and the on-screen menu of the selected currently selected remote camera.
- Page 183 Parts and their functions Auto focus button [AUTO] PTZ/FOCUS SPEED dial [PTZ/FOCUS SPEED] Press this to control the focus automatically. Use this dial to adjust the speed at which the operations Button indicator ON: (pan, tilt, zoom, focus) of the remote cameras are Auto focusing controlled.
-
Page 184: Rear Panel
Parts and their functions Rear panel SIGNAL GND POWER TO PAN/TILT HEAD 12V IN TALLY/GPI BOOT DC IN socket [12V IN] (DC 12 V) POWER switch [POWER] The AC adapter provided with the unit is connected to When the POWER switch is set to the ON position, this socket. -
Page 185: Basic Operations Of The Unit
Basic operations of the unit Turn on the unit’s power. Adjust the lens iris. Set the POWER switch to the ON position. Use the IRIS dial to adjust the lens iris. While the lens iris is being adjusted, a level meter is Power is now supplied to the unit, and the POWER indicator lights. -
Page 186: Basic Operations For The Menus
Basic operations for the menus Set the MENU button to ON. Press the EXIT button to return the menu to its Press the MENU button and light its indicator. previous hierarchical level. When the down arrow “” is displayed for a setting Select the target menu. -
Page 187: Network Settings
Network settings This section describes how the unit’s network are set. Turn the F2 dial, and select the setting. 2. S U B N E T M A S K Setting the unit 25 5 2 5 5 . 2 5 5 . 00 0 The unit’s settings are established using the [SYSTEM] menu. - Page 188 Network settings Setting the IP address Setting the default gateway On the [SYSTEM] menu, select the [NETWORK] menu, and On the [SYSTEM] menu, select the [NETWORK] menu, and display [IP ADDRESS]. display [GATEWAY]. Then operate the F2 dial to set the IP address. Then operate the F2 dial to set the gateway.
-
Page 189: Connections
Connections Example of IP connections Connections with the AW-HE50 and AW-HS50 AW-HE50S AW-HE50S Монитор 2 Кабель LAN Видеосигнал SDI Коммутирующий Монитор 1 концентратор Кабель LAN Монитор Монитор AW-HS50 AW-RP50 Connecting a multiple number of the units with the AW-HE50 units ... -
Page 190: Example Of Serial Connections
Connections Example of serial connections Connection with the AW-HE50 AW-HE50 Remote camera control signal Кабель LAN AW-RP50 SIGNAL GND POWER TO PAN/TILT HEAD 12V IN TALLY/GPI BOOT Монитор 1: Use straight cables (category 5 or above) for these connections. 2: The multi-interface cable (AW-CA20T6G) is required for the serial connection with the AW-HE50. - Page 191 Connections Connections with the AW-PH400 and camera Camera model: AW-HE870, AW-E860, AW-E750, AW-E650, AW-E350, AK-HC1500 or AK-HC1800 Кабель LAN Объектив с увеличением макс. 1000 м макс. 500 м AW-RP50 AW-PH400 SIGNAL GND POWER TO PAN/TILT HEAD 12V IN TALLY/GPI BOOT Конвертер...
- Page 192 Connections Connection with the AW-PH650 MULTI POWER AW-PH650 Релейный адаптер RJ-45 Кабель LAN AW-RP50 SIGNAL GND POWER TO PAN/TILT HEAD 12V IN TALLY/GPI BOOT Вход G/L Монитор : Use straight cables (category 5 or above) for these connections. 21 (R)
-
Page 193: Settings For Connection With The Remote Cameras
Connections IP connection Settings for connection with the remote cameras Select “Network” as the setting for the target camera number. Either serial connection “Serial” or IP connection “Network” 2.C AM 2 can be selected for the connections between the unit and Net wo rk the remote cameras for camera numbers CAM1 to CAM100. -
Page 194: Setting The Ip Addresses Automatically (Auto Ip Setting)
Connections Setting the IP addresses automatically (auto IP setting) When “Auto IP setting” is initiated, the IP addresses are set [Switcher settings] On the [SYSTEM] menu, in [SW CTL], if the [SW] item is automatically for the remote cameras and the switcher which are connected within the same subnet. - Page 195 Connections On the [SYSTEM] menu, select [AUTO SET Turn the F2 dial, select “Yes,” and then press IP], and display [AUTO SETUP]. Then select the F2 dial. RENEW, and press the F2 dial. This starts the “Auto IP setting” process. When “Auto IP setting”...
- Page 196 Connections When introducing additional remote Setting the IP address from the unit cameras or a switcher into an environment where similar existing [Remote camera settings] devices are already in use The unit sets the IP addresses for the remote cameras that have been detected by associating them with camera Even when additional remote cameras or switcher are numbers whose connection setting is set to “NoAsign”.
- Page 197 Connections Connect the additional remote cameras and Turn the F2 dial, select “Yes,” and then press the switcher to be introduced and the unit to the F2 dial. the network within the same subnet. This starts the “Auto IP setting” process. When “Auto IP setting”...
- Page 198 Connections Changing the IP address on the unit to match the IP Connect the additional remote cameras and address of the remote camera or switcher the switcher to be introduced and the unit to the network within the same subnet. [Remote camera settings] The unit sets the IP addresses for the remote cameras On the [SYSTEM] menu, select [AUTO SET...
-
Page 199: Changing The Ip Addresses Of The Remote Cameras
Connections Changing the IP addresses of Turn the F2 dial, select “Yes,” and then press the F2 dial. the remote cameras This starts the “Auto IP setting” process. When “Auto IP setting” has been initiated, the progress Setting the IP addresses ... -
Page 200: Changing The Camera Numbers
Connections Changing the camera numbers Changing the IP address of the switcher The camera numbers which have been set by “Auto IP setting” can be changed. The IP address of the switcher which was set by “Auto IP They are changed by replacing the IP addresses of the setting”... -
Page 201: Selecting The Remote Cameras To Be Operated
Selecting the remote cameras to be operated Up to five remote cameras to be operated can be selected The statuses of the remote cameras assigned to CAMERA using the CAMERA STATUS/SELECTION buttons. STATUS/SELECTION buttons 1 to 5 can be identified by the When one of the CAMERA STATUS/SELECTION buttons lighting statuses of the indicators above the buttons. -
Page 202: Maintenance
Maintenance Carry out the maintenance described below at periodic intervals to ensure the safety and performance of the unit. Disconnect the power plug, and wipe the unit’s surfaces WARNING with a dry cloth. Before proceeding with maintenance, disconnect the To remove stubborn dirt, soak the cloth in a diluted power plug from the power outlet, and allow the unit solution of kitchen detergent (neutral), wring it out well,... - Page 203 Внешний вид Единица измерения: мм POWER ALARM CAMERA MENU PAGE GAIN/PED R/B GAIN R/B PED AWB/ABB SHUTTER EXIT STORE DELETE DETAIL SCENE/MODE CAMERA SETUP SYSTEM USER1 USER2 PRESET MEMORY / MENU IRIS AUTO PT ACTIVE CAMERA STATUS / SELECTION AUTO TELE ZOOM WIDE...
- Page 204 Технические характеристики Напряжение питания: Постоянное напряжение 12 В 10 % (Прилагаемый адаптер переменного тока) Потребляемая мощность: Данный знак обозначает информацию, относящуюся к Постоянное напряжение 12 В, 0,5 A технике безопасности. Адаптер переменного тока Общие Вход: Рабочая окружающая температура: От...
- Page 205 Memo...
- Page 206 Memo...
- Page 207 Memo...
- Page 208 © Panasonic System Networks Co., Ltd. 2010 F0610Y0...
Need help?
Do you have a question about the AW-RP50E and is the answer not in the manual?
Questions and answers