Table of Contents
Advertisement
Advertisement
Table of Contents

Subscribe to Our Youtube Channel
Related Manuals for FP Postbase Mini


Summary of Contents for FP Postbase Mini
- Page 1 Franking machine Operator Manual First steps...
-
Page 2: About This Manual
This manual describes installation and comissioning of the PostBase Mini franking machine and gives basic information on operating the PostBase Mini. Functions that are described here but are not available for each PostBase Mini (among other things because of postal requirements in the individual countries) are identified as (not avail- able in all countries). -
Page 3: Table Of Contents
Contents About this Manual _____________________________________________2 1 Safety tips ____________________________________________________4 2 A short description of the PostBase Mini __________________________6 3 Installation and commissioning __________________________________9 Step 1: Unpacking and checking the contents of the package ____________9 Step 2: Assembling PostBase Mini _______________________________10... -
Page 4: Safety Tips
• Use only with specified power supply unit: XP POWER LTD. - VEH40US24. • Make sure the socket for connecting the PostBase Mini is close by and easily accessible at all times. • Unplug the mains plug in case of an emergency. Call the Customer Support. - Page 5 General safety tips • Install the PostBase Mini according to the instructions. • When you move the PostBase Mini from a cold environment (i.e. below 10 °C / 50 °F): Unpack the PostBase Mini and wait at least two hours before connecting the PostBase Mini.
-
Page 6: Short Description Of The Postbase Mini
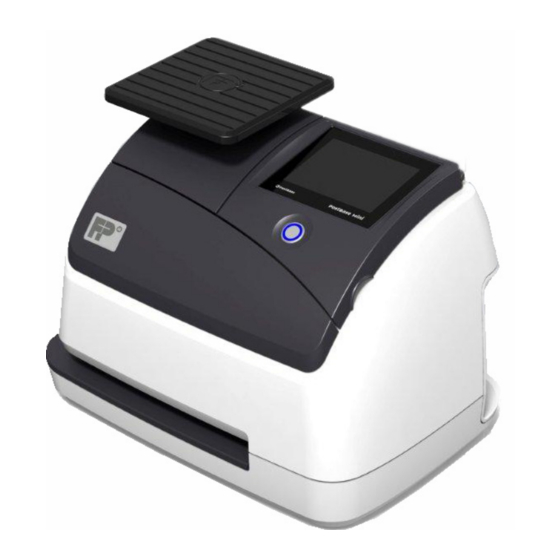
PostBase Mini A short description of the PostBase Mini Scale with Display / touch screen weighing platform Stylus for touch screen operation: pull out to the right Operating panel ink cartridge below it Button ON / OFF Letter slot Serial number plate... - Page 7 Download postage You conveniently download the postage for franking online from the data centre into your franking machine. If desired, PostBase Mini can also, by itself, make sure there is always sufficient postage available and prompt you automatically to download postage.
- Page 8 The determined weight directly affects the product settings. Account function – PostBase Mini allows for registra- tion and billing of postage costs to accounts. Access control – PostBase Mini can be protected against unauthorised use via a PIN (Personal Identifica- tion Number).
-
Page 9: Installation And Commissioning
Step 1: Unpacking and checking the contents of the package Warning! Do not start operating PostBase Mini if parts are damaged or miss- ing. Please contact the Customer Support. Caution! Carry out the steps exactly in the given order. Also, consult the installation instructions (fold-out). -
Page 10: Step 2: Assembling Postbase Mini
Caution! When you move PostBase Mini from a cold environment (i.e. below 10 °C / 50 °F): Unpack the PostBase Mini and wait at least 2 hours before connecting PostBase Mini. PostBase Mini requires this period to adapt to the ambient conditions. -
Page 11: Step 3: Removing The Transport Fixture
(step 6)! Transport fixture • Lower the operating panel back into position. Keep the transport fixture (cardboard). use it again whenever you need to transport your PostBase Mini, or when sending it to the cus- tomer support. -
Page 12: Step 4: Connecting Postbase Mini
PostBase Mini Step 4: Connecting PostBase Mini Warning! Use only the power supply unit provided with the PostBase Mini or approved by Francotyp-Postalia. Make sure that the power supply unit is not damaged. Use the cables provided with the PostBase Mini or approved by Francotyp- Postalia. -
Page 13: Step 5: Turning The Postbase Mini On
Step 5: Turning the PostBase Mini on • Press the button on the operating panel. The display lighting and button illumination switch on. PostBase Mini performs a self test and then starts the installation procedure. Step 6: Installing PostBase Mini PostBase Mini will guide you step by step through the installation procedure. - Page 14 PostBase Mini comes with pre-set connec- tion settings that should work in most cases. • Press the button to use these settings. PostBase Mini tests the connection to the FP Infrastructure. If no connection can be established, the wiz- ard for entering connection parameters is opened.
- Page 15 Installation and commissioning PostBase Mini then asks you to insert the ink cartridge. • Lift up the operating panel as far as it goes. You can feel it engage. • Remove the ink cartridge from the packing. • Remove the nozzle protection.
- Page 16 As soon as the sensor (in the back right hand corner of the letter slot) detects the envelope, the PostBase Mini grips the envelope tightly and prints the test print. Test print (example) • On the test print, determine the numbers where –...
- Page 17 Installation and commissioning Adjust cartridge: horizontal line • Type the number where the horizontal par- tial lines are as exactly next to each other as possible. In the example, this is number ‘4’. (If necessary: Press CE to clear the dis- played number.) •...
- Page 18 PostBase Mini • Contact to the data centre / load postage. To be able to frank with your PostBase Mini, the PostBase Mini must have the corre- sponding postage credit available. For this, a connection to the data centre is necessary.
-
Page 19: The Basics Of Operation
The basics of operation The basics of operation In this chapter, you will learn about the basic functions of the PostBase Mini and how to handle the touch screen. Turning the PostBase Mini on / off Turning on • Press the button on the operating panel. -
Page 20: Standby
The PostBase Mini franking machine will go to standby automatically if it is not used for some time. The display is dark and the button is illumi- nated in standby. The touch function is inactive. You can ‘wake up’ PostBase Mini by briefly pressing the button. -
Page 21: Screen Elements And Operation Philosophy
4.3.1 The touch screen The touch screen is active when the display is lit. To operate the PostBase Mini, simply touch the screen elements with your finger. General operation philosophy You briefly touch the desired screen element (in the example: the postage button) with your finger. - Page 22 PostBase Mini Buttons You distinguish buttons from the screen background by a frame. They can have vari- ous states, depending on the function: Button can be pressed / is active. Button is selected. Button is being pressed. Button cannot be pressed / is deactivated.
-
Page 23: The Home Screen
Operation philosophy A function can be edited or selected by simply touching its button. Depending on the respective function, the PostBase Mini opens a list, an adjustment menu or a menu offering further options. In the chapters to follow, you will be introduced to each of the menu and window types and their operation. -
Page 24: The Product Calculation Menu
PostBase Mini 4.3.3 The Product calculation menu In the Product calculation menu, you set the product for franking. Calling up the Product calculation menu You open the Product calculation menu by pressing the button showing the postage value. The left area of the display shows the availa-... - Page 25 You select the mailing data for a product by pressing the button with the desired setting. PostBase Mini applies your selection and shows the next available mailing data to the left in the display. PostBase Mini guides you through the postage calculation process step by step. Press the button to accept the current setting and to return to the Home screen.
-
Page 26: The Menu
PostBase Mini 4.3.4 The Menu Use the M button to open the Menu. From this Menu, you can access the basic settings, administration, and service functions. Menu (example) Use the arrow buttons to scroll to the next page and back in the Menu. -
Page 27: Adjustment Menus
The basics of operation 4.3.6 Adjustment menus A separate menu each opens for editing and selecting settings. There are different types of adjustment menus, for example lists where you select a setting or menus with a keypad for entering figures or letters. Lists The left area of the display shows the availa- ble settings. -
Page 28: Pop-Up Windows
(pop-up window). The pop-up prompts you for an action. Messages and the ‘PC Mode’ (using the PC control software for PostBase Mini) also appear as a pop-up. Some pop-up messages feature auto-confir- mation, i.e. they automatically close after some time. -
Page 29: Procedures (Wizards)
The basics of operation 4.3.8 Procedures (wizards) For more complex settings, e.g. when setting up connection data, PostBase Mini guides you through all necessary actions step by step. Different window types are used, depending on requirements. Press the button to accept the current settings and to go to the next step. -
Page 30: Franking
PostBase Mini Franking Setting the franking imprint Set advertising imprint Set postal product / postage Date Product details Open list wth further Shortcuts Open the Menu: shortcuts (set postal product) – setting date – changing account Detailed information on the franking imprint of your postal service can be found in the country-specific addendum. -
Page 31: Positioning And Franking A Letter
Franking Positioning and franking a letter You can use the PostBase Mini to frank postcards and letters up to a thickness of 6 mm (0.23"). For thicker mail pieces, frank the empty envelope or use the special franking labels of at least 140 mm (5.5") length. You can order suitable labels for the PostBase Mini from Francotyp-Postalia. - Page 32 PostBase Mini...
-
Page 33: Appendix
ISABLED port DHCP. During manual configuration, you will need to enter the following parameters: – Static IP address for your PostBase Mini – Subnet mask – Default gateway – IP address of the DNS server. Please contact you network administrator for details. - Page 34 – User name for proxy access – Password. Please contact you network administrator for details. In case your network only supports explicitly authorised devices, your network administrator will require the MAC address of your PostBase Mini. You can find it in the Connectivity Settings menu.
- Page 35 Appendix – Connection settings (Overview) Reference Information for Network Administrators The PostBase Mini requires (preferably) an Ethernet connection, with a minimum of 10 Mbit/sec, in order to able to download postal funds from a Francotyp-Postalia server. Ethernet cables of class CAT5E are recommended. For this it normally uses TCP/IP (v4 only) through an https connection using TLS v1.2 over port 443.
-
Page 36: Technical Data
PostBase Mini Technical Data Dimensions – Length 310 mm (12.2") – Width / Depth 205 mm (8.1") – Height 230 mm (9.1") Weight 3,0 kg (6.6 lbs) Power supply 24 VDC / 0.7 A (using an external power supply unit) - Page 37 Appendix – Technical Data Ink cartridge Ink cartridge FP ink cartridge for PostBase Mini (ink colour depending on country) Operating and storage +15 °C to +35 °C (59 °F to 95 °F) conditions Only use in closed rooms Do not expose to direct sunlight Rel.
-
Page 38: Declaration Of Conformity
PostBase Mini Declaration of conformity... -
Page 39: License
Appendix – License License This is a copy of the current LICENSE file inside the CVS repository. LICENSE ISSUES ============== The OpenSSL toolkit stays under a dual license, i.e. both the conditions of the OpenSSL License and the original SSLeay license apply to the toolkit. See below for the actual license texts. - Page 40 PostBase Mini * This product includes cryptographic software written by Eric Young * (eay@cryptsoft.com). This product includes software written by Tim * Hudson (tjh@cryptsoft.com). Original SSLeay License ----------------------- /* Copyright (C) 1995-1998 Eric Young (eay@cryptsoft.com) * All rights reserved. * This package is an SSL implementation written * by Eric Young (eay@cryptsoft.com).
-
Page 41: Security Declaration For Data Usage
Security Declaration for data usage Product Description: PostBase Mini franking machine The PostBase Mini franking machine is connected to the user’s local network through an Ethernet interface to share data with the Francotyp-Postalia Data Centre using both the local network and a suitable available internet connection provided by the user. - Page 42 PostBase Mini...
-
Page 43: Customer Support / Warranty
Customer Support / Warranty Customer Support Every PostBase Mini is thoroughly checked before leaving the factory. Should any faults occur with your PostBase Mini in spite of our extensive quality con- trol, please contact Francotyp-Postalia help line. fp-francotyp.com Warranty For warranty information, refer to the country- specific addendum to the PostBase Mini Operator Manual (if available in your country).
Need help?
Do you have a question about the Postbase Mini and is the answer not in the manual?
Questions and answers