Table of Contents
Advertisement
Quick Links
Advertisement
Table of Contents

Related Manuals for FP optimail 30


Summary of Contents for FP optimail 30
- Page 1 30 Franking machine Operator Manual...
- Page 2 30 – Display and Keyboard Display Multifunction keys (soft keys) Arrow keys – navigate – scroll – increase / decrease values Confirm input Acknowledge messages Shift key: switch upper / lower Memory: case letters display / select saved postage settings...
-
Page 3: Table Of Contents
5 Franking ____________________________________________________31 Selecting / changing an account ___________________________31 Positioning and franking a letter ____________________________33 6 Postage calculation (optimail 30 with integrated scale only) __________________36 The postage calculation menu _____________________________36 Setting dispatch data for postage calculation _________________38 Weighing, postage calculation, franking _____________________40... - Page 4 Moistening and sealing letters (optional) ______________________ 47 Using an external postal scale ____________________________ 49 7.4.1 Connecting the postal scale to the optimail 30 ________________ 49 7.4.2 Operating optimail 30 with an external postal scale ____________ 50 8 Memory _____________________________________________________ 51...
- Page 5 Contents 13.6 Setting the display contrast _______________________________70 13.7 Setting audible signals ___________________________________71 13.8 Clock ________________________________________________72 13.8.1 Correcting the time ______________________________________72 13.8.2 Summer time changeover ________________________________73 13.8.3 Setting the time zone ____________________________________73 13.9 Changing the stand-by time _______________________________74 13.10 Changing the user interface language _______________________75 13.11 Modem settings –...
-
Page 6: About This Operator Manual
30 Operator Manual About this Operator Manual Please read this Operator Manual before using the optimail 30 franking machine. Please keep the manual near the optimail 30 at all times for reference. This Operator Manual describes the optimail 30 –... -
Page 7: Safety Tips
• Install and commission the optimail 30 according to the instructions in the Installa- tion Guide. • When you move the optimail 30 from a cold environment (i.e. below 10°C / 50°F): Wait at least 24 hours before connecting the optimail 30. The optimail 30 requires this period to adapt to the ambient conditions. -
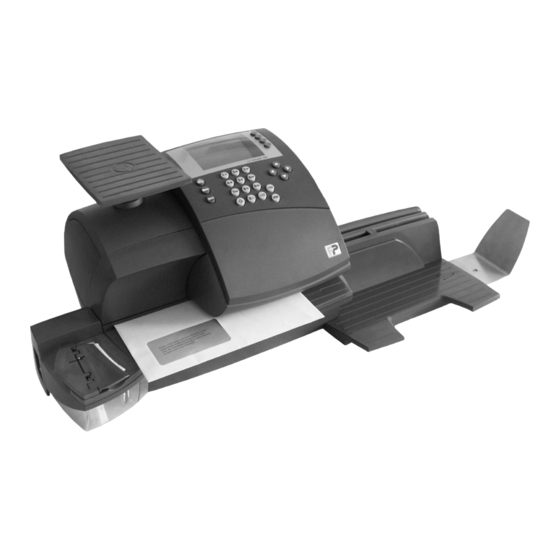
Page 8: Short Description Of The Optimail 30
30 Operator Manual A short description of the optimail 30 Scale with scale platform Display (optional) Keyboard Power switch Sealer (optional) Card reader with card Letter guide Letter receiving tray Flap with ribbon cassette behind Flap release key (ribbon cassette compartment) - Page 9 The optimail 30 shows all major franking information at a single glance. You only have to put the letter in place – the optimail 30 feeds the letter, franks it and ejects the ready to send letter to the right.
- Page 10 30 Operator Manual Additional functions The optimail 30 offers a number of convenient additional functions that will soon be among your favourites: – Memory function for frequently used Royal Mail products. – Account function for separate registration and billing of portage costs.
-
Page 11: The Basics Of Operation
The basics of operation The basics of operation In this chapter you will learn about the basic optimail 30 functions and how to handle the franking machine user interface. Turning on / off Push the power switch, the toggle switch on the back left side of the franking machine, to turn the optimail 30 ON or OFF. -
Page 12: Stand-By
When in stand-by the optimail 30 displays a clock. The display is dark. The optimail 30 goes to stand-by if you do not feed any letters or press any keys for some time. You can reactivate the optimail 30 by pressing any key. -
Page 13: The User Interface
The basics of operation The user interface This chapter covers the optimail 30 user interface. You will be introduced to the menu and window types, the used symbols, the modes of operation and how the present manual presents menu / operating sequences. - Page 14 30 Operator Manual Opens the MENU for system settings, administration, special and service functions for the optimail 30. Back key – Key pressed briefly: back to last menu / window. – Keeping the key pressed (approx. 2 seconds): back to the home menu.
-
Page 15: Display Symbols
The basics of operation 3.4.2 Display symbols The letter symbol indicates: The optimail 30 is ready for franking. You can feed and frank mail. The letter box symbol indicates the Incoming mail stamp is enabled and ready. You can load incoming mail. -
Page 16: Description Of Operating Procedures And Menu Sequences In The Present Operator Manual
30 Operator Manual 3.4.3 Description of operating procedures and menu sequences in the present Operator Manual Illustrations of display screens show current settings and what to type. The multifunction key that must be pressed to trigger an action / function is shown in black. -
Page 17: The Home Menu
The status bar informs of the current operating state and gives additional hints. In the home menu you can – set postage and enter the postage calculation menu (optimail 30 with scale only) – select an advertising imprint , a text message and an endorsement... -
Page 18: The Menu
30 Operator Manual 3.4.5 The menu Use key to open the MENU. From this menu you can access the adminis- tration functions, the system settings and service functions. Use the arrow keys to scroll to the next page and back. -
Page 19: Lists
The basics of operation 3.4.6 Lists Lists (e.g. for memory items, adverts, text Symbolises the Caption messages) offer all available settings in list Print lists function form. The assigned number appears on the display right. You can scroll the list with the arrow keys if more than four memory items are available. -
Page 20: Adjustment Menus
30 Operator Manual 3.4.7 Adjustment menus The optimail 30 opens a separate menu each Caption for editing system parameters and for typing, editing, clearing user-specific data. Structure and function of these menus are similar. On the display left the optimail 30 shows the current setting. -
Page 21: Text Input
The basics of operation Text input Letters including accents, punctuation marks and special characters are assigned to the numeric keys for entering texts such as account names, advert names and text messages. Page 14 shows available special characters. Typing characters A cursor marks the point where a character Symbolises the... -
Page 22: Test Imprint
30 feeds the sheet. A roller pushes the sheet against ribbon and Folded edge print head and printing starts as soon as the letter sensor detects the sheet. The optimail 30 prints the zero imprint and ejects the imprinted sheet to the right. -
Page 23: Setting The Franking Imprint
– Text message (see Chapter 4.4) – Date (see Chapter 4.5). With the memory you can easily and quickly set the postage and the endorse- ment. Refer to Chapter 8 on how to use the optimail 30 memory function. Postage In the home menu:... - Page 24 Only available on an optimail 30 with integrated scale High postage The optimail 30 issues a warning if you set too high a postage. The optimail 30 thus helps you to prevent overfranking and loss of postage. You can edit the limit for this moni- toring function in the SYSTEM SETTINGS menu (see Chapter 13.3 on page 68).
-
Page 25: Endorsement
• Select the desired endorsement. In the example it is “First Class” (endorsement No. 1). The optimail 30 returns to the home menu. The endorsement is set. Quick results for the advanced user. In the home menu: • Type the desired endorsement number. -
Page 26: Advert
30 Operator Manual Advert You can print an advert of your choice on your mail. The optimail 30 offers the following options for advert printing: – The franking machine can hold a maximum of 6 different adverts. The saved adverts are available to all users. -
Page 27: Text Message
• Press the key next to the last advert in the list. The optimail 30 returns to the home menu. The advert on the USER card is set for frank- ing. You can also define the advert on the USER card as the default advert for this account (see page 58). - Page 28 • Select the desired text message. In the example that is “We are on holidays…” (text No. 2). The optimail 30 returns to the home menu. The text is set. Quick results for the advanced user In the home menu: •...
-
Page 29: Date
Date The date for the franking imprint is set automatically to the current date by the system clock. You can set the date of the franking imprint forward. The optimail 30 does not allow backward dating for franking. Setting the mailing date In the home menu: •... - Page 30 In the home menu: • Press the key next to • Press TODAY to set the current date. • Press USE to set the date. The optimail 30 returns to the home menu. The current date is set for franking.
-
Page 31: Franking
• Push in the card against a slight resistance all the way to the stop. You can feel the card snap in. The optimail 30 selects the account config- ured on the access card as well as the de- faults for adverts and additional text it contains. - Page 32 MASTER card or when access control was disabled. In the home menu: • Press the key next to The optimail 30 opens a list containing all accounts. You see the account names and numbers. • Select the desired account.
-
Page 33: Positioning And Franking A Letter
Franking Positioning and franking a letter The optimail 30 allows letters up to a thickness of 6 mm (0,24") and postcards to be franked. Format and material of mail pieces must meet the specifications on page 107. It is always good practice to use envelopes of reasonable quality as this will ensure a perfect franked impression every time. - Page 34 The stop features four catches for the most common sizes. Franking You can start franking if the optimail 30 is ready for franking (letter symbol in the top right corner and appropriate information in the status bar).
- Page 35 • Push the double label in direction of the arrow until the letter sensor detects the double label. The illustration shows the approximate posi- tion where the optimail 30 starts feeding the double label. The imprinted double label is ejected to the right.
-
Page 36: Postage Calculation (Optimail 30 With Integrated Scale Only)
• In the home menu press the key next to briefly. The menu for entering the postage appears. • Select CALCULATE POSTAGE. The optimail 30 opens the postage calcula- tion menu. The display area for the current setting is empty. You can now select the desired postal rate. - Page 37 – To clear all: Keep the key pressed for scroll with arrow keys approx. 2 seconds. Changing to the home menu Pressing the key returns you to the home menu. The optimail 30 saves the current settings to the home menu when the postage calculation menu is left.
-
Page 38: Setting Dispatch Data For Postage Calculation
Setting dispatch data for postage calculation In the home menu: • Press the key next to briefly. The optimail 30 opens the postage entry menu. • Select CALCULATE POSTAGE. The optimail 30 opens the postage calcula- tion menu. The display area for the current setting is empty. - Page 39 • Press the key to return to the home menu. You can save frequently used settings as memory items and directly access these in the home menu. Refer to Chapter 8 on how to use the optimail 30 memory function.
-
Page 40: Weighing, Postage Calculation, Franking
– The scale is designed for a maximum weight of 3 kg. – The optimail 30 can determine a new weight only if the scale has been emptied beforehand. You must therefore empty the scale platform before you place a new mail piece to be weighed. - Page 41 Postage calculation • Take the mail piece from the scale platform and frank as usual (see Chapter 5.2). The ‘High postage’ monitoring function is inactive if you use the ‘Postage calculation’ function.
-
Page 42: Special Functions
Using the DX feature (optional) 7.1.1 Things worth knowing about the DX feature The optimail 30 can frank mail pieces for dispatch by the private carrier DX. You can switch between ‘Royal Mail mode’ and ‘DX Mode’ in the home menu. -
Page 43: Franking Dx-Mail
Special functions 7.1.2 Franking DX-mail Switching DX mode on If the access control of the optimail 30 is enabled: • Insert access card (MASTER / USER). The set account is for access control only and is not shown in the DX mode. - Page 44 Make the settings exactly as described for Royal Mail franking procedures (see Chapter 4 on page 23). When the optimail 30 is ready for franking in DX mode: • Position the mail piece as usual and frank it.
-
Page 45: Viewing And Printing Information On Dx Mode
DX franking imprints as well as the DX license number. Printing the DX report • Load an empty sheet or a double label. The optimail 30 prints a report with the DX information. Only FP after-sales service is authorised to reset the DX counter. -
Page 46: Stamping Incoming Mail
Setting the incoming stamp In the home menu: • Press the key next to The optimail 30 sets the Incoming Mail Stamp and displays the set date. Date of incoming mail You can set the incoming mail stamp date as desired. -
Page 47: Moistening And Sealing Letters (Optional)
Operating the optimail 30 with the specially available sealer lets you seal and frank letters in a single step. The sealer is filled with tap water and installed on the left side of the optimail 30. Two catches fasten the sealer to the franking machine housing. For further information on how to set up the sealer please refer to the Installation Guide. - Page 48 • Align the letter top edge with the franking Letter guide machine letter guide and push in the letter in arrow direction until the optimail 30 feeds and franks the letter. Sealing moistened envelope flaps We recommend that you firmly press on the envelope flaps after franking to make sure the envelopes are firmly sealed.
-
Page 49: Using An External Postal Scale
7.4.1 Connecting the postal scale to the optimail 30 You need a special interface cable to connect the postal scale to the optimail 30. A suitable interface cable is available from Francotyp-Postalia. Caution! Read the Operator Manual of your FP postal scale before you con- nect it to the optimail 30. -
Page 50: Operating Optimail 30 With An External Postal Scale
7.4.2 Operating optimail 30 with an external postal scale Caution! Also read the Operator Manual of your FP postal scale. Pay special attention to the information on how to safely operate the postal scale. • Turn on the optimail 30 and FP postal scale. -
Page 51: Memory
The basic optimail 30 version features 4 memory items. Each memory item can hold a postage with appropriate endorsement. An optimail 30 with integrated scale features 9 memory items. You can store the set- tings for postage calculation instead of postage and endorsement. When a new rate table comes into effect, the memories are automatically updated. -
Page 52: Saving Memory Items
• Select in the menu: MEMORIZED RATES. • Select the memory number under which Memorized Rates you wish to save the settings. The optimail 30 opens the Memorized Rates Select memory: 1 … 4 (9) menu. The display left shows the old assign- ment. -
Page 53: Renaming Memory Items
Memory Renaming memory items You can name each of the memory items. The memory item selection list shows this name instead of the saved assignment. • Press the key. • Select in the menu: MEMORIZED RATES. • Select the memory the name of which you Memorized Rates wish to change. -
Page 54: Displaying And Printing Registers
30 Operator Manual Displaying and printing registers The optimail 30 saves important parameters and information on used postage in registers. You can view and print the register states. • Press the key. The REGISTER menu displays the current register states. -
Page 55: Loading Postage - Teleset
Teleset is the loading of the desired postage credit via modem. The modem is built into the optimail 30. To load postage a connection is made to the Teleset Data Centre (TDC) with the optimail 30 and the desired amount is loaded. Accounting is as per your contract with Royal Mail. - Page 56 30 Operator Manual To load the displayed amount: • Use LOAD to establish the connection to the Teleset Data Centre. Loading continues automatically. You can monitor the progress in the display. Please stand by. Data exchange takes some time.
-
Page 57: Account Administration
Accounts can be sections / departments of a company or individual companies within a community office. You can define up to nine accounts in your optimail 30 and set up access rights with MASTER and USER cards. Account 1 is defined ex factory and permanently assigned to the MASTER card (MASTER account). - Page 58 30 Operator Manual Possible account parameters and their meaning: Name Letters, special char- Refer to page 21 for information on acters and numbers how to type text. Default advert NO DEFAULT The advert selected last remains set in the home menu when you select an account.
-
Page 59: Assigning / Blocking User Card(S) For An Account
Each account (except MASTER account) can be assigned one or several USER cards. The USER card allows access to the assigned account only. You can block the USER card(s) in order to protect the optimail 30, e.g. when a card is lost. • Press the key. -
Page 60: Viewing And Printing Account Statistics
30 Operator Manual 11.3 Viewing and printing account statistics You can view and print the postage used by the separate accounts and the number of franking imprints in an overview. The printed list also includes the current settings of all accounts. - Page 61 CHANGE Opens the procedure for changing the account parameters (name, default advert, etc.). The optimail 30 successively displays the parameters you are authorised to change. You can keep or change the current parameters. Press CONTINUE to save the displayed parameters.
-
Page 62: Clearing Down All Accounts
30 Operator Manual 11.5 Clearing down all accounts • Press the key. • Select in the menu: ACCOUNT ADMINISTRATION CLEAR DOWN ALL. Account Administration Following a security prompt the postage used and the number of franking imprints are Clear Down All... -
Page 63: Imprint Management
Imprint management Imprint management The optimail 30 offers a number of powerful management functions for managing individual imprint elements. Among these are setting up text messages, the assign- ment of custom names for adverts, graphical preview and printing of adverts as well as deleting of superfluous adverts, text messages and endorsements. -
Page 64: Using / Renaming / Deleting Adverts
LOAD ALL Loads all data from the card into the optimail 30. SELECT optimail 30 prompts for each imprint: “Do you want to load: YES / NO”. When you have answered all prompts, the selected imprints are flagged with OK. -
Page 65: Entering New Text Messages
Imprint management 12.3 Entering new text messages The optimail 30 is provided with 6 memory slots for text messages. A text message may contain up to 5 lines with about 20 characters each. • Press the key. • Select in the menu:... -
Page 66: Deleting Endorsements
30 Operator Manual Functions in the TEXT MESSAGE MANAGER menu and their meaning: CHANGE Opens the menu where you can edit the text. You can move the cursor in the text and delete or insert characters at the indicated position. -
Page 67: Advanced Settings & System Information
Advanced settings & system information 13.1 Viewing / printing / sending system information You can view and print all major machine parameters as a list. optimail 30 also lets you send the data to the FP after-sales service. • Press the key. -
Page 68: Displaying And Clearing Down The Item Counter
Displaying and clearing down the item counter Apart from storing the total number of franking imprints in register (R4) and the account counters the optimail 30 features a customisable item counter. This item counter counts all Royal Mail franking imprints. Independently of other optimail 30 counter functions you can reset the item counter to zero or use it as a daily or job counter. -
Page 69: Low Postage Warning - Setting The Threshold
13.4 Low postage warning – setting the threshold The ‘Low postage warning’ function warns you when the available postage in your optimail 30 drops below a preset threshold. You can also disable the low postage warning. • Press the key. -
Page 70: Setting The Display Contrast
30 Operator Manual Access rights – possible settings and their meaning: Franking is possible with a valid access card (MASTER or USER) only. No access restrictions for franking. Franking is possible without access card on all accounts. 13.6 Setting the display contrast You can adapt the display contrast to increase the readability. -
Page 71: Setting Audible Signals
Advanced settings & system information 13.7 Setting audible signals The optimail 30 confirms each keypress with a beep. A series of audible signals indi- cates an error. You can restrict the scope of audible signals to warnings or turn off the audible signals altogether. -
Page 72: Clock
The optimail 30 features a battery-backed system clock adjusted at the factory. It is rarely necessary to correct the time. The optimail 30 automatically corrects the time when summer time starts and ends. You can disable this automatic function and manually correct the time for summer time. -
Page 73: 13.8.2 Summer Time Changeover
• SAVE the setting shown. Summer time changeover – possible settings and their meaning: Automatic The optimail 30 automatically corrects the time when summer time starts and ends. The optimail 30 does not automatically correct the time when summer time starts and ends. -
Page 74: Changing The Stand-By Time
Changing the stand-by time The stand-by time is the time after the last franking procedure or the last keypress the optimail 30 waits until it switches to the clock display. The factory setting is 5 minutes. • Press the key. -
Page 75: Changing The User Interface Language
Advanced settings & system information 13.10 Changing the user interface language The optimail 30 user interface supports the languages English and German. Lan- guage changeover will have immediate effect. Text messages as well as the names for accounts, adverts, etc. remain unchanged. -
Page 76: Modem Settings - Changing Dialling Parameters
13.11 Modem settings – changing dialling parameters You must set the modem parameters for the optimail 30 to match your telephone connection. The modem configuration is part of the log-in procedure during commis- sioning. You should verify and, if necessary, correct the settings if changes were made to your telephone system. - Page 77 Advanced settings & system information Modem parameters – possible settings and their meaning Phone type DIRECT LINE optimail 30 is connected to a direct line. EXTENSION optimail 30 is connected to an extension. Access method EXCHANGE DIGIT Defines how the exchange is dialled (extension only) from the extension.
-
Page 78: Changing Dial-Up Numbers
30 Operator Manual 13.12 Changing dial-up numbers The optimail 30 comes with major dial-up numbers for franking machine operation saved ex factory. The dial-up numbers and their meaning: Dial-up number of the Teleset Data Centre. The optimail 30 dials this number during the Teleset process. -
Page 79: Integrated Scale (Optional)
The optimail 30 supports loading of new rate tables from chip card. Order the new rate table card from Francotyp-Postalia. The optimail 30 can save up to 2 rate tables. The optimail 30 automatically monitors the validity of rate tables. The system clock controls the switchover to the valid rate table. -
Page 80: 13.13.2 Deleting Rate Tables
Scale and Postage Rate Maintenance DELETE RATE TABLE. • Confirm the security prompt with YES. Delete Rate Table All rate tables saved in the optimail 30 will be deleted after a security prompt. At the same time the optimail 30 deletes the memory items. -
Page 81: 13.13.4 Zeroing
The optimail 30 does not print an endorse- ment if a suitable endorsement is not availa- ble. The optimail 30 does not automatically select an endorsement. -
Page 82: Creating A Master Card
• Press the key. • Select in the menu: SYSTEM SETTINGS System Settings CREATE MASTER CARD. • Follow the instructions on the display. Create Master Card The optimail 30 will guide you through the generating procedure for a new MASTER card. -
Page 83: Maintenance And Care
– Changing the battery. – Topping up water for envelope flap moistening (optimail 30 with sealer) . – Cleaning / replacing the rocker with moistening felt (optimail 30 with sealer) . – Replacing the absorption felt (optimail 30 with sealer) . -
Page 84: Changing The Ribbon Cassette
30 Operator Manual 14.2 Changing the ribbon cassette Caution! Only use original ribbon cassettes from Francotyp-Postalia. • Open the flap of the ribbon cassette com- partment by lightly pressing the release catch. The flap swings up automatically. • Holding it as shown in the illustration, pull out the used ribbon cassette in arrow direction. - Page 85 Maintenance and care Caution! Make sure not to crease or tear the ribbon when inserting it. Otherwise the ribbon might break. Also make sure the edges of the ribbon do not fold over. Folded ribbons are thicker and prematurely fill the take-up ribbon spool. •...
-
Page 86: Sealer (Optional)
30 Operator Manual 14.3 Sealer (optional) 14.3.1 Cleaning To remove glue residues the sealer should be cleaned once a month. • Separate the sealer from the franking machine: Slightly lift the franking machine on the left side and pull the sealer away to the left. -
Page 87: 14.3.2 Checking The Water Level And Topping Up Water
Maintenance and care 14.3.2 Checking the water level and topping up water • Check the water level in the sealer regu- larly. Make sure the sealer is always filled at least to the ‘Min’ mark to prevent the felts from dry- ing up. -
Page 88: 14.3.3 Replacing Felts
30 Operator Manual 14.3.3 Replacing felts • Separate the sealer from the franking machine: Slightly lift the franking machine on the left side and pull the sealer away to the left. • Empty the water reservoir. Removing the rocker with moistening felt •... - Page 89 Maintenance and care Installing the absorption felt • Install a new absorption felt as shown in Positioning contour the illustration. The felt should be halfway in the sealer. • Bend the upper part of the felt to the right Absorption felt and push it beneath the letter receiving tray until it reaches the stop in the contour.
- Page 90 30 Operator Manual Installing the rocker with moistening felt Leg spring The rocker features two clips that engage on the two bolts at the sealer. • Fit the new rocker such that one leg of the leg spring is located in the rocker groove and the other leg in the sealer slot.
-
Page 91: Changing The Battery
Maintenance and care 14.4 Changing the battery The optimail 30 monitors the charging state of the battery. An appropriate message appears in the display when it is time to change the battery. Caution! Only use the batteries provided by Francotyp-Postalia 90.4701.8004.00. - Page 92 30 Operator Manual • Turn the franking machine on its back and hold it in place. You now have access to the battery compart- ment on the bottom of the franking machine. • Press the clip lock on the battery compart- ment cover in the direction of the arrow and remove the battery compartment cover.
- Page 93 Maintenance and care • Put the franking machine on its feet again. • Reattach accessories (catch tray, scale platform, sealer). • Reestablish all cable connections. You can now use the franking machine again. For further information on how to install the catch tray, scale platform and sealer and how to connect the machine please refer to the Installation Guide.
-
Page 94: Tips For Troubleshooting
Remove the card and insert it in the card reader again (chip facing the rear). Wrong card type inserted. optimail 30 behaves Software issue. erratically or fails to react Turn off the optimail 30. Wait at least one minute. Turn the optimail 30 on again. - Page 95 / during franking imprint setting Jam / machine blocked Turn off the optimail 30. Remove paper. Wait at least one minute. Turn the optimail 30 on again. Franking is impossible / No access card inserted. optimail 30 is not ready Insert access card (USER or MASTER).
- Page 96 Use sufficiently sized envelopes (e.g. ISO C6/5, DL) or extra large labels provided by Francotyp-Postalia (see also page 33) . … during weighing and postage calculation (optimail 30 with scale only) Endorsement imprint is not Automatic endorsement imprinting is disabled (see Chapter 13.13.3, page 80) .
- Page 97 The scale platform was still occupied when another let- no weight is determined for ter was placed on it. The optimail 30 can determine a the letter on the scale new weight only if the scale has been emptied before- hand.
- Page 98 Failure to load from card The card contains no valid data. Wrong card inserted? Insert a data card. optimail 30 fails to recognise the card. Card is defective. Call the FP after-sales service. …...
- Page 99 Tips for troubleshooting Correcting the moistening felt position on the rocker • Slightly tilt the rocker and pull it off in an obliquely upward direction. Caution! Make sure to always hold the leg spring on the pin with one hand while posi- tioning the moistening felt.
-
Page 100: Appendix
30 Operator Manual Appendix Access rights for selected functions Status Without With With Access with access card USER card MASTER card card: OFF Functions Accounts: clear down Accounts: delete Accounts: preset advert / text message only your own Accounts: release... - Page 101 Appendix – Access rights for selected functions Status Without With With Access with access card USER card MASTER card card: OFF Functions Rename adverts System information: display / print System settings not all not all not all Teleset (load postage) if released Text messages: edit / delete...
-
Page 102: Menu (Overview)
30 Operator Manual Menu (overview) -
Page 103: Glossary
Appendix – Glossary Glossary Private carrier. In case the DX feature is enabled, your optimail 30 can also frank mail pieces for delivery by DX. All DX frankings will be counted separately and bal- anced directly with the private carrier. - Page 104 30 Operator Manual Teleset Data Centre Data centre of Francotyp-Postalia. (TDC) Here the called postage is released and accounting is managed. The Teleset Data Centre is at your service for loading postage 24 hours a day via the built-in modem.
-
Page 105: Technical Data
+15°C to +35°C (59°F to 95°F) Ribbon cassette Ribbon cassette red for optimail 30 Storage conditions: 0°C to +32°C (32°F to +89,6°F), do not expose to direct sunlight, rel. humidity max. 65 %, non-condensing... - Page 106 Standard – Postage loading via integrated modem (Teleset) – Card reader and MASTER card – 4 short code memories (optimail 30 without scale) 9 short code memories (optimail 30 with integrated scale) – 9 accounts – Up to 6 adverts –...
- Page 107 Appendix – Technical Data Mail piece specifications for franking Format (Length x Width) min. 140 mm x 90 mm Thickness letters: up to 6 mm postcards: up to 1 mm Material smooth paper no high-gloss paper no extremely fibrous paper no structured paper no dark paper When in doubt about imprint quality, use a self-adhe-...
-
Page 108: Declaration Of Conformity
30 Operator Manual Declaration of Conformity... -
Page 109: Index
After-sales service. See Service time correction 72 Arrow keys 2 Commissioning 7 Ascending 54 Connecting Audible signal 71 optimail 30 93 on / off 71 postal scale 49 warnings only 71 Control total 54 Automatic endorsement selection 40 turning on / off 80... - Page 110 30 Operator Manual Correcting errors 94 Enter key 2 Equipment 106 See also Error Error 94 Counter. See Item counter franking 95 general 94 moistening / sealing 98 Date postage calculation 96 default value after turning on 11 setting franking imprint 95...
- Page 111 13 Low postage warning 69 menu 102 disabling 69 modem parameters 77 setting the threshold 69 optimail 30 8 symbols and their meaning 15 Machine number 67 Mail piece specifications 107 Phone number MASTER card 12, 103 orderline 78...
- Page 112 36 Second carrier. See DX Postal scale (external) 49 Serial interface (25-pin) 8 connecting 49 Service 78, 115 operating with the optimail 30 50 Shift key 2 Power connection 8 Soft keys 2 Power switch 8 Software version 67...
- Page 113 Appendix – Index Teleset Data Centre 104 Test imprint 22, 104 Text input 21 Text message 9, 17, 23 changing 28, 65 creating 28 deleting 65 enter 65 new 65 setting 27 Time zone setting 73 Tips for the advanced user 19, 24, 25, 26, 28, 29, 32, 51 Topping up water 87 Total items 54...
- Page 114 30 Operator Manual...
-
Page 115: Service
Service Every optimail 30 franking machine is thoroughly checked before leaving the factory. Should any faults occur with your optimail 30 in spite of our extensive quality control, please contact your local Francotyp-Postalia dealer. Our main office will be pleased to tell you the address of your local servicing dealer.
Need help?
Do you have a question about the optimail 30 and is the answer not in the manual?
Questions and answers