Advertisement
Available languages
Available languages
Table of Contents
Toyota Prius C 2012-2014
KIT FEATURES
• ISO DIN radio provision with pocket
• Painted Matte Black
KIT COMPONENTS
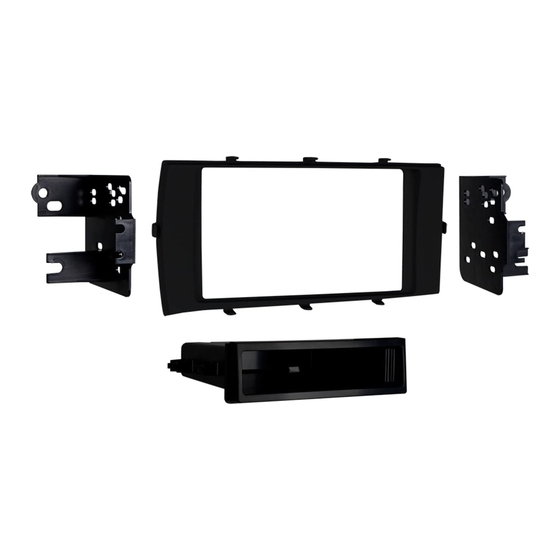
• A) Radio trim panel • B) Radio brackets • C) Pocket • D) (4) #8 x 3/8" Phillips pan head screws
• E) (2) #8 x 3/8 Phillips truss head screws
A
B
WIRING & ANTENNA CONNECTIONS (sold separately)
Wiring Harness: • 70-1761
Antenna Adapter: • 40-LX11
TOOLS REQUIRED
• Panel removal tool • Phillips screwdriver • Socket wrench
METRA. The World's best kits.
Installation instructions for part 99-8239B
99-8239B
C
D
™
metraonline.com
Dash Disassembly ................................................. 2
– ISO DIN radio provision with pocket ...................... 3
E
CAUTION!
tery terminal before beginning any installation, unless the vehicle
manufacturer recommends against so. Please check with your local
Dealership for more information. All accessories, switches, climate
controls panels, and especially air bag indicator lights must be con -
nected before reconnecting the battery or cycling the ignition. Also,
do not remove the factory radio with the key in the on position, or the
vehicle running. It would be best to remove the key from the ignition
and then wait a few seconds before removing the factory radio.
Table of Contents
Metra recommends disconnecting the negative bat -
© COPYRIGHT 2004-2015 METRA ELECTRONICS CORPORATION
Advertisement
Table of Contents

Related Manuals for Metra Electronics 99-8239B


Summary of Contents for Metra Electronics 99-8239B
- Page 1 Installation instructions for part 99-8239B Table of Contents Toyota Prius C 2012-2014 99-8239B Dash Disassembly ..........2 Kit Assembly – ISO DIN radio provision with pocket ...... 3 KIT FEATURES • ISO DIN radio provision with pocket • Painted Matte Black KIT COMPONENTS •...
- Page 2 99-8239B Dash Disassembly 1. Unclip and remove the trim panel from around the radio including the hazard switch. (Figure A) 2. Remove (4) 8mm bolts securing the factory radio, then unplug and remove the radio. (Figure B) Continue to kit assembly...
-
Page 3: Kit Assembly
99-8239B Kit Assembly ISO DIN radio provision with pocket 1. Secure the radio brackets to the radio trim panel using (2) #8 x 3/8” Phillips truss head screws supplied. (Figure A) 2. Remove the metal DIN sleeve and trim ring from the aftermarket radio. - Page 4 Installation instructions for part 99-8239B IMPORTANT If you are having difficulties with the installation of this product, please call our Tech Support line at 1-800-253-TECH. Before doing so, look over the instructions a second time, and make sure the installation was performed exactly as the instructions are stated.
- Page 5 Instrucciones de instalación para la pieza 99-8239B Indice Toyota Prius C 2012-2014 99-8239B Desmontaje del tablero ......... 2 Ensamble del kit – Provisión de radio ISO DIN con cavidad ....3 CARACTERÍSTICAS DEL KIT • Provisión de radio ISO DIN con cavidad •...
- Page 6 99-8239B Desmontaje del tablero 1. Desenganche y quite el panel de moldura que rodea el radio que incluyendo el interruptor de las luces intermitentes. (Figura A) 2. Retire los (4) pernos de 8mm que sujetan el radio de fábrica a continuación, desenchufe y quitar...
- Page 7 99-8239B Ensamble del kit Provisión de radio ISO DIN con cavidad 1. Atornille los soportes del radio al panel de moldura del radio con los (2) tornillos Phillips de cabeza segmentada #8 de 3/8” suministrados. (Figura A) 2. Quite la manga de metal DIN y el anillo de moldura del radio de mercado secundario.
- Page 8 Instrucciones de instalación para la pieza 99-8239B IMPORTANTE Si tiene dificultades con la instalación de este producto, llame a nuestra línea de soporte técnico al 1-800-253-TECH. Antes de hacerlo, revise las instrucciones por segunda vez y asegúrese de que la instalación se haya realizado exactamente...
Need help?
Do you have a question about the 99-8239B and is the answer not in the manual?
Questions and answers