Table of Contents
Advertisement
Quick Links
INSTALLATION INSTRUCTIONS FOR PART 99-9011
CC 2009/EOS 2007-09/New Jetta 2005-09
GLI 2008-09/GTI 2006-09/Passat 2006-09
Rabbit 2006-09/R32 2008-09/Tiguan 2009
99-9011
KIT FEATURES
• DIN Head Unit Provision with pocket
• ISO Head Unit Provision with pocket
• Double DIN Head Unit Provision
• ISO Stacked Head Unit Provision
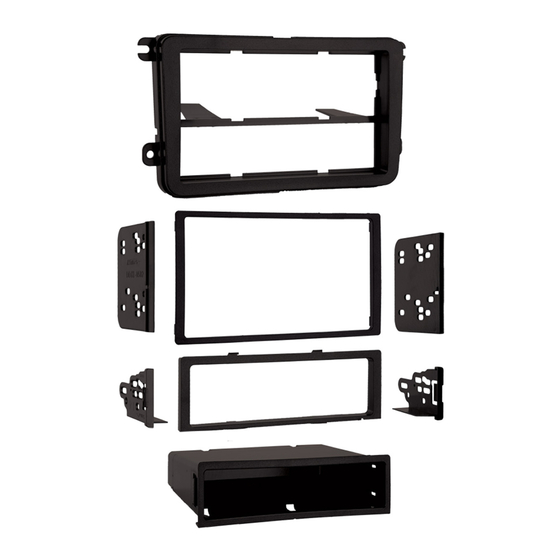
KIT COMPONENTS
A) Radio Housing • B) ISO Brackets • C) ISO Trim Plate • D) DDIN Brackets • E) DDIN Trim Plate • F) Pocket
A
F
T-20 Torx Screwdriver • Flat Blade Screwdriver Or Panel Removal Tool
1-800-221-0932
© COPYRIGHT 2004-2009 METRA ELECTRONICS CORPORATION
Applications
VW
B
WIRING AND ANTENNA CONNECTIONS (Sold Separately)
E
Wire harness:
• XSVI-9003-NAV VW Interface 2003-up
Antenna adapter:
• 40-EU55-adapter for amplified antenna 2002-up
TOOLS REQUIRED:
www.metraonline.com
D
C
Advertisement
Table of Contents

Related Manuals for Metra Electronics 99-9011


Summary of Contents for Metra Electronics 99-9011
- Page 1 INSTALLATION INSTRUCTIONS FOR PART 99-9011 Applications CC 2009/EOS 2007-09/New Jetta 2005-09 GLI 2008-09/GTI 2006-09/Passat 2006-09 Rabbit 2006-09/R32 2008-09/Tiguan 2009 99-9011 KIT FEATURES • DIN Head Unit Provision with pocket • ISO Head Unit Provision with pocket • Double DIN Head Unit Provision •...
-
Page 2: Table Of Contents
99-9011 T ABLE OF CONTENTS Dash Disassembly • - GLI 2008 -09................1,2 - GTI 2006-09.................1,2 - New Jetta 2005-09..............1,2 - Rabbit 2006-09................1,2 - R32 2008-09................1,2 - CC 2009 ..................3 - Passat 2006-09 ................3 - Tiguan 2009................... 4 - Eos 2007-09................... 5 Kit Assembly: •... -
Page 3: Dash Disassembly
99-9011 DASH DISASSEMBL Y NEW JETTA 2005-09/GLI 2008-09 GTI 2006-09/RABBIT 2006-09 R32 2008-09 Disconnect the negative battery terminal to prevent an accidental short circuit. Unclip and remove the grille from the top-center of dash. (Figure A) Remove one T-20 torx screw from black insert from under grille removed in step one. -
Page 4: Gli 2008 -09
99-9011 DASH DISASSEMBL Y NEW JETTA 2005-09/GLI 2008-09 GTI 2006-08-09/RABBIT 2006-09 R32 2008-09 Unsnap and remove the vent assembly above the radio. (Figure E) Remove two T-20 torx screws from top sides of radio/climate panel. (Figure F) Remove panel. (Figure G) Remove four T-20 torx screws to remove the radio. -
Page 5: Passat 2006-09
99-9011 DASH DISASSEMBL Y CC 2009 / VW PASSAT 2006-2009 Disconnect the negative battery terminal to prevent an accidental short circuit. Unclip and remove trim panel sur- rounding radio. (Figure A) Remove (4) T-20 Torx screws to remove radio. -
Page 6: Tiguan 2009
99-9011 DASH DISASSEMBL Y TIGUAN 2009 Disconnect the negative battery terminal to prevent an accidental short circuit. PASSENGER PASSENGER AIR BAG AIR BAG PASSENGER Unclip and remove passenger air AIR BAG bag light panel to the right of the hazard light button. (Figure A) -
Page 7: Eos 2007-09
99-9011 DASH DISASSEMBL Y EOS 2007-2009 Disconnect the negative battery terminal to prevent an accidental short circuit. Unclip and remove the radio trim panel. (Figure A) Remove the (4) screws securing the radio. Unplug and remove the radio. (Figure B) -
Page 8: Kit Assembly
99-9011 KIT ASSEMBL Y DIN HEAD UNIT PROVISION WITH POCKET Slide the DIN cage into the Radio Housing and secure by bending the metal locking tabs down. (Figure A) Slide the aftermarket head unit into the cage and secure. (Figure B) Snap the pocket into the radio hous- ing. -
Page 9: Iso Head Unit Provision With Pocket
99-9011 KIT ASSEMBL Y ISO HEAD UNIT PROVISION WITH POCKET Mount the ISO Brackets to the head unit with the screws sup- plied with the unit. (Figure A) Slide the head unit into the radio opening until the side clips engage. -
Page 10: Double Din Head Unit Provision
99-9011 KIT ASSEMBL Y DOUBLE DIN HEAD UNIT PROVISION Cut and remove center divide from radio housing. (Figure A) Snap the DDIN brackets to the inside edge of the radio housing. (Figure B) Slide the DDIN radio unit into the... -
Page 11: Stacked Iso Head Unit Provision
99-9011 KIT ASSEMBL Y STACKED ISO HEAD UNIT PROVISION Cut and remove center divider from radio housing. (Figure A) Snap the DDIN brackets to the inside edge of the radio housing. (Figure B) Slide the stacked ISO DIN units into... -
Page 12: Final Assembly
Left Rear (-) ..Green / Black *NOTE: When a Black wire is not present, ground radio to vehicle chassis. All colors may not be present on all leads due to manufacturer’s specifications. 1-800-221-0932 www.metraonline.com REV. 05/26/09 © COPYRIGHT 2004-2009 METRA ELECTRONICS CORPORATION INST99-9011...
Need help?
Do you have a question about the 99-9011 and is the answer not in the manual?
Questions and answers