Advertisement
Available languages
Available languages
Chrysler multi-kit 1998-2010
KIT FEATURES
• DIN radio provision with pocket
• ISO DIN radio provision with pocket
KIT COMPONENTS
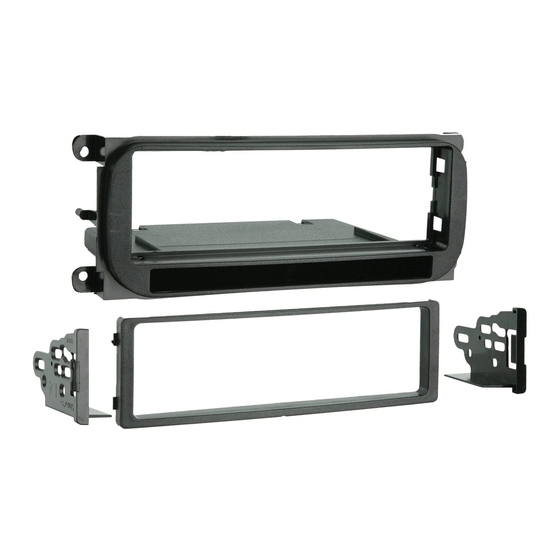
• A) Radio housing • B) ISO trim plate • C) ISO snap-in brackets
A
B
WIRING & ANTENNA CONNECTIONS (sold separately)
Wiring Harness: • Please visit metraonline.com for options
Antenna Adapter: • Please visit metraonline.com for options
METRA. The World's best kits.
Installation instructions for part 99-6505
99-6505
C
APPLICATIONS
See application list inside cover
™
metraonline.com
Table of Contents
See Table of Contents list inside cover
TOOLS REQUIRED
• Torx T-20 driver • Phillips screwdriver • Socket wrench
CAUTION!
Metra recommends disconnecting the negative bat -
tery terminal before beginning any installation, unless the vehicle
manufacturer recommends against so. Please check with your local
Dealership for more information. All accessories, switches, climate
controls panels, and especially air bag indicator lights must be con -
nected before reconnecting the battery or cycling the ignition. Also,
do not remove the factory radio with the key in the on position, or the
vehicle running. It would be best to remove the key from the ignition
and then wait a few seconds before removing the factory radio.
© COPYRIGHT 2004-2015 METRA ELECTRONICS CORPORATION
Advertisement
Chapters

Subscribe to Our Youtube Channel
Related Manuals for Metra Electronics 99-6505


Summary of Contents for Metra Electronics 99-6505
- Page 1 Installation instructions for part 99-6505 Chrysler multi-kit 1998-2010 Table of Contents 99-6505 See Table of Contents list inside cover KIT FEATURES TOOLS REQUIRED • DIN radio provision with pocket • Torx T-20 driver • Phillips screwdriver • Socket wrench • ISO DIN radio provision with pocket KIT COMPONENTS •...
-
Page 2: Table Of Contents
99-6505 Applications Table of Contents CHRYSLER DODGE (cont’d) Dash Disassembly 300M 1999-2004 Neon 2000-2006 – ......... 3 Chrysler 300M 1999-2004/Concorde 1998-2004 Concorde 1998-2004 2002-2005 – ................3 Chrysler LHS 1999-2001 1999-2001 Stratus 2001-2006 – ..............3 Chrysler PT Cruiser 2001-2005... -
Page 3: Chrysler 300M 1999-2004/Concorde 1998-2004 - Chrysler Lhs 1999-2001
99-6505 Dash Disassembly Chrysler PT Cruiser 2001-2005 Chrysler Sebring 2001-2006 Chrysler 300M 1999-2004 Concorde 1998-2004 / LHS 1999-2001 Dodge Stratus 2001-2006 1. Unclip the power window control Dodge Intrepid 1998-2004 panel. Disconnect and remove the 1. Remove (2) Phillips screws from 1. -
Page 4: Chrysler Town & Country 2000-2007
99-6505 Dash Disassembly Chrysler Town & Country 2000-2007/ Dodge Neon 2000-2006 Dodge Ram 2002-2005 Jeep Grand Cherokee 1999-2004 Voyager 2001-2003 Plymouth Neon 2000-2001 1. Unclip the top edge of the trim 1. Unclip and remove the radio trim Dodge Caravan 2001-2007 panel below the steering column. -
Page 5: Jeep Liberty 2002-2007
99-6505 Dash Disassembly Dodge Dakota 2001-2004 Jeep Liberty 2002-2007 Jeep Wrangler 2003-2006 2 Screws Durango 2001-2003 1. Remove the ashtray and remove 1. Unsnap and remove the defroster (1) Phillips screw exposed. grille panel near the windshield. 1. Remove (3) T-20 Torx screws from the bottom edge of the panel below 2. -
Page 6: Dodge Viper 2003-2010
99-6505 Dash Disassembly Dodge Viper 2003-2010 1. Using a panel removal tool, pry up on the center console trim panel. Be careful not to scratch the trim panel. (Figure A) 2. Loosen the shifter lock nut below the center console trim panel (Figure A), and unscrew the shifter knob. -
Page 7: Kit Assembly
99-6505 Kit Assembly DIN radio provision with pocket ISO DIN radio provision with pocket 1. Remove the metal DIN sleeve from 1. Remove the metal DIN sleeve and the aftermarket radio. trim ring from the aftermarket radio. 2. Slide the sleeve into the assembly 2. -
Page 8: Installation Instructions For Part
Installation instructions for part 99-6505 IMPORTANT If you are having difficulties with the installation of this product, please call our Tech Support line at 1-800-253-TECH. Before doing so, look over the instructions a second time, and make sure the installation was performed exactly as the instructions are stated. - Page 9 Instrucciones de instalación para la pieza 99-6505 Chrysler multi-kit 1998-2010 Indice 99-6505 Ver interior de la portada para indice CARACTERÍSTICAS DEL KIT HERRAMIENTAS REQUERIDAS • Provisión de radio DIN con cavidad • Destornillador Torx T-20 • Destornillador Phillips • Provisión de radio ISO DIN con cavidad •...
- Page 10 99-6505 Aplicaciones Indice CHRYSLER DODGE (continuación) Desmontaje del tablero 300M 1999-2004 Neon 2000-2006 – ......... 3 Chrysler 300M 1999-2004/Concorde 1998-2004 Concorde 1998-2004 2002-2005 – ................3 Chrysler LHS 1999-2001 1999-2001 Stratus 2001-2006 – ..............3 Chrysler PT Cruiser 2001-2005 PT Cruiser...
-
Page 11: Desmontaje Del Tablero
99-6505 Desmontaje del tablero Chrysler PT Cruiser 2001-2005 Chrysler Sebring 2001-2006 Chrysler 300M 1999-2004 Concorde 1998-2004 / LHS 1999-2001 Dodge Stratus 2001-2006 1. Desenganche el panel de Dodge Intrepid 1998-2004 control eléctrico de la ventana. 1. Quite los (2) tornillos Phillips de 1. -
Page 12: Chrysler Town & Country 2000-2007
99-6505 Desmontaje del tablero Chrysler Town & Country 2000-2007/ Dodge Neon 2000-2006 Dodge Ram 2002-2005 Jeep Grand Cherokee 1999-2004 Voyager 2001-2003 Plymouth Neon 2000-2001 1. Desenganche y quite panel de Desenganche el borde superior del panel Dodge Caravan 2001-2007 moldura de radio . -
Page 13: Jeep Liberty 2002-2007
99-6505 Desmontaje del tablero Dodge Dakota 2001-2004 Jeep Liberty 2002-2007 Jeep Wrangler 2003-2006 2 Screws Durango 2001-2003 1. Retire el cenicero y retire el (1) 1. Suelte y retire el panel de la rejilla del tornillo Phillips expuesto. desempañador cerca del parabrisas . -
Page 14: Dodge Viper 2003-2010
99-6505 Desmontaje del tablero Dodge Viper 2003-2010 1. Con una herramienta de remoción de paneles, haga palanca para quitar el panel de la moldura de la consola central. Tenga cuidado de no rayar el panel de la moldura. (Figura A) 2. -
Page 15: Ensamble Del Kit
99-6505 Ensamble del kit Provisión de radio DIN con cavidad Provisión de radio ISO DIN con cavidad 1. Quite la manga de metal DIN y 1. Quite la manga de metal DIN del el anillo de moldura del radio de radio de mercado secundario. - Page 16 Instrucciones de instalación para la pieza 99-6505 IMPORTANTE Si tiene dificultades con la instalación de este producto, llame a nuestra línea de soporte técnico al 1-800-253-TECH. Antes de hacerlo, revise las instrucciones por segunda vez y asegúrese de que la instalación se haya realizado exactamente...
Need help?
Do you have a question about the 99-6505 and is the answer not in the manual?
Questions and answers