Table of Contents
Advertisement
Quick Links
INSTALLATION INSTRUCTIONS FOR PART 99-8218
Toyota Camry/Camry Hybrid 2007-up
KIT FEATURES
• DIN radio provision with pocket
• ISO radio provision with pocket
• Double DIN radio provision
• Stacked ISO units provision
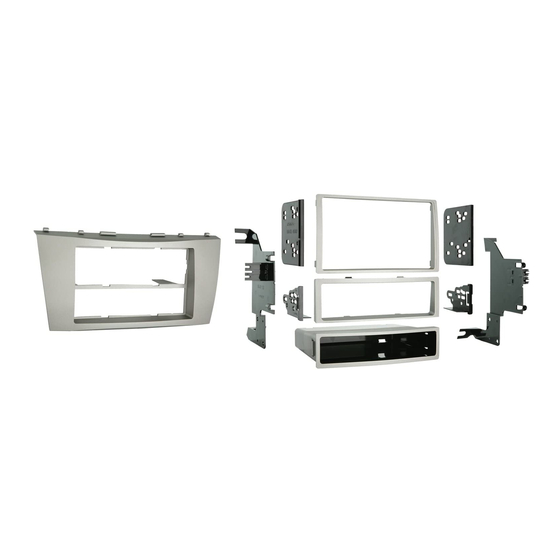
KIT COMPONENTS
• A) Radio Housing • B) Radio Housing Brackets • C) ISO Snap-In Brackets • D) Double DIN Brackets • E) Trim Plate
• F) Double DIN Trim Plate • G) Pocket • H) (4) # 8 x 3/8 Phillips Screws • I) (4) #4 x 1/4 Phillips Screws
A
F
WIRING & ANTENNA CONNECTIONS (Sold Separately)
Wiring Harness: • 70-1761 Toyota harness 1987-up
Antenna Adapter: • Not Required
Panel Removal Tool • Phillips Screwdriver • Small Flat Blade Screwdriver • Socket Wrench
APPLICATIONS
99-8218
B
C
G
• TYTO-01 Toyota amp interface 2003-up
TOOLS REQUIRED
METRA. THE WORLD'S BEST KITS.™
1-800-221-0932
© COPYRIGHT 2004-2011 METRA ELECTRONICS CORPORATION
D
H
I
metraonline.com
E
Advertisement
Table of Contents

Related Manuals for Metra Electronics 99-8218


Summary of Contents for Metra Electronics 99-8218
- Page 1 INSTALLATION INSTRUCTIONS FOR PART 99-8218 APPLICATIONS Toyota Camry/Camry Hybrid 2007-up 99-8218 KIT FEATURES • DIN radio provision with pocket • ISO radio provision with pocket • Double DIN radio provision • Stacked ISO units provision KIT COMPONENTS • A) Radio Housing • B) Radio Housing Brackets • C) ISO Snap-In Brackets • D) Double DIN Brackets • E) Trim Plate •...
-
Page 2: Table Of Contents
99-8218 Table of Contents Dash Disassembly – Toyota Camry/Camry Hybrid 2007-up Kit Assembly – DIN radio provision with pocket – ISO radio provision with pocket – Double DIN radio provision 9-10 – Stacked ISO units provision 11-12 Caution Metra recommends disconnecting the negative battery terminal before beginning any installation. -
Page 3: Dash Disassembly
99-8218 Dash Disassembly 1. Turn the shift knob counterclockwise to remove. 2. Unclip and remove (1) trim panel from each side of the pocket below the radio/ climate control assembly. (2 panels total) (Figure A) 3. Unclip and remove the shift knob trim panel. - Page 4 99-8218 Dash Disassembly 7. Unclip and remove the A/C vents above the radio. (Take care not to scratch the dash panel). (Figure D) 8. Remove (2) 10mm bolts above the radio (behind the A/C vents) and (2) 10mm bolts below the climate controls (behind pocket) then unplug and remove the radio/climate control assembly.
-
Page 5: Kit Assembly
Kit Assembly 99-8218 DIN radio provision with pocket 1. Locate the factory wiring harness in the dash. Metra recommends using the proper mating adapter from Metra or AXXESS. Re-connect the negative battery terminal and test the unit for proper operation. -
Page 6: Din Radio Provision With Pocket
Kit Assembly 99-8218 DIN radio provision with pocket 6. Attach the radio housing brackets to the radio housing using the included Phillips screws. (Figure D) 7. Secure the radio housing brackets to the climate control using the factory hardware. (Figure D) 8. -
Page 7: Iso Radio Provision With Pocket
Kit Assembly 99-8218 ISO radio provision with pocket 1. Locate the factory wiring harness in the dash. Metra recommends using the proper mating adapter from Metra or AXXESS. Re-connect the negative battery terminal and test the unit for proper operation. -
Page 8: Iso Radio Provision With Pocket
Kit Assembly 99-8218 ISO radio provision with pocket 7. Attach the radio housing brackets to the radio housing using the included Phillips screws. (Figure D) 8. Secure the radio housing brackets to the climate control using the factory hardware. (Figure D) 9. -
Page 9: Double Din Radio Provision
Kit Assembly 99-8218 Double DIN radio provision 1. Locate the factory wiring harness in the dash. Metra recommends using the proper mating adapter from Metra or AXXESS. Re-connect the negative battery terminal and test the unit for proper operation. 2. Cut and remove center divider from radio housing. -
Page 10: Double Din Radio Provision
Kit Assembly 99-8218 Double DIN radio provision 6. Align the small legs on the bottom of the radio housing with the slots in the top of the climate control then slide the climate control sideways to engage together. (Figure D) 7. -
Page 11: Stacked Iso Units Provision
Kit Assembly 99-8218 Stacked ISO units provision 1. Locate the factory wiring harness in the dash. Metra recommends using the proper mating adapter from Metra or AXXESS. Re-connect the negative battery terminal and test the unit for proper operation. 2. Cut and remove center divider from radio housing. -
Page 12: Stacked Iso Units Provision
Kit Assembly 99-8218 Stacked ISO units provision 6. Align the small legs on the bottom of the radio housing with the slots in the top of the climate control then slide the climate control sideways to engage together. (Figure D) 7. - Page 13 Notes...
- Page 14 Notes...
- Page 15 Notes...
- Page 16 INSTALLATION INSTRUCTIONS FOR PART 99-8218 METRA. THE WORLD’S BEST KITS.™ metraonline.com 1-800-221-0932 © COPYRIGHT 2004-2011 METRA ELECTRONICS CORPORATION...
Need help?
Do you have a question about the 99-8218 and is the answer not in the manual?
Questions and answers