Table of Contents
Advertisement
Thank you very much for purchasing our Alkaline
Ionizer.
Please read through this manual carefully before using the product to ensure proper operation.
Be absolutely sure to read the "Safety Precautions" (see pages 4 to 5) before use to ensure that
you will use the product safely. After reading the manual, keep it in a safe place along with the warranty
in case you need to refer to it later.
Be absolutely sure to check that the purchase date has been entered on the warranty.
Please keep in mind that the manufacturer of the product will not be responsible for any product
malfunctioning or accidents resulting from the improper installation or operation of the product.
Use properly to economize on electricity
Instruction Manual
Alkaline Ionizer
TK7585-SHK
Model No.
Household Use
-E
Advertisement
Table of Contents

Related Manuals for Panasonic TK7585-SHK


Summary of Contents for Panasonic TK7585-SHK
- Page 1 Instruction Manual Alkaline Ionizer Household Use TK7585-SHK Model No. Thank you very much for purchasing our Alkaline Ionizer. Please read through this manual carefully before using the product to ensure proper operation. Be absolutely sure to read the “Safety Precautions” (see pages 4 to 5) before use to ensure that you will use the product safely.
-
Page 2: Table Of Contents
The Alkaline Ionizer eliminates turbidity and odors, and makes your water tasty. The Alkaline Ionizer produces alkaline ion water and weak acidic water by electrolysis. It eliminates free residual chlorine, turbidity, total trihalomethane, chloroform, bromodichloromethane, dibromochloromethane, bromoform, tetrachloroethylene, trichloroethylene, 1,1,1-trichloroethane, CAT, 2-MIB (mold smell), soluble lead, so that the water you drink will be tasty. - Page 3 ..................................................................................................................................................................................................................................................................................................
-
Page 4: Safety Precautions
Safety Precautions These must be observed Be sure to observe these precautions ● Do not disassemble, repair or remodel the Alkaline Ionizer. Doing so can lead to a fire and/or electric shocks. • If the Alkaline Ionizer needs to be repaired, consult your dealer. ●... - Page 5 ● People in the following situations should consult a doctor before applying weak acidic water to their skin. • People with sensitive skin • People susceptible to allergic dermatitis ● First-time users should consume small quantities (1 to 2 cupfuls) starting at the “Alkaline 1”...
-
Page 8: Supplied Accessories
Supplied Accessories Before using the Alkaline Ionizer, check that the following supplied accessories are accounted for. If any are missing, contact your dealer. For Use in Attaching For Use in Installing the Main Unit Consumables the Bypass Selector Mounting Disc Acidic Water Stand Bypass Selector (with drain outlet and... -
Page 9: Names Of The Parts And Steps To Take Before Operation
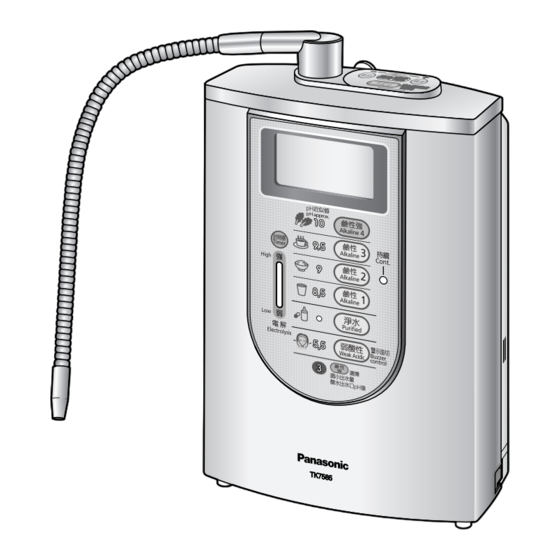
Names of the Parts and Steps to Take Before Operation Outlet pipe (length: approx. 45 cm) Control panel (see page 53) Water supply hose (length: approx. 90 cm) Faucet (not included) LCD display Main Main unit Hose strap spout Drain outlet Suction Bypass Power plug... - Page 10 ▼...
-
Page 11: Checking The Faucet
Checking the Faucet Water faucet which can not install the Alkaline Ionizer • Faucet without a metal lip end • Faucet with an end of 10 mm or less • • less than 10 mm Plastic or other material • Shower nozzle •... -
Page 12: Attaching The Bypass Selector
Attaching the Bypass Selector • Keep all parts that are not used during installation, as they may be needed later if the unit is moved or the faucet is changed. • Outside-screwed faucet • Water faucet which can attach the Alkaline Ionizer without an accessory. - Page 13 Attach the bypass selector and tighten the mounting nut. • Do not use any tools. (This may damage the unit.) • Mounting nut Bypass selector...
- Page 14 Attaching the Bypass Selector (continued) • Keep all parts that are not used during installation, as they may be needed later if the unit is moved or the faucet is changed. • Inside-screwed faucet Inside-screwed faucet • Water faucet which can attach the Alkaline Ionizer with an accessory.
- Page 15 Attach the mounting nut and adaptor. • The adaptor should be screwed on Mounting nut straight. Screwing it on tilted may strip the threads, resulting in water leaks. • Gasket Adaptor Attach the bypass selector and tighten the mounting nut. •...
- Page 16 Attaching the Bypass Selector (continued) • Keep all parts that are not used during installation, as they may be needed later if the unit is moved or the faucet is changed. • Faucet without an aerator • Water faucet which can attach the Alkaline Ionizer with accessory.
- Page 17 Tighten the 4 screws Screws Mounting nut temporarily and loosen the (4 pcs.) mounting nut to leave a 3~4 mm gap. 3-4 mm Push the bypass selector against the faucet and install the 4 screws as shown below. Water faucet •...
-
Page 18: Installing The Alkaline Ionizer
Installing the Alkaline Ionizer Installation precautions Do not install the Alkaline Ionizer in any of the following locations: (Doing so may cause malfunction.) Where there are naked flames or near other high-temperature area (above 60°C) Where the Alkaline Ionizer will be exposed to direct sunlight Where oil or grease will stick to the Alkaline Ionizer Outdoors or where the Alkaline Ionizer will be exposed to the wind and rain In a bathroom or where the Alkaline Ionizer will be exposed to water or steam... - Page 19 Preparations Extend the power cord and hose in the manner that best suits the location where the unit is installed. Do not flatten or bend the cord or hose. Bottom of the unit When extending the cord and hose from the left/ Spring (to prevent the hose from being bent) Front panel of the unit...
- Page 20 Installing the Alkaline Ionizer (continued) Secure the water supply After completing the preparations, hose connect the water supply hose. (using the hose strap) q Remove the hose fastening nut from the bypass selector, and pass the hose through the nut. w Insert the water supply hose into the bypass selector as far as it will go.
- Page 21 Screw in the outlet pipe until it is secured firmly. Do not use any tools for this job (since the pipe may be damaged). Ensure that the gasket is not twisted (since this may cause the water to leak). Do not lift the unit by taking hold of the outlet pipe (otherwise damage may result).
-
Page 24: Checks After Installation
Installing the Alkaline Ionizer (continued) Checks after installation After installing the Alkaline Ionizer, run water through it, check the following, and take the suggested action if there is any trouble. Check item Trouble inspection location and remedial action Reference page Is water coming out of the main spout? Is the water supply hose bent or flattened. - Page 25 Check item Trouble inspection location and remedial action Reference page Is there any water leaking from where the Has the water supply hose been attached securely to water supply hose is the bypass selector? connected? Insert it as far as it will go, and use the hose fastening nut to secure it.
-
Page 26: Measuring The Ph Level (Ion Concentration)
Measuring the pH Level (Ion Concentration) After the Alkaline Ionizer has been installed or after it has not been used for a prolonged period (generally, a week or more), be absolutely sure to measure the pH level, and check that it is within the “pH standard”... - Page 27 CAUTION Do not bring the pH test liquid near a naked flame. Doing so may cause the reagent to ignite, causing a fire. Do not drink the pH test liquid or the water containing the test liquid or put in your eyes. (Keep these liquids away from children.) Failure to observe these instructions may cause health problems.
-
Page 28: Before Use
Operating Precautions Do not lift the unit by taking hold of the Depending on the region and water outlet pipe quality, it may not be possible to obtain (otherwise damage may result). the designated pH level. In cases like this, use tap water. Do not use the Alkaline Ionizer if the outlet pipe is loose When using the Alkaline Ionizer in areas... -
Page 29: Before Operation
Before Operation Selecting the language of the LCD displays/ The language of the LCD displays can be selected from English or Chinese. The default setting is Chinese. Turn off the faucet, and press repeatedly until the buzzer beeps four times (about 3 seconds). -
Page 30: Tips On Operating The Alkaline Ionizer
Before Operation (continued) Tips on operating the Alkaline Ionizer (using it to suit the intended application) Alkaline ion water: The pH level of alkaline ion water increases by about 0.5 per setting in the following sequence: Alkaline 1 → Alkaline 2 → Alkaline 3 → Alkaline 4 (Strongly Alkaline). In these instructions, “Alkalines 1 to 3”... -
Page 31: Lcd Displays Which Appear During Operation
LCD displays which appear during operation During use Standby status Characters and pictographs indicating the application are The balance cartridge displayed alternately. life is displayed Example: When the “Alkaline 1” (Drinking water for new user) is (see page 62). When the selected faucet is At intervals of approx. -
Page 34: Operation
Operation Using alkaline ion water, weak acidic water or purified water Press the water Set the bypass Open the quality selector button selector to faucet. corresponding to the type of “Purified”. water required. The buzzer beeps, and the water “Preparation time” quality indicator and LCD now appears on the display light. - Page 35 When the faucet is turned off Start using the Alkaline Ionizer. after use: When Alkaline 4 (Strongly Alkaline), The “Preparation time” display is cleared, and the buzzer weak acidic or purified water beeps three times, indicating that the Alkaline Ionizer is now has been used, the water quality ready to be used.
- Page 36 Operation (continued) Using alkaline ion water, weak acidic water or purified water (continued) When the “Reduce flow” display appears (only while “Alkaline” or “Weak Acidic” is selected) This message appears when too much water is (Example) flowing (in which case, it may not be possible to When “Alkaline”...
-
Page 37: Using The Unpurified Water (Tap Water)
Using the unpurified water (tap water) By “unpurified water” is meant here the untreated tap water. Set the bypass selector to “Unpurified” or “Shower”. The water comes straight out. The water comes out as a shower. Bypass selector [Bypass selector as seen from below] If hot water has been run through the Alkaline Ionizer by mistake, it will come out of the hot water opening. - Page 38 Purified...
- Page 40 ▼...
- Page 41 Unpurified Shower Purifi ed Unpurifi ed Shower...
-
Page 42: Finely Adjusting The Ph Level (Ion Concentration)
Operation (continued) Finely adjusting the pH level (ion concentration) To bring the pH level of the water processed Operation through the Alkaline Ionizer closer to the pH Turn off the faucet, and standard (water quality indicator number), the pH levels set for the “Alkaline” or “Weak Acidic” water press on the control quality selector buttons can be finely adjusted in 3... - Page 43 LCD displays Mode selection Setting mode Check mode ▼ Setting mode pH fine adjustment Continue mode Water output buzzer ▼ Example/ pH fine adjustment: Alkaline 1 Stronger Standard Milder ▼ Example/ When pH fine adjustment: Alkaline 3 pressed Stronger Standard Milder ▼...
-
Page 44: For Your Operating Convenience
For Your Operating Convenience/ Measuring the water output volume/ Each time water is run through the Alkaline Ionizer, the total water output (amount of water that comes out of the main spout) is calculated and indicated on the LCD display in 0.1-liter increments. (Water output display) In measuring the water output, it is recommended that you set the main spout and acidic water spout as instructed in the procedure on page 46 (in order to improve the accuracy of the water output display). - Page 45 To sound the advisory buzzer when the amount to be measured is reached Press the water quality selector Setting range Display Display button corresponding to the water quality that is to be selected. Increased in Lower Reduced in 0.6 to 2.0 increments increments liters...
- Page 46 For Your Operating Convenience (continued)/ Measuring the water output volume (continued) Setting the difference in height Operation between the main spout and acidic Turn off the faucet, and press water spout on the control panel for It is recommended that this height be set in 1 second.
- Page 47 LCD display Mode selection Setting mode Check mode ▼ Setting mode pH fine adjustment Continue mode Water output buzzer ▼ Setting mode Electrolysis signal Measurement condition setting Exit ▼ Measurement condition setting Height difference Compensation ▼ Height difference 10 to 20 (cm) 20 to 30 (cm) 30 to 40 (cm) ▼...
- Page 48 For Your Operating Convenience (continued)/ Measuring the water output volume (continued) Correcting the water output display Operation Press , and select There is a slight difference between the water “ ”. output display and actual output of water. (This depends on the usage conditions, water pressure and other factors.) If there is a significant difference, correct the water output Press...
- Page 49 LCD display Measurement condition setting Height difference Compensation ▼ Compensation –20% –10% ±0% ▼ Example: When the water output display is 0.5 liter, and the actual water output is 0.6 liter (the water output is about 20% more than the display) Compensation –20%...
-
Page 50: Monitoring The Water Flow
For Your Operating Convenience (continued)/ Monitoring the water flow/ While water is running through the Alkaline Ionizer, the water flow (total flow of water coming out of the main spout, acidic water spout and drain outlet per minute) is displayed and can be monitored. (Flow display) Example/ Press... -
Page 51: Using The Timer
Using the timer The buzzer beeps (for about 10 seconds) when the set time is reached. This is useful when setting cooking times. Turn off the faucet, press , and set the time. Example The LCD display changes to the “Set timer”... - Page 52 For Your Operating Convenience (continued)/...
-
Page 53: Setting Mode And Check Mode
Setting mode and check mode/ The following items can be set and checked in the setting mode and check mode. (No setting or checking operations can be performed while water is running through the Alkaline Ionizer.) The settings established when purchased can be used for this mode. Selector button/ Control panel The setting mode and check mode is started by pressing this button for 1 second. - Page 54 For Your Operating Convenience (continued)/ Setting mode and check mode (continued)/ How to set (For details on the items which can be set and the settings established when purchased, see page 53.) Operation LCD display Item set / Continue mode OFF (ON) / Turn off the faucet, and press Mode selection 1 second.
- Page 55 Water output buzzer OFF (ON) / Weak acidic buzzer OFF (ON) / Mode selection Mode selection Setting mode Setting mode Check mode Check mode ▼ ▼ Setting mode Setting mode pH fine adjustment pH fine adjustment Continue mode Continue mode Water output buzzer Water output buzzer ▼...
- Page 56 For Your Operating Convenience (continued)/ Setting mode and check mode (continued)/ How to set (For details on the items which can be set and the settings established when purchased, see page 53.) Operation LCD display Item set / Alkaline priority OFF (ON) / Turn off the faucet, and press Mode selection 1 second.
- Page 57 Buzzer volume High, Medium, Low / Electrolysis signal OFF (ON) / Mode selection Mode selection Setting mode Setting mode Check mode Check mode ▼ ▼ Setting mode Setting mode pH fine adjustment pH fine adjustment Continue mode Continue mode Water output buzzer Water output buzzer ▼...
- Page 58 For Your Operating Convenience (continued)/ Setting mode and check mode (continued)/ How to check (For details on the items which can be checked, see page 53.) Operation LCD display Item checked / Optional accessory: Cartridge / Turn off the faucet, and press Mode selection for 1 second.
- Page 59 Setting checks / Mode selection Setting mode Check mode ▼ Mode selection Setting mode Check mode ▼ Check mode Optional accessories Setting checks Exit ▼ Check mode Optional accessories Setting checks Exit ▼ Setting checks Continue mode: Note Water outlet buzzer: OFF Example/ Weak acidic buzzer: OFF ▼...
-
Page 60: Maintenance
Maintenance Main unit, bypass selector and acidic water stand Plated part Soak a soft cloth in water, wring it out well, and use it wipe the units and parts. Use a toothbrush or other implement to remove dirt at the shower part. Shower part The water volume will be reduced if dirt and other foreign matter are allowed to clog the filter at the bypass selector mount... - Page 61 CAUTION Avoid bringing the main unit into contact with water by spraying it with water or washing. Otherwise, power leaks, electric shocks and/or trouble may result. Important Do not use detergents, cleansers, paint thinners, benzine, alcohol or kerosene for cleaning purposes. If, for instance, a detergent has been used by mistake, wipe the surface with a damp cloth to remove all traces of the detergent.
-
Page 62: Before Replacing The Cartridge
Before Replacing the Cartridge Replacement display The volume of water which has run through the Alkaline Ionizer is totalized, and the balance cartridge life is indicated on the LCD display. Use this display as a general guideline for when to replace the cartridge. The cartridge life (12,000 liters) is a figure based on tests involving a standard water quality and water pressure (JIS S 3201: Testing methods for household water purifiers), and with tap water in general there may a significant difference in the clogging time depending on the water quality... - Page 63 Even if U25 or U26 is not displayed, replace the cartridge when: The water has an unpleasant odor or taste (this means that the cartridge’s ability to filter out these impurities has deteriorated). The period of time (about 1 year) that serves as a general guideline for when to replace the cartridge has passed.
-
Page 64: Replacing The Cartridge
Replacing the Cartridge Replace the cartridge without disconnecting the power plug. (The cartridge life cannot be reset when the power plug is disconnected.) Before replacing the cartridge, turn off the faucet. Do not run water through the Alkaline Ionizer with the cartridge removed. (Doing so will cause the water to overflow.) Do not replace it with the condition of main unit flat. - Page 65 Press (for about 3 seconds). Reset completed screen Cartridge life display The “Reset completed” screen appears, and about 3 seconds later the “Cartridge life” display appears. Refer to the displays on the right, and check whether the balance cartridge life has been reset correctly. LCD display Open the faucet, and run water through the...
- Page 66 Replacing the Cartridge (continued) Turn off the faucet, and put the cover back on. Engage the tabs here. Important Dispose of the used cartridge in accordance with the applicable ordinances in the area concerned. In order to display the balance cartridge life correctly, the cartridge life should be reset with step 3. Note When alkaline ion water is poured into a glass after the cartridge has been replaced, it may contain white bubbles: this is normal and does not indicate any trouble.
-
Page 67: Automatic Electrode Cleaning
Automatic Electrode Cleaning/ This operation automatically removes the calcium deposits on the electrode plates inside the main unit. When the faucet After producing weak Automatic electrode cleaning is acidic water is turned off performed for up to 50 seconds or so. “Electrode cleaning”... -
Page 68: When The Power Or Water Supply Is Cut Off
When the Power or Water Supply is Cut Off When the power supply is cut off Turn off the faucet if the power is cut off while the Alkaline Ionizer is being used. Purified water comes out of the main spout if water is run through the Alkaline Ionizer while the power is off. -
Page 69: When Moving The Alkaline Ionizer
When Moving the Alkaline Ionizer Follow the steps below to drain off the water in the Alkaline Ionizer. LCD display Disconnect the power plug, Drain outlet and connect it again. “Preparation time” blinks for about 15 seconds on the LCD display, and water comes out of the drain outlet. - Page 70 When Moving the Alkaline Ionizer (continued) Remove the cartridge. Push slightly Do not place the unit on its side or upside down with the cartridge removed (since water may get inside the unit and cause trouble). Cover Push down on the top Cartridge Pull toward Pull up and out...
-
Page 71: Q&A
Q&A Before use Isn’t it possible to use underground water for the Alkaline Ionizer? Underground water cannot be used. The quality of undergoround water is unstable, so please use the tap water. What is the point of the effects that the properties of source water (tap water) have on the water produced by the Alkaline Ionizer? Consult the table below. - Page 72 Q&A (continued) What should I do when I’m not going to What’s the maximum temperature of the use the Alkaline Ionizer for a prolonged hot water that can be run through the period (more than a week or so as a Alkaline Ionizer? general guide)? 35°C for the main unit, and 80°C for the bypass...
- Page 73 What do the braille characters on top What should I do if I get diarrhea or a of the water quality selector buttons rash after I start drinking alkaline ion represent? water? Stop drinking alkaline ion water, and consult a doctor. Refer to the table below.
- Page 74 Q&A (continued) When alkaline ion water is poured into a What kind of water should babies be glass, white bubbles are formed. drinking? What is this about? Water produced at the “Purified Water” setting is It means that air has become mixed in with the recommended for babies.
-
Page 79: Error Code
Error Code When one of the following codes appears on the LCD display, take the suggested action described below. If a code from H31 to H39 has appeared, do NOT attempt to disassemble and repair the Alkaline Ionizer yourself, but contact your dealer. Error code Cause and remedial action Depending on the water quality and environment, electrolysis may be... - Page 80 ► U21 U27 ► U22 U23 ► ► ► ► ►...
-
Page 81: Troubleshooting
Troubleshooting If you think that something is wrong with the Alkaline Ionizer, check out the following points before requesting repairs. If you decide that trouble has occurred, do NOT attempt to disassemble and repair the Alkaline Ionizer yourself, but contact your dealer. Sometimes suspected trouble is remedied by disconnecting the power plug and then re-connecting it. - Page 82 Troubleshooting (continued) When the LCD display shows the following (continued) Reference Symptom Cause and remedial action page This happens when the water flow is reduced too much or the When the water flow is flow is diminished due to a change in the water pressure. reduced at the faucet during When using the Alkaline Ionizer at the “Alkaline 4 (Strongly use, the display suddenly...
- Page 83 Reference Symptom Cause and remedial action page Is the water pressure too low? Open up the faucet all the way. Check the flow. Has the flow at the faucet been reduced too much? — Open up the faucet. Very little or no water is discharged from Is the filter of the bypass selector clogged? 60, 61...
- Page 84 Troubleshooting (continued) Is this a malfunction? (continued) Reference Symptom Cause and remedial action page These sounds are made by the water inside the unit draining Sounds are heard from — the unit after the faucet off. has been turned off This is not a malfunction.
- Page 85 Reference Symptom Cause and remedial action page White suspended This is calcium which has built up inside the Alkaline Ionizer. matter is mixed in — with the alkaline ion This is not a malfunction. water Not much water This happens because the air inside the cartridge is being comes out of the expelled.
- Page 86 —...
- Page 87 —...
- Page 88 — — — — —...
- Page 89 — — — —...
- Page 90 — — —...
-
Page 91: Optional Accessories
Optional Accessories Obtain all optional accessories from your dealer. For details on how they are used, refer to the accompanying instructions. For use with large faucet Consumables Replacement cartridge Large-diameter Faucet Fitting Model No.: TK7815C1ZEX (inside diameter 32.5 mm) Model No.: P-06JRC For faucets whose end diameter is 24 mm to 32 mm (see page 11) Wall mounting bracket... -
Page 92: Specifications
Current fuse: 2.5 A Overheating protector (automatic resetting type, activated at Overheating protection devices temperature of 120°C) (inside isolation transformer) Thermal fuse (activated at temperature of 145°C) x1 Panasonic Electric Works Co., Ltd. Manufacturer and retailer 1048, Kadoma, Osaka 571-8686, Japan... - Page 93 All figures given are for a water temperature of 20°C. This product cannot convert hard water into soft water. The total volume of water coming out of the main spout, acidic water spout and drain outlet is given as the run-through water volume and daily volume of water used. Note 1: The water which can be used as alkaline ion water and weak acidic water is equivalent to about 80% of the filtration flow volume.
- Page 96 Inspection Check the Alkaline Ionizer you’ve been using for years! Nothing appears on the LCD display even though If any of these symptoms the power plug has been have occurred, connected. disconnect the power Are any of An error code (U21 to plug from the power the following U28) has appeared, and...
Need help?
Do you have a question about the TK7585-SHK and is the answer not in the manual?
Questions and answers
While no display and no light indicator