Ricoh Aficio AP610N Quick Installation Manual
Hide thumbs
Also See for Aficio AP610N:
- Software manual (301 pages) ,
- Maintenance manual (124 pages) ,
- Setup manual (97 pages)
Table of Contents
Advertisement
Quick Links
QUICK INSTALLATION GUIDE
Please read the Safety Information in the Setup Guide before using this machine. It contains important
information related to USER SAFETY and PREVENTING EQUIPMENT PROBLEMS.
WHERE TO PUT THE PRINTER
Environments to Avoid
The printer's location should be carefully chosen
because environmental conditions greatly affect its
performance.
❒ Areas exposed to direct sunlight or strong light
❒ Dusty areas
Warning
❒ Areas with corrosive gases
• Confirm that the wall outlet is near the machine
❒ Areas that are excessively cold, hot, or humid
and freely accessible, so that in event of an
❒ Locations near an air conditioner or humidifier
emergency, it can be unplugged easily.
❒ Locations near other electronic equipment
• Only connect the machine to the power source
❒ Locations subject to frequent strong vibration
described on this sheet.
• Avoid multi-wiring.
Power Source
• Do not damage, break or make any modifica-
Connect the power cord to a power source with the follow-
tions to the power cord. Do not place heavy ob-
ing specifications:
jects on it, pull it hard or bend it more than nec-
essary. These actions could cause an electric
❒ 220-240V, 50/60Hz, 4.5A or more
shock or fire.
• Enclosed set of power cord is only for the use
Space Required for Installing
with this product and should not be used with
Leave enough space around the printer. This space is neces-
any other electronic equipment or appliances.
sary to operate the printer. The recommended (or minimum)
Do not use any other power cord with this prod-
space requirement is as follows:
uct. They could cause electric shock or fire.
Caution
• Do not handle the plug with wet hands. Doing
so might cause an electrical shock.
• Keep the machine in an area that is within opti-
mum environmental conditions. Operating the
machine in an environment that is outside the
recommended ranges of humidity and tempera-
ture can cause an electrical fire hazard. Keep
the area around the socket free of dust. Accu-
mulated dustcan become an electrical fire haz-
A: 10 cm (4 inches) or more
ard.
• Place the machine on a strong and level sur-
B: 10 cm (4 inches) or more
face. Otherwise, it might fall and injure some-
C: 100 cm (39.4 inches) or more
one.
D: 10 cm (4 inches) or more
• If you use the machine in a confined space,
ensure there is continuous air circulation.
❒ To avoid possible build-up of ozone, locate this
machine in a large well ventilated room that has
Optimum Environmental Conditions
an air turnover of more than 30 m
❒ When you use this machine for a long time in a
Permissible and recommended temperature and humidity
ranges are as follows:
confined space without good ventilation, you may
detect an odd smell. To keep the workplace
comfortable, we recommend you keep it well
ventilated.
Permissible Range
Recommended range
The machine must be level within 5 mm, 0.2" both front to rear
and left to right.
<G116-8626>
UNPACKING THE PRINTER AND
CHECKING THE CONTENTS OF
Important
THE BOX
Check the contents of the box according to
the following list. If one or some items are miss-
ing, please contact your sales or service rep-
resentative.
Important
❒ The interface cable is not included in the box.
Make sure that the interface cable you use, is
appropriate for your computer.
Quick Installation Guide (this sheet)
Setup Guide
Maintenance Guide
CD-ROM "Printer Drivers and Utilities"
CD-ROM "Display-Version Manuals (HTML)"
CD-ROM "Print-Version Manuals (PDF)"
Power Cable
Paper Tray Cover
ZKGH010E
Printer (including a starter toner cartridge)
Additional Documentation
Remove the plastic bag. Lift the printer and move
it to the place where you want to install it.
Note
When lifting the machine, use the inset grips on both sides. Other-
wise the machine could break or cause injury if dropped.
3
/hr/person.
Remove the orange adhesive tape.
Important
❒ Lower the machine slowly and carefully to
prevent trapping your hands.
INSTALLING THE TONER
CARTRIDGE
Warning
• Do not incinerate spilled toner or used toner. Toner
dust is flammable and might ignite when exposed
to an open flame.
• Disposal should take place at an authorized dealer
or an appropriate collection site.
• If you dispose of the used toner cartridges your-
self, dispose of them according to local regula-
tions.
• Do not store toner, used toner, or toner contain-
ers in a place with an open flame. The toner might
ignite and cause burns or a fire.
Caution
• Keep toner (used or unused) and the toner car-
tridge out of reach of children.
• If toner or used toner is inhaled, gargle with plenty
of water and move into a fresh air environment.
Consult a doctor if necessary.
• If your skin comes into contact with toner or used
toner, wash the affected area thoroughly with soap
and water.
• If toner or used toner gets into your eyes, flush
immediately with large amounts of water. Con-
sult a doctor if necessary.
• If toner or used toner is swallowed, dilute by drink-
ing a large amount of water. Consult a doctor if
necessary.
• Avoid getting toner on your clothes or skin when
AGN100S
removing a paper jam or replacing toner. If your
skin comes into contact with toner, wash the af-
fected area thoroughly with soap and water.
• If toner gets on your clothing, wash with cold wa-
ter. Hot water will set the toner into the fabric and
may make removing the stain impossible.
• Our products are engineered to meet the highest
standards of quality and functionality. When pur-
chasing expendable supplies, we recommend
using only those provided by an authorized dealer.
Important
❒ Do not expose the toner cartridge to a light for a
long time. If you do, the toner cartridge will be
damaged and the print quality might be reduced.
Open the front cover by pushing the front cover
release button.
AGN300S
ZKGH126E
Remove the fixing material inserted between
toner cartridge and the printer.
ZKGT146E
Lift the front side of the toner cartridge, and then
Close the front cover by pressing the indenta-
pull it out of the printer.
tions on the left and right sides.
ZKGT115E
Note
Important
❒ Do not hold the toner cartridge upside down or
❒ Do not close the front cover with force. If you
stand it vertically.
cannot close the cover easily, pull out the toner
❒ Do not put the toner cartridge on an unstable
cartridge from the printer and insert it again.
or tilted surface.
After that, close the front cover again.
❒ Dispose of removed fixing material and tape in
Place the toner cartridge on a flat surface. Pull
the same manner as ordinary plastic waste.
out the tape inside the unit horizontally while
holding the cartridge with one hand as shown
in the illustration.
LOADING PAPER
The default paper settings size are as follows:
Metric version: A4 L (long-edge feed)
Inch version: 8
The following describes how to load paper into the
ZKGT155E
standard paper tray (Tray 1).
Important
For settings other than the default paper size, and
❒ Be sure to remove the tape completely before
information about the paper sizes that can be set
installing the toner cartridge. Otherwise, the
in the paper tray, see "Paper and Other Media" ,
printer might be damaged.
Maintenance Guide.
❒ If you pull out the strips when the toner cartridge
is slant or standing on its side, the cartridge
Caution
might cause trouble with the printer.
• Keep toner (used or unused) and the toner car-
❒ Be sure to pull the tape horizontally. Pulling it
tridge out of reach of children.
upward or downward may cause the toner to
scatter.
❒ After pulling the tape out of the cartridge, toner
Important
scatters easily. Do not shake the cartridge.
❒ To avoid paper jams, make sure paper is not
Hold the grips of the toner cartridge, and then
stacked above the limit mark inside the tray.
insert it into the printer until it stops.
Misfeeds might occur.
❒ Do not mix different types of paper in a single
paper tray.
Pull out the paper tray until it stops.
ZKGT121E
Lower the toner cartridge when it touches the
back.
Note
❒ Do not touch the three white pins on the left
front side of the printer.
ZKGT145E
ZKGH135E
" x 11" L (long-edge feed)
1
/
2
ZKGH160E
Advertisement
Chapters
Table of Contents
Troubleshooting

Related Manuals for Ricoh Aficio AP610N


Summary of Contents for Ricoh Aficio AP610N
- Page 1 QUICK INSTALLATION GUIDE <G116-8626> Please read the Safety Information in the Setup Guide before using this machine. It contains important information related to USER SAFETY and PREVENTING EQUIPMENT PROBLEMS. WHERE TO PUT THE PRINTER Environments to Avoid Lift the front side of the toner cartridge, and then Close the front cover by pressing the indenta- UNPACKING THE PRINTER AND INSTALLING THE TONER...
- Page 2 ❖ Parallel connection Lift the front side of the tray, and then pull it out The following message appears and the configuration page is Connect the Ethernet cable to the Ethernet TURNING THE POWER ON Press the {L} or {M} key to display [Lan- of the printer.
-
Page 3: Setup Guide
Setup Guide Guide to the Printer Setting Up Installing Options Connecting the Printer Configuration Installing the Printer Driver Read this manual carefully before you use this product and keep it handy for future reference. For safe and correct use, please be sure to read the Safety Information in this manual before using the machine. - Page 4 Introduction This manual contains detailed instructions and notes on the operation and use of this machine. For your safety and benefit, read this manual carefully before using the machine. Keep this manual in a handy place for quick reference. Power Source 220 - 240 V, 50/60 Hz, 4.5 A or more Please be sure to connect the power cable to a power source as above.
-
Page 5: Table Of Contents
TABLE OF CONTENTS Trademarks......................1 Safety Information ....................2 Positions of RWARNING and RCAUTION labels ..........6 ENERGY STAR Program ..................7 Manuals for This Printer..................8 How to Read This Manual ..................9 1. Guide to the Printer Exterior ......................... 11 Inside........................ - Page 6 4. Connecting the Printer Network Connection ....................57 USB Connection....................59 Parallel Connection .....................60 IEEE 1394 Connection ..................61 5. Configuration Ethernet Configuration..................63 IEEE 802.11b (Wireless LAN) Configuration ............. 66 IEEE 1394 Configuration ..................70 IP over 1394......................70 SCSI print.........................72 6. Installing the Printer Driver Quick Install......................73 Install the Operating Instructions...............75 INDEX......................
-
Page 7: Trademarks
Trademarks Microsoft, Windows and Windows NT are registered trademarks of Microsoft Corporation in the United States and/or other countries. IPS-PRINT Printer Language Emulation Copyright© 1999-2000 Oak Technolo- gy, Inc., All rights reserved. ® Bluetooth is a registered trademark of Bluetooth-SIG Inc. worldwide. Other product names used herein are for identification purposes only and might be trademarks of their respective companies. -
Page 8: Safety Information
Safety Information When using your printer, the following safety precautions should always be fol- lowed. In this manual, the following important symbols are used: Indicates a potentially hazardous situation which, if instructions are not followed, could result in death or serious injury. Indicates a potentially hazardous situation which, if instructions are not followed, may result in minor or moderate injury or damage to property. - Page 9 R WARNING: • Confirm the wall outlet is near the machine and freely accessible, so that in the event of emergency, it can be unplugged easily. • Only connect the machine to the power source described in the man- ual. •...
- Page 10 R CAUTION: • Do not handle the plug with wet hands. Doing so might cause an electrical shock. • Keep the machine in an area that is within optimum environmental condi- tions. Operating the machine in an environment that is outside the recom- mended ranges of humidity and temperature can cause an electrical fire hazard.
- Page 11 R CAUTION: • The printer weighs about 20 kg (44.1 lb.).When lifting the machine, use the inset grips on both sides. Otherwise the printer could break or cause injury if dropped. • Do not touch the inside of the controller board compartment. Doing so may cause a malfunction or a burn.
-
Page 12: Positions Of Rwarning And Rcaution Labels
Positions of RWARNING and RCAUTION labels This machine has labels for RWARNING and RCAUTION at the positions shown below. For safety, please follow the instructions and handle the machine as indicated. AGN039S Do not incinerate toner or toner containers. Toner dust may cause flashback when exposed to open flames. -
Page 13: Energy Star Program
ENERGY STAR Program As an ENERGY STAR Partner, we have deter- mined that this machine model meets the EN- ERGY STAR Guidelines for energy efficiency. The ENERGY STAR Guidelines intend to establish an international energy-saving system for developing and introducing energy-efficient office equipment to deal with environmental is- sues, such as global warming. -
Page 14: Manuals For This Printer
Manuals for This Printer For particular functions, see the relevant parts of the manual. ❖ Setup Guide (this manual) Provides information about printer setup and options. ❖ Maintenance Guide Provides information about paper, replacing supplies, and dealing with pa- per jams and error messages. ❖... -
Page 15: How To Read This Manual
How to Read This Manual The following set of symbols is used in this manual. This symbol indicates a potentially hazardous situation that might result in death or serious injury when you misuse the machine without following the in- structions under this symbol. Be sure to read the instructions, all of which are de- scribed in the Safety Information section. -
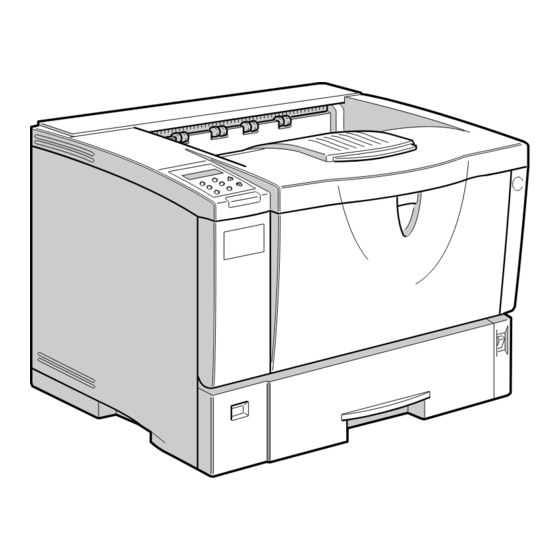
Page 17: Guide To The Printer
1. Guide to the Printer Exterior AGN010S Paper Size Dial See “Paper and Other Media Supported by this Printer” and “Loading Paper in Adjust this dial to match the size and feed the Bypass Tray”, Maintenance Guide. direction of the paper loaded in the paper tray. - Page 18 Guide to the Printer Ventilator Paper Tray Cover This hole helps to keep components in- Attach it when pulling out the tray exten- side the printer from overheating. sion of the paper tray. Power Port Important Connect the power cable to this port and ❒...
-
Page 19: Inside
Inside Inside AGN044S Toner Cartridge Transfer Roller Cover Includes toner and a photo conductor Open this cover when replacing a trans- unit. fer roller. When “Replace Toner Cartridge” ap- Transfer Roller pears on the panel display, replace this When “Replace Maintenance Kit” ap- unit. -
Page 20: Control Panel
Guide to the Printer Control Panel AGN204S {Online} key Display Shows the current status of the printer Press this key to switch the printer be- and error messages. tween online and offline. See “Error & Status Messages on the Con- {Job Reset} key trol Panel”, Maintenance Guide. - Page 21 Control Panel {Escape} key Press this key to return to the previous condition on the display. {# Enter} key Press this key to execute menu items se- lected on the display. Press this key to clear some errors. See “Troubleshooting”, Maintenance Guide.
- Page 22 Guide to the Printer...
-
Page 23: Setting Up
2. Setting Up Where to Put the Printer The printer's location should be carefully chosen because environmental condi- tions greatly affect its performance. R WARNING: • Confirm the wall outlet is near the machine and freely accessible, so that in the event of emergency, it can be unplugged easily. •... - Page 24 Setting Up ❖ Space Required for Installation Leave enough space around the printer. This space is necessary to operate the printer. The recommended (or minimum) space requirements are as follows: ZKGH010E A: 10 cm (4 inches) or more B: 10 cm (4 inches) or more C: 100 cm (39.4 inches) or more D: 10 cm (4 inches) or more ❖...
- Page 25 Where to Put the Printer Note ❒ The machine must be level within 5 mm, 0.2” from both front to rear and left to right. ❒ To avoid possible build-up of ozone, locate this machine in a large well ventilated room that has an air turnover of more than 30 m /hr/person.
-
Page 26: Unpacking The Printer And Checking The Contents Of The Box
Setting Up Unpacking the Printer and Checking the Contents of the Box Check the contents of the box according to the following list. If one or some items are missing, please contact your sales or service representative. Important ❒ The interface cable is not included in the box. Make sure that the interface cable you use, is appropriate for your computer. -
Page 27: Installing The Toner Cartridge
Installing the Toner Cartridge Installing the Toner Cartridge The following procedure describes R CAUTION: how to install the toner cartridge. • If toner or used toner is swal- lowed, dilute by drinking a large R WARNING: amount of water. Consult a doc- •... - Page 28 Setting Up Open the front cover by pushing Place the toner cartridge on a flat the front cover release button. surface. Pull out the tape inside the unit horizontally while hold- ing the cartridge with one hand as shown in the illustration. AGN020S Remove the fixing material in- serted between toner cartridge...
- Page 29 Installing the Toner Cartridge Insert the toner cartridge in its ap- propriate position by gently pushing down. AGN024S Close the front cover by pressing the indentations on the left and right sides. ZKGH130E Important ❒ Do not close the front cover with force.
-
Page 30: Loading Paper
Setting Up Loading Paper The following describes how to load Lift the front side of the tray, and paper into the standard paper tray then pull it out of the printer. (Tray 1). R CAUTION: • Do not pull out the paper tray forcefully. - Page 31 Loading Paper Note Important ❒ When loading paper other than ❒ Confirm that the setting of the × A4L(long-edged feed) or 8 paper size dial matches the sizes 11L(long-edged feed), adjust and feed direction of the paper the paper size dial to match the in the tray.
-
Page 32: Turning The Power On
Setting Up Turning the Power On Follow the procedure below to turn the power on. R WARNING: • Plug and unplug the power ca- ble with dry hands, or an elec- tric shock could occur. Make sure the power is set to “b” Off. -
Page 33: Selecting The Display Language
Selecting the Display Language Selecting the Display Language Select a language using the procedure The following message appears on described here. the display: The message for the selected lan- Language: guage will appear on the display. If *English you want to use the display in Eng- lish, the following procedures are un- necessary. -
Page 34: Test Printing
Setting Up Test Printing The following explains the procedure The following message appears for test printing of the configuration and the configuration page is page. printed. Test print in order to verify that the Printing... printer is working normally. Test printing checks printer performance only;... -
Page 35: Installing Options
3. Installing Options Available Options This section describes how to install options. By installing options, you can improve the printer performance and have an ex- panded variety of features to use. For the specifications of each option, see Main- tenance Guide. R CAUTION: •... -
Page 36: Option Installation Flow Chart
Installing Options Option Installation Flow Chart We recommend you install multiple options in the following order: Attach the paper feed unit (Paper Feed Unit Type 610). Attach the paper feed unit to the bottom of the printer. You can attach up to two paper feed unit. Up to 1750 sheets of paper can be loaded. -
Page 37: Installing Options
Available Options Installing Options Install options in the positions shown in the illustration. ❖ Exterior ZKGH150E Paper Feed Unit Type 610 Note (Tray 2 or Tray 3) ❒ The envelope feeder is a tray that You can load up to 500 sheets (60-105 slides into the optional paper feed , 16-28 lb.) of plain paper into the unit. - Page 38 Installing Options ❖ Interior AGN003S 802.11b Interface Unit Type F Memory Unit Type C 256MB (SDRAM module) See p.43 “Attaching 802.11b Interface Unit Type F”. See p.36 “Attaching Memory Unit Type C 256MB (SDRAM Module)”. 1394 Interface Unit Type 4510 Network Data Protection Unit Type B See p.39 “Attaching 1394 Interface Unit Type 4510”.
-
Page 39: Attaching Paper Feed Unit Type 610
Attaching Paper Feed Unit Type 610 Attaching Paper Feed Unit Type 610 Preparation Check the package contains the following: When installing multiple options, install the paper feed unit first. ❖ Paper Feed Unit R CAUTION: (including a paper tray) • The printer weighs about 20 kg (44.1 lb.). - Page 40 Installing Options Note There are three pins on the top of ❒ After finishing installation, you the paper feed unit that point straight up. On the bottom of the can check whether the paper printer there are three holes. feed unit is properly installed: Align the holes over the pins, and Print the configuration page then lower the printer gently onto...
-
Page 41: Attaching Envelope Feeder Type 610
Attaching Envelope Feeder Type 610 Attaching Envelope Feeder Type 610 Note Pull out the second paper tray ❒ This unit is a tray that slides into (Tray 2) of the optional paper feed unit until it stops. After that, lift it the optional paper feed unit. -
Page 42: Attaching Memory Unit Type C 256Mb (Sdram Module)
Installing Options Attaching Memory Unit Type C 256MB (SDRAM Module) R CAUTION: Turn off the power of the printer, • Do not touch the inside of the and then unplug the printer's pow- controller board compartment. er cable and the interface cable. Doing so may cause a malfunc- If the duplex unit is attached, tion or a burn. - Page 43 Attaching Memory Unit Type C 256MB (SDRAM Module) Pull out the handle of the control- Remove the default memory unit ler board. before installing a new memory unit. Press down the levers on both sides to remove the default memory unit. ZKGX370E Pull the handle, and then slide the controller board out.
- Page 44 Installing Options Note Push the handle of the controller ❒ Be sure to return the provided board until it clicks. screwdriver to its original posi- tion on the inside of the front cover. ❒ After finishing the installation, you can check the memory unit is properly installed: Print the configuration page from the “List/Test Print”...
-
Page 45: Attaching 1394 Interface Unit Type 4510
Attaching 1394 Interface Unit Type 4510 Attaching 1394 Interface Unit Type 4510 R CAUTION: Check the package contains the • Do not touch the inside of the following: controller board compartment. ❖ 1394 Interface Unit Type 4510 Doing so may cause a malfunc- tion or a burn. - Page 46 Installing Options Turn off the power of the printer, Pull out the handle of the control- and then unplug the printer's pow- ler board. er cable and the interface cable. If the duplex unit is attached, push down the lever on right side ( ) and pull out the duplex Unit until it stops ( ).
- Page 47 Attaching 1394 Interface Unit Type 4510 ❒ The removed cover is not used Fasten the 1394 interface unit to when installing the 1394 inter- the controller board. face unit. ZKGX443E ZKGX410E Match the controller board to the Attach the 1394 interface unit to top and bottom rail using the “T”...
- Page 48 Installing Options Note Fasten the controller board to the ❒ After finishing installation, you printer with the two screws. can check the 1394 interface unit is properly installed: Print the configuration page from the “List/Test Print” menu. If it is installed properly, you will see “IEEE1394”...
-
Page 49: Attaching 802.11B Interface Unit Type F
Attaching 802.11b Interface Unit Type F Attaching 802.11b Interface Unit Type F • Card R CAUTION: • Do not touch the inside of the controller board compartment. Doing so may cause a machine malfunction or a burn. Important ❒ Before touching the 802.11b inter- face unit, touch something metal to discharge any static electricity. - Page 50 Installing Options Remove the two screws holding Pull the handle, and then slide the controller board in place. the controller board out. Note ❒ Use a coin or similar object if the screws do not turn easily. ❒ These screws are used again in fastening the controller board.
- Page 51 Attaching 802.11b Interface Unit Type F Attach the 802.11b interface unit. Insert the card slowly into the in- terface unit with the label facing Insert the end of the 802.11b inter- down and the uneven black anten- face unit into the opening ( ), and na surface facing up until it stops.
- Page 52 Installing Options Note Fasten the controller board to the ❒ After finishing installation, you printer with the two screws. can check the 802.11b interface unit is properly installed: Print the configuration page from the “List/Test Print” menu. If it is installed properly, you will see “IEEE 802.11b”...
-
Page 53: Attaching Bluetooth Interface Unit Type C
Attaching Bluetooth Interface Unit Type C Attaching Bluetooth Interface Unit Type C • Card R CAUTION: • Do not touch inside the controller board compartment. Doing so may cause a machine malfunc- tion or a burn. Important ❒ When using the printer with the Bluetooth interface unit installed, Bluetooth needs to be installed on the computer. - Page 54 Installing Options Remove the two screws holding Pull the handle, and then slide the controller board in place. the controller board out. Note ❒ Use a coin or similar object if the screws do not turn easily. ❒ These screws are used again in fastening the controller board.
- Page 55 Attaching Bluetooth Interface Unit Type C Attach the Bluetooth interface With the side labeled INSERT fac- unit. ing up, slowly insert the card into the interface unit, until it stops. Insert the end of the Bluetooth in- terface unit to the opening ( ), and then push down until it clicks ( ).
- Page 56 Installing Options Fasten the controller board to the Align the power cable to the left printer with the two screws. side groove of the duplex unit, and then slide the duplex unit in until it is connected to the printer. ZKGX602E Press the antenna to extend it.
-
Page 57: Attaching Hard Disk Drive Type 2600
Attaching Hard Disk Drive Type 2600 Attaching Hard Disk Drive Type 2600 Important Note ❒ Before touching the hard disk ❒ Use a coin or similar object if the drive, touch something metal to screws do not turn easily. discharge any static electricity. ❒... - Page 58 Installing Options Fasten the two screws (using a coin, etc.) to fix the hard disk drive. ZKGX360E Note ❒ After finishing installation, you can check whether the hard disk drive is properly installed: Print the configuration page from the “List/Test Print” menu. If it is installed properly, you will see “Printer Hard Disk Drive”...
-
Page 59: Attaching Network Data Protection Unit Type B
Attaching Network Data Protection Unit Type B Attaching Network Data Protection Unit Type B Important Carefully insert the network data ❒ Protect the network data protec- protection unit, until the card clicks into the place. tion unit from physical shocks. Note ❒... -
Page 60: Attaching Duplex Unit Ad610
Installing Options Attaching Duplex Unit AD610 Important Open the rear cover by pushing ❒ If you attach the duplex unit and the two knobs as shown in the il- lustration. the paper feed unit, the paper feed unit must be attached prior to at- taching the duplex unit. - Page 61 Attaching Duplex Unit AD610 ❒ If the printing position is not Align the power cable to the left correct, adjust the registration of side groove of the duplex unit, the trays. For more information and then slide the duplex unit in about adjusting the registration until it is connected to the printer.
- Page 62 Installing Options...
-
Page 63: Connecting The Printer
4. Connecting the Printer Network Connection Follow the procedure below to connect the printer to the computer through the network. Prepare the hub and other network devices before connecting the 10 BASE-T or 100 BASE-TX cable to the machine's Ethernet port. Important ❒... -
Page 64: Reading The Led Lamps
Connecting the Printer -Reading the LED Lamps ZKGH260E Green: lit when the printer is properly connected to the network. Yellow: lit when 100BASE-TX is being used. Unlit when 10BASE-T is being used. -
Page 65: Usb Connection
USB Connection USB Connection Important ❒ USB2.0 interface cable is not supplied. Obtain it separately, according to the computer you are using. ❒ USB connection is possible under Windows 98 SE/Me/2000/XP, Windows Server 2003, Mac OS 9.x, and Mac OS X v10.3 or higher. ❒... -
Page 66: Parallel Connection
Connecting the Printer Parallel Connection Important ❒ The parallel interface cable is not provided with the printer. ❒ The printer's parallel connection is a standard bidirectional interface that re- quires an IEEE 1284-compliant 36-pin parallel cable and host computer paral- lel port. -
Page 67: Ieee 1394 Connection
IEEE 1394 Connection IEEE 1394 Connection Important ❒ Use the 1394 interface cable provided with the 1394 interface unit. ❒ You cannot plug devices together to create loops. ❒ Do not use a cable more than 4.5 meters (14.8 feet) long. Connect the interface cable to the 1394 interface unit. - Page 68 Connecting the Printer...
-
Page 69: Configuration
5. Configuration Ethernet Configuration Make the following network settings Press the {Menu} key. according to the network interface you are using. You can use SmartDeviceMonitor for Admin or a Web browser to make IP address-related settings in a TCP/IP- capable environment. Important ❒... - Page 70 Configuration Press the {U} or {T} key to select Press the {U} or {T} key to enter Active Protocol, and then press the left most entry field of the IP the {# Enter} key. address, and then press the {# En- ter} key.
-
Page 71: Network Setup
Ethernet Configuration Important Note ❒ When DHCP is “On”, you can- ❒ Usually, use the default setting not make settings for the follow- (“Auto”). When you first select ing items: “Auto”, the frame type detected by the printer is adopted. If •... -
Page 72: Ieee 802.11B (Wireless Lan) Configuration
Configuration IEEE 802.11b (Wireless LAN) Configuration Configure the printer to use IEEE Press the {Menu} key. 802.11b (Wireless LAN). The follow- ing table shows the control panel set- tings and their default values. These items appear in the [Host Interface] menu. - Page 73 IEEE 802.11b (Wireless LAN) Configuration Press the {U} or {T} key to select Press the {U} or {T} key to enter the channel, and then press the {# the transmission mode of IEEE 802.11b, and then press the {# En- Enter} key.
- Page 74 Configuration Press the {U} or {T} key to dis- In the case of using a WEP key on play [Enter ID], and then press the a network, activate the WEP set- {# Enter} key. ting to be used for communica- tion along with WEP.
- Page 75 IEEE 802.11b (Wireless LAN) Configuration • hexadecimal Press the {U} or {T} key to dis- play [Yes (HEX)] when inputting a Error: Enter 10 hexadecimal WEP key or [Yes (AS- or 26 characters CII)] when inputting an ASCII WEP key. Then press the {# Enter} •...
-
Page 76: Ieee 1394 Configuration
Configuration IEEE 1394 Configuration Use this procedure to configure the IP over 1394 printer for use in an IEEE 1394 envi- ronment. The following table shows the control panel settings and their Press the {Menu} key. default values. These items appear in the [Host Interface] menu. - Page 77 IEEE 1394 Configuration Press the {U} or {T} key to select Note ❒ The value moves by 10 if the either [Active] or [Not Active], and then press the {# Enter} key. {U} or {T} key is kept pressed. ❒ You can return the pointer (k) to IP over 1394: the previous (left) entry field by pressing the {Escape} key.
-
Page 78: Scsi Print
Configuration Press the {U} or {T} key to select SCSI print either [Active] or [Not Active], and then press the {# Enter} key. Press the {Menu} key. SCSI print: *Active After the settings are made, about two seconds later, the screen re- turns to the IEEE 1394 setting menu. -
Page 79: Installing The Printer Driver
6. Installing the Printer Driver Quick Install Windows 95/98/Me/2000/XP, Windows Server 2003, and Windows NT 4.0 us- ers can easily install this software using the CD-ROM provided. Using Quick Install, the PCL printer driver and RPCS printer driver and Smart- DeviceMonitor for Client is installed under network environment, and TCP/IP port will be set. - Page 80 Installing the Printer Driver Select the printer model you want to use in the [Select Printer] dialog box. Note ❒ For network connection via TCP/IP, select the printer whose IP address is displayed in [Connect To]. ❒ For parallel connection, select the printer whose printer port is displayed in [Connect To].
-
Page 81: Install The Operating Instructions
Install the Operating Instructions Install the Operating Instructions The CD-ROM provided with the printer contains an HTML Operating Instruc- tions Manual in HTML version. Follow the above instructions to install it. Important ❒ System Requirements : • Windows 95/98/Me, Windows 2000/XP, Windows Server 2003 or Windows NT4.0. -
Page 82: Index
INDEX Energy Star , 7 1394 Interface Unit , 39 , 61 , 70 Envelope Feeder Type 610 , 35 802.11b Interface Unit , 43 , 66 Ethernet , 57 , 63 Ethernet Port , 57 Attaching 1394 Interface Unit Type 4510 , Guide to the Printer Attaching 802.11b Interface Unit , 43 Control Panel , 14... - Page 83 Quick Install , 73 Safety Information , 2 Setting Up , 17 Test Printing , 28 Toner Cartridge , 21 Tray 1 , 24 Turning the Power On , 26 Unpacking , 20 USB Port , 59 Where to Put the Printer , 17 Wireless LAN , 66...
- Page 84 MEMO G116-8600...
- Page 85 France, Germany, Italy, or the Netherlands is prohibited. The CE Declaration of Conformity is available on the Internet at URL: http://www.ricoh.co.jp/fax/ce_doc/. This product is only for use in EEA or other authorized countries. Outdoor use of this product in Belguim,France,Germany,Italy,or the Netherlands is prohibited.
- Page 86 RICOH ASIA PACIFIC PTE.LTD. 260 Orchard Road, France #15-01/02 The Heeren, Singapore 238855 RICOH FRANCE S.A. Phone: +65-6830-5888 383, Avenue du Général de Gaulle BP 307-92143 Clamart Cedex Phone: +33-(0)-821-01-74-26 Model number: Aficio AP610N Printed in The Netherlands GB GB G116-8600 G1168600...
-
Page 87: Maintenance Guide
Maintenance Guide Paper and Other Media Replacing Consumables and Maintenance Kit Cleaning the Printer Adjusting the Printer Troubleshooting Removing Misfed Paper Appendix Read this manual carefully before you use this product and keep it handy for future reference. For safe and correct use, please be sure to read the Safety Information in the “Setup Guide”... - Page 88 Introduction This manual contains detailed instructions and notes on the operation and use of this machine. For your safety and benefit, read this manual carefully before using the machine. Keep this manual in a handy place for quick reference.
- Page 89 TABLE OF CONTENTS Trademarks......................1 How to Read This Manual ..................2 1. Paper and Other Media Paper and Other Media Supported by This Printer..........3 Paper Recommendations..................9 Loading Paper......................9 Storing Paper ......................9 Types of Paper and Other Media ................10 Paper not supported by this printer ................12 Print Area .........................13 Loading Paper ......................14...
- Page 90 5. Troubleshooting Error & Status Messages on the Control Panel ..........55 Printer Does Not Print ..................62 Checking the port connection...................64 Other Printing Problems ..................66 Additional Troubleshooting ................69 6. Removing Misfed Paper Removing Misfed Paper ..................71 When “Remove Misfeed Paper Tray” Appears ..........72 When “Remove Misfeed Internal Path”...
-
Page 91: Trademarks
Trademarks Microsoft, Windows and Windows NT are registered trademarks of Microsoft Corporation in the United States and/or other countries. IPS-PRINT Printer Language Emulation Copyright© 1999-2000 Oak Technolo- gy, Inc., All rights reserved. ® Bluetooth is a registered trademark of Bluetooth-SIG Inc. worldwide. Other product names used herein are for identification purposes only and might be trademarks of their respective companies. -
Page 92: How To Read This Manual
How to Read This Manual The following set of symbols is used in this manual. This symbol indicates a potentially hazardous situation that might result in death or serious injury when you misuse the machine without following the in- structions under this symbol. Be sure to read the instructions, all of which are de- scribed in the Safety Information section. -
Page 93: Paper And Other Media
1. Paper and Other Media Paper and Other Media Supported by This Printer This section describes the paper size, feed direction, and the maximum amount of paper that can be loaded into each paper tray in this printer. Note ❒ The following symbols and terminology are used to represent the feed direc- tion. - Page 94 Paper and Other Media ❖ Input Paper Sizes (Metric version) 297 × 420 × 257 × 364 × B4 JIS 210 × 297 × 297 × 210 × 182 × 257 × B5 JIS 257 × 182 × 148 × 210 ×...
- Page 95 Paper and Other Media Supported by This Printer • The size is supported and indicated on the tray dial. Be sure to set the pa- per size dial to match the actual paper size loaded in the tray. • The size is supported but not indicated on the tray dial. You should set the tray dial to “p”, and select the paper size with the control panel.
- Page 96 Paper and Other Media ❖ Input Paper Sizes (Inch version) 11 × 17 11 × 17 × × × 14 Legal (LG) × × 11 Letter (LT) × 11 × 8 × × × × 8 × 8 × × ×...
- Page 97 Paper and Other Media Supported by This Printer • The size is supported and indicated on the tray dial. Be sure to set the pa- per size dial to match the actual paper size loaded in the tray. • The size is supported but not indicated on the tray dial. You should set the tray dial to “p”, and select the paper size with the control panel.
- Page 98 Paper and Other Media ❖ Paper weight and number of sheets to be set Maximum number of Supported paper weight sheets (plain paper) Tray 1 60 - 105 g/m (16 - 28 lb.) 500 (80 g/m , 20 lb.) Bypass Tray 52 - 162 g/m (14 - 43 lb.) 100 (80 g/m...
-
Page 99: Paper Recommendations
Paper Recommendations Paper Recommendations Loading Paper Important ❒ Do not use ink-jet printer paper because it may stick to the fusing unit and cause a paper misfeed. ❒ When printing on OHP transparencies that have a print side, load them with the print side over on the bypass tray. -
Page 100: Types Of Paper And Other Media
Paper and Other Media Types of Paper and Other Media Plain Paper Paper thickness 60 - 105 g/m (16 - 28 lb.) Printer setup Press [Paper Input] menu, [Paper Type], and then [Plain Paper]. Note ❒ The paper type selected using the printer driver overrides that selected using the control panel. - Page 101 Paper Recommendations OHP transparencies Printer setup Press [Paper Input] menu, [Paper Type], and then [Transparency] on the control panel. Note ❒ The paper type selected using the printer driver overrides that selected using the control panel. Printer driver setup Click [Transparency] in the [Type:] list. Enabled paper feeding tray Bypass tray Number of sheets that can Load only one OHP transparency at the same time onto the bypass...
-
Page 102: Paper Not Supported By This Printer
Paper and Other Media • Envelopes in the following condi- Paper not supported by this tions: printer • damp • excessively curled or twisted Avoid using the following paper as • stuck together they are not supported by this print- •... -
Page 103: Print Area
Paper Recommendations ❖ Envelope Print Area The following shows the print area for this printer. Be sure to set the print margins correctly by the application. ❖ Paper Print area Feed direction Approx. 4.2 mm (0.18 inches) Approx. 4.2 mm (0.18 inches) Note ❒... -
Page 104: Loading Paper
Paper and Other Media Loading Paper This describes how to load paper into Lift the paper tray slightly, and the paper tray and bypass tray. then pull it out until it stops. R CAUTION: • Do not pull out the paper tray forcefully. - Page 105 Loading Paper Important Changing the paper size ❒ Confirm that the top of the stack is not higher than the limit mark Important inside the tray. ❒ Confirm that the setting of the pa- ❒ Confirm that paper fits under per size dial matches the paper size the rear guide.
- Page 106 Paper and Other Media Lift the front side of the tray, and Slide the tray until it stops. then pull it out of the printer. ZKGY170E ZKGY140E Return the catches to their origi- nal positions. If you load paper larger than ×...
- Page 107 Loading Paper Important Attach the paper tray cover pro- ❒ To avoid damage, pinch the pa- vided when you have pulled out the tray extension. per guides when moving them. Load paper into the tray with the print side down. ZKGH240E Note ❒...
- Page 108 Paper and Other Media Press the {U} or {T} key to dis- If you load a paper size that is not play the target paper tray, and selected automatically then press the {# Enter} key. To load paper whose size cannot be selected automatically, set the paper Tray Paper Size: size on the control panel.
- Page 109 Loading Paper Press the {U} or {T} key to dis- Specifying custom size paper for the play [Paper Input], and then press optional paper feed unit the {# Enter} key. Important Menu: ❒ When printing on custom size pa- Paper Input per, specify the paper size using the control panel or printer driver.
- Page 110 Paper and Other Media Press the {U} or {T} key to set the Specifying a paper type for paper tray vertical value, and then press the and the optional paper feed unit {# Enter} key. Improve printer performance by se- lecting the optimum paper type for Custom Size: the tray.
-
Page 111: Loading Paper In The Bypass Tray
Loading Paper Press the {U} or {T} key to dis- Loading Paper in the Bypass play the target paper tray, and Tray then press the {# Enter} key . When the optional paper feed units are installed in the printer, Opening and Closing the Bypass Tray [Tray 2] and [Tray 3] will appear de- pending on the number of the in-... - Page 112 Paper and Other Media Adjust the side guides to the pa- Specifying standard size paper for the per width. Bypass Tray Important ❒ Shuffle the paper before loading the stack onto the tray, so multiple sheets are not fed in together. ❒...
- Page 113 Loading Paper Press the {Online} key. To set the paper size and feed di- rection, Press the {Menu} key. The initial screen appears. Note ❒ To load thick paper, OHP trans- parencies, or envelopes, make settings for thick paper or OHP transparencies using the control panel and printer driver.
- Page 114 Paper and Other Media Check [Bypass Size] appears, and Specifying custom size paper for the then press the {# Enter} key. Bypass Tray The paper size selection menu ap- pears. Important ❒ The settings of custom sized paper Press the {U} or {T} key to dis- that take effect are not the settings play [Custom Size], and then press made on the control panel but the...
- Page 115 Loading Paper Press the {U} or {T} key to dis- Specifying a paper type for the Bypass play [Paper Type], and then press Tray the {# Enter} key. By selecting the paper type you want The paper tray selection menu ap- to load, the printer performs better.
-
Page 116: Loading Envelopes
Paper and Other Media Load envelopes until they stop, Loading Envelopes with the print side up and the sides of the flaps on the left as As there are many kinds of envelopes, shown below. be sure to check if those to be used are supported by this printer. - Page 117 Loading Paper Press the {# Enter} key to apply Set the envelope size and feed di- rection. Press the {Menu} key. the settings. Wait for a while. After about two seconds, the dis- play returns to the menu. Press the {Online} key. The initial screen appears.
- Page 118 Paper and Other Media Important Pinch the side guides, and then ❒ Confirm that the envelope flaps slide them outward until they stop. Pinch the rear guide, and are securely folded down, and then slide it toward the back. that there is no air inside the en- velopes.
- Page 119 Loading Paper Press the {U} or {T} key to dis- Lift the front of the tray, and then slide it carefully into the printer play [Tray Paper Size], and then press the {# Enter} key. until it stops. The paper tray selection menu ap- pears.
-
Page 120: Switching Between Paper Trays
Paper and Other Media Press the {U} or {T} key to dis- Switching between Paper Trays play [Tray Priority], and then press the {# Enter} key. When paper of the same size is load- The paper tray selection menu ap- ed in both the standard tray and the pears. -
Page 121: Replacing The Toner Cartridge
2. Replacing Consumables and Maintenance Kit Replacing the Toner Cartridge R WARNING: R CAUTION: • Do not incinerate spilled toner • If toner or used toner is swal- or used toner. Toner dust is lowed, dilute by drinking a large flammable and might ignite amount of water. - Page 122 Replacing Consumables and Maintenance Kit Note Note ❒ When handling toner cartridges, ❒ Do not put the toner cartridge never stand them up on either end on an unstable or tilted surface. or position them upside down. Wipe around the metallic regis- ❒...
- Page 123 Replacing the Toner Cartridge Note Close the front cover by pressing ❒ Be sure to remove the tape com- the left and right side indenta- tions. pletely before installing the new toner cartridge, otherwise the printer might be damaged. ❒ Keep the toner cartridge hori- zontal when pulling out the ton- er seal.
-
Page 124: Replacing The Maintenance Kit
Replacing Consumables and Maintenance Kit Replacing the Maintenance Kit R WARNING: Before Replacing • Do not risk electric shock by handling the power cord or Replace all the parts included in plug with wet hands. Maintenance Kit at the same time. Re- place them according to the following R CAUTION: procedure. -
Page 125: Replacing The Friction Pad
Replacing the Maintenance Kit Remove paper from the paper Replacing the Friction Pad tray. Place the tray upside down on a flat surface. Replace all friction pad of the tray. There are two kinds of friction pads. One is for the paper tray (Tray 1), and the other are for the paper feed unit(s) (Tray 2, 3). - Page 126 Replacing Consumables and Maintenance Kit Return the paper tray to its origi- Push the friction pad until it locks nal position, and then remove the securely. friction pad from the tray. If your printer is equipped with Note the optional paper feed unit(s), ❒...
-
Page 127: Replacing The Transfer Roller
Replacing the Maintenance Kit Hold the lock levers (“ ” parts), Replacing the Transfer Roller and then pull them. Open the front cover by pushing the front cover release button. ZKGM200E Hold the green parts of the roller on both sides, and then remove AGN020S the roller from the printer as Pull the toner cartridge out of the... - Page 128 Replacing Consumables and Maintenance Kit Important Lower the toner cartridge when it ❒ Do not insert the roller on the touches the back. back of the socket, or the printer might be damaged. ❒ Insert the metallic part of the roller on the socket.
-
Page 129: Replacing The Paper Feed Rollers
Replacing the Maintenance Kit If the optional duplex unit is in- Replacing the Paper Feed Rollers stalled, uninstall them from the printer. Replace all feed rollers including the printer and the optional paper feed Move the printer to the edge of a unit(s). - Page 130 Replacing Consumables and Maintenance Kit While sliding the green lock lever Place paper in the paper trays and to the left ( ), set the new roller additional removed paper trays. ( ). Then return the green lock le- Lift the front of the tray, and then ver to its original position ( ).
-
Page 131: Replacing The Fusing Unit
Replacing the Maintenance Kit Lift the lock levers of the fusing Replacing the Fusing Unit unit as shown in the illustration. R CAUTION: • The fusing unit becomes very hot. When installing the new fus- ing unit, turn off the printer and wait about an hour. - Page 132 Replacing Consumables and Maintenance Kit Replace the new fusing unit into Close the rear cover. the printer. AGN005S AGN008S Print a configuration page to con- Push the lock levers of the fusing firm that the printer works prop- unit down until it clicks. erly.
- Page 133 Replacing the Maintenance Kit Pull out the pins on both sides of Replacing the fusing unit with the the new fusing unit. duplex unit attached Push down the lever on the right side of the duplex unit ( ), and then pull it out until it stops ( ).
- Page 134 Replacing Consumables and Maintenance Kit Align the power cable with the groove of the left slide of the du- plex unit, and then insert the du- plex unit into back of the printer aligning the rails inside of the printer until it is connected. ZKGX240E Print a configuration page to con- firm that the printer works prop-...
-
Page 135: Cleaning The Printer
3. Cleaning the Printer Cautions to Take When Cleaning R WARNING: • Do not remove any covers or screws other than those specified in this manual. Some parts of the machine are at a high voltage and could give you an electric shock. Also, if the machine has laser systems, di- rect (or indirect) reflected eye contact with the laser beam may cause serious eye damage. -
Page 136: Cleaning The Friction Pad
Cleaning the Printer Cleaning the Friction Pad If the friction pad is dirty, a multi- Load paper into the paper tray feed or a misfeed might occur. In this with the print side up. Carefully case, clean the pad as follows: slide the paper tray into the print- er until it stops. -
Page 137: Cleaning The Paper Feed Roller
Cleaning the Paper Feed Roller Cleaning the Paper Feed Roller If the paper feed roller is dirty, a mis- Turn off the power. feed might occur. In this case, clean the roller as follows: Pull out the plug from the socket. Remove all the cables from the R CAUTION: printer. - Page 138 Cleaning the Printer Slide the green lock lever to the Move the printer to the place left ( ), so that the paper feed where it was placed. Carefully roller can be released ( ). slide the paper tray into the print- er until it stops.
-
Page 139: Cleaning The Registration Roller
Cleaning the Registration Roller Cleaning the Registration Roller If the registration roller is dirty, a mis- Pull the toner cartridge out of the feed might occur. In this case, clean printer by holding the grips of the the roller as follows: cartridge. - Page 140 Cleaning the Printer Important Hold the grips of the toner car- ❒ Carefully close the front cover. tridge, and then insert it into the printer until it stops. If you cannot close the cover easily, pull the toner cartridge out of the printer and insert it again.
-
Page 141: Adjusting The Printer
4. Adjusting the Printer Adjusting the Image Density You can adjust the image density Press the {U} or {T} key to set the when the print side of the page is a image density value. shaded or print image is too light. Image Density: Important ❒... -
Page 142: Adjusting Tray Registration
Adjusting the Printer Adjusting Tray Registration You can adjust the registration of Print the test sheet to preview the each tray. The vertical adjustment is settings. Confirm that [Prt. Test used for all trays. Normally, you need Sheet] is displayed, and then press not update the registration. - Page 143 Adjusting Tray Registration Press the {U} or {T} key to set the registration value (mm). Horiz: Tray 2: (-4.0 +4.0) Press the {U} or {T} key to set the digit of the registration value (mm). Increase the value to shift the print area in the positive direction, and decrease to shift in the negative di- rection.
- Page 144 Adjusting the Printer...
-
Page 145: Troubleshooting
5. Troubleshooting Error & Status Messages on the Control Panel This section explains what the messages that appear on the control panel mean and what to do when a particular message appears. ❖ Messages (in alphabetical order) Messages Description Solution /Second messages Call Service: EC A communication error sent... - Page 146 Troubleshooting Messages Description Solution /Second messages Hardware Problem An error has occurred in the Turn the power off, and then on. If the optional Network Interface message appears again, call your sales Ethernet Board. or service representative. Hardware Problem An error has occurred in the Turn the power off, and then on, If the optional Hard Disk Drive.
- Page 147 Error & Status Messages on the Control Panel Messages Description Solution /Second messages Hardware Problem The printer identified an op- Turn the power off, and then on. Re- tional RAM error. move and re-install the optional Option RAM RAM. If the message appears again, contact your sales or service repre- sentative.
- Page 148 Troubleshooting Messages Description Solution /Second messages HDD Full The maximum HDD area size Delete the disused form/font types. for form/font has been exceed- The optional Hard Disk Drive Delete any unnecessary stored files. is full. The sample print job or locked print job to be sent from the computer is too large to store.
- Page 149 Error & Status Messages on the Control Panel Messages Description Solution /Second messages Menu Protected The menu is protected and the Wait for two seconds until the previ- settings cannot be changed. ous display appears. Cannot change No Files exist There are no files available for Wait for two seconds until the previ- the sample print job or the...
- Page 150 Troubleshooting Messages Description Solution /Second messages Replace The toner cartridge is not set Set the toner cartridge correctly. correctly or toner is almost run Toner Cartridge See p.31 “Replacing the Toner Car- out. tridge”. The toner dust is full. Prepare a new toner cartridge. If the image density gets too light, replace the toner cartridge with a new one.
- Page 151 Error & Status Messages on the Control Panel Messages Description Solution /Second messages Setting changed [RAM Disk] or [Notify by E-mail] Restart the printer so the new settings setting has been changed. can take effect. Restart Printer SSID not entered This message appears if the Enter the SSID.
-
Page 152: Printer Does Not Print
Troubleshooting Printer Does Not Print Possible Cause Solutions Is the power on ? Confirm that the cable is securely plugged into the power outlet and the printer. Turn on the power. If not, Press the {Online} key to light it. Does the Online indicator stay on ? Does the Alert indicator... - Page 153 Printer Does Not Print Possible Cause Solutions When you use the optional Bluetooth interface unit. Make sure the machine you want to use appears in the 3Com Bluetooth Connection Manager. Make sure “Bluetooth Serial Client (COMx)” appears under Client Ports in the 3Com Bluetooth Connection Manager. Restart computer, this printer, and the other devices.
-
Page 154: Checking The Port Connection
Troubleshooting Checking the port connection When the printer is directly connected via the PC cable and the data-in indicator does not flash or light up, the method of checking the port connection is as fol- lows. • For a parallel port connection, port LPT 1 or LPT 2 should be set. •... - Page 155 Printer Does Not Print Windows XP Home Edition Select the [Control Panel] window from [Start] on the taskbar. Click [Printers and Other Hardware]. Click [Printers and Faxes]. Click to select the icon of the printer. Next, on the [File] menu, click [Proper- ties].
-
Page 156: Other Printing Problems
Troubleshooting Other Printing Problems Status Possible Causes, Descriptions, and Solutions The print side of the page Adjust the image density. is a hazy gray. See p.51 “Adjusting the Image Density”. If paper is curled, correct it. If you continuously print data that contains extremely small amount of words or images in the printable area, the printed side of the page could be a hazy gray. - Page 157 Other Printing Problems Status Possible Causes, Descriptions, and Solutions Multiple pages are fed Clean the friction pad if it is dirty. through the printer at See p.46 “Cleaning the Friction Pad”. once. If the problem persists, set the paper the other way up, and then print it.
- Page 158 Troubleshooting Status Possible Causes, Descriptions, and Solutions The printed image is dif- When you use some functions, such as enlargement and reduction, ferent from the image on the layout of the image might be different from that shown in the the computer.
-
Page 159: Additional Troubleshooting
Additional Troubleshooting Additional Troubleshooting Problems Solutions Strange noise is heard. If a supply was recently replaced or an option attached in the area the strange noise is coming from, check the supply or option is properly attached. If the strange noise persists, con- tact your sales or service representative. - Page 160 Troubleshooting Problems Solutions Alert Resolving is set for send- If the power of the main unit is turned off after an Alert oc- ing e-mail, but no Alert-re- curs, the Alert is resolved during the time the power is off: no solved e-mail is sent.
-
Page 161: Removing Misfed Paper
6. Removing Misfed Paper Removing Misfed Paper An error message appears if a paper misfeed occurs. The error message gives the location of the misfeed. Important ❒ Misfed paper may be covered in toner. Be careful not to get toner on your hands or clothes. -
Page 162: When "Remove Misfeed Paper Tray" Appears
Removing Misfed Paper When “Remove Misfeed Paper Tray” Appears Important Open the front cover by pushing ❒ Forcefully removing misfed paper the front cover release button, and then close it to reset the mis- may cause paper to tear and leave feed condition. -
Page 163: When "Remove Misfeed Internal Path" Appears
When “Remove Misfeed Internal Path” Appears When “Remove Misfeed Internal Path” Appears Important Pull out the misfed paper by ❒ Forcefully removing misfed paper holding both sides of paper. Be careful not to get toner dust on may cause paper to tear and leave your hands or clothes. - Page 164 Removing Misfed Paper Close the front cover by pressing the left and right side indenta- tions. ZKGH130E Important ❒ If paper is fed from the bypass tray, be sure to remove all the paper from the bypass tray and close it before opening the front cover.
-
Page 165: When "Remove Misfeed Paper Exit Cover" Appears
When “Remove Misfeed Paper Exit Cover” Appears When “Remove Misfeed Paper Exit Cover” Appears R CAUTION: Removing misfed paper from the • When removing misfed paper, exit cover do not touch the fusing section because it becomes very hot. Open the paper exit cover. •... - Page 166 Removing Misfed Paper Pull the fusing unit out. Removing misfed paper from the fusing unit Open the rear cover by pushing the two knobs. AGN007S Hold the tab, and then remove the misfed paper. AGN004S Remove the rear cover in a hori- zontal direction.
- Page 167 When “Remove Misfeed Paper Exit Cover” Appears Push the lock levers of the fusing unit down until it clicks. AGN009S Insert the rear cover to the inside grooves on both sides of the print- er in a horizontal direction. ZKGX221E Close the rear cover.
-
Page 168: When "Remove Misfeed Duplex Unit" Appears
Removing Misfed Paper When “Remove Misfeed Duplex Unit” Appears R CAUTION: Close the rear cover of the duplex • When removing misfed paper, unit. do not touch the fusing section because it becomes very hot. Important ❒ Forcefully removing misfed paper may cause paper to tear and leave scraps of paper in the duplex unit. - Page 169 When “Remove Misfeed Duplex Unit” Appears Important Close the cover of the duplex unit. ❒ When A5L paper misfeeds, you might not be able to remove it by pulling the duplex unit out. In this case, pull the paper tray out, and then remove the paper.
- Page 170 Removing Misfed Paper...
-
Page 171: Appendix
7. Appendix Moving and Transporting the Printer R CAUTION: • When lifting the machine, use the inset grips on both sides. Otherwise the printer could break or cause injury if dropped. • When you move the printer, remember to unplug the power cord from the wall outlet to avoid a fire or an electric shock. -
Page 172: Moving The Printer
Appendix Moving the Printer R CAUTION: • The machine weight is approximately 20 kg (44.1 lb.). • When lifting the machine, use the inset grips on both sides. Otherwise the printer could break or cause injury if dropped. • Before moving the machine, unplug the power cord from the outlet. If the cord is unplugged abruptly, it could become damaged. -
Page 173: Consumables
Consumables Consumables R CAUTION: • Our products are engineered to meet the highest standards of quality and functionality. When purchasing expendable supplies, we recommend using only those specified by an authorized dealer. Toner Cartridge Name Average printable number of pages Toner Cartridge 20,000 pages A4, 3% test chart... -
Page 174: Maintenance Kit
Appendix Maintenance Kit ❖ Maintenance Kit Type 610 Name Average printable number of pages Fusing Unit 90,000 pages Transfer Roller 90,000 pages Paper Feed Roller × 3 90,000 pages Friction Pad × 3 90,000 pages A4, 3% test chart Note ❒... -
Page 175: Specifications
Specifications Specifications Mainframe ❖ Configuration: Desktop ❖ Print Process: Laser beam scanning & Electrophotographic printing Dual component toner development ❖ First Print Speed: ×11K) 7.5 sec or less (A4K, 8 Note ❒ If the printer has not been used for a while, there may be a short delay be- fore the first page starts printing. - Page 176 Appendix ❖ Fonts: PCL 6, PCL 5e Agfa Font Manager 35 Intellifonts, 10 TrueType fonts, and 1 bitmap font Font Manager available, plus 31 additional fonts. PostScript, PDF 136 fonts (Type 2:24, Type 14:112) ❖ Paper size: See p.3 “Paper and Other Media Supported by This Printer”. ❖...
- Page 177 Specifications ❖ Dimensions: Width Depth Height Printer only 478 mm (18.4 inches) 437 mm (17.2 inches) 343 mm (13.5 inches) (tray not extended) Printer only 478 mm (18.4 inches) 572 mm (22.6 inches) 343 mm (13.5 inches) (tray extended) With one optional 478 mm (18.4 inches) 437 mm (17.2 inches) 473 mm (18.6 inches) feed unit With two optional...
-
Page 178: Options
Appendix ❖ Optional Equipment: • Paper Feed Unit Type 610 • Envelope Feeder Type 610 • Duplex Unit AD610 • Memory Unit Type C 256MB • Hard Disk Drive Type 2600 • 1394 Interface Unit Type 4510 • 802.11b Interface Unit Type F •... - Page 179 Specifications Duplex Unit AD610 ❖ Dimensions (W×D×H): 419 × 378 × 257 mm (16.5 × 14.9 × 10.2 inches) ❖ Paper Size: See p.3 “Paper and Other Media Supported by This Printer”. ❖ Paper Weight: 60 - 105 g/m (17 - 28 lb.) ❖...
- Page 180 Appendix ❖ Required cable: 1394 interface cable (6 pins x 4 pins, 6 pins x 6 pins) Important ❒ You cannot plug devices together to create loops. ❒ Do not use a cable more than 4.5 meters (14.8 feet) long. ❖...
- Page 181 Specifications Bluetooth Interface Unit Type C ❖ Supported Profiles: SPP (Serial Port Profile) HCRP (Hardcopy Cable Replacement Profile) BIP (Basic Imaging Profile) ❖ Frequency Range: 2 GHz ISM band ❖ Data Transmission Speed: 732 kbps Note ❒ The transmission speed is adjusted according to factors such as the dis- tance and obstacles between the devices, radio signal condition and Blue- tooth adaptor.
-
Page 182: Index
INDEX Hard Disk Drive Type 2600 , 89 1394 Interface Unit Type 4510 , 89 How to Read This Manual , 2 802.11b Interface Unit Type F , 90 Loading Envelopes , 26 Additional Troubleshooting , 69 Bypass Tray , 26 Adjusting the Image Density , 51 Envelope Feeder Unit , 27 Adjusting Tray Registration , 52... - Page 183 Registration Roller , 49 Remove Misfed Paper Duplex Unit , 78 Internal Path , 73 Paper Exit Cover , 75 Paper Tray , 72 Removing Misfed Paper , 71 Replacing Consumables and Maintenance Kit , 31 Replacing the Maintenance Kit , 34 Friction Pad , 35 Fusing Unit , 41 Paper Feed Roller , 39...
- Page 184 MEMO G116-8606...
- Page 185 Copyright © 2004...
- Page 186 RICOH ASIA PACIFIC PTE.LTD. 260 Orchard Road, France #15-01/02 The Heeren, Singapore 238855 RICOH FRANCE S.A. Phone: +65-6830-5888 383, Avenue du Général de Gaulle BP 307-92143 Clamart Cedex Phone: +33-(0)-821-01-74-26 Model number: Aficio AP610N Printed in The Netherlands GB GB G116-8606 G1168606...
-
Page 187: Operating Instructions
Operating Instructions Software Guide Read This First Manuals for This Printer..................8 Preparing for Printing Quick Install......................9 Confirming the Connection Method..............11 Network Connection....................11 Local Connection .....................13 Using the SmartDeviceMonitor for Client Port..........15 Installing SmartDeviceMonitor for Client ..............15 Installing the PCL or RPCS Printer Driver (TCP/IP)..........16 Installing the PCL or RPCS Printer Driver (NetBEUI) ..........17 Installing the PCL or RPCS Printer Driver (IPP) ............19 Installing the PostScript 3 Printer Driver (Windows 95/98/Me - TCP/IP)....21... - Page 188 Using the Standard TCP/IP Port .................39 Installing the PCL or RPCS Printer Driver..............39 Installing the PostScript 3 Printer Driver (Windows 2000) ........40 Installing the PostScript 3 Printer Driver (Windows XP, Windows Server 2003) ..41 Using the LPR Port ....................44 Installing the PCL or RPCS Printer Driver..............44 Installing the PostScript 3 Printer Driver (Windows 2000) ........45 Installing the PostScript 3 Printer Driver (Windows XP, Windows Server 2003) ..46 Installing the PostScript 3 Printer Driver (Windows NT 4.0)........47...
- Page 189 Windows NT 4.0 - Accessing the Printer Properties ..........85 RPCS - Accessing the Printer Properties ............88 Windows 95/98/Me - Accessing the Printer Properties ..........88 Windows 2000 - Accessing the Printer Properties ...........89 Windows XP, Windows Server 2003 - Accessing the Printer Properties ....91 Windows NT 4.0 - Accessing the Printer Properties ..........93 PostScript 3 - Setting Up for Printing ..............96 Windows 95/98/Me - Accessing the Printer Properties ..........96...
- Page 190 List/Test menu parameters ..................133 Maintenance Menu..................... 135 Changing the maintenance menu ................135 Maintenance menu parameters ................137 System Menu...................... 141 Changing the system menu ...................141 System menu parameters ..................141 Host Interface Menu................... 149 Changing the Host Interface menu ................149 Host Interface menu parameters................149 PCL Menu ......................156 Changing the PCL menu..................156 PCL Menu parameters ...................156...
- Page 191 appletalk.........................184 autonet ........................185 btconfig........................185 devicename......................186 dhcp ........................186 diprint ........................187 dns .........................188 domainname ......................189 help ........................190 hostname .......................190 ifconfig........................191 info .........................192 ipp ..........................192 netware ........................193 passwd ........................194 prnlog ........................195 rendezvous......................195 route ........................197 set ..........................198 show........................199 slp...........................200 smb ........................200 snmp ........................201 sntp ........................204 spoolsw ........................204 sprint ........................205 status........................205...
- Page 192 Setting Up as a Print Server (NetWare 4.x, 5/5.1, 6/6.5) ........237 Using Pure IP in the NetWare 5/5.1 or 6/6.5 Environment........238 Setting Up as a Remote Printer (NetWare 3.x) ............241 Setting Up as a Remote Printer (NetWare 4.x, 5/5.1, 6/6.5) ........243 Special Operations under Windows Printing Files Directly from Windows ..............
- Page 193 Appendix Software and Utilities Included on the CD-ROM ..........277 Printer Drivers for This Printer................277 SmartDeviceMonitor for Admin ................278 SmartDeviceMonitor for Client ................279 Cautions to Take When Using in a network ............ 282 Connecting a Dial-up Router to a Network.............282 Using DHCP......................282 Configuring the WINS Server.................284 Using the Dynamic DNS Function................286 Configuring SSL Encryption................288...
-
Page 194: Read This First
Read This First Manuals for This Printer For particular functions, see the relevant parts of the manual. ❖ Setup Guide Provides information about printer setup and options. ❖ Maintenance Guide Provides information about paper, replacing supplies, and dealing with paper jams and error messages. -
Page 195: Preparing For Printing
Preparing for Printing Quick Install Windows 95/98/Me/2000/XP, Windows Server 2003, and Windows NT 4.0 users can easily install this software using the CD-ROM provided. Using Quick Install, the PCL printer driver and/or RPCS printer driver and Smart- DeviceMonitor for Client is installed under network environment, and TCP/IP port will be set. - Page 196 Preparing for Printing Click [Exit] in the first dialog box of the installer, and then take out the CD-ROM. ❒ To stop installation of the selected software, click [Cancel] before installa- tion is complete. ❒ Auto Run may not work with certain operating system settings. If this hap- pens, launch “Setup.exe”...
-
Page 197: Confirming The Connection Method
Preparing for Printing Confirming the Connection Method This printer supports network and local connection. Before installing the printer driver, check how the printer is connected. Follow the driver installation procedure that is appropriate to the connection method. Network Connection This printer can be used as a Windows printing port or network printer. Using this printer as the Windows printing port Network connections can be established through Ethernet, IEEE 802.11b, and IEEE 1394 (IP over 1394). - Page 198 Preparing for Printing Connection Method Available Ports IEEE 1394 (IP over 1394) None ❖ Windows XP Connection Method Available Ports Ethernet/ IEEE 802.11b SmartDeviceMonitor for Client port Standard TCP/IP LPR port IEEE 1394 (IP over 1394) SmartDeviceMonitor for Client port Standard TCP/IP ❖...
-
Page 199: Local Connection
Preparing for Printing Using as a network printer This printer can be used as the Windows network printer, the NetWare print serv- er, or the NetWare remote printer. See the explanation of how to install the printer driver for each type of network printer. - Page 200 Preparing for Printing • USB, Parallel, IEEE 1394 (SCSI print), and Bluetooth connections • Windows NT 4.0: • Parallel and Bluetooth connections See the explanation of how to install the printer driver for each method of connection. For the USB connection, see p.59 “Installing the Printer Driver Using USB”.
-
Page 201: Using The Smartdevicemonitor For Client Port
Preparing for Printing Using the SmartDeviceMonitor for Client Port Installing SmartDeviceMonitor for Client ❒ To install SmartDeviceMonitor for Client under Windows 2000/XP Profession- al, Windows Server 2003, and Windows NT 4.0, you must have an account that has Manage Printers permission. Log on as an Administrator. ❒... -
Page 202: Installing The Pcl Or Rpcs Printer Driver (Tcp/Ip)
Preparing for Printing ❒ SmartDeviceMonitor for Client supports the following languages: Czech, Danish, German, English, Spanish, French, Italian, Hungarian, Dutch, Nor- wegian, Polish, Portuguese, Finnish, Swedish, Chinese Simple and Chi- nese Traditional. Installing the PCL or RPCS Printer Driver (TCP/IP) ❒... -
Page 203: Installing The Pcl Or Rpcs Printer Driver (Netbeui)
Preparing for Printing A list of printers using TCP/IP appears. Select the printer you want to use, and then click [OK]. Only printers that respond to a broadcast from the computer appear. To use a printer not listed here, click [Specify address], and then enter the IP address or host name of the printer. - Page 204 Preparing for Printing Insert the CD-ROM into the CD-ROM drive. The installer starts. Auto Run may not work with certain operating system settings. If this hap- pens, launch “Setup.exe”on the CD-ROM root directory. Select an interface language, and then click [OK]. The default interface language is English.
-
Page 205: Installing The Pcl Or Rpcs Printer Driver (Ipp)
Preparing for Printing This allows a SmartDeviceMonitor for Admin user to display and check statis- tics about the number of sheets which each user prints. For details, see SmartDeviceMonitor for Admin Help. Up to 8 numeric characters can be entered. Neither alphabetic characters nor symbols are available. - Page 206 Preparing for Printing The software license agreement appears in the [License Agreement] dialog box. After reading the agreement, click [I accept the agreement], and then click [Next]. Select a printer driver you want to use in the [Printer Program] dialog box. You can select several printer drivers.
-
Page 207: Installing The Postscript 3 Printer Driver (Windows 95/98/Me - Tcp/Ip)
Preparing for Printing Up to 8 numeric characters can be entered. No alphabetic characters or sym- bols can be entered. Select the [Default Printer] check box to configure the printer as default. Click [Finish]. Installation starts. Click [Finish] in the installation completion dialog box. A message about restarting the computer may appear. -
Page 208: Installing The Postscript 3 Printer Driver (Windows 95/98/Me - Netbeui)
Preparing for Printing Select the name of the printer whose driver you want to install, and then click [Next]. In the [Available ports:] box, click [Printer Port], and then click [Next]. Change the printer name if you want, and then click [Next]. Select the [Yes] check box to configure the printer as default. - Page 209 Preparing for Printing Insert the CD-ROM into the CD-ROM drive. The installer starts. Auto Run may not work with certain operating system settings. If this hap- pens, launch “Setup.exe”on the CD-ROM root directory. Select an interface language, and then click [OK]. The default interface language is English.
-
Page 210: Installing The Postscript 3 Printer Driver (Windows 95/98/Me - Ipp)
Preparing for Printing Only printers that respond to a broadcast from the computer appear. To use a printer not listed here, click [Specify address], and then enter the NetBEUI ad- dress. The NetBEUI address can be checked with the configuration page. For information about printing a configuration page, see p.131 “Printing a Config- uration... - Page 211 Preparing for Printing Select the name of the printer whose driver you want to install, and then click [Next]. In the [Available ports:] box, click [Printer Port], and then click [Next]. Change the printer name if you want, and then click [Next]. Select the [Yes] check box to configure the printer as default.
-
Page 212: Installing The Postscript 3 Printer Driver (Windows 2000 - Tcp/Ip)
Preparing for Printing Check that the selected port is highlighted in [Printer to the following port], and then click [OK] . Restart the computer to complete installation. ❒ A user code can be set after the printer driver installation. For information about user code, see the printer driver Help. -
Page 213: Installing The Postscript 3 Printer Driver (Windows 2000 - Netbeui)
Preparing for Printing Only printers that respond to a broadcast from the computer appear. To use a printer not listed here, click [Specify address], and then enter the IP address or host name of the printer. Check that the name of the printer whose driver you want to install is se- lected, and then click [Next >]. -
Page 214: Installing The Postscript 3 Printer Driver (Windows 2000 - Ipp)
Preparing for Printing Click [Local printer], and then click [Next >]. Click [Add Port...]. Click [SmartDeviceMonitor], and then click [Next >]. Click [NetBEUI], and then click [Search]. A list of printers using NetBEUI appears. Select the printer you want to use, and then click [OK]. Only printers that respond to a broadcast from the computer appear. - Page 215 Preparing for Printing Auto Run may not work with certain operating system settings. If this hap- pens, launch “Setup.exe” on the CD-ROM root directory. Select an interface language, and then click [OK]. The default interface language is English. ❒ The printer driver with the selected language will be installed. The English printer driver is installed when the following language is selected: Cestina, Magyar, Polski, Portugues, Suomi.
-
Page 216: Installing The Postscript 3 Printer Driver (Windows Xp, Windows Server 2003 - Tcp/Ip)
Preparing for Printing Change the printer name if you want, and then click [Next >]. Click [Next >]. Specify whether or not to print a test page, and then click [Next >]. Click [Finish]. The printer driver installation starts. ❒ A user code can be set after the printer driver installation. For information about user code, see the printer driver Help. - Page 217 Preparing for Printing A list of printers using [TCP/IP] appears. Select the printer you want to use, and then click [OK]. Only printers that respond to a broadcast from the computer appear. To use a printer not listed here, click [Specify address], and then enter the IP address or host name of the printer.
- Page 218 Preparing for Printing Add Printer Wizard starts. Click [Next >]. Click [Local printer], and then click [Next >]. Click [Create a new port:]. Click [SmartDeviceMonitor], and then click [Next >]. Click [IPP]. In the [Printer URL] box, enter “http://(printer's address)/printer” as the printer's address.
-
Page 219: Installing The Postscript 3 Printer Driver (Windows Nt 4.0 - Tcp/Ip)
Preparing for Printing Installing the PostScript 3 Printer Driver (Windows NT 4.0 - TCP/IP) ❒ Installing this printer driver requires Administrators permission. Log on using an account that has Administrators permission. Quit all applications currently running. Insert the CD-ROM into the CD-ROM drive. The installer starts. -
Page 220: Installing The Postscript 3 Printer Driver (Windows Nt 4.0 - Netbeui)
Preparing for Printing The printer driver installation starts. Restart the computer to complete installation. ❒ A user code can be set after the printer driver installation . For information about user code, see the printer driver Help. Installing the PostScript 3 Printer Driver (Windows NT 4.0 - NetBEUI) ❒... -
Page 221: Installing The Postscript 3 Printer Driver (Windows Nt 4.0 - Ipp)
Preparing for Printing Only printers that respond to a broadcast from the computer are displayed. To use a printer not listed here, click [Specify address], and then enter the Net- BEUI address. The NetBEUI address can be checked with the configuration page. - Page 222 Preparing for Printing Add Printer Wizard starts. Click [Next]. Click [Add Port:]. Click [SmartDeviceMonitor], and then click [New Port...]. Click [IPP]. In the [Printer URL] box, enter “http://(printer's address)/printer”as the printer's address. If the server authentification is issued, to enable SSL (a protocol for encrypted communication), enter “https://(printer's address)/printer”...
-
Page 223: Changing The Port Settings For Smartdevicemonitor For Client
Preparing for Printing Changing the Port Settings for SmartDeviceMonitor for Client Follow the procedure below to change the SmartDeviceMonitor for Client set- tings, such as TCP/IP timeout, recovery/parallel printing, and printer groups. ❒ There are no settings for NetBEUI protocol. Windows 95/98: Open [Printers] window from [Start] menu. - Page 224 Preparing for Printing Click [Extended Features Settings], and then select the [Set Recovery/Par- allel Printing for each port] check box. Click [OK] to close the [Extended Features Settings] dialog box. • User, proxy, and timeout settings can be configured for IPP. For information about these settings, see SmartDeviceMonitor for Client Help.
-
Page 225: Using The Standard Tcp/Ip Port
Preparing for Printing Using the Standard TCP/IP Port Installing the PCL or RPCS Printer Driver ❒ To install printer driver under Windows 2000/XP Professional, and Windows Server 2003, you must have an account that has Manage Printers permission. Log on as an Administrators or Power Users group member. Quit all applications currently running. -
Page 226: Installing The Postscript 3 Printer Driver (Windows 2000)
Preparing for Printing The [Port Name] text box automatically obtains a port name. Change this name if necessary. When screen for Device selection appears, select “RICOH NetworkPrinter Driver C Model”. Click [Finish] in the [Add Standard TCP/IP Printer Port Wizard] dialog box. -
Page 227: Installing The Postscript 3 Printer Driver (Windows Xp, Windows Server 2003)
Enter the printer name or IP address in the [Printer Name or IP Address] box, and then click [Next>]. When screen for Device selection appears, select “RICOH NetworkPrinter Driver C Model”. Click [Finish] in the [Add Standard TCP/IP Printer Port Wizard] dialog box. - Page 228 Enter the printer name or IP address in the [Printer Name or IP Address] box, and then click [Next >]. When screen for Device selection appears, select “RICOH NetworkPrinter Driver C Model”. Click [Finish] in the [Add Standard TCP/IP Printer Port Wizard] dialog box.
- Page 229 Preparing for Printing ❒ A user code can be set after the printer driver installation. For information about user code, see the printer driver Help.
-
Page 230: Using The Lpr Port
Preparing for Printing Using the LPR Port Installing the PCL or RPCS Printer Driver ❒ To install this printer driver under Windows 2000/XP Professional, Windows Server 2003, and Windows NT 4.0, you must have an account that has Man- age Printers permission. Log on as an Administrators or Power Users group member. -
Page 231: Installing The Postscript 3 Printer Driver (Windows 2000)
Preparing for Printing Enter “lp” in the [Name of printer or print queue on that server] box, and then click [OK]. The port is added. Check that the port of the selected printer is displayed in [Port:]. Configure the default printer as necessary. Click [Finish]. -
Page 232: Installing The Postscript 3 Printer Driver (Windows Xp, Windows Server 2003)
Preparing for Printing Click [Local printer], and then click [Next >]. Click [Add Port...]. Click [LPR Port], and then click [New Port...]. Enter the printer's IP address in the [Name or address of server providing lpd] box. Enter “lp” in the [Name of printer or print queue on that server] box, and then click [OK]. -
Page 233: Installing The Postscript 3 Printer Driver (Windows Nt 4.0)
Preparing for Printing ❒ The printer driver with the selected language will be installed. The English printer driver is installed when the following language is selected: Cestina, Magyar, Polski, Portugues, Suomi. Click [PostScript 3 Printer Driver]. Add Printer Wizard starts. Click [Next >]. - Page 234 Preparing for Printing The installer starts. Auto Run may not work with certain operating system settings. If this hap- pens, launch “Setup.exe” on the CD-ROM root directory. Select an interface language, and then click [OK]. The default interface language is English. ❒...
-
Page 235: Using As The Windows Network Printer
Preparing for Printing Using as the Windows Network Printer Installing the PCL or RPCS Printer Driver To use the print server, install the printer driver by selecting “Network printer server”, and then select the Windows 2000/XP, Windows Server 2003, or Win- dows NT 4.0 shared printer. -
Page 236: Installing The Postscript 3 Printer Driver (Windows 95/98/Me)
Preparing for Printing Select the [Printer Name:] check box to select the printer models you want to use. The printer name can be changed in the [Change settings for 'Printer Name'] box. Double-click the printer name to display the printer settings. The details shown in [Comment:], [Driver:], and [Port:] vary depending on the operating system, printer model, and port. -
Page 237: Installing The Postscript 3 Printer Driver (Windows 2000)
Preparing for Printing The installer starts. Auto Run may not work with certain operating system settings. If this hap- pens, launch “Setup.exe” on the CD-ROM root directory. Select an interface language, and then click [OK]. The default interface language is English. ❒... -
Page 238: Installing The Postscript 3 Printer Driver (Windows Xp, Windows Server 2003)
Preparing for Printing Insert the CD-ROM into the CD-ROM drive. The installer starts. Auto Run may not work with certain operating system settings. If this hap- pens, launch “Setup.exe” on the CD-ROM root directory. Select an interface language, and then click [OK]. The default interface language is English. - Page 239 Preparing for Printing ❒ If you print from a print server connected to the printer using the SmartDevice- Monitor port, the client cannot use Recovery Printing and Parallel Printing. ❒ If you print with a Windows XP or Windows Server 2003 print server, Smart- DeviceMonitor notification functions may not be possible for the client.
-
Page 240: Installing The Postscript 3 Printer Driver (Windows Nt 4.0)
Preparing for Printing Installing the PostScript 3 Printer Driver (Windows NT 4.0) ❒ Installing this printer driver requires Administrators permission. Log on using an account that has Administrators permission. ❒ If you print from a print server connected to the printer using the SmartDevice- Monitor port, the client cannot use Recovery Printing and Parallel Printing. - Page 241 Preparing for Printing ❒ A user code can be set after the printer driver installation. For information about user code, see the printer driver Help.
-
Page 242: Using As The Netware Print Server/Remote Printer
Preparing for Printing Using as the NetWare Print Server/Remote Printer This explains how to set up the Windows computer used as the NetWare client. ❒ To install this printer driver under Windows 2000/XP Professional, Windows Server 2003, and Windows NT 4.0, you must have an account that has Man- age Printers permission. -
Page 243: When Using The Postscript 3 Printer Driver
Preparing for Printing The details shown in [Comment:], [Driver:], and [Port:] vary depending on the operating system, printer model, and port. Click [Port:], and then click [Add]. Click [Network Printer], and then click [OK]. Double-click the name of the NetWare file server on the network tree. The created queue is displayed. -
Page 244: Form Feed
Preparing for Printing Click [Advanced]. Clear the [Send CTRL+D before job] and [Send CTRL+D after job] check boxes, and then click [OK]. Click [OK] to close the printer properties dialog box. Form Feed Do not use NetWare to configure form feed. Form feed is controlled by the printer driver on Windows. -
Page 245: Installing The Printer Driver Using Usb
Preparing for Printing Installing the Printer Driver Using USB This section explains how to install printer drivers using USB. ❒ Make sure that printer is connected to the computer's USB ports using the USB interface cable. Before installing, check that only the operating system is running on the comput- er and no print jobs are in progress. - Page 246 Preparing for Printing If the CD-ROM drive is D, the source files of USB Printing Support are stored in the following location: D:DRIVESRPCSWIN98_ME Check the location, and then click [Next]. USB Printing Support is installed. Click [Finish]. If the printer driver has already been installed, plug and play is enabled, and the icon of the printer connected to the “USB001”...
-
Page 247: Windows 2000 - Usb
Preparing for Printing Installation is complete. If installation is successful, the icon of the printer con- nected to the “USB001” port is added to the [Printers] window. ❒ The number after “USB” varies depending on the number of printers con- nected. -
Page 248: Windows Xp, Windows Server 2003 - Usb
Preparing for Printing If the CD-ROM drive is D, the source files of the printer driver are stored in the following location: • RPCS D:DRIVESRPCSWIN2K_XP(Language)DISK1 • PCL 5e D:DRIVESPCL5EWIN2K_XP(Language)DISK1 • PCL 6 D:DRIVESPCL6WIN2K_XP(Language)DISK1 • PostScript 3 D:DRIVESPS3WIN2K_XP(Language)DISK1 Check the printer driver location, and then click [OK]. Click [Next]. -
Page 249: Troubleshooting Usb
Preparing for Printing To disable Auto Run, press the left {SHIFT} key when inserting the CD- ROM into the drive and keep it pressed until the computer finishes read- ing from the CD-ROM. ❒ If Auto Run starts, click [Cancel], and then [Exit]. Select the [Include this location in the search] check box under [Search for the best driver in these location], and then click [Browse] to select the printer driv- er location. - Page 250 Preparing for Printing Windows has already configured Open Windows' Device Manager, and then, under [Univer- the USB settings. sal Serial Bus controllers], remove any conflicting devices. Conflicting devices have a yellow [!] or [?] icon by them. Take care not to accidentally remove required devices. For details, see Windows Help.
-
Page 251: Printing With Parallel Connection
Preparing for Printing Printing with Parallel Connection To use a printer connected using a parallel interface, click [LPT1] when installing the printer driver. Installing the PCL or RPCS Printer Driver ❒ To install this printer driver under Windows 2000/XP Professional, Windows Server 2003, and Windows NT 4.0, you must have an account that has Man- age Printers permission. -
Page 252: Installing The Postscript 3 Printer Driver (Windows 95/98/Me)
Preparing for Printing The printer driver installation starts. Click [Finish] in the installation completion dialog box. ❒ To stop installation of the selected software, click [Cancel] before installa- tion is complete. A message appears if there is a newer version of the printer driver already installed. -
Page 253: Installing The Postscript 3 Printer Driver (Windows 2000)
Preparing for Printing Restart the computer to complete installation. ❒ A user code can be set after the printer driver installation. For information about user code, see the printer driver Help. Installing the PostScript 3 Printer Driver (Windows 2000) ❒ Installing this printer driver requires Administrators permission. Log on using an account that has Administrators permission. -
Page 254: Installing The Postscript 3 Printer Driver (Windows Xp, Windows Server 2003)
Preparing for Printing Installing the PostScript 3 Printer Driver (Windows XP, Windows Server 2003) ❒ Installing this printer driver requires Administrators permission. Log on using an account that has Administrators permission. Quit all applications currently running. Insert the CD-ROM into the CD-ROM drive. The installer starts. -
Page 255: Installing The Postscript 3 Printer Driver (Windows Nt 4.0)
Preparing for Printing Installing the PostScript 3 Printer Driver (Windows NT 4.0) ❒ Installing this printer driver requires Administrators permission. Log on using an account that has Administrators permission. Quit all applications currently running. Insert the CD-ROM into the CD-ROM drive. The installer starts. -
Page 256: Installing The Printer Driver Using Ieee 1394 (Scsi Print)
Preparing for Printing Installing the Printer Driver Using IEEE 1394 (SCSI print) The printer drivers can be installed from the CD-ROM provided with this printer. ❒ Quit all applications currently running, and do not print during installation. ❒ Do not connect IEEE 1394 or USB devices to the computer or turn on another printers during installation. - Page 257 Preparing for Printing To disable Auto Run, press the left {SHIFT} key when inserting the CD- ROM into the drive and keep it pressed until the computer finishes read- ing from the CD-ROM. If Auto Run starts, click [Cancel], and then [Exit]. Click [Browse].
-
Page 258: Windows Xp, Windows Server 2003
Preparing for Printing When the message “Driver Files Search Results” appears, select the [Disable the device. The Add/Remove Hardware Wizard in the control Panel can be able to complete the driver installations.] check box, and then click [Fin- ish]. Windows XP, Windows Server 2003 ❒... - Page 259 Preparing for Printing D:DRIVESRPCSWIN2K_XP(Language)DISK1 • PCL 5e D:DRIVESPCL5EWIN2K_XP(Language)DISK1 • PCL 6 D:DRIVESPCL6WIN2K_XP(Language)DISK1 • PostScript 3 D:DRIVESPS3WIN2K_XP(Language)DISK1 When installation is complete, the printer connected to “1394_00n” appears in the [Printers and Faxes] window. (“n” shows the number of printers connect- ed.) Follow the instructions.
-
Page 260: Printing With Bluetooth Connection
Preparing for Printing Printing with Bluetooth Connection Supported Profiles ❖ SPP, HCRP • A maximum of two Bluetooth adaptor or Bluetooth-equipped computers can be connected at the same time using the Bluetooth interface: one by SPP, one by HCRP. • When connecting more than one Bluetooth adaptor or Bluetooth-equipped computer at the same time, the first device that establishes connection is selected. - Page 261 Preparing for Printing Start 3Com Bluetooth Connection Manager. Check that the printer you want to use appears in 3Com Bluetooth Con- nection Manager. On the [Tool] menu, click [COM port]. Check that the message “Bluetooth Serial Client (COMx) “ appears un- der Client Ports.
- Page 262 Preparing for Printing If you click [High], or [Custom], and specify [Link] in the [Custom Settings] dialog box, enter the Bluetooth password. For information about entering the pass- word, see p.76 “Send the print job to the printer in use.”. For all other security modes and custom settings, no password is required.
-
Page 263: If A Message Appears During Installation
Preparing for Printing If a Message Appears during Installation Message number 58 or 34 indicates the printer driver cannot be installed using Auto Run. Install the printer driver using [Add Printer] or [>Install Printer]. For Windows 95/98/Me, Windows 2000 and Windows NT 4.0: On the [Start] menu, point to [Settings], and then click [Printers]. -
Page 264: Making Option Settings For The Printer
Preparing for Printing Making Option Settings for the Printer Make option settings for the printer using the printer driver when bidirectional communication is disabled. For details about making option settings for the printer, see p.79 “If Bidirec- tional Communication is Disabled”. -
Page 265: If Bidirectional Communication Is Disabled
Preparing for Printing • Under Windows 2000, [Enable bidirectional support] must be selected, and [Enable printer pooling] must not be selected on the [Port] tab with the RPCS printer driver. • In addition to the above, one of the following conditions must also be met: •... - Page 266 Preparing for Printing Click the icon of the printer you want to use. On the [File] menu, click [Properties]. Click the [Accessories] tab. If options in the [Change Accessories] tab are disabled, bidirectional connection is enabled. In this case, no change is necessary for option settings. ❒...
-
Page 267: Setting Up The Printer Driver
Setting Up the Printer Driver PCL - Accessing the Printer Properties Windows 95/98/Me - Accessing the Printer Properties There are two methods to open the printer properties dialog box. Making printer default settings To make the printer default settings, open the printer properties dialog box from the [Printers] window. -
Page 268: Windows 2000 - Accessing The Printer Properties
Setting Up the Printer Driver ❒ The procedure to open the printer properties dialog box may vary depend- ing on the application. For details, see the manuals provided with the ap- plication you use. ❒ With some applications, the printer driver settings are not used, and the ap- plication's own default settings are applied. - Page 269 Setting Up the Printer Driver Making printer default settings - Printing Preferences ❒ You cannot change the printer default settings for each user. Settings made in the printer properties dialog box are applied to all users. On the [Start] menu, point to [Settings], and then click [Printers]. The [Printers] window appears.
-
Page 270: Windows Xp, Windows Server 2003 - Accessing The Printer Properties
Setting Up the Printer Driver Windows XP, Windows Server 2003 - Accessing the Printer Properties Making printer default settings - the printer properties ❒ To change the printer default settings including option configuration settings, log on using an account that has Manage Printers permission. Members of the Administrators and Power Users groups have Manage Printers permission by default. -
Page 271: Windows Nt 4.0 - Accessing The Printer Properties
Setting Up the Printer Driver ❒ Settings you make here are used as the default settings for all applications. For details, see Printer Driver Help. Making printer settings from an application You can make printer settings for a specific application. To make printer settings for a specific application, open the [Printing Preferences] dialog box from that application. - Page 272 Setting Up the Printer Driver The [Printers] window appears. Click the icon of the printer you want to use. On the [File] menu, click [Properties]. The printer properties dialog box appears. Make the necessary settings, and then click [OK]. ❒ Settings you make here are used as the default settings for all applications. ❒...
- Page 273 Setting Up the Printer Driver ❒ The procedure to open the printer properties dialog box may vary depending on the application. For details, see the manuals provided with the application you use. ❒ With some applications, the printer driver settings are not used, and the appli- cation's own default settings are applied.
-
Page 274: Rpcs - Accessing The Printer Properties
Setting Up the Printer Driver RPCS - Accessing the Printer Properties Windows 95/98/Me - Accessing the Printer Properties There are two dialog box types of the printer properties dialog box. “Multi-tab” is used as an example in this manual. For details about changing the dialog box types, see the printer driver Help. -
Page 275: Windows 2000 - Accessing The Printer Properties
Setting Up the Printer Driver Making printer settings from an application You can make printer settings for a specific application. To make printer settings for a specific application, open the printer properties di- alog box from that application. The following explains how to make settings for the WordPad application provided with Windows 95/98/Me. - Page 276 Setting Up the Printer Driver The [Printers] window appears. Click the icon of the printer you want to use. On the [File] menu, click [Properties]. The printer properties dialog box appears. ❒ When you open the printer properties dialog box initially after installing the RPCS printer driver, a confirmation message appears.
-
Page 277: Windows Xp, Windows Server 2003 - Accessing The Printer Properties
Setting Up the Printer Driver ❒ The procedure to open the [Printing Preferences] dialog box may vary depend- ing on the application. For details, see the manuals provided with the applica- tion you use. ❒ Any settings you make in the following procedure are valid for the current ap- plication only. - Page 278 Setting Up the Printer Driver Make the necessary settings, and then click [OK]. ❒ Settings you make here are used as the default settings for all applications. ❒ Do not make a setting for [Form to Tray Assignment]. For details, see Printer Driver Help. Making printer default settings - Printing Preferences ❒...
-
Page 279: Windows Nt 4.0 - Accessing The Printer Properties
Setting Up the Printer Driver On the [File] menu, click [Print...]. The [Print] dialog box appears. Select the printer you want to use in the [Select Printer] list. Make the necessary settings, and then click [Apply] to start printing. For details, see Printer Driver Help. Windows NT 4.0 - Accessing the Printer Properties Making printer default settings - the printer properties ❒... - Page 280 Setting Up the Printer Driver Making printer default settings - Default ❒ To change the printer default settings including option configuration settings, log on using an account that has Full Control permission. Members of the Ad- ministrators, Server Operators, Print Operators, and Power Users groups have Full Control permission by default.
- Page 281 Setting Up the Printer Driver Select the printer you want to use in the [Name] list, and then click [Prop- erties]. The printer properties dialog box appears. Make the necessary settings, and then click [Apply]. Click [OK] to start printing. For details, see Printer Driver Help.
-
Page 282: Postscript 3 - Setting Up For Printing
Setting Up the Printer Driver PostScript 3 - Setting Up for Printing Windows 95/98/Me - Accessing the Printer Properties There are two methods to open the printer properties dialog box. Making printer default settings To make the printer default settings, open the printer properties dialog box from the [Printers] window. -
Page 283: Windows 2000 - Accessing The Printer Properties
Setting Up the Printer Driver ❒ Any settings you make in the following procedure are valid for the current ap- plication only. ❒ General users can change the properties displayed in the [Print] dialog box of an application. Settings made here are used as defaults when printing from this application. - Page 284 Setting Up the Printer Driver For details, see Printer Driver Help. Making printer default settings - Printing Preferences ❒ You cannot change the printer default settings for each user. Settings made in the printer properties dialog box are applied to all users. On the [Start] menu, point to [Settings], and then click [Printers].
-
Page 285: Windows Xp, Windows Server 2003 - Accessing The Printer Properties
Setting Up the Printer Driver For details, see Printer Driver Help. Windows XP, Windows Server 2003 - Accessing the Printer Properties Making printer default settings - the printer properties ❒ To change the printer default settings including option configuration settings, log on using an account that has Manage Printers permission. -
Page 286: Windows Nt 4.0 - Accessing The Printer Properties
Setting Up the Printer Driver Make the necessary settings, and then click [OK]. ❒ Settings you make here are used as the default settings for all applications. For details, see Printer Driver Help. Making printer settings from an application You can make printer settings for a specific application. To make printer settings for a specific application, open the [Printing Preferences] dialog box from that application. - Page 287 Setting Up the Printer Driver On the [Start] menu, point to [Settings], and then click [Printers]. The [Printers] window appears . Click the icon of the printer you want to use. On the [File] menu, click [Properties]. The printer properties dialog box appears. Make the necessary settings, and then click [OK].
-
Page 288: Mac Os - Setting Up For Printing
Setting Up the Printer Driver To make printer settings for a specific application, open the printer properties di- alog box from that application. The following explains how to make settings for the WordPad application provided with Windows NT 4.0. ❒ The procedure to open the printer properties dialog box may vary depending on the application. - Page 289 Setting Up the Printer Driver The [Page Setup] dialog box varies depending on the application you use. For details, see the manuals provided with the Mac OS. Configure the settings, and then click [OK]. Setting up for printing from an application Open the file you want to print.
-
Page 290: Other Print Operations
Other Print Operations Printing a PDF File Directly You can send PDF files directly to this printer to print, without opening its appli- cation. ❒ This is possible for Adobe PDF files only. ❒ PDF files of versions 1.3, 1.4, and 1.5 are supported. ❒... -
Page 291: Using Commands
Other Print Operations ❒ Auto Run may not work under certain operating system settings. In this case, launch “Setup.exe” located on the CD-ROM root directory. Select an interface language, and then click [OK]. Click [DeskTopBinder Lite] , and then click [Next]. Follow the instructions on the display to install DeskTopBinder Lite. -
Page 292: Sample Print
Other Print Operations Sample Print Use this function to print the first set of a multiple-set print job. After checking the results, the remaining sets can be printed using the control panel. This function can protect you from printing a large quantity of misprints. ❒... -
Page 293: Printing The Remaining Sets
Other Print Operations Select the printer you want to use in the [Name] list, and then click [Prop- erties]. The printer properties dialog box appear. In the [Job Type:] box, click [Sample Print]. In the [User ID:] box, enter a user ID using up to eight alphanumeric char- acters. -
Page 294: Deleting A Sample Print File
Other Print Operations To cancel printing, press the {Escape} key. Press the {# Enter} key. To change the number of sets you want to print, press the {U} or {T} key and select the number of sets, and then press the {# Enter} key. - Page 295 Other Print Operations ❒ The latest 50 error files are stored in the error log. If a new error file is added when there are 50 error files already stored, the oldest file is deleted. Howev- er, if the oldest error file is a sample print file, it is not deleted, but stored in- stead in the sample print error log until the number of sample print error files reaches 20.
-
Page 296: Locked Print
Other Print Operations Locked Print Use this function to print confidential documents. Documents will not be printed automatically unless a password is entered using the control panel. ❒ To use this function, the optional hard disk must be installed on the printer. ❒... -
Page 297: Entering A Password
Other Print Operations The [Print] dialog box appears. Select the printer you want to use in the [Name] list, and then click [Prop- erties]. In the [Job Type:] box, click [Locked Print]. In the [User ID:] box, enter a user ID using up to eight alphanumeric char- acters. -
Page 298: Deleting A Locked Print File
Other Print Operations Enter the password. Press the {U} or {T} key to enter the leftmost digit of the password, and then press the {# Enter} key. The next digit appears. Repeat step to enter all the digits of the password, and then press the {# Enter} key. -
Page 299: Checking The Error Log
Other Print Operations Press the {# Enter} key. The message [Deleted] appears, and then the Locked Print job selection screen appears. Checking the Error Log When a print job is not saved on the hard disk, it remains in the error log and can be checked using the control panel. - Page 300 Other Print Operations The initial screen appears.
-
Page 301: Form Feed
Other Print Operations Form Feed This message appears when the paper tray is empty, or when the paper in the paper tray is not of the same size or form as that specified by the printer driver. You can form feed using tray. Press the {Form Feed} key, and then select the paper tray on the screen. -
Page 302: Canceling A Print Job
Other Print Operations Canceling a Print Job You can cancel printing from either the printer or a client computer. Since can- celing procedures vary depending on the print job status, check the job status and cancel printing according to the following procedure. Windows - Canceling a Print Job ❒... -
Page 303: Mac Os - Canceling A Print Job
Other Print Operations If the print job you want to cancel is not being printed Double-click the printer icon on the Windows task tray. A window appears showing all print jobs that are currently queuing to be print- ed. Check the current status of the job you want to cancel. You can also open the print job queue window by double-clicking the printer icon in the [Printer] window. - Page 304 Other Print Operations Printing resumes if you press the {Escape} key after the message appears. Press the {# Enter} key. The job is canceled. When the cancellation procedure is complete, a mes- sage appears. ❒ A print job that contains a large volume of data may take considerable time to cancel.
-
Page 305: Caution During Printing
Other Print Operations Caution During Printing Collate The Collate function allows you to print while sorting printouts into page-ordered sets, such as when printing multiple copies of meeting materials. For details about collate and job separation, see the printer driver Help. ❖... - Page 306 Other Print Operations ❒ When sending print jobs spooled from several computers, up to one diprint job, 10 lpr jobs, one ipp job, one ftp job, and one smb job can be spooled. Jobs exceeding this spooling capacity cannot be executed. It is necessary to wait to add new jobs.
-
Page 307: Cover
Other Print Operations A list of spooled jobs appears. To delete a job, select the check box of the job you want to delete, and then click [Delete]. The selected job is deleted. Quit Web Image Monitor. For details, see Web Image Monitor Help. Cover Using this function, you can insert cover fed from a different tray to that of the main paper, and print on them. - Page 308 Other Print Operations ❖ 384 MB (standard + 256 MB) • A6, A5, B5 JIS, A4, Letter, and Legal sized paper printing is guaranteed. One-sided printing (1200 x 600 dpi) ❖ 128 MB (standard) • A6 and A5 sized paper printing is guaranteed. •...
- Page 309 Other Print Operations ❖ 256 MB (standard + 128 MB) • A6, A5, B5 JIS, A4, Letter, and Legal sized paper printing is guaranteed. ❖ 384 MB (standard + 256 MB) • A6, A5, B5 JIS, A4, Letter, and Legal sized paper printing is guaranteed. Two-sided printing (1200 x 1200 dpi) ❖...
-
Page 310: Making Printer Settings Using The Control Panel
Making Printer Settings Using the Control Panel Menu Chart This section explains how to change the default settings of the printer and pro- vides information about the parameters included in each menu. ❖ Sample Print ❒ Appear only when the optional hard disk is installed. ❒... - Page 311 Making Printer Settings Using the Control Panel Menu Curl Prevention HD Format WL.LAN Signal WL.LAN Defaults Key Repeat Menu Protect List Print Lock Ppr.Size Errors File Locking Unlock Files ❖ System Menu Prt. Err Report Auto Continue Memory Overflow Copies Printer Lang.
- Page 312 Making Printer Settings Using the Control Panel Menu Email Date ❒ [Spool Printing] appear when the optional hard disk is installed. ❒ [RAM Disk] will not appear when the optional hard disk is installed. ❖ Host Interface Menu I/O Buffer I/O Timeout Network Setup IEEE 1394 Setup...
- Page 313 Making Printer Settings Using the Control Panel ❖ PS Menu Menu Data Format Resolution ❖ PDF Menu Menu PDF: Change PW PDF Group PW Resolution ❖ Language Menu English German French Italian Dutch Swedish Norwegian Danish Spanish Finnish Portuguese Czech Polish Hungarian...
-
Page 314: Paper Input Menu
Making Printer Settings Using the Control Panel Paper Input Menu This section explains about paper settings on the Paper Input menu such as pa- per sizes and types on each tray. Changing the paper input menu Tray locking Follow the procedure below to lock/unlock trays. Press the {Menu} key. -
Page 315: Paper Input Menu Parameters
Making Printer Settings Using the Control Panel Press the {Menu} key. The [Menu] screen appears. Press the {U} or {T} key to display [Paper Input], and then press the {# Enter} key. Press the {U} or {T} key to display [Tray Priority], and then press the {# Enter} key. - Page 316 Making Printer Settings Using the Control Panel ❖ Paper Type If you use various types of paper, select the paper type for tray 1, tray 2, tray 3 or bypass tray. For details about types of paper loaded in each tray, see “Paper and Other Media Supported by This Printer”, Maintenance Guide.
-
Page 317: List/Test Print Menu
Making Printer Settings Using the Control Panel List/Test Print Menu You can print lists of configurations on printer or the paper printings. Also, you can check the types and characters of all the printable fonts. Printing a Configuration Page Follow the procedure below to print the configuration page. ❒... - Page 318 Making Printer Settings Using the Control Panel ❖ Firmware Version • Firmware The version number of the printer controller firmware is displayed. • Engine The version number of the printer engine firmware is displayed. • NCS The version number of the network interface board is displayed. ❖...
-
Page 319: List/Test Menu Parameters
Making Printer Settings Using the Control Panel For details, see p.149 “Host Interface Menu”. ❖ PCL Menu Settings made on the [PCL Menu] are displayed. For details, see p.156 “PCL Menu”. ❖ PS Menu Settings made on the [PS Menu] are displayed. For details, see p.159 “PS Menu”. - Page 320 Making Printer Settings Using the Control Panel ❖ PDF Config.Page You can print an installed PS3 font and the Disk Directory List which shows the optional hard disk. ❖ Hex Dump You can print the data sent by the computer using Hex Dump.
-
Page 321: Maintenance Menu
Making Printer Settings Using the Control Panel Maintenance Menu You can set printing conditions such as density and calibration, and printer man- agement such as formatting the optional hard disk unit. Changing the maintenance menu This section explains changing the maintenance menu using examples. HD Format Follow the procedure below to format the optional hard disk unit after initial set- Press the {Menu} key. - Page 322 Making Printer Settings Using the Control Panel ❒ If the [HD Format] button is not displayed, the optional hard disk unit is not properly installed. Reinstall the optional hard disk unit. For details about the optional hard disk unit, see Setup Guide. If you cannot install it properly even after attempting reinstallation, contact your sales or service represen- tative.
-
Page 323: Maintenance Menu Parameters
Making Printer Settings Using the Control Panel ❒ The signal is rated [Good] if signal strength is 86%-100%, [Fair] if 61%-85%, [Poor] if 31%-60%, and [Unavailable] if 0%-30%. If the signal is unstable or unavailable, remove any obstructions or move the printer to a place to re- ceive the signal. - Page 324 Making Printer Settings Using the Control Panel • -3 to 3 For details, see “Adjusting the Image Density”, Maintenance Guide. ❖ Registration You can adjust the starting position of the printing page. ❖ Prt. Test Sheet You can print the registration sets sheet. •...
- Page 325 Making Printer Settings Using the Control Panel ❖ WL.LAN Defaults Reset the wireless LAN to default. The menu appears when the 802.11b in- terface unit is installed. ❖ Key Repeat Holding down [On] allows users to scroll through items and settings. Pressing [Off] moves through items and settings one at a time.
- Page 326 Making Printer Settings Using the Control Panel • Detect • Do not detect ❒ Default: Detect ❒ When it is “Detect”, it prints with the paper size that was set when the error message appeared. ❒ While the printer is online, press the {# Enter} key, then press the {Escape} key, and then press the {Menu} key.
-
Page 327: System Menu
Making Printer Settings Using the Control Panel System Menu You can set basic functions required to use the printer. The printer can be used on factory default, but the configuration can be changed depending on the con- dition of the user. The changed condition holds even if the printer is turned off. Changing the system menu Follow the procedure below to change the settings for E. - Page 328 Making Printer Settings Using the Control Panel ❖ Prt. Err Report You can select [On] or [Off] to have an error report printed when a printer error or memory error occurs. • Off • On ❒ Default: Off ❖ Auto Continue You can make the Auto Continue setting.
- Page 329 Making Printer Settings Using the Control Panel ❒ Default: Auto Detect ❖ Sub Paper Size You can select [Off] or [Auto] to enable the Sub Paper Size function. When you select [Auto], the printer uses an alternative paper size if the currently specified paper is not loaded.
- Page 330 Making Printer Settings Using the Control Panel ❒ Default: PCL ❖ Duplex You can specify whether or not to print on both sides of a sheet. • Off • Short Edge Bind • Long Edge Bind ❒ Default: Off ❒ This menu appears only when the optional duplex unit is installed. ❖...
- Page 331 Making Printer Settings Using the Control Panel ❒ Default: 30 minutes ❒ When the printer switches to the Energy Saver mode, the Power indica- tor goes off, while the On Line indicator stays lit and [Energy Save Mode] appears. ❖ Auto Reset Time You can set On or Off and the time for the Auto Reset Timer.
- Page 332 Making Printer Settings Using the Control Panel ❖ Edge Smoothing You can set whether edge smoothing is enabled. When it is on, jagged lines appear more smoothly. Set it to off when the print image contains fine grada- tion in tone. •...
- Page 333 Making Printer Settings Using the Control Panel ❒ Default: Driver/Command ❒ Appear only at network standard model. ❖ RAM Disk If the optional hard disk is not installed for PDF Direct Print, select a value of 2 MB or higher. This menu appears only when the optional hard disk is not installed.
- Page 334 Making Printer Settings Using the Control Panel • On ❒ default: Off ❒ While the printer is online, press the {# Enter} key, then press the {Es- cape} key, and then press the {Menu} key. You can access [Email Date] from the display panel.
-
Page 335: Host Interface Menu
Making Printer Settings Using the Control Panel Host Interface Menu You can set configurations about network connections and communication when using parallel connection between the printer and the computer. The changed configuration holds even if the printer is turned off. Changing the Host Interface menu Follow the procedure below to change the I/O Timeout Press the {Menu} key. - Page 336 Making Printer Settings Using the Control Panel • 256 KB • 512 KB ❒ Default: 128 KB ❖ I/O Timeout You can set how many seconds the printer should wait before ending a print job. If printing operation is frequently interrupted by data from other ports, you can increase the timeout period.
- Page 337 Making Printer Settings Using the Control Panel ❒ When DHCP is set to on, the subnet mask cannot be changed. To change it, set DHCP to off. Contact your network administrator for infor- mation about the network configuration. ❒ Default: 000.000.000.000 ❖...
- Page 338 Making Printer Settings Using the Control Panel • 100Mbps Half D. • 100Mbps Full D. ❒ Default: Auto Select ❖ LAN Type You can select Ethernet or IEEE 802.11b for LAN Type. This menu appears only when the optional 802.11 interface unit is in- stalled.
- Page 339 Making Printer Settings Using the Control Panel ❖ IP over 1394 You can specify whether or not to activate IP over 1394. • Active • Not Active ❒ Default: Active ❖ SCSI print You can specify whether or not to activate SCSI print. •...
- Page 340 Making Printer Settings Using the Control Panel ❖ Trans. Speed You can select the transmission speed for IEEE 802.11b. • Auto • 11 Mbps • 5.5 Mbps • 2 Mbps • 1 Mbps ❒ Default: Auto ❖ SSID You can set an SSID in the infrastructure mode and the 802.11 Ad hoc mode.
- Page 341 Making Printer Settings Using the Control Panel ❒ When using 64 bit WEP, up to 10 hexadecimal or 5 ASCII characters can be entered. When using 128 bit WEP, up to 26 hexadecimal or 13 ASCII characters can be entered. ❒...
-
Page 342: Pcl Menu
Making Printer Settings Using the Control Panel PCL Menu You can set conditions when using PCL for printing. Changing the PCL menu Follow the procedure below to change the setting for Orientation. Press the {Menu} key. The [Menu] screen appears. Press the {U} or {T} key to display [PCL Menu], and then press the {# En- ter} key. - Page 343 Making Printer Settings Using the Control Panel ❒ Default: Portrait ❖ Form Lines You can specify the number of lines per page between 5 and 128. ❒ Default: • Metric version: 64 • Inch version: 60 ❖ Font Source You can set the location of the default font. •...
- Page 344 Making Printer Settings Using the Control Panel ❖ Symbol Set You can specify the character set for the default font. Available sets are as follows: Roman-8, ISO L1, ISO L2, ISO L5, PC-8, PC-8 D/N, PC-850, PC-852, PC8- TK, Win L1, Win L2, Win L5, Desktop, PS Text, VN Intl, VN US, MS Publ, Math-8, PS Math, VN Math, Pifont, Legal, ISO 4, ISO 6, ISO 11, ISO 15, ISO 17, ISO 21, ISO 60, ISO 69, Win 3.0 ❒...
-
Page 345: Ps Menu
Making Printer Settings Using the Control Panel PS Menu You can set conditions when using Postscript for printing. Changing the PS menu Follow the procedure below to change the setting for date format. Press the {Menu} key. The [Menu] screen appears. Press the {U} or {T} key to display [PS Menu], and then press the {# Enter} key. - Page 346 Making Printer Settings Using the Control Panel When you use a parallel or USB connection, the print job is canceled if binary data is sent from the printer driver. When you use an Ethernet connection, the print job is canceled if: •...
-
Page 347: Pdf Menu
Making Printer Settings Using the Control Panel PDF Menu You can set conditions when using PDF printing. Changing the PDF menu Follow the procedure below to change the resolution setting. Press {Menu} key. The [Menu] screen appears. Press {U} or {T} key to display [PDF Menu], and then press the {# Enter} key. - Page 348 Making Printer Settings Using the Control Panel ❒ The password can be set using Web Image Monitor, but must be sent through the network. For increased security, use this menu on the control panel to set the password directly. ❒ Default: no password set ❖...
-
Page 349: Language Menu
Making Printer Settings Using the Control Panel Language Menu You can set language displayed on the menu. Changing the language menu Follow the procedure below to change the language. Press the {Menu} key. The [Menu] screen appears. Press the {U} or {T} key to display [Language], and then press the {# En- ter} key. -
Page 350: Monitoring And Configuring The Printer
Monitoring and Configuring the Printer Using Web Image Monitor Using Web Image Monitor, you can check the printer status and change settings. ❖ Available operations The following operations can be remotely performed using Web Image Moni- tor from a client computer. •... -
Page 351: Displaying Top Page
Monitoring and Configuring the Printer Displaying Top Page This section explains the Top Page and how to display Web Image Monitor. Start your Web browser. Enter “http: //(printer's address)/” in the address bar of a Web browser. Top Page of Web Image Monitor appears. ❒... -
Page 352: About Menu And Mode
Monitoring and Configuring the Printer About Menu and Mode There are two modes available with Web Image Monitor: user mode and admin- istrator mode. Displayed Items may differ depending on the printers. ❖ About User Mode In the user mode, printer status, settings, and print job status can be viewed, but the printer settings cannot be changed. -
Page 353: Access In The Administrator Mode
Monitoring and Configuring the Printer Allows you to display list of Spooled Print Job, Job History, Error Log, Sample Print and Locked Print. This also allows you to delete Spooled Print Job, Locked Print and Sample Print Jobs. Address Book User information can be registered, displayed, changed, and deleted. - Page 354 Monitoring and Configuring the Printer Downloading Help In the [OS] list, select the operating system. In the [Language] list, select the language. Click [Download]. Download Help by following the instructions on the screen. Store the downloaded compressed file in a location, and then decom- press the file.
-
Page 355: Using Smartdevicemonitor For Admin
Monitoring and Configuring the Printer Using SmartDeviceMonitor for Admin Using SmartDeviceMonitor for Admin, you can monitor the network printers. Al- so, you can change the configuration of the network interface board using TCP/IP or IPX/SPX. ❖ Protocol stack provided with Operating System •... -
Page 356: Installing Smartdevicemonitor For Admin
Monitoring and Configuring the Printer • Lock some of the setting items on the control panel so that they cannot be changed using the control panel. • Select type of paper loaded in the paper trays. • Energy Saver function •... -
Page 357: Changing The Network Interface Board Configuration
Monitoring and Configuring the Printer ❒ If you are required to restart the computer after installing SmartDeviceMon- itor for Admin, restart the computer and continue the configuration. ❒ SmartDeviceMonitor for Admin supports the following languages: Czech, Danish, German, English, Spanish, French, Italian, Hungarian, Dutch, Nor- wegian, Polish, Portuguese, Finnish, Swedish, Chinese Simple and Chi- nese Traditional. -
Page 358: Changing The Paper Type
Monitoring and Configuring the Printer On the [Group] menu, point to [Search Device], and then click [TCP/IP], [IPX/SPX] or [TCP/IP(SNMPv3)]. A list of printers using the selected protocol appears. ❒ Select the protocol of the printer whose configuration you want to change. Select a printer. -
Page 359: Managing User Information
Monitoring and Configuring the Printer Enter the user name and password, and then click [OK]. To use the default account, enter “admin” as the user name, and leave the password blank. The [Paper] page appears. Select a paper type in the [Paper Type] list for each tray. Click [Apply]. - Page 360 Monitoring and Configuring the Printer Displaying the Number of Sheets Printed Follow the procedure below to display the number of sheets printed under each user code. Start SmartDeviceMonitor for Admin. Click the [User Page Count] tab of User Management Tool. The number of pages printed under each user code appears.
- Page 361 Monitoring and Configuring the Printer Restricting Functions Follow the procedure below to restrict use of individual functions. Start SmartDeviceMonitor for Admin. On the [Edit] menu of User Management Tool, click [Restrict Access To De- vice]. Select the check box of the functions you want to restrict. Click [OK].
-
Page 362: Configuring The Energy Saver Mode
Monitoring and Configuring the Printer Configuring the Energy Saver Mode Follow the procedure below to configure Energy Saver mode. Start SmartDeviceMonitor for Admin. On the [Group] menu, point to [Search Device], and then click [TCP/IP], [IPX/SPX] or [TCP/IP(SNMPv3)]. A list of printers using the selected protocol appears. ❒... -
Page 363: Checking The Printer Status
Monitoring and Configuring the Printer To use the default account, enter “admin” as the user name, and leave the password blank. Top Page of Web Image Monitor appears. Click [Configuration]. Click [Device Settings]. Click [Program/Change Administrator]. Click [Change]. On the [New Password], enter a password. Enter the same password in [Confirm Password] . - Page 364 Monitoring and Configuring the Printer On the [Group] menu, point to [Search Device], and then click [TCP/IP], [IPX/SPX] or [TCP/IP(SNMPv3)]. A list of printers using the selected protocol appears. ❒ Select the protocol of the printer whose configuration you want to change. Select a printer in the list.
-
Page 365: Using Smartdevicemonitor For Client
Monitoring and Configuring the Printer Using SmartDeviceMonitor for Client To view the status of printers using SmartDeviceMonitor for Client, configure SmartDeviceMonitor for Client beforehand. Monitoring Printers Follow the procedure below to monitor the printer using SmartDeviceMonitor for Client. Start SmartDeviceMonitor for Client. The SmartDeviceMonitor for Client icon appears in the task tray. -
Page 366: When Using Ipp With Smartdevicemonitor For Client
Monitoring and Configuring the Printer When Using IPP with SmartDeviceMonitor for Client When using IPP with SmartDeviceMonitor for Client, note the following: • The network printer can only receive one print job from SmartDeviceMonitor for Client at a time. While the network printer is printing, another user cannot access it until the job is finished. -
Page 367: Printer Status Notification By E-Mail
Monitoring and Configuring the Printer Printer Status Notification by E-Mail Whenever a paper tray becomes empty or paper is jammed, an e-mail alert is issued to the registered addresses to notify the printer status. For this notification, you can make the e-mail notification settings. Notification timing and e-mail content can be set. - Page 368 Monitoring and Configuring the Printer Auto E-mail Notification In the menu area, click [Auto E-mail Notification]. The dialog box for making notification settings appears. Make the following settings: • Notification Message • Items in the Groups to Notify column • Items in the Select Groups/Items to Notify column To make detailed settings for these items, click [Edit] next to [Details of E- mail Notification Settings].
-
Page 369: Remote Maintenance By Telnet
Monitoring and Configuring the Printer Remote Maintenance by telnet ❒ Remote Maintenance should be password-protected so that access is al- lowed to administrators only. ❒ The password is the same as the one of Web Image Monitor administrator. When the password is changed using “mshell”, other passwords change also. ❒... -
Page 370: Access
Monitoring and Configuring the Printer access Use the “access” command to view and configure access control. You can also specify two or more access ranges. ❖ View settings msh> access ❖ Configuration msh> access ✩ range “start-address end-address” • ✩ represents a target number between 1 and 5. (Up to five access ranges can be registered and selected.) Example: to specify accessible IP addresses between 192.168.0.10 and 192.168.0.20:... -
Page 371: Autonet
Monitoring and Configuring the Printer • Timeout value becomes ineffective. autonet Use the “autonet” command to configure AutoNet parameters. ❖ View settings The following command displays the current AutoNet settings: msh> autonet ❖ Configuration You can configure AutoNet settings. msh> autonet {on|off} •... -
Page 372: Devicename
Monitoring and Configuring the Printer ❖ Mode settings You can set the Bluetooth operation mode to {private} or {public}. msh> btconfig {private | public} • The default is {public}. devicename Use the “devicename” command to display and change the printer name. ❖... -
Page 373: Diprint
Monitoring and Configuring the Printer Interface name Interface configured wlan IEEE 802.11b interface ❖ Current interface priority configuration display msh> dhcp priority ❖ Interface priority configuration msh> dhcp priority “interface_name” • You can select which interface has DHCP parameter priority. •... -
Page 374: Dns
Monitoring and Configuring the Printer • The “Port” specifies the port number of the direct printing port. • The “bidirect” setting indicates whether the direct printing port is bidirec- tional or not. ❖ Setting timeout msh> diprint timeout [30~65535] • You can specify the timeout interval to use when the printer is expecting data from the network. -
Page 375: Domainname
Monitoring and Configuring the Printer Interface name Interface configured wlan IEEE 802.11b interface ❖ Specifying the record overlap operation msh> dns overlap {update|add} • You can specify operations performed when records overlap. • update To delete old records and register new records. •... -
Page 376: Help
Monitoring and Configuring the Printer You can configure the Ethernet interface, IEEE 1394 interface, or IEEE 802.11b interface. ❖ View settings The following command displays the current domain name: msh> domainname ❖ Interface domain configuration msh> domainname “interface_name” ❖ Setting the Domain Name msh>... -
Page 377: Ifconfig
Monitoring and Configuring the Printer ❖ Configuration msh> hostname “interface_name” “printer_name” • Enter the printer name using up to 63 alphanumeric characters. • You cannot use a printer name starting with “RNP” or “rnp”. • The Ethernet interface and IEEE 802.11b interface will have the same printer name. -
Page 378: Info
Monitoring and Configuring the Printer ❖ Changing the Interface msh> ifconfig “interface” up • You can specify either the Ethernet interface or IEEE 802.11b interface when using the optional IEEE 802.11b interface unit. You cannot specify the IEEE 1394 interface. The following explains how to configure an IP address 192.168.15.16 on Ethernet interface. -
Page 379: Netware
Monitoring and Configuring the Printer timeout=900(sec) auth basic • The “timeout” setting specifies how many seconds the computer tries to send print jobs when no connection can be made to the network printer. • The “auth” setting indicates the user authorization mode. ❖... -
Page 380: Passwd
Monitoring and Configuring the Printer ❖ Encap type msh> netware encap [802.3/802.2/snap/ethernet2/auto] ❖ Remote Printer Number msh> netware rnum ❖ Timeout msh> netware timeout ❖ Printer server mode msh> netware mode pserver msh> netware mode ps ❖ Remote printer mode msh>... -
Page 381: Prnlog
Monitoring and Configuring the Printer ❒ The password can be entered using up to 32 alphanumeric characters. Pass- words are case-sensitive. For example, “R” is not the same as “r”. prnlog Use the “prnlog” command to obtain printer log information. ❖... - Page 382 Monitoring and Configuring the Printer ❖ Setting order of priority for each protocol • diprint msh> rendezvous diprint [0-99] • lpr msh> rendezvous lpr [0-99] • ipp msh> rendezvous ipp [0-99] You can specify the order of priority for “diprint”, “lpr”, and “ipp”. Smaller num- bers indicate higher priority.
-
Page 383: Route
Monitoring and Configuring the Printer route Use the “route” command to control the routing table. ❖ All route information display msh> route ❖ Specified route information display msh> route “destination” • Specify the IP address to destination. ❖ Enabling/disabling Specified Destination msh>... -
Page 384: Set
Monitoring and Configuring the Printer Use the “set” command to set the protocol information display “active” or “inac- tive”. ❖ View settings The following command displays protocol information (active/inactive). msh> set tcpip msh> set appletalk msh> set netware msh> set smb msh>... -
Page 385: Show
Monitoring and Configuring the Printer • Disabling TCP/IP also disables ip1394, lpr, ftp, rsh, diprint, web, snmp, ssl, ipp, http, and rendezvous msh> set appletalk {up | down} msh> set netware {up | down} msh> set smb {up | down} msh>... -
Page 386: Slp
Monitoring and Configuring the Printer Use “slp” command to configure SLP settings. msh> slp ttl “ttl_val” • You can search the NetWare server using SLP in the PureIP environment of NetWare 5/5.1 and Netware 6/6.5. Using the “slp” command, you can config- ure the value of TTL which can be used by SLP multicast packet. -
Page 387: Snmp
Monitoring and Configuring the Printer ❖ Protocol settings msh> smb protocol [netbeui {up | down} | tcpip {up | down}] • Enable or disable NetBEUI and TCP/IP. Specify “up” to enable, and “down” to disable. snmp Use the “snmp” command to display and edit SNMP configuration settings such as the community name. - Page 388 Monitoring and Configuring the Printer Access type Type of access permission read read only write read and write trap user is notified of trap messages ❖ Protocol configuration msh> snmp {ip | ipx} {on | off} • Use the following command to set protocols “active” or “inactive”: If you set a protocol “inactive”, all access settings for that protocol are disabled.
- Page 389 Monitoring and Configuring the Printer ❖ Deleting sysContact msh> snmp clear contact ❖ SNMP v1v2 function configuration msh> snmp v1v2 {on | off} • Specify “on” to enable, and “off” to disable. ❖ SNMP v3 function configuration msh> snmp v3 {on | off} •...
-
Page 390: Sntp
Monitoring and Configuring the Printer • If you select “auto”, the print job will be encrypted when encryption is pos- sible. • If you select “on”, Clear Text communication is not possible, and encryption password must be set before encryption communication can be used. ❒... -
Page 391: Sprint
Monitoring and Configuring the Printer msh> spoolsw ❖ Job Spool setting msh> spoolsw spool {on | off} ❒ Specify “on” to enable Job Spool, or “off” to disable it. ❖ Resetting Job spool setting msh> spoolsw clear job {on | off} •... -
Page 392: Syslog
Monitoring and Configuring the Printer syslog Use the “syslog” command to display the information stored in the printer's sys- tem log. ❖ View message msh> syslog ❒ For details about the information displayed, see p.227 “System Log Informa- tion”. upnp Use the “upnp”... -
Page 393: Wiconfig
Monitoring and Configuring the Printer msh> web name “Name you want to display” ❖ Deleting URL names registered as link destinations msh> web x clear name Specify “1” or “2” for x as the number corresponding to the link name. ❖... - Page 394 Monitoring and Configuring the Printer Parameter Value configured channel frequency channel no. You can enable or disable the WEP function. To enable the WEP function, specify [on]; to disable it, specify [off]. To start the WEP function, enter the correct WEP key.
-
Page 395: Wins
Monitoring and Configuring the Printer Parameter Value configured auth [open|shared] You can set an authorization mode when us- ing WEP. The specified value and authorized mode are as follows: open: open system authorized (default) shared: shared key authorized rate rate [auto|11m|5.5m|2m|1m] You can set the IEEE 802.11b transmitting speed. - Page 396 Monitoring and Configuring the Printer • Use the “primary” command to configure a primary WINS server IP ad- dress. • Use the “secondary” command to configure a secondary WINS server IP address. • Do not use “255.255.255.255” as the IP address. ❖...
-
Page 397: Snmp
Monitoring and Configuring the Printer SNMP The SNMP agent operating on UDP and IPX is incorporated into the built-in Ethernet board and optional IEEE 802.11b interface unit of this printer. Also, the SNMP agent operating on UDP is incorporated in the optional IEEE 1394 inter- face board. -
Page 398: Getting Printer Information Over The Network
Monitoring and Configuring the Printer Getting Printer Information over the Network This section explains details of each item displayed in the printer status and in- formation. Current Printer Status The printer status can be checked using the following commands: • UNIX: Use the “lpq” command and “rsh”, “rcp”, and “ftp” parameters. •... - Page 399 Monitoring and Configuring the Printer Messages Description Empty: Black Toner The black toner cartridge is almost empty. Empty: Cyan Toner The cyan toner cartridge is almost empty. Empty: Magenta Toner The magenta toner cartridge is almost empty. Empty: Yellow Toner The yellow toner cartridge is almost empty.
- Page 400 Monitoring and Configuring the Printer Messages Description Full: Hole Punch Receptacle Punch Chip receptacle for hole punch is full. Full: Standard Tray The output paper tray is full. Full: Waste Toner Waste toner is full. Full: Waste Toner Bottle Waste toner bottle is full. Hex Dump Mode It is a hex dump mode.
- Page 401 Monitoring and Configuring the Printer Messages Description Malfunction: Staple Unit There is a problem with the staple unit. Malfunction: Tray 1 There is a problem with tray 1. Malfunction: Tray 2 There is a problem with tray 2. Malfunction: Tray 3 There is a problem with tray 3.
- Page 402 Monitoring and Configuring the Printer Messages Description No Paper: Tray 3 There is no paper in tray 3. No Paper: Tray 4 There is no paper in tray 4. Not Detected: B2 Lever B2 lever is not correctly set. Not Detected: Black Toner Black toner is not correctly set.
- Page 403 Monitoring and Configuring the Printer Messages Description Not Detected: Yellow Toner Yellow toner is not correctly set. Not Detected: Z-fold’g Internal The Z fold unit is not correctly set. Not Reached, Data Deleted Unreached job is deleted. Not Reached, Data Removed Unreached job is deleted.
-
Page 404: Printer Configuration
Monitoring and Configuring the Printer Messages Description Replace Develop. Unit (Color) It is time to replace the development unit (col- or). Replace Develop. Unit (Cyan) It is time to replace the development unit (cy- an). Replace Develop. Unit (Magenta) It is time to replace the development unit (ma- genta). - Page 405 Monitoring and Configuring the Printer This section explains the checking procedure for input/output tray and printer language. • UNIX: Use the “info” command and “rsh”, “rcp”, and “ftp” parameters. • mshell: Use the “info” command. ❖ Input Tray Item Description ID number of the paper tray Name Name of the paper tray...
-
Page 406: Understanding The Displayed Information
Monitoring and Configuring the Printer Understanding the Displayed Information This section explains how to read status information returned by the network in- terface board. Print Job Information Use the following command to display print job information: • UNIX: Use the “info” command and “rsh“, “rcp”, and “ftp” parameters. •... -
Page 407: Configuring The Network Interface Board
Monitoring and Configuring the Printer Item Description Result Print Request Result Communication Result • Print was completed normally. However, the print result may not be as required due to printer problems. • Printing was not completed normally. • Canceled An “rcp”, “rsh”, or “lpr” command print request was canceled, possibly due to the printing application. - Page 408 Monitoring and Configuring the Printer Item Description Device name Printer name Comment Comment location Location of the printer in the SNMP and Rendezvous in- formation Contact Administrator information for the printer and contact in- formation in the SNMP information Soft switch appletalk mode AppleTalk protocol in selection...
- Page 409 Monitoring and Configuring the Printer Item Description broadcast Broadcast address DNS Domain DNS domain type gateway Default gateway address Access Range[✩] Access control range Time server NTP server address Time Zone NTP server time difference Time server polling time NTP server interval SYSLOG server Home page URL URL of homepage.
- Page 410 Monitoring and Configuring the Printer Item Description protocol IEEE 802.11b Device name Printer name dhcp DHCP (on/off) Address IP address netmask Subnet mask broadcast Broadcast address DNS Domain DNS domaintype ssid SSID used Channel range Channels available for use Channel Channel used Communication mode IEEE 802.11b interface transmitting mode...
- Page 411 Monitoring and Configuring the Printer Item Description wlan Domain name on a wireless LAN connection ip1394 rendezvous Computer Name Computer name Rendezvous Name (ether) Rendezvous name on an Ethernet connection Rendezvous Name (wlan) Rendezvous name on a wireless LAN connection Rendezvous Name (ip1394) Rendezvous name on an IP over 1394 connection location...
- Page 412 Monitoring and Configuring the Printer Item Description v1Trap v2Trap v3Trap SNMPv1v2Remoto Setting SNMPv3 Privacy Shell mode Mode of the remote maintenance tool...
-
Page 413: Message List
Monitoring and Configuring the Printer Message List This is a list of messages that appear in the printer's system log. The system log can be viewed using the “syslog” command. System Log Information Use the following command to display the system log information: •... - Page 414 Monitoring and Configuring the Printer Message Problem and solutions Change IP address from DHCP Server. The IP address changes when DHCP lease is renewed. To always assign the same IP ad- dress, set a static IP address to the DHCP server.
- Page 415 Monitoring and Configuring the Printer Message Problem and solutions inetd start. The inetd service has started. IPP cancel-job: permission denied. The printer could not authenticate the name of the user attempting to cancel a job. ipp disable. Printing with ipp is disabled. ipp enable.
- Page 416 Monitoring and Configuring the Printer Message Problem and solutions Printer <printer name> has no queue (In the print server mode) The print queue is not assigned to the printer. Using NWadmin, assign the print queue to the printer, and then restart it.
- Page 417 Monitoring and Configuring the Printer Message Problem and solutions SMTPC: refused connect by smtp server. Connection to the SMTP server is denied. This could be because: • A server other than the SMTP server has been specified. • The specified SMTP server port number is incorrect.
- Page 418 Monitoring and Configuring the Printer Message Problem and solutions SNMPD: account is unavailable: User account is disabled. This could be be- cause the authentication password is not set, The authentication password is not set up. and only the encryption account is set. SNMPD: account is unavailable: Encryption is not possible and account is dis- abled.
-
Page 419: Using A Printer Server
Using a Printer Server Preparing Printer Server This section explains how to configure the printer as a Windows network printer. The printer is configured to enabling network clients to use it. When the network printer is connected via SmartDeviceMonitor for Client, you can set the printing notification function to notify clients of the results of their print jobs. - Page 420 Using a Printer Server The print server setting dialog box appears. Select the [Notify Client of Printing] check box, and click [OK]. After print server setting is made, a dialog box appears. Confirm the dialog box content, and click [OK]. Click [Cancel] to interrupt the procedure.
-
Page 421: Using Netware
Using a Printer Server Using NetWare This section describes the setting procedure for network printers in the NetWare environment. In the NetWare environment, you can connect the printer as a “print server” or “remote printer”. ❖ Setting procedure • When using the printer as a print server Installing SmartDeviceMonitor for Admin Setting the network interface board. -
Page 422: Setting Up As A Print Server (Netware 3.X)
Using a Printer Server ❖ Printers listed by SmartDeviceMonitor for Admin SmartDeviceMonitor for Admin lists printers connected to the network. If you cannot identify the printer you want to configure, print configuration page, and then check the printer name. Setting Up as a Print Server (NetWare 3.x) Follow the procedure below to connect the printer as a print server using Net- Ware 3.x. -
Page 423: Setting Up As A Print Server (Netware 4.X, 5/5.1, 6/6.5)
Using a Printer Server ❒ If the printer works as configured, the name of the print server appears as a connected user. ❒ If you cannot identify the printer you want to configure, check the printer name with the configuration page printed from the printer. For details about printing a configuration page, see p.131 “Printing a Configuration Page”. -
Page 424: Using Pure Ip In The Netware 5/5.1 Or 6/6.5 Environment
Using a Printer Server For a context, object names are entered from the lowest object with each ob- ject separated by a period. For example, if you want to create a print server in NET under DS, enter “NET.DS”. Enter the print server name in the [Print Server Name] box, the printer name in the [Printer Name] box, the print queue name in the [Print Queue Name] box, and the print queue volume in the [Print Queue Volume] box, and then click [Next]. - Page 425 Using a Printer Server ❒ When creating a queued print server in a pure IP environment of NetWare 5/5.1 or NetWare 6.0, create a print queue on the file server using NetWare Administrator. ❒ This printer is not available as a remote printer for use in a pure IP environ- ment.
- Page 426 Using a Printer Server In the [Print Server Operation Mode] area, click [As Print Server]. Click [OK] to close the [NIB Setup Tool] dialog box. Setting up using NWadmin From Windows, start NWadmin. For details about NWadmin, see the NetWare manuals. Select the object in which the print queue is located in the directory tree, and then click [Create] on the [Object] menu.
-
Page 427: Setting Up As A Remote Printer (Netware 3.X)
Using a Printer Server In the [Print Server Name] box, enter the print server name. Use the same print server name specified using NIB Setup Tool. Select the [Define additional properties] check box, and then click [Create]. Click [Assignments], and then click [Add] in the [Assignments] area. In the [Available objects] box, click the queue you created, and then click [OK]. - Page 428 Using a Printer Server Use the same printer number created in the print server. A confirmation message appears. Click [OK]. On the [NIB] menu, click [Exit]. Setting up using PCONSOLE Enter “PCONSOLE” from the command prompt. F:> PCONSOLE Create a print queue. When using the existing print queue, go to the procedure for creating a printer.
-
Page 429: Setting Up As A Remote Printer (Netware 4.X, 5/5.1, 6/6.5)
Using a Printer Server Press the {ESC} key to return to [Print Server Configuration Menu]. Assign print queues to the created printer. From [Print Server Configuration Menu], select [Queues Serviced By Printer]. Select the printer created. Press the {INSERT} key to select a queue serviced by the printer. You can select several queues. - Page 430 Using a Printer Server Select a printer you want to configure. Click [NetWare]. In the [Logon Mode] area, click [File Server Mode] or [NDS mode]. If [File Server Mode] is selected, the network connection is established based on the string you entered. If [NDS mode] is selected, the network connection is established based on the string you entered.
- Page 431 Using a Printer Server Set up the network connection to a print queue. Select the object in which the print queue is located in the directory tree, and then click [Cre- ate] on the [Object] menu. In the [Class of new object] box, click [Print Queue], and then click [OK]. In the [Print Queue Name] box, enter the name of the print queue.
- Page 432 Using a Printer Server In the [Available objects] box, click the queue you created, and then click [OK]. In the [Printers] area, click the printer you assigned, and then click [Printer Number] Enter the printer number, and then click [OK]. Check the settings, and then click [OK].
-
Page 433: Special Operations Under Windows
Special Operations under Windows Printing Files Directly from Windows You can print files directly using Windows commands. For example, you can print PostScript files for PostScript 3. ❖ Windows 95/98/Me You can print files directly using “ftp” command. ❖ Windows 2000/XP, Windows Server 2003, Windows NT 4.0 You can print files directly using “lpr”, “rcp”... - Page 434 Special Operations under Windows When setting the IP address of a printer using DHCP Use the printer name on the configuration page as the host name. For details about printing a configuration page, see p.131 “Printing a Config- uration Page”. In other cases Add the IP address and host name of the network printer to the hosts file on the computer used for printing.
-
Page 435: Printing Commands
Special Operations under Windows Save the file. Printing Commands The following explains printing operations using the “lpr”, “rcp”, and “ftp” com- mands. Enter commands using the command prompt window. The location of the com- mand prompts varies depending on operating systems: •... - Page 436 Special Operations under Windows ❖ When using a host name instead of an IP address c:> lpr -Sprinter's host name [-Poption] [-ol] \pass name\file name When printing a binary file, add the “-ol” option (lowercase O, and lowercase When using a printer with the host name “host” to print a PostScript file named “file 1”...
- Page 437 Special Operations under Windows User: Password: When printing a binary file, set the file mode to binary. ftp> bin When printing a binary file in ASCII mode, print may not come out correctly. Specify files to be printed. The following shows the examples of printing a PostScript file named “file 1” in the “C:\PRINT”...
-
Page 438: Mac Os Configuration
Mac OS Configuration Mac OS This section explains how to configure a Mac OS to use EtherTalk and USB. The following explains how to configure Mac OS 9.1. If you are not using Mac OS 9.1, see the manual of the Mac OS you are using for details ❒... -
Page 439: Setting Up Ppd Files
Mac OS Configuration Open the [DISK1] folder. Drag the PPD file and the plugin file into [Printer Descriptions] in [Extensions] under [System Folder]. Restart the Mac OS. Setting Up PPD Files ❒ Make sure that the printers are connected to an AppleTalk network before performing the following procedure. -
Page 440: Setting Up Options
Mac OS Configuration The printer icon appears on the desktop. Quit Desktop Printer Utility. Setting Up Options On the [Apple] menu, click [Chooser]. Click the Adobe PS icon. In the [Select the PostScript Printer:] list, click the name of the printer you want to use, and then click [Setup]. -
Page 441: Installing Adobe Type Manager
Mac OS Configuration Insert the CD-ROM into the CD-ROM drive. The CD-ROM drive icon appears. Double-click the CD-ROM drive icon. The contents of the CD-ROM appear. Double-click the [Mac OS 8 and 9] folder. Double-click the [ColorSync Profiles] folder. Drag the file to the [ColorSync Profiles] folder on the hard disk. -
Page 442: Installing Screen Fonts
Mac OS Configuration ❒ For details about installation, see the operating instructions in the ATM folder. Installing Screen fonts Follow the procedure below to install screen fonts. The screen fonts described below can be found in the [Fonts] folder on the CD- ROM. -
Page 443: Changing To Ethertalk
Mac OS Configuration Select the PPD files of the connected printer, and then click [Select]. Click [Change] in [USB Printer Selection]. Select the model you are using in [Select a USB Printer:], and then click [OK]. Click [Create]. The following message appears. Specify the file location and the name, and then click [Save]. - Page 444 Mac OS Configuration For information about installing applications required for EtherTalk, see the Mac OS manuals.
-
Page 445: Mac Os X
Mac OS Configuration Mac OS X This section explains how to configure a Mac OS X to use EtherTalk and USB. Follow the procedure below to configure Mac OS X 10.1. If you are not using Mac OS X 10.1, see the manual of the Mac OS X you are using for details. ❒... -
Page 446: Setting Up Options
Mac OS Configuration Setting Up Options ❒ No printer option settings can be made under Mac OS X. No new settings for options not installed can be made. Using USB Interface Follow the procedure below to setup USB connection. Start Print Center. Click [Add]. -
Page 447: Changing To Ethertalk
Mac OS Configuration A list of printer types appears. Select the name of the connected printer from the list of printer models, and then click [Add]. Close the [Printer List] dialog box, and then quit Print Center. ❒ When printing with a Rendezvous connection to a Macintosh computer, printer language does not change automatically. -
Page 448: Configuring The Printer
Mac OS Configuration Configuring the Printer Use the control panel to enable AppleTalk. (The default is active.) -
Page 449: Using Postscript 3
Mac OS Configuration Using PostScript 3 Job Type You can select the type of print job. ❒ If you use Mac OS X, this function is not available. ❖ Normal Select this for normal printing. The print job starts immediately after the print command is given. - Page 450 Mac OS Configuration The print dialog box appears. On the pop-up menu, click [Job Log]. In [Job Type:], click [Sample Print], and then select the appropriate setting. In [User ID:], enter the user ID using up to eight alphanumeric (a-z, A-Z, 0- 9) characters.
-
Page 451: Duplex Printing
Mac OS Configuration ❒ Print jobs are not saved on the hard disk in the following cases. You can check the error log for jobs not saved. • When there are 30 Sample Print and Locked Print jobs saved on the hard disk. -
Page 452: Color Mode
Mac OS Configuration ❒ Availability of these items varies depending on the operating system you are using. Click the button that means [Flip on Long Edge] or [Flip on Short Edge]. Color Mode Use this function to select whether the document is printed in color or black and white. -
Page 453: Color Setting
Mac OS Configuration ❖ Presentation Use this setting to enhance reproduction of documents containing text and graphics. This CRD is best for printing colored charts, graphs, presentation materials and so on. If you use this CRD for printing photographs, color and gradation might not reproduce so well. -
Page 454: Cmyk Simulation Profile
Mac OS Configuration ❒ Use this function to select a color rendering dictionary (CRD). The CRD is re- ferred to color matching, so you should select the appropriate CRD for the document you are printing. The selected CRD is also referred to when [Fine] or [Super Fine] is selected for “Color Setting”. -
Page 455: Printer Utility For Mac
Mac OS Configuration Printer Utility for Mac By using Printer Utility for Mac, you can download fonts, change the name of the printer and so on. ❒ If a Macintosh and printer are connected by USB, you cannot use Printer Util- ity for Mac. -
Page 456: Starting Printer Utility For Mac
Mac OS Configuration Starting Printer Utility for Mac Mac OS ❒ Before starting Printer Utility for Mac, make sure the printer is selected in [Chooser] on the Apple menu. Double-click the Printer Utility for Mac icon. The [Printer Utility for Mac] dialog box appears. Click [OK]. - Page 457 Mac OS Configuration ❒ Confirm that a Macintosh and the printer are connected with Appletalk. Select [Download PS Fonts...] on the [File] menu. Click [Add to list]. The dialog box to select fonts appears. Select the desired font files, and then click [Open]. The list of selectable font names appears.
- Page 458 Mac OS Configuration Select [Printer's memory] or [Printer's disk]. Select the fonts you want to delete. Click [Delete]. A confirmation message appears. Confirm the fonts you want to delete and the printer name from which you want to delete the fonts. Click [Continue], and then click [OK].
- Page 459 Mac OS Configuration Click [Print]. ❒ The paper selected under [Page Setup] is used. Printing Font Sample You can print samples of fonts downloaded to the hard disk drive or memory. Select [Print Fonts Sample...] on the [File] menu. Click [Print]. ❒...
- Page 460 Mac OS Configuration Mac OS X On the [File] menu, click [Rename Printer...]. In the [New Name:] filed enter a new name. Click [Rename]. The printer name is changed. Click [OK]. On the [Printer Utility for Mac] menu, click [Choose Printer...]. In the [Available Network Zones:] list, select the zone for the Macintosh in use.
- Page 461 Mac OS Configuration ❒ Confirm that a Macintosh and printer are connected with Appletalk. Mac OS On the [Utility] menu, click [Select Zone...]. The zone to which the printer belongs and the available zone list appear. Select the zone in which you want to locate the printer, and then click [Change].
- Page 462 Mac OS Configuration Displaying the Printer Status You can display and confirm the current status of the printer. Select [Display Printer Status...] on the [Utility] menu. The current status of the printer appears. Confirm the current status of the printer. You can confirm the memory capacity, the VM (Virtual Memory) space, the hard disk drive status and available space on the hard disk drive.
-
Page 463: Appendix
Appendix Software and Utilities Included on the CD- The following softwares and utilities are included in the CD-ROMs that come with the printer. ❖ Font Manager 2000 For installing new screen fonts, or organizing and managing fonts already in the system. For details about Font Manager 2000, see the manual on the CD- ROM labeled “Printer Drivers and Utilities”. -
Page 464: Smartdevicemonitor For Admin
Appendix ❖ PCL 6/5e printer driver This printer driver allows the computer to communicate with the printer via a printer language. The following operating system is supported. • Windows 95/98/Me, Windows 2000/XP, Windows Server 2003, and Win- dows NT 4.0 ❒... -
Page 465: Smartdevicemonitor For Client
Appendix ❖ File path SmartDeviceMonitor for Admin is stored in the following folder on the CD- ROM. NETWORK\NETMON\admin\DISK1 Operating system Protocol stack Windows 95/98/Me TCP/IP provided with Windows 95/98/Me IPX/SPX provided with Windows 95/98/Me NetWare Client provided with Windows 95/98 Novell Client provided with Windows 95/98 Windows 2000 TCP/IP provided with Windows 2000... - Page 466 Appendix • Printing in a peer-to-peer network, using TCP/IP, NetBEUI, and IPP from Win- dows 95/98/Me/2000/XP, Windows Server 2003, and Windows NT 4.0. • Constantly monitoring the status of devices on the network using TCP/IP and IPX/SPX. ❖ File path SmartDeviceMonitor for Client is stored in the following folder on the CD- ROM.
- Page 467 Appendix • Prints on a substitute printer when there are too many jobs waiting on the specified printer, or when an error disables printing (Recovery Print- ing). • Allocates multiple print jobs to multiple printers (Parallel Printing). • Executes prior group registration of printers specified for Recovery Printing or Parallel Printing.
-
Page 468: Cautions To Take When Using In A Network
Appendix Cautions to Take When Using in a network Connecting a Dial-up Router to a Network When the NetWare file server and printer are on opposite sides of a router, pack- ets are sent back and forth, causing communication charges to be incurred. Be- cause packet transmission is a specification of NetWare, you need to change the configuration of the router. - Page 469 Appendix ❖ When static IP addresses are set for each interface • IP address: When set at the same value, the Ethernet interface is pre- ferred. • Subnet mask: When a value overlaps, the Ethernet interface is preferred. • Gateway address: The value set is used. For the gateway address, set the gateway address located in the subnetwork set by the interface.
-
Page 470: Configuring The Wins Server
Appendix ❒ The IP address acquired from DHCP can be checked on the configuration page. For information about printing a configuration page, see p.131 “Printing a Configuration Page”. ❒ When using WINS server, set the WINS server as shown on p.284 “Configur- ing the WINS Server”. - Page 471 Appendix ❒ The WINS server is supported with Windows NT 4.0 Server Service Pack 4 or higher, and Windows 2000 Servers WINS Manager. ❒ For details about the WINS server settings, see Windows Help. ❒ If there is no reply from the WINS server, the NetBIOS name is registered by broadcast.
-
Page 472: Using The Dynamic Dns Function
Appendix Using the Dynamic DNS Function Dynamic DNS is a function which dynamically updates (registers and deletes) records (A record and PTR record) managed by the DNS server. When a DNS server is part of the network environment to which this printer, a DNS client, is connected, records can be dynamically updated using this function. - Page 473 Appendix • IEEE 1394 RNPXXXXXXXXXX (XXXXXXXXXX represents the lower 3-7 bytes of the MAC Address in hexadecimal) ❒ Dynamic update using message authentication (TSIG, SIG(0)) is not support- DNS servers targeted for operation ❖ For static IP setting • Microsoft DNS servers with standard Windows 2000 Server/Windows Server 2003 features •...
-
Page 474: Configuring Ssl Encryption
Appendix Configuring SSL Encryption This section describes how to configure SSL (secure sockets layer) encryption. Using SSL encryption, you can issue a server certificate to authorize use of the printer. This can be specified only when the optional network date protection unit is in- stalled. - Page 475 Appendix Log on to the printer. The network administrator can log on. Enter the login user name and login password. Click [Configuration], then click [Security], and then click [Certificates]. Click [Create]. Make the necessary settings. For details about the displayed items and selectable items, see Web Image Monitor Help.
- Page 476 Appendix Make the necessary settings. For details about the displayed items and selectable items, see Web Image Monitor Help. Click [OK]. [Requesting] appears for [Certificate Status] in the [Certificates] area. Quoting the character string displayed in [Certificate Request Contents:], apply to the certificate authority for a certificate.
-
Page 477: User Settings For Ssl (Secure Sockets Layer)
Appendix For details about the displayed items and selectable items, see Web Image Monitor Help. Click [OK]. [Installed] appears under [Certificate Status] to show that a server certificate for the printer has been installed. Log off from the printer. Enabling SSL After installing the server certificate in the printer, enable the SSL setting. - Page 478 Appendix When the [Security Alert] dialog box appears, click [View Certificate]. The [Certificate] dialog box appears. To be able to respond to inquiries from users about such problems as expiry of the certificate, check the contents of the certificate. On the [General] tab, click [Install Certificate...]. Certificate Import Wizard starts.
-
Page 479: Installing Font Manager 2000
Appendix Installing Font Manager 2000 ❒ Under Windows 2000/XP, Windows Server 2003, or Windows NT 4.0, install- ing applications by Auto Run requires administrator permission. To install a printer driver by Auto Run, log on using an account that has administrator per- mission. -
Page 480: Using Adobe Pagemaker Version 6.0, 6.5, Or 7.0
Appendix Using Adobe PageMaker Version 6.0, 6.5, or 7.0 Under Windows 95/98/Me/2000/XP, Windows Server 2003, or Windows NT 4.0 with Adobe PageMaker, you need to copy PPD files to the PageMaker folder. PPD files have the .ppd extension in the folder “DRIVERS\PS\WIN9X_ME \(Lan- guage)\DISK1\”... -
Page 481: When Using Windows Terminal Service/Metaframe
Appendix When Using Windows Terminal Service/MetaFrame The following explains how to use Windows Terminal Service and Maintenance. Operating Environment The following operating systems and MetaFrame versions are supported. ❖ Windows NT Server 4.0 Terminal Server Edition • MetaFrame 1.8 SP3/FR1 SP3/SP4 •... - Page 482 Appendix Use [Add/Remove Programs] in [Control Panel] to install SmartDeviceMonitor for Client. Enter the following command in the MS-DOS command prompt: CHANGE USER /INSTALL To quit the install mode, enter the following command in the MS-DOS com- mand prompt: CHANGE USER /EXECUTE For more information, see Windows Help.
-
Page 483: Cautions When Using Bluetooth Interface Unit
Appendix Cautions When Using Bluetooth Interface Unit The optional Bluetooth interface unit operation mode is set to [Public] as default. If the setting is changed to [Private], only registered computers can use this print- er via the Bluetooth interface unit. Check the operation mode settings using Web Image Monitor or telnet. -
Page 484: Information About Installed Applications
Appendix Information about Installed Applications expat Use of the software installed on this product, including the controller (hereinafter “software”) and the expat Version 1.95.2 application software (hereinafter “expat 1.95.2”), is subject to the following conditions: The product manufacturer provides warranty and support to the software of the product including expat 1.95.2 and the product manufacturer allows the initial de- veloper of expat 1.95.2 to be free from these obligations. - Page 485 Appendix This product contains NetBSD operating system: For the most part, the software constituting the NetBSD operating system is not in the public domain; its authors retain their copyright. The following text shows the copyright notice used for many of the NetBSD source code.
-
Page 486: Samba(Ver 2.2.2-1.1)
Appendix • This product includes software developed by Jonathan R. Stone for the Net- BSD Project. • This product includes software developed by the NetBSD Foundation, Inc. and its contributors. • This product includes software developed by Manuel Bouyer. • This product includes software developed by Charles Hannum. •... -
Page 487: Rsa Bsafe
Appendix This program is free software; you can redistribute it and/or modify it under the terms of the GNU General Public License as published by the Free Software Foundation; either version 2 of the License, or (at your option) any later version. This program is distributed in the hope that it will be useful, but WITHOUT ANY WARRANTY;...
Need help?
Do you have a question about the Aficio AP610N and is the answer not in the manual?
Questions and answers