Table of Contents
Advertisement
Quick Links
Advertisement
Table of Contents

Subscribe to Our Youtube Channel
Related Manuals for Vello Freewave Aviator


Summary of Contents for Vello Freewave Aviator
- Page 1 FREEWAVE AVIATOR TTL FLASH REMOTE SYSTEM USER MANUAL...
- Page 2 TTL capability. effects. You can instantly raise and lower functions in all lighting conditions including The FreeWave Aviator System is an ideal power levels on select lights, or use the bright daylight or direct sunshine. tool for photographers on every level.
-
Page 3: Table Of Contents
TABLE OF CONTENTS Contents ............. 4 Using Studio Flashes with a Receiver or Changing a Flash Group's Power Mode ..24 Transceiver ............14 Key Features ............5 Using High Speed Sync/Second Curtain Sync About TTL ............15 Modes ..............25 Precautions ............ -
Page 4: Contents
CONTENTS Transceiver Kit Transceiver Receiver • Transceiver • Receiver • Lanyard • Lanyard • 3.5 mm to 3.5 mm cable • 3.5 mm to 3.5 mm cable • 3.5 mm to 1/4˝ mono-plug cable • 3.5 mm to 1/4˝ Mono-plug cable Receiver Kit •... -
Page 5: Key Features
KEY FEATURES Wireless TTL (Through-the-Lens): TTL or Manual Mode: remotely Additional Lighting Options: makes full use of your flashes’ sets your flash to TTL or Manual can trigger Studio Lights together built-in TTL technology mode and can adjust power levels with your hot-shoe flashes 16 Channels (2.4 GHz Radio): TTL Exposure Compensation: enables... -
Page 6: Precautions
PRECAUTIONS • Please read full manual before using • Do not use in the presence of flammable • Do not expose to high temperature. device. gases. Failure to observe this precaution Do not leave product in a closed vehicle could result in fire or explosion. in the sun or other area subject to •... - Page 7 • Read and follow all warnings and • Batteries may leak when fully discharged. instructions provided by the battery To avoid damage to the product, be sure manufacturer. to remove the batteries if the product will not be used for an extended period •...
-
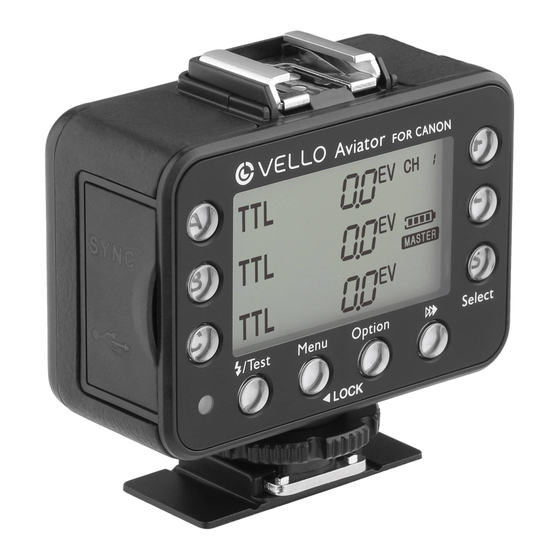
Page 8: Overview
OVERVIEW Transceiver Front Right 1. LCD Display Screen 2. Group Settings Buttons (A,B, and C) 3. LED Indicator 4. Test Button 5. Menu Button 6. Option Button 7. Flash Sync Mode Button Back Left 8. Select Button 9. + and − Buttons 10. - Page 9 Receiver Left 1. LED Indicator 2. Test Button 3. TTL-Dedicated Hot Shoe 4. Battery Compartment 5. 1/4˝-20 Lightstand Socket 6. Channel Switch 7. Power Switch Bottom Right 8. Threaded PC Sync Output Port 9. Group Switch 10. USB Port 11. 3.5 mm Sync Output Port 12.
-
Page 10: Before You Begin
BEFORE YOU BEGIN COMPATIBLE DEVICES Installing the Batteries The Aviator Transceiver and Receiver units The Vello FreeWave Aviator is available each require two AA batteries to operate. in models for both Nikon i-TTL and Canon E-TTL cameras. The Nikon and... -
Page 11: Mounting/Turning On The Transceiver
MOUNTING/TURNING ON THE TRANSCEIVER 1. With your camera and Transceiver Off, Note: make sure that your Master loosen the Transceiver’s locking ring. Transceiver and all Receiver units and Slaves are set to the same Channel before use. 2. Insert the Transceiver’s hot shoe on your camera's hot-shoe mount with the LCD panel facing the rear of the camera. -
Page 12: Mounting The Receiver
3. Slide the Channel Switch to 1, 2, 3, or Auto. (“Auto” is equal to the Transceiver's Channel “4”.) Note: make sure that all your FreeWave Aviator units are set to the same channel before use. -
Page 13: Mounting A Hot-Shoe Flash To A Receiver/Transceiver
6. Your flash must be in TTL mode in order 2. Switch the flash’s locking switch to the to function properly in all modes with unlocked position. the FreeWave Aviator. (See your flash’s manual for assistance.) 3. Insert the flash’s hot-shoe foot into the Receiver or Transceiver’s hot-shoe 7. -
Page 14: Using Studio Flashes With A Receiver Or Transceiver
For more complex lighting needs, the 1. Plug the 3.5 mm cable into the Receiver 1. Using a PC Sync to 3.5 mm cable (not FreeWave Aviator can also trigger studio or Transceiver’s Sync Port. included), plug the PC Sync end into the flashes independently or alongside hot-shoe Receiver's PC Sync port. -
Page 15: About Ttl
ABOUT TTL Main TTL Adjustment Screen The FreeWave Aviator automatically The startup or default screen for the Note: see page 29 for resetting the sets the appropriate flash level using Aviator Transceiver is called the TTL Transceiver to factory default settings. -
Page 16: Setting Channels
SETTING CHANNELS Setting an Aviator Setting an Aviator Receiver’s Channel Transceiver’s Channel While the Receiver is Off, slide the Channel To set the desired Channel, switch to the desired Channel (1, 2, 3 do the following: or Auto). Then turn the Receiver on. 1. -
Page 17: Adjusting Master/Slave Mode On The Transceiver
ADJUSTING MASTER/SLAVE MODE ON THE TRANSCEIVER Using the FreeWave Aviator System 1. From the TTL Screen, press Menu requires at least two units: one Transceiver twice. The device’s current mode will set to Master mode and either a Receiver start blinking. -
Page 18: Setting Flash Groups
SETTING FLASH GROUPS Setting Flash Groups on the Setting Flash Groups on the Aviator Transceiver in Master Mode Aviator Transceiver in Slave Mode The Aviator Transceiver allows individual When the Transceiver is in Slave mode, set control of flash settings for groups A, B and the desired group by pressing A, B, or C. - Page 19 Setting the Group on the Aviator Receiver Slide the Group switch on the Aviator Receiver to the desired Group (either A, B, or C). To assign multiple Receivers to the same flash group, simply select the same group letter for each Receiver in the flash group. Note: you can combine studio lights and speedlights within the same flash group.
-
Page 20: Adjusting A Flash Group's Ttl Power (Ev)
ADJUSTING A FLASH GROUP’S TTL POWER (EV) Using a Transceiver in Master mode: Note: /Test fires a test flash on all connected hot-shoe lights and studio lights. 1. From the TTL Screen, press Select. The It is advisable to always test fire your flashes screen will start flashing. -
Page 21: Adjusting A Flash Group's Zoom
ADJUSTING A FLASH GROUP’S ZOOM The FreeWave Aviator has the ability 4. Press Select when done to apply the to refine your flash output by adjusting setting. a flash group's zoom. This function controls the concentration and diffusion 5. Press /Test to confirm settings. -
Page 22: Using Ttl Ratio Adjustment Modes
Group B. Adjustments to Group C (Background Light) using a FreeWave Aviator Transceiver. Group C are set in EV. Each EV stop higher or lower will be either twice or half the A standard portrait lighting setup uses a... - Page 23 Ratio A:B Mode Ratio A:BC Mode Using a Transceiver in Master mode: Using a Transceiver in Master mode: 6. Press Select when done. 1. Set your TTL-compatible hot-shoe flash 1. From the TTL Screen, press Option 7. Press /Test to confirm settings. to TTL mode.
-
Page 24: Changing A Flash Group's Power Mode
CHANGING A FLASH GROUP'S POWER MODE Set a Flash Group to Manual mode Turn a Flash Group Off Using a Transceiver in Master mode: 5. Press Select twice when done to apply Using a Transceiver in Master mode: the settings. 1. -
Page 25: Using High Speed Sync/Second Curtain Sync Modes
USING HIGH SPEED SYNC/SECOND CURTAIN SYNC MODES For Nikon The Vello FreeWave Aviator supports Using a Transceiver in Master mode: Hi-Speed Sync (HSS) up to 1/8000 of a second on compatible cameras and 1. From the TTL Screen choose a flash sync mode by pressing the Flash Sync TTL flashes. - Page 26 For Canon Using a Transceiver in Master mode: 2. From the TTL Screen choose a flash sync mode by pressing the Flash Sync Mode [ ] button to cycle through and choose an option. High Speed • Second Curtain Sync ( Sync Mode •...
-
Page 27: Setting Auto-Focus Assist (Nikon Only)
SETTING AUTO-FOCUS ASSIST (NIKON ONLY) To configure your Nikon flash's Auto-Focus Assist (AF Assist) from the Transceiver: 1. Make sure your flash's AF Assist is turned on (see your flash's manual) 2. From the TTL Screen, press the Menu AF Assist button three times Setting 3. -
Page 28: Additional Features
ADDITIONAL FEATURES TTL Pass-through Flash Wake-Up When a Transceiver is set to Master If your flash has a wake-up function mode and mounted on your camera, a press the /Test button on the hot-shoe flash attached to its hot shoe Transceiver to wake your flash. -
Page 29: Resetting The Transceiver To Factory Default Settings
RESETTING THE TRANSCEIVER TO FACTORY DEFAULT SETTINGS Channel The FreeWave Aviator Transceiver remembers the last Group Mode, Channel, Master/Slave Mode Master Mode Zoom and Master/Slave settings when Flash Group Power Mode TTL Mode powered off. To reset your Transceiver TTL Mode Power (EV) 0.0 EV for Groups A,B, and C... -
Page 30: Specifications
SPECIFICATIONS Receiver Transceiver Dimensions (W × H × D) 2.75˝ × 2.63˝ × 1.25˝ (70 × 67 × 32 mm) 1.75˝ × 1.25˝ × 3.19˝ (45 × 32 × 81 mm) Weight (without battery) 4.8 oz. (136 g) 2.4 oz. (68 g) Power 2 AA batteries (240 hrs. -
Page 31: Troubleshooting
TROUBLESHOOTING FCC COMPLIANCE • Check the contact between the light’s • Change the channel by adjusting the This device complies with Part 15 of hot shoe foot and the Receiver’s hot switch on the Receiver and the setting the FCC Rules. Operation is subject shoe, and between the camera’s hot on the Transceiver to a different to the following two conditions:... - Page 32 To obtain warranty coverage, contact the Vello Customer Service Department to obtain a return merchandise authorization (“RMA”) number, and return the defective product to Vello along with the RMA number and proof of purchase. Shipment of the defective product is at the purchaser’s own risk and expense.
Need help?
Do you have a question about the Freewave Aviator and is the answer not in the manual?
Questions and answers