Table of Contents
Advertisement
Advertisement
Table of Contents

Related Manuals for Vello FreeWave Flash Trigger LR


Summary of Contents for Vello FreeWave Flash Trigger LR
- Page 1 FREEWAVE FLASH TRIGGER LR USER MANUAL...
- Page 2 Thank you for choosing Vello. Multiple triggering modes enable you to fire all channels simultaneously or separate your The Vello FreeWave Flash Trigger LR is an receivers into separate channels. With a 1/250 8-channel, extended range wireless flash sec. sync speed, the Vello FreeWave Flash trigger with digital circuitry.
-
Page 3: Box Contents
BOX CONTENTS RFW-LR RFW-LR RFW-LR-R RFW-LR-R • Transmitter • Receiver • Receiver • 2x AA batteries • 4x AA batteries • 3.5 to 3.5 mm sync cable • 3.5 to 3.5 mm sync cable • 3.5 mm to 1/4" monoplug adapter • 3.5 mm to 1/4"... - Page 4 8 digital channels: Avoids interference Compatible with the Vello Captain TTL transmitter Ch. 1-4: Receiver from other wireless remote controls can be triggered via Vello Captain TTL Transmitter All trigger mode: Can fire all channels at once Low-profile construction: Tilting joint reduces transmitter’s on-camera...
-
Page 5: Compatible Devices
The Vello FreeWave Flash Trigger LR transmitter and receiver is compatible with most hot-shoe and lights, studio lights. The Vello FreeWave Flash Trigger LR does not transmit through-the-lens (TTL) settings; therefore, we recommend using a fully manually controlled hot-shoe flash with this device. - Page 6 PRECAUTIONS • Please read and follow these instructions • Keep out of reach of children. This and keep this manual in a safe place. device contains small parts which may pose a choking hazard. • There are no user-serviceable parts inside the devices.
- Page 7 • Handle the units with care. • Make sure the item is intact and that there are no missing parts. • Do not use or leave the devices in conditions of extreme heat, • All photos are for illustrative severe cold, or high humidity. purposes only.
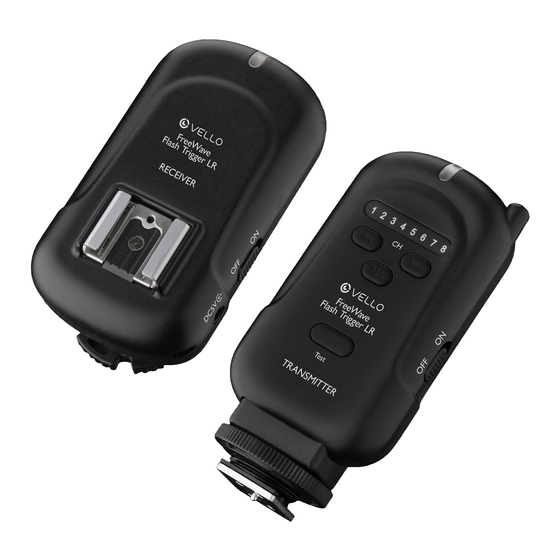
- Page 8 OVERVIEW Transmitter LED confirmation light Internal antenna Lanyard loop Battery compartment (on back) Channel indicator panel Channel up selector button Channel down selector button All-channel selector button On/Off switch Test button Low-profile tilt joint Tightening ring Hot-shoe foot...
- Page 9 Receiver LED confirmation light Battery compartment Channel down selector button Channel indicator panel On/Off switch Channel up selector button 3.5 mm flash 5V input output port Lanyard loop Hot-shoe Cold-shoe mount / mount 1/4"-20 threaded socket...
-
Page 10: Installing The Batteries & Turning On The Device
INSTALLING THE BATTERIES & TURNING ON THE DEVICE The Vello FreeWave Flash Trigger LR transmitter and receiver each take two AA batteries. To install the batteries, simply remove the battery compartment door on the back of each unit. With the door... -
Page 11: Setting The Channels
The transmitter can be set to trigger all Note: The FreeWave Flash Trigger LR Transmitter of the units connected to Vello FreeWave and Receiver will remember the channel setting... -
Page 12: Mounting The Transmitter
MOUNTING THE TRANSMITTER To wirelessly trigger your flash device using the Vello FreeWave Flash Trigger LR, with the camera and Flash Trigger LR powered off, mount the transmitter on the camera’s hot shoe by sliding the transmitter’s hot- shoe foot into the camera’s hot-shoe mount. -
Page 13: Mounting The Receiver
MOUNTING THE RECEIVER Note: Make sure your flash and Flash Trigger LR are turned off before mounting. Mount the receiver to your tripod or stand via one of the two provided mounting options: 1. Threaded socket for a standard 1/4" screw mount 2. - Page 14 CONNECTING THE RECEIVER TO A HOT-SHOE FLASH 1. With your hot-shoe flash unit 6. Confirm that your camera, transmitter, turned off, switch the flash’s locking receiver, and hot-shoe flash are all switch to the unlock position. powered on. 2. Insert the hot-shoe flash’s hot-shoe foot 7.
- Page 15 Note: We recommend using a fully manual controlled flash with this device. Since the FreeWave Flash Trigger LR does not transmit TTL settings, you will need to set the power output of your flash manually. Note: Your flash unit may enter sleep mode after a period of non-use.
-
Page 16: Connecting The Receiver
CONNECTING THE RECEIVER 1. Turn off the Studio light and the 4. Confirm that your camera, transmitter, FreeWave Flash Trigger LR. receiver, and studio flash are all powered on. 2. Using the included 3.5 mm sync cable, 5. Fully press the shutter release button attach one end to the receiver’s flash... -
Page 17: Specifications
SPECIFICATIONS Sync Speed 1/250s Frequency 2.4 GHz Range 600 feet (183 meters) approx. Channels 8 channels Transmitter Dimensions 1.3" × 1.9" × 4"(3.4 × 4.9 × 10.2 cm) Receiver Dimensions 1.5" × 1.9" × 3.4" (3.9 × 4.9 × 8.7 cm) Transmitter Weight 2.4 oz. -
Page 18: Troubleshooting
TROUBLESHOOTING Check that channels on all communicating Make sure that a communication devices are identical. When turning on confirmation appears on the LED indicator the unit, it is important to review and, if when sending or receiving a signal. necessary, reset the channel selection. Verify that flash and camera equipment If first choice of channel does not work, try a are operating properly. -
Page 19: One-Year Limited Warranty
ONE-YEAR LIMITED WARRANTY This Vello product is warranted to the original purchaser to be free from defects in materials and workmanship under normal consumer use for a period of one (1) year from the original purchase date or thirty (30) days after replacement, whichever occurs later. - Page 20 www.vellogear.com © Copyright 2014 Gradus Group...
Need help?
Do you have a question about the FreeWave Flash Trigger LR and is the answer not in the manual?
Questions and answers