Table of Contents
Advertisement
Quick Links
Advertisement
Table of Contents

Related Manuals for Vello Freewave micro


Summary of Contents for Vello Freewave micro
- Page 1 FREEWAVE MICRO WIRELESS REMOTE SHUTTER RELEASE...
- Page 2 Nikon. This compact set includes the same area. a small transmitter and a low- The FreeWave Micro also allows profile receiver that sits directly you to take photographs without The FreeWave Micro transmitter touching your camera—a great on the 10-pin remote terminal—...
-
Page 3: Key Features
2.4 GHz Radio Frequency: reduced interference and improved wireless signal quality. Bulb Mode Release: when the camera is in Bulb mode, the FreeWave Micro remote control Extended Range: operates at up to 328' (100 m), depending on conditions. can open the shutter at the beginning of the... - Page 4 • Do not handle with wet hands or immerse in or equipment—doing so will void the warranty, and expose to water or rain. Failure to observe this Vello will not be responsible for any damage. precaution can result in fire or electric shock. • Handle the unit with care.
-
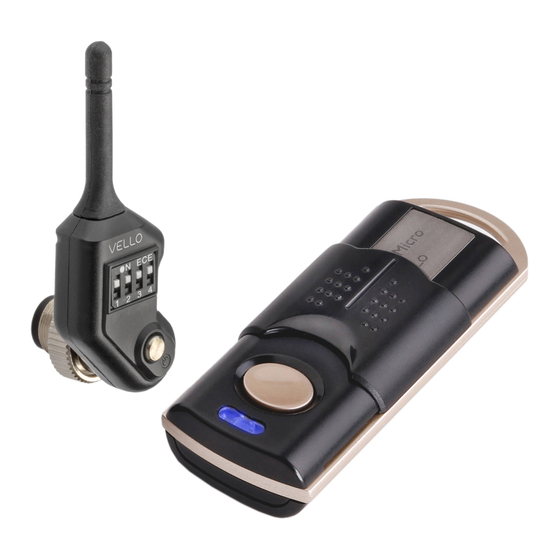
Page 5: Features Diagram
FEATURES DIAGRAM Antenna Lanyard hook 16-channel switch Receiver Transmitter Power LED Focus LED Shutter LED Power switch Locking wheel 10 pin connection to the camera. Channel selection pin Protective sliding cover Shutter release button LED Indicator Focus—vivid blue / Shutter—dim blue / Shooting alarm—red Battery compartment door Lanyard... -
Page 6: Setting Up The Receiver
INSTRUCTIONS To get the most from your FreeWave Micro Wireless Remote Control, please read this manual. Setting Up the Receiver 2. Turn the receiver slightly until you feel that it’s seated The camera must have a 10-pin properly in the terminal. - Page 7 4. Turn the receiver on by 7. To turn the receiver off, press pressing the power button. the power switch and hold it for approximately one second. 5. The red Power LED on the The red Power LED will turn receiver will blink on and off off.
-
Page 8: Setting Up The Transmitter
Setting Up the Transmitter 4. Slide the battery chamber cover closed. Please follow these directions to set up the transmitter. 5. To activate autofocus, press the shutter button on the 1. Press down on the knurled transmitter halfway down. area on the back of the When autofocus is engaged, transmitter and slide open the the indicator LED will become... -
Page 9: Setting The Channel
Be sure to set the same channel on the transmitter and the receiver. This allows you to use the Freewave Micro Wireless Remote Control without interference from other devices using radio frequencies in the same area. The channel selection pin attached to the included lanyard helps you to adjust the channels. - Page 10 USING THE FREEWAVE MICRO WIRELESS REMOTE SHUTTER RELEASE FOR NIKON After you attach the receiver to alarm LED on the transmitter of the camera is open. When your camera, you can use the will light up to confirm that the...
-
Page 11: Troubleshooting
TROUBLESHOOTING Transmitter Receiver Transmitter light does not blink Insert a fresh battery into the battery chamber, ensuring that the polarity is correct. Transmitter light blinks, but receiver light does Check to be sure that the power switch for the receiver is in the not blink On position. -
Page 12: Compatible Cameras
COMPATIBLE CAMERAS Nikon D1 / D1H / D1X / D2 / D200 / D2H / ® D2Hs / D2x / D2Xs / D3 / D300 / D300s / D3s / D3x / D4 / D4s / D700 / D800 / D800e / D810 Fuji ®... -
Page 13: Specifications
SPECIFICATIONS Transmitter Receiver Frequency 2.427 GHz to 2.457 GHz Channels Maximum Range 328' (100 m) Battery 1x AAA Powered by camera Operating Temperature Range -4 to 122°F (-20 to 50°C) Dimensions 2.83 × 0.86 × 0.90" 2.75 × 1.33 × 0.67" (82 ×... -
Page 14: Fcc Compliance
FCC COMPLIANCE This device complies with Part 15 of the FCC Rules. Operation is subject to the following two conditions: 1. This device may not cause harmful interference. 2. This device must accept any interference received, including interference that may cause undesired operation. -
Page 15: One-Year Limited Warranty
To obtain warranty coverage, contact the Vello Customer Service Department to obtain a return merchandise authorization (“RMA”) number, and return the defective product to Vello along with the RMA number and proof of purchase. Shipment of the defective product is at the purchaser’s own risk and expense. - Page 16 © Copyright 2014 Gradus Group. www.vellogear.com All other trademarks are the property of their respective owners...
Need help?
Do you have a question about the Freewave micro and is the answer not in the manual?
Questions and answers