AudioCodes MP-202 User Manual
Telephone adapter
Hide thumbs
Also See for MP-202:
- Quick start manual ,
- User manual (212 pages) ,
- Release notes (14 pages)
Table of Contents
Advertisement
Advertisement
Table of Contents

Related Manuals for AudioCodes MP-202


Summary of Contents for AudioCodes MP-202
- Page 1 MP-202 Telephone Adapter User's Manual Version 2.6.0 Document #: LTRT-50605...
- Page 2 Notice This document describes the MP-202 Telephone Adapter available from AudioCodes. Information contained in this document is believed to be accurate and reliable at the time of printing. However, due to ongoing product improvements and revisions, AudioCodes cannot guarantee the accuracy of printed material after the Date Published nor can it accept responsibility for errors or omissions.
-
Page 3: Customer Support
Each abbreviation, unless widely used, is spelled out in full when first used. Only industry- standard terms are used throughout this manual. Hexadecimal notation is indicated by 0x preceding the number. When the term 'device' is used, it refers to the MP-202 Telephone Adapter. -
Page 4: Related Documentation
User's Manual Related Documentation Document Title MP-202 Telephone Adapter Quick Installation Guide MP-202 Telephone Adapter Release Notes AC494 VoIP SoC Data Book AC494 VoIP SoC User’s Manual AC494 VxWorks SDK Getting Started Guide AC494 Linux SDK Getting Started Guide AC494 SDK Release Notes for VxWorks... -
Page 5: Table Of Contents
Configuring Line Settings Screen ................49 5.1.7 Configuring Speed Dial Settings................50 5.1.8 Configuring Telephone Interfaces ................53 Connecting the MP-202 to a VoIP Service Provider ........55 Opening a SIP Account..................55 Configuring VoIP Parameters ................55 Making VoIP Calls .....................57 Placing a Call ......................57 Answering a Waiting Call .................. - Page 6 Creating an L2TP IPSec VPN Connection with the Connection Wizard ....95 9.4.3 General ........................97 9.4.4 PPP Configuration ....................97 9.4.5 PPP Authentication....................97 9.4.6 PPP Encryption......................97 9.4.7 PPP Compression ....................98 9.4.8 Internet Protocol ......................98 9.4.9 DNS Server......................98 9.4.10 Routing........................98 9.4.11 Internet Connection Firewall ..................98 MP-202 Telephone Adapter Document #: LTRT-50605...
- Page 7 12.8 Security Log ......................155 13 Advanced Settings ..................161 13.1 Remote Administration..................163 13.2 About the MP-202 ....................165 13.3 Configuration File ....................165 13.3.1 Loading From a Computer in the Network............167 13.3.2 Loading From a Remote Server ................169 13.4 Restart........................
- Page 8 13.21 Protocols ......................198 14 System Monitoring ..................201 14.1 Connections ......................201 14.2 Traffic ........................202 14.3 System Log ......................202 14.4 System Up Time....................203 14.5 Voice over IP......................204 15 Software and Hardware Specifications ............205 MP-202 Telephone Adapter Document #: LTRT-50605...
- Page 9 MP-202 Telephone Adapter Contents List of Figures Figure 2-1: Cabling the Device.......................17 Figure 3-1: IP and DNS Configuration....................20 Figure 3-2: 'Welcome' Screen ........................21 Figure 3-3: Logging In ..........................21 Figure 3-4: Quick Setup..........................22 Figure 3-5: Internet Connection - Automatic IP Address Ethernet Connection........23 Figure 3-6: Internet Connection - Manual IP Address Ethernet Connection..........24...
- Page 10 Figure 10-35: Network Bridging......................120 Figure 10-36: No IP Address ....................... 120 Figure 10-37: System Monitoring ......................121 Figure 10-38: Example of Tagging Voice and Untagging Data............122 Figure 10-39: WAN/LAN Bridge ......................123 MP-202 Telephone Adapter Document #: LTRT-50605...
- Page 11 MP-202 Telephone Adapter Contents Figure 10-40: VLAN Interface Screen ....................123 Figure 10-41: Bridge Section of the Screen ..................124 Figure 10-42: VLAN Settings....................... 124 Figure 10-43: No IP Address ....................... 124 Figure 10-44: Configuring WAN Ethernet.................... 125 Figure 10-45: System Monitoring ......................125 Figure 10-46: Testing the Setup......................
- Page 12 Figure 14-2: System Monitoring - Traffic ..................... 202 Figure 14-3: System Monitoring - System Log ..................203 Figure 14-4: System Monitoring - System Up Time ................203 Figure 14-5: Advanced - System Monitoring - VoIP................204 MP-202 Telephone Adapter Document #: LTRT-50605...
- Page 13 Table 13-3: Adding a Routing Rule - Parameter Descriptions ............187 Table 13-4: Dynamic DNS Parameter Descriptions................191 Table 13-5: DHCP Server Parameter Descriptions................193 Table 15-1: MP-202 Telephone Adapter Software Specifications ............205 Table 15-2: MP-202 Telephone Adapter Hardware Specifications ............. 206 Version 2.6...
- Page 14 User's Manual Reader's Notes MP-202 Telephone Adapter Document #: LTRT-50605...
-
Page 15: Introducing Audiocodes' Mp-202 Telephone Adapter
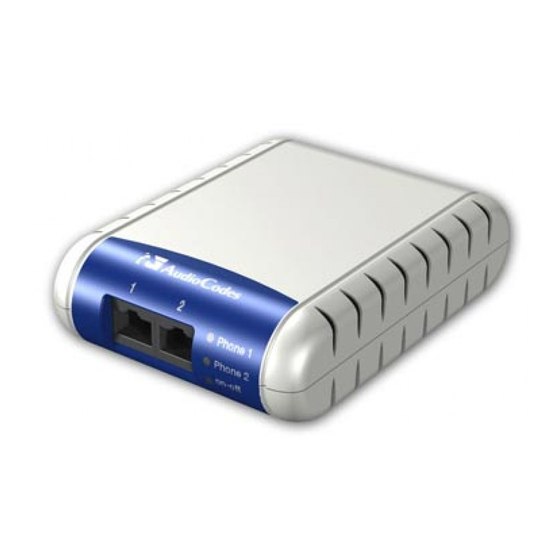
Introducing AudioCodes' MP-202 Telephone Adapter The MP-202 is a 2-line SIP gateway allowing residential and SOHO subscribers to connect ordinary POTS telephones or fax machines, and is interoperable with leading Softswitches and SIP Application Servers for enabling legacy phone services such as caller ID and call waiting. - Page 16 User's Manual Reader's Notes MP-202 Telephone Adapter Document #: LTRT-50605...
-
Page 17: Cabling The Mp-202 Telephone Adapter
Optionally, you can connect the MP-202's connector labeled 'LAN/PC' to a switch / hub and connect multiple PCs to the latter. Connect the MP-202's two RJ-11 ports labeled 'PHONE 1' and 'PHONE 2' to two analog telephones. Connect the power cable to the power supply; the green LEDs illuminate; the power- up process takes approximately 40 seconds. - Page 18 User's Manual Reader's Notes MP-202 Telephone Adapter Document #: LTRT-50605...
-
Page 19: Setting Up A Network Connection
DNS address, or should be instructed to automatically obtain an IP address using the Network DHCP server. The MP-202 provides a DHCP server on its LAN and it is recommended to configure your PC to obtain its IP and DNS server IPs automatically. -
Page 20: Windows Xp
Type 'ifconfig' to display the network devices and allocated IP's. Type 'pump -i <dev>', where <dev> is the network device name. Type 'ifconfig' again to view the new allocated IP address. Make sure no firewall is active on device <dev>. MP-202 Telephone Adapter Document #: LTRT-50605... -
Page 21: Configuring The Mp-202'S Network Connection
3. Setting up a Network Connection Configuring the MP-202's Network Connection The Web-based management interface of the MP-202 allows you to control the device's system parameters. The interface is accessed through a Web browser. For detailed information on the gateway's Web-management interface, refer to ''Using the MP-202's... -
Page 22: Configuring 'Quick Setup' Screen Parameters
Note: Make sure you retain your User Name and Password for future reference as this is the only way you can access and manage the MP-202. Note: If there’s inactivity after logging in, a new login becomes necessary after a lapse of 15 minutes. -
Page 23: Configuring Your Internet Connection
'Connection Type' drop-down list in the figure below). Figure 3-5: Internet Connection - Automatic IP Address Ethernet Connection If left at the default, the MP-202 will obtain the WAN IP and DNS IP addresses from a DHCP server on the WAN. -
Page 24: Figure 3-6: Internet Connection - Manual Ip Address Ethernet Connection
(refer to the figure). Figure 3-6: Internet Connection - Manual IP Address Ethernet Connection According to your ISP's instructions, specify the following parameters: IP address Subnet mask Default device Primary DNS server Secondary DNS server MP-202 Telephone Adapter Document #: LTRT-50605... -
Page 25: Figure 3-7: Internet Connection - Pppoe
MP-202 Telephone Adapter 3. Setting up a Network Connection 3.2.2.1.3 Point-to-Point Protocol over Ethernet (PPPoE) Select 'Point-to-point protocol over Ethernet (PPPoE)' from the 'Connection Type' drop-down list (refer to the figure). Figure 3-7: Internet Connection - PPPoE Your ISP should provide you with the following information:... -
Page 26: Figure 3-9: Layer 2 Tunneling Protocol
Select 'No Internet Connection' from the 'Connection Type' combo-box (refer to the figure). Choose this connection type if you do not have an Internet connection, or if you want to disable all existing connections. Figure 3-10: Internet Connection - No Internet Connection MP-202 Telephone Adapter Document #: LTRT-50605... -
Page 27: Using The Mp-202'S Web Interface
The network map depicts the various network elements from top going down: External network interface (Internet connection) Firewall MP-202 Telephones connected to the MP-202 Local network computers and peripherals (the figure above shows a network element that obtained its IP address automatically via the MP-202's DHCP server). Version 2.6 May 1... -
Page 28: Figure 4-2: Host Information
Minimum, Typical or Maximum. Click this icon to configure security settings. If the MP-202 is equipped with multiple LAN devices (other than bridges) then the home network will use the following icons to indicate the interface used for connecting the PC. -
Page 29: Web Interface Left Sidebar Icons
Configure the Firewall and regulate communications between the Internet and the Security home network. VoIP Use the MP-202's Voice over IP to place and receive calls over the Internet using a standard telephone set. Quality of Configure QoS parameters for the gateway. -
Page 30: Managing Tables
Use the Edit button to edit a row from the table. Use the Delete button to remove a row from the table. In many tables, the last row includes a button that allows adding a new row to the table. MP-202 Telephone Adapter Document #: LTRT-50605... -
Page 31: Configuring Voip Parameters
MP-202 Telephone Adapter 5. Configuring VoIP Parameters Configuring VoIP Parameters Voice over IP Screen Open the 'Voice over IP' screen by clicking the button 'Voice over IP' on the menu bar to the left; the Voice over IP' screen opens showing the tabs that allow:... -
Page 32: Configuring Signaling Protocol Parameters
'Use SIP Proxy IP and Port for Registration' is checked as well, the configured SIP proxy will also be used as the registrar, allowing incoming calls. Use SIP Registrar Check to use a separate SIP registrar server. Default is unchecked. MP-202 Telephone Adapter Document #: LTRT-50605... -
Page 33: Figure 5-2: Voip - Signaling Protocol - Sip Proxy And Registrar
MP-202 Telephone Adapter 5. Configuring VoIP Parameters Check the checkbox 'Use SIP Proxy'; the 'SIP Proxy' screen (showing basic parameters) opens. Click the button 'Advanced>>'; the 'SIP Proxy' screen (showing the advanced parameters, including the basic parameters) opens. Figure 5-2: VoIP - Signaling Protocol - SIP Proxy and Registrar Version 2.6... -
Page 34: Table 5-2: Voip - Signaling Protocol - Signaling Protocol
The MP-202 does not initiate reliable provisional responses. Include ptime in SDP* When enabled, the MP-202 adds the ptime field to the SDP message body. Enable rport* When enabled, the MP-202 adds the rport parameter to the relevant SIP Message fields. -
Page 35: Table 5-4: Voip - Signaling Protocol - Sip Timers
MP-202 Telephone Adapter 5. Configuring VoIP Parameters Parameter Description Use SIP Proxy IP and Use the SIP proxy IP and port for registration. Default = checked. When Port for Registration checked, there is no need to configure the address of the registrar separately. -
Page 36: Figure 5-3: Voip - Signaling Protocol - Sip Proxy And Registrar
Check the box to use a separate SIP registrar server. Registrar Address The IP address or host name of the registrar server. Registrar Port The UDP or TCP port of the registrar server. Registrar Expires The registration timeout, in seconds. MP-202 Telephone Adapter Document #: LTRT-50605... -
Page 37: Figure 5-4: Voip - Signaling Protocol - Sip Outbound Proxy
MP-202 Telephone Adapter 5. Configuring VoIP Parameters Click the button 'Advanced', and then check the box 'Use SIP Outbound Proxy'; the parameters screen for 'SIP Outbound Proxy' opens (showing the advanced parameters, including the basic parameters). Figure 5-4: VoIP - Signaling Protocol - SIP Outbound Proxy... -
Page 38: Figure 5-5: Voip - Signaling Protocol - Nat Traversal
The IP address of the STUN server used to resolve private addresses. STUN Server Port* The port of the STUN server. Subnet Mask* The subnet mask address of the STUN server used to resolve private addresses. This parameter appears only if 'Enable STUN' is checked. MP-202 Telephone Adapter Document #: LTRT-50605... -
Page 39: Configuring Dialing Parameters
MP-202 Telephone Adapter 5. Configuring VoIP Parameters 5.1.2 Configuring Dialing Parameters To configure Dialing parameters: Click tab 'Dialing'; the 'Dialing Parameters' screen opens. Click the button 'Advanced>>'; the advanced Dialing Parameters screen opens. Figure 5-6: VoIP - Dialing Table 5-8: VoIP - Dialing Parameters... - Page 40 When checked, a specific key can be defined for the Complete Dialing key. Enabled dialing Pressing the Dialing complete key forces the MP-202 to make a call to the complete key* dialed digits even if there is no match in the dial plan or digit map. The default value is enabled.
-
Page 41: Configuring Media Streaming Parameters
MP-202 Telephone Adapter 5. Configuring VoIP Parameters Parameter Description Sequence* Choose either 'Flash only' (default) or ‘Flash + digits sequence’. ‘Flash only’ uses only the phone's Flash button. There are 3 scenarios: (1) During an existing call, if the user presses Flash, the call is put on hold;... -
Page 42: Figure 5-8: Voip - Media Streaming - Advanced
Refer to ''Configuring Codecs'' on page 6th Codec Refer to ''Configuring Codecs'' on page Click the button 'Advanced'; the 'Media Streaming Parameters' and 'Quality of Service Parameters' screen sections open. Figure 5-8: VoIP - Media Streaming - Advanced MP-202 Telephone Adapter Document #: LTRT-50605... -
Page 43: Configuring Codecs
This is a part of the IP header that defines the type of routing service to be used to tag outgoing voice packets, originated from the MP-202. It is used to tell routers along the way that this packet should get specific QoS. Leave this value as 0xb8 (default) if you are unfamiliar with the Differentiated Services IP protocol parameter. -
Page 44: Packetization Time
To configure Voice and Fax parameters: Click the tab 'Voice and Fax'; the basic 'Voice and Fax' parameters screen opens. Click the button 'Advanced'; the extended 'Voice and Fax' parameters screen opens. Figure 5-9: VoIP - Voice and Fax MP-202 Telephone Adapter Document #: LTRT-50605... -
Page 45: Table 5-13: Voip - Voice And Fax
T.38 Relay = Fax is relayed to the remote side according to the T.38 standard VBD = (Voice Band Data) Switch to G.711 via SIP messaging Bypass = An automatic switch to AudioCodes' proprietary payload type (102, 103). The maximum fax rate. Select from the drop-down list either: Rate* 2.4 Kbps, 4.8 Kbps, 7.2 Kbps, 9.6 Kbps, 12 Kbps or 14.4 Kbps (default). - Page 46 T.38 fax relay upon detection of the CED signal from the remote fax. If the local fax machine sends a fax, the MP-202 switches to T.38 only after detecting the CNG signal from the local side and the CED signal from the remote side.
-
Page 47: Configuring Services Parameters
MP-202 Telephone Adapter 5. Configuring VoIP Parameters 5.1.5 Configuring Services Parameters To configure Service parameters: Click the tab 'Service'; the basic 'Service' parameters screen opens. Click the button 'Advanced'; the extended 'Service' parameters screen opens. Figure 5-10: VoIP - Services - Advanced Version 2.6... -
Page 48: Table 5-14: Voip - Services
In addition, the MP 202 generates an FSK signal to the phone to indicate that a message is waiting. If the telephone connected to the MP-202 supports this feature, an MWI ‘envelope icon’ is displayed. -
Page 49: Configuring Line Settings Screen
Table 5-15: VoIP - Line Settings Parameter Description Line Number A telephone port in the MP-202 to which you can connect a standard (POTS) telephone. You can manage which telephone is operational by checking the check-box adjacent to it. User ID This telephone's VoIP user ID, used for identification to initiate and accept calls. -
Page 50: Configuring Speed Dial Settings
Proxy, Local Line or Direct Call. Note that when connecting the MP-202 to a World-Wide SIP Server (refer to'' Connecting MP-202's VoIP to a VoIP Service Provider'' on page 55), you don't need to configure 'Speed Dial Settings'. -
Page 51: Figure 5-15: Voip - Speed Dial - Local Line
The figure below shows how a local line speed dial is configured from port ‘Line 2’ on the MP-202 to port ‘Line 1’ on the MP-202. The speed dial number 225 is now associated with Line 1 on the MP-202. -
Page 52: Figure 5-17: Voip - Speed Dial - Direct Call
The entry's destination, in this case a direct call. Specify the remote party's user ID. User ID IP Address or Host Specify the remote party's IP Address or host name. Name Port The SIP UDP or TCP port of the remote party. MP-202 Telephone Adapter Document #: LTRT-50605... -
Page 53: Configuring Telephone Interfaces
MP-202 Telephone Adapter 5. Configuring VoIP Parameters 5.1.8 Configuring Telephone Interfaces Use the 'Telephone Interface' screen to enable and disable FXS (telephone interface) parameters. To configure ''Telephone Interface' settings: Click the tab 'Telephone Interface'; the 'Telephone Interface' screen opens. Figure 5-18: VoIP - Telephone Interface Check the checkbox 'Enabled' to enable the Polarity Reversal feature. - Page 54 User's Manual Reader's Notes MP-202 Telephone Adapter Document #: LTRT-50605...
-
Page 55: Connecting The Mp-202 To A Voip Service Provider
Connecting the MP-202 to a VoIP Service Provider Using the MP-202's VoIP capabilities, it is possible to connect to a remote SIP server in order to conduct worldwide phone calls. The following section describes how to place a worldwide phone call utilizing the MP-202's VoIP capabilities over a SIP server. -
Page 56: Figure 6-2: Voip - Line Settings - Defining A New Line
Pick up the phone receiver and listen for the dial tone; you’re now ready to place an outgoing call. All your settings are saved in the gateway's non-volatile memory. From now on, you won’t need the PC to make VoIP calls. MP-202 Telephone Adapter Document #: LTRT-50605... -
Page 57: Making Voip Calls
MP-202 Telephone Adapter 7. Making VoIP Calls Making VoIP Calls Users connected to the MP-202 can place calls, put calls on hold, transfer calls and manage 3-way conferences. The following describes how to perform these operations. Placing a Call To place a call, take these steps: Pick up the phone. -
Page 58: Performing A Call Transfer
Dial party C's number and wait until the call is established. Press 'Flash' again to put B and C in a 3-way conference. To end the 3-way conference call, on-hook. Alternatively, press 'Flash' again. MP-202 Telephone Adapter Document #: LTRT-50605... -
Page 59: Forwarding Calls To Another Phone
MP-202 Telephone Adapter 7. Making VoIP Calls To extend an existing call with party B into a 3-way conference by bringing in party C when 'Flash + digits sequence' is configured (refer to '' on page 39): Configuring Dialing Parameters'' During a call with party B, press 'Flash' and then the '1' key on the phone;... - Page 60 User's Manual Reader's Notes MP-202 Telephone Adapter Document #: LTRT-50605...
-
Page 61: Quality Of Service (Qos)
MP-202 Telephone Adapter 8. Quality of Service (QoS) Quality of Service (QoS) Traffic Shaping Traffic Shaping is the solution for managing and avoiding congestion where a high speed LAN meets limited broadband bandwidth. A user may have, for example, a 100 Mbps Ethernet LAN with a 100 Mbps WAN interface router. -
Page 62: Figure 8-2: Qos - Edit Device Traffic Shaping
(in milliseconds) of a single packet. Any packet that requires a longer time to be transmitted, will be fragmented to smaller sections. This avoids transmission of large, bursty packets that may cause delay or jitter for real-time traffic such as VoIP. MP-202 Telephone Adapter Document #: LTRT-50605... -
Page 63: Shaping Classes
MP-202 Telephone Adapter 8. Quality of Service (QoS) 8.1.2 Shaping Classes The bandwidth of a device can be divided in order to reserve constant portions of bandwidth to predefined traffic types. Such a portion is known as a Shaping Class. When not used by its predefined traffic type, or owner (for example VoIP), the class will be... -
Page 64: Class Rules
A in your LAN belong to your VoIP class. These packets will be limited to the class settings (bandwidth, schedule, etc.). In addition, you can define the traffic protocol and priority for each rule (this is not mandatory as in Traffic Priority rules). MP-202 Telephone Adapter Document #: LTRT-50605... -
Page 65: Figure 8-5: Qos - Edit Device Traffic Shaping - Edit Class - Add Traffic Priority Rule
MP-202 Telephone Adapter 8. Quality of Service (QoS) 8.1.2.1.1 Inbound and Outbound Data The gateway can control outgoing data easily. It can queue packets, delay them, give precedence to other packets, or drop them. This helps in resolving upload (Tx) traffic bottlenecks and in most cases is sufficient. -
Page 66: Traffic Priority
You can set QoS parameters using flexible rules, according to the following parameters: Source/destination IP address, MAC address or host name Device Source/destination ports MP-202 Telephone Adapter Document #: LTRT-50605... - Page 67 MP-202 Telephone Adapter 8. Quality of Service (QoS) Limit the rule for specific days and hours; the gateway supports two priority marking methods for packet prioritization: DSCP 802.1p Priority The matching of packets by rules is connection-based, known as Stateful Packet Inspection (SPI), using the same connection-tracking mechanism used by firewall.
-
Page 68: Figure 8-6: Qos - Traffic Shaping
'New Entry' adjacent to 'All Devices'. Figure 8-6: QoS - Traffic Shaping After clicking the appropriate 'New Entry' link, the screen 'Add Traffic Priority Rule' opens (refer to the figure). Figure 8-7: QoS - Add Traffic Priority Rule MP-202 Telephone Adapter Document #: LTRT-50605... -
Page 69: Table 8-4: Add Traffic Priority Rule - Parameter Descriptions
MP-202 Telephone Adapter 8. Quality of Service (QoS) Table 8-4: Add Traffic Priority Rule - Parameter Descriptions Parameter Description Source Address The source address of the packets sent to or received from the network object. From the drop-down list choose 'Any', 'User Defined' or the host. -
Page 70: Dscp Mapping
You can edit or delete any of the existing DSCP setting, as well as add new entries. Press the QoS button on the sidebar and then click the DSCP Settings tab. The following screen will appear (refer to the figure). Figure 8-8: QoS - DSCP Settings MP-202 Telephone Adapter Document #: LTRT-50605... -
Page 71: Figure 8-9: Qos - Edit Dscp Settings
MP-202 Telephone Adapter 8. Quality of Service (QoS) To edit an existing entry, click its Edit action icon. To add a new entry, click the New Entry link. In both cases, the ’Edit DSCP Settings’ screen will appear (refer to the figure). -
Page 72: Mapping
The eight 802.1p values are pre-configured with the three priority levels: high, medium and low. You can change these levels for each of the eight values in their respective combo box. Click ’OK’ to save the settings. MP-202 Telephone Adapter Document #: LTRT-50605... -
Page 73: Class Statistics
202. When giving VoIP priority over data, the bottleneck is effectively moved from the Cable / ADSL modem into the MP-202. To give priority to calls from the LAN, you must define a traffic priority rule (for SIP and RTP from the device on the LAN). -
Page 74: Figure 8-12: Qos - Edit Device Traffic Shaping
'Maximum Delay' to define the maximum allowed delay (e.g. 20 milliseconds). This will cause long TCP packets to be fragmented when there is an active voice call. Figure 8-12: QoS - Edit Device Traffic Shaping MP-202 Telephone Adapter Document #: LTRT-50605... -
Page 75: Figure 8-13: Qos - Edit Device Traffic Shaping - Submitting The Configuration
MP-202 Telephone Adapter 8. Quality of Service (QoS) Click OK to submit the new definition. Figure 8-13: QoS - Edit Device Traffic Shaping - Submitting the Configuration Click OK again to exit the QoS page and return to the main page. - Page 76 User's Manual Reader's Notes MP-202 Telephone Adapter Document #: LTRT-50605...
-
Page 77: Wan Settings
'New Connection' in the 'Network Connections' screen, check the 'Advanced Connection' radio button and then choose the connection type. WAN Ethernet WAN Ethernet is the default mode. WAN Ethernet is used to connect the MP-202 to the network either directly or via an external modem. To access its properties: Click on the link 'Network Connections' and in the screen 'Network Connections', click link 'WAN Ethernet';... -
Page 78: General
It is recommended not to change the default values in this screen unless you are familiar with the networking concepts they represent. Since your Telephone Adapter is configured to operate with the default values, no parameter modification is necessary. You can configure the following general connection settings: MP-202 Telephone Adapter Document #: LTRT-50605... -
Page 79: Internet Protocol Settings
MP-202 Telephone Adapter 9. WAN Settings Table 9-1: General Connection Settings Parameter Description Schedule You can configure scheduler rules in order to define time segments during which the connection is active (via Advanced>Scheduler Rules). Network Select whether the parameters you are configuring relate to a LAN/WAN connection, by selecting LAN/WAN from the drop down list. -
Page 80: Dns Server
IP address. Use NAPT if your LAN encompasses multiple devices, a topology that necessitates port translation in addition to address translation. MP-202 Telephone Adapter Document #: LTRT-50605... -
Page 81: Advanced Routing Properties
MP-202 Telephone Adapter 9. WAN Settings Parameter Description Device Metric The device metric is a value used by the Telephone Adapter to determine whether one route is superior to another, considering parameters such as bandwidth, delay, and more. Select this check box to define this device as a the default route. -
Page 82: Wan Pppoe
Point-to-Point Protocol (PPP) is the most popular method for transporting packets between the user and the Internet service provider. PPP supports authentication protocols such as PAP and CHAP, as well as other compression and encryption protocols. MP-202 Telephone Adapter Document #: LTRT-50605... -
Page 83: Ppp Authentication
MP-202 Telephone Adapter 9. WAN Settings Table 9-4: PPP Configuration Parameter Descriptions Parameter Description Service Name Specify the networking peer's service name, if provided by your ISP. PPP-on-Demand Use PPP on demand to initiate the point-to-point protocol session only when packets are actually sent over the Internet. -
Page 84: Ppp Encryption
PPP supports encryption facilities to secure the data across the network connection. A wide variety of encryption methods may be negotiated, although typically only one method is used in each direction of the link. MP-202 Telephone Adapter Document #: LTRT-50605... -
Page 85: Ppp Compression
MP-202 Telephone Adapter 9. WAN Settings Note that PPP encryption can only be used with MS-CHAP or MS-CHAP-V2 authentication algorithms. Figure 9-11: PPP Encryption Table 9-6: PPP Encryption Parameter Descriptions Parameter Description Require Encryption Select this check box to ensure that the PPP connection is encrypted. -
Page 86: Internet Protocol
To create a new PPTP connection, take these steps: Open the screen 'Network Connections' and click the link 'New Connection'; the 'Connection Wizard' screen opens. Select the radio button 'Internet Connection' and click 'Next'; the screen 'Internet Connection' opens. MP-202 Telephone Adapter Document #: LTRT-50605... -
Page 87: Figure 9-13: Internet Cable Modem Connection
MP-202 Telephone Adapter 9. WAN Settings Select the radio button External Cable Modem (this option is for both internal and external cable modems) and click 'Next'; the screen 'Internet Cable Modem Connection' opens (refer to the figure). Figure 9-13: Internet Cable Modem Connection Version 2.6... -
Page 88: Figure 9-14: Point-To-Point Tunneling Protocol
Check the 'Edit the Newly Created Connection' check box if you wish to be routed to the new connection's configuration screen after clicking Finish. Click Finish to save the settings; the new PPTP connection is added to the network connections list and is configurable like any other connection. MP-202 Telephone Adapter Document #: LTRT-50605... -
Page 89: Creating A Pptp Vpn Connection With The Connection Wizard
MP-202 Telephone Adapter 9. WAN Settings 9.3.2 Creating a PPTP VPN Connection with the Connection Wizard To create a new PPTP VPN connection, take these steps: Open the screen 'Network Connections' and click link 'New Connection'; the screen 'Connection Wizard' opens. -
Page 90: Figure 9-17: Point-To-Point Tunneling Protocol Virtual Private Network (Pptp Vpn)
Check the check box 'Edit the Newly Created Connection' if you wish to be routed to the new connection's configuration screen after clicking Finish. Click Finish to save the settings; the new PPTP VPN connection is added to the network connections list and is configurable like any other connection. MP-202 Telephone Adapter Document #: LTRT-50605... -
Page 91: General
MP-202 Telephone Adapter 9. WAN Settings 9.3.3 General This section displays the connection's general parameters. Figure 9-19: General PPTP Settings Table 9-8: General PPTP Settings Parameter Description Schedule By default, the connection is always active. However, you can configure scheduler rules (via Advanced>Scheduler Rules) in order to define... -
Page 92: Ppp Encryption
Click the link 'New Connection' in the screen 'Network Connections'; the screen 'Connection Wizard' opens. Select the radio button 'Connect to a Virtual Private Network over the Internet' and click 'Next'; the screen 'Connect to a Virtual Private Network over the Internet' opens. MP-202 Telephone Adapter Document #: LTRT-50605... -
Page 93: Figure 9-20: Vpn Client Or Point-To-Point
MP-202 Telephone Adapter 9. WAN Settings Select the radio button 'VPN Client or Point-To-Point' and click 'Next'; the screen 'VPN Client or Point-To-Point' opens(refer to the figure). Figure 9-20: VPN Client or Point-To-Point Version 2.6 May 1... -
Page 94: Figure 9-21: Layer 2 Tunneling Protocol Over Internet Protocol Security (L2Tp Ipsec Vpn)
Check the check box 'Edit the Newly Created Connection' to be routed to the new connection's configuration screen after clicking 'Finish'. Click 'Finish' to save the settings; the new L2TP IPSec VPN connection is added to the network connections list and is configurable like any other connection. MP-202 Telephone Adapter Document #: LTRT-50605... -
Page 95: Creating An L2Tp Ipsec Vpn Connection With The Connection Wizard
MP-202 Telephone Adapter 9. WAN Settings 9.4.2 Creating an L2TP IPSec VPN Connection with the Connection Wizard To create a new L2TP IPSec VPN connection, take these steps: Click the link 'New Connection' in the screen 'Network Connections'; the screen 'Connection Wizard' opens. -
Page 96: Figure 9-24: Layer 2 Tunneling Protocol Over Internet Protocol Security (L2Tp Ipsec Vpn)
Check the check box 'Edit the Newly Created Connection' to be routed to the new connection's configuration screen after clicking 'Finish'. Click 'Finish' to save the settings; the new L2TP IPSec VPN connection is added to the network connections list; it is configurable like any other connection. MP-202 Telephone Adapter Document #: LTRT-50605... -
Page 97: General
MP-202 Telephone Adapter 9. WAN Settings 9.4.3 General This section displays the connection's general parameters. Table 9-9: General Settings Parameter Description By default, the connection is always active. However, you can configure Schedule scheduler rules (via Advanced>Scheduler Rules) in order to define time segments during which the connection may be active. -
Page 98: Ppp Compression
Refer to ''Internet Protocol Settings'' on page 9.4.9 DNS Server Refer to ''DNS Server'' on page 9.4.10 Routing Refer to ''Routing'' on page 9.4.11 Internet Connection Firewall Refer to ''Internet Connection Firewall'' on page MP-202 Telephone Adapter Document #: LTRT-50605... -
Page 99: Vlan And Bridge Settings
MP-202 Telephone Adapter 10. VLAN and Bridge Settings VLAN and Bridge Settings 10.1 Virtual LAN Interface (VLAN) 10.1.1 Creation with the Connection Wizard To create a new VLAN interface: Click the New Connection link in the 'Network Connections' screen (refer to the figure);... -
Page 100: General
Since your Telephone Adapter is configured to operate with the default values, no parameter modification is necessary. You can configure the following general connection settings: MP-202 Telephone Adapter Document #: LTRT-50605... -
Page 101: Table 10-1: Vlan Interface - General Communication Parameters
MP-202 Telephone Adapter 10. VLAN and Bridge Settings Table 10-1: VLAN Interface - General Communication Parameters Parameter Description Schedule By default, the connection will always be active. However, you can configure scheduler rules in order to define time segments during which the connection may be active. -
Page 102: Ip Address Distribution
Configuration Protocol (DHCP) server parameters. The DHCP automatically assigns IP addresses to network PCs. If you enable this feature, make sure that you also configure your network PCs as DHCP clients. For a comprehensive description of this feature, refer to Section 10.28. MP-202 Telephone Adapter Document #: LTRT-50605... -
Page 103: Figure 10-6: Ip Address Distribution - Dhcp Server
MP-202 Telephone Adapter 10. VLAN and Bridge Settings Select one of the following options from the 'IP Address Distribution' combo box: Table 10-2: IP Address Distribution Parameters Parameter Description DHCP Server Start IP Address The first IP address that may be assigned to a LAN host. -
Page 104: Routing
You can choose to setup your Telephone Adapter to use static or dynamic routing. Dynamic routing automatically adjusts how packets travel on the network, whereas static routing specifies a fixed routing path to neighboring destinations. MP-202 Telephone Adapter Document #: LTRT-50605... -
Page 105: Table 10-5: Routing Parameters
MP-202 Telephone Adapter 10. VLAN and Bridge Settings Table 10-5: Routing Parameters Parameter Description Routing Select 'Advanced' or 'Basic' routing. Routing Mode Select one of the following Routing modes: Route Use route mode if you want your device to function as a router between two networks. -
Page 106: Internet Connection Firewall
Section 5. Figure 10-11: Internet Connection Firewall 10.1.6 Allow Unrestricted Administration Select this check box to enable users other than those defined as 'Administrator' to change the device's configuration. Figure 10-12: Allow Unrestricted Administration MP-202 Telephone Adapter Document #: LTRT-50605... -
Page 107: Additional Ip Addresses
You can add alias names (additional IP addresses) to the Telephone Adapter by clicking the 'New IP Address' link. This enables you to access the device using these aliases in addition to 192.168.1.1 and http://MP-202.home. Figure 10-13: Additional IP Addresses 10.1.8 Example of Configuring 3 VLANs: VoIP, Data and Management... -
Page 108: Figure 10-15: Example Of Using Vlan - Vlan Interface Screen
VLAN 311. Repeat the same steps for MP202-2. Use a different IP address. To access the web management for both MP-202-1 and MP-202-2, connect a PC that works on the same VLAN management (311). Defining a VLAN, Configuring its Interface To define an interface VLAN: Open menu Network Connections >... -
Page 109: Figure 10-16: Verifying A New Interface On The Wan Side
MP-202 Telephone Adapter 10. VLAN and Bridge Settings Define a VLAN ID for each device. Verify that you've got a new interface on the WAN side (WAN Ethernet 2) (refer to the figure below). Figure 10-16: Verifying a New Interface on the WAN Side Enter the new interface by clicking the Action icon (shown in the screen above);... -
Page 110: Figure 10-18: Use The Following Ip Address
Configure parameter 'Routing Mode' (NAT or Route). Choose 'Route' and check the check box 'Default Route' in order to use the VoIP VLAN. Configure 'Device Metric' to be the lower than the default metric (default = 3). MP-202 Telephone Adapter Document #: LTRT-50605... -
Page 111: Figure 10-21: Route Settings
MP-202 Telephone Adapter 10. VLAN and Bridge Settings Adding a Static Route To add a static route: Open menu Advanced > Routing and click link 'New Route'; the screen shown below opens. Figure 10-21: Route Settings From the 'Name' drop-down list, choose 'WAN Ethernet'; configure the parameters Destination, Netmask and Gateway. -
Page 112: Figure 10-23: Edit Advanced Filter
Place a VOIP call. Verify that the VOIP is using 802.1q/p, that the VLAN ID is 300 and that the IP is 3.3.x.x (refer to the screen shown below). Figure 10-24: Testing the Setup MP-202 Telephone Adapter Document #: LTRT-50605... -
Page 113: Figure 10-25: Testing The Setup
MP-202 Telephone Adapter 10. VLAN and Bridge Settings Connect a PC to the LAN port of MP202 (1 or 2) and send traffic (ICMP). Verify that the ICMP traffic is tagged (802.1q) and that it is using VLAN 521. Figure 10-25: Testing the Setup Connect the management PC to VLAN 311 and verify that all management traffic is carried in this VLAN (refer to the figure below). -
Page 114: Wan-Lan Bridge
Select the radio button 'Network Bridging' and click 'Next'; the screen 'Bridge Options' opens (refer to the figure below). Figure 10-27: Bridge Options Select whether to configure an existing bridge (this option will only appear if a bridge exists) or to add a new one: MP-202 Telephone Adapter Document #: LTRT-50605... -
Page 115: Figure 10-28: Network Bridging
MP-202 Telephone Adapter 10. VLAN and Bridge Settings Configure Existing Bridge Select this option and click 'Next'; the screen 'Network Bridging' opens (refer to the figure below) allowing you to add new connections or remove existing ones, by checking or unchecking their respective check boxes. -
Page 116: General
Click 'Finish' to save the settings; the new bridge is added to the network connections list; it's configurable like any other bridge. 10.2.2 General Refer to ''General'' on page 100. 10.2.3 Internet Protocol Settings Refer to ''Internet Protocol Settings'' on page MP-202 Telephone Adapter Document #: LTRT-50605... -
Page 117: Bridge Settings
MP-202 Telephone Adapter 10. VLAN and Bridge Settings 10.2.4 Bridge Settings The bridge section allows you to specify the LAN and WAN devices that you would like to join under the network bridge. Click the icon 'Edit' on the VLAN column to assign the network connections to specific Virtual LANS. -
Page 118: Examples Of Configuring Vlans In Bridge Mode
10.2.5 Examples of Configuring VLANs in Bridge Mode 10.2.5.1 Example 1 - Configuring 3 VLANs: VoIP, Data and Management This example explains how to configure the MP-202 to use 3 separate VLANs (for VOIP, data and management) in bridge mode. -
Page 119: Figure 10-33: Network Connections
MP-202 Telephone Adapter 10. VLAN and Bridge Settings Open menu Advanced > Remote Administration. Check the check boxes 'Using Primary HTTP Port (80)' and 'Allow Incoming ICMP Echo Requests' (to allow HTTP and ICMP from the WAN interface) For data, configure VLAN ID 300 and then configure it to 'Obtain IP Address Automatically' (refer to the figure below) (optionally, you can use a static IP address). -
Page 120: Figure 10-35: Network Bridging
Figure 10-36: No IP Address Reboot the MP-202 (optional). Ensure that the PC is connected to the LAN port of the MP-202 and then configure it to 'Obtain IP Address Automatically'; all data from the LAN port will be in VLAN 300. -
Page 121: Figure 10-37: System Monitoring
MP-202 Telephone Adapter 10. VLAN and Bridge Settings To access the web from the LAN, set your PC to a static IP address 192.168.2.2-254; the figure below shows the System Monitoring screen. Figure 10-37: System Monitoring Testing the Setup Place a VOIP call and see that the VOIP is using 802.1q/p and that the VID is 200. -
Page 122: Example 2 - Configuring Tagged Voip, Untagged Data Traffic
User's Manual 10.2.5.2 Example 2 - Configuring Tagged VoIP, Untagged Data Traffic This example explains how to configure the MP-202 to tag VoIP traffic and untag data traffic in bridge mode. Figure 10-38: Example of Tagging Voice and Untagging Data Setup Two MP-202s are connected to the switch. -
Page 123: Figure 10-39: Wan/Lan Bridge
MP-202 Telephone Adapter 10. VLAN and Bridge Settings Add a network bridge: In the screen 'Network Bridging', check LAN Ethernet and WAN Ethernet (refer to the figure below). Figure 10-39: WAN/LAN Bridge For VoIP, add VLAN Interface 200 (VID 200) and choose option 'Bridge' in the drop- down list of parameter 'Underlying Device' (refer to the figure below). -
Page 124: Figure 10-41: Bridge Section Of The Screen
Figure 10-41: Bridge Section of the Screen Figure 10-42: VLAN Settings Set the bridge to use 'No IP Address'. Click Apply and OK and then click OK again. Figure 10-43: No IP Address MP-202 Telephone Adapter Document #: LTRT-50605... -
Page 125: Figure 10-44: Configuring Wan Ethernet
MP-202 Telephone Adapter 10. VLAN and Bridge Settings For WAN Ethernet 2 (VLAN ID 200), configure this interface to Obtain IP Address Automatically. Optionally, you can choose option 'Use the Following IP Address' for a static IP address. Figure 10-44: Configuring WAN Ethernet Set your PC to use DHCP address;... -
Page 126: Figure 10-46: Testing The Setup
Place a VoIP call and verify that VOIP is using 802.1q/p and that the VID is 200. Figure 10-46: Testing the Setup Ping from the PC (connected to the LAN port of the MP-202) and verify that the data traffic (ICMP) is untagged (refer to the screen below). -
Page 127: Example 3 - Configuring Voip And Data In The Same Vlan
MP-202 Telephone Adapter 10. VLAN and Bridge Settings 10.2.5.3 Example 3 - Configuring VoIP and Data in the Same VLAN To configure VoIP and data in the same VLAN: For VoIP and data, configure a VLAN ID and then configure each to 'Obtain IP Address Automatically' (refer to the figure below) (optionally, you can use a static IP address). -
Page 128: Figure 10-49: No Ip Address
Go to the regular WAN and change the mode to 'No IP Address' Figure 10-49: No IP Address If your configuration is correct, all data from the LAN and VoIP should be sent in the same VLAN. MP-202 Telephone Adapter Document #: LTRT-50605... -
Page 129: Cpe Wan Management Protocol
Following is the list of the TR-069 objects supported by the MP-202. Objects that are partly supported have a detailed list of their implemented parameters. If not specified, the listed object is fully implemented. InternetGatewayDevice. InternetGatewayDevice.ManagementServer. - Page 130 • SoftwareVersion • SpecVersion • ProvisioningCode • UpTime • DeviceLog InternetGatewayDevice.LANDevice.{i} InternetGatewayDevice.LANDevice.{i}.LANHostCongManagement. • DHCPServerEnable • MinAddress • MaxAddress • SubnetMask • DNSServers InternetGatewayDevice.LANDevice.{i}.Hosts. InternetGatewayDevice.LANDevice.{i}.Hosts.Host.{i}. • IPAddress • AddressSource • MACAddress • HostName • InterfaceType MP-202 Telephone Adapter Document #: LTRT-50605...
- Page 131 MP-202 Telephone Adapter 11. TR-069 CPE WAN Management Protocol InternetGatewayDevice.LANDevice.{i}.LANEthernetInterfaceConfig.{}. • Status • MACAddress • MaxBitRate InternetGatewayDevice.LANDevice.{i}.LANEthernetInterfaceConfig. {}.Stats. InternetGatewayDevice.WANDevice.{i}. InternetGatewayDevice.WANDevice.{i}.WANCommonInterfaceConfig. • EnabledForInternet • WANAccessType • Layer1UpstreamMaxBitRate • Layer1DownstreamMaxBitRate • PhysicalLinkStatus • TotalBytesSent • TotalBytesReceived • TotalPacketsSent • TotalPacketsReceived InternetGatewayDevice.WANDevice.{i}.WANDSLConnectionManagement. InternetGatewayDevice.WANDevice.{i}.WANDSLConnectionManagement.
-
Page 132: Viewing, Changing Tr-069 Parameters Using The Cli
TR-069 parameters. Use the example as a guide. To run CLI commands: Open Telnet Access the system from a PC connected to the LAN port of the MP-202 Telnet 192.168.2.1 Enter the administrator user and password. MP-202 Telephone Adapter... -
Page 133: Table 11-1: Tr-069 Parameter Descriptions
To change a TR-069 parameter, use the following API: rg_conf_set manufacturer/vendor_name CompanyName rg_conf_set manufacturer/vendor_oui 12AB56 (Organizationally Unique Identifier; AudioCodes' OUI is 00908F) rg_conf_set manufacturer/product_class MP-20X rg_conf_set manufacturer/model_number MP-20X rg_conf_set manufacturer/hardware/serial_num 123456 rg_conf_set cwmp/acs_url http://acsurl.com rg_conf_set cwmp/username cpe... - Page 134 User's Manual Reader's Notes MP-202 Telephone Adapter Document #: LTRT-50605...
-
Page 135: Security
(refer to the figure below). Figure 12-1: Firewall in Action The MP-202 firewall provides both the security and flexibility that home and office users seek. It provides a managed, professional level of network security while enabling the safe use of interactive applications, such as Internet gaming and video-conferencing. -
Page 136: General Security Level Settings
(allowed to pass through the MP-202) or rejected (barred from passing through the MP-202) according to a flexible and configurable set of rules. These rules are designed to prevent unwanted intrusions from the outside, while allowing home users access to the Internet services that they require. -
Page 137: Table 12-1: Behavior For The Three Security Levels
For example, when you point your Web browser to a Web page on the Internet, a request is sent out to the Internet for this page. When the request reaches the MP-202, the firewall will identify the request type and origin--HTTP and a specific PC in your home network, in this case. -
Page 138: Access Control
User's Manual To configure the MP-202's security settings: (Refer to the figure 'General Security Level Settings') Choose from among the three predefined security levels described in the table above. 'Maximum Security' is the default setting. Using the Minimum Security setting may expose the home network to significant security risks, and thus should only be used, when necessary, for short periods of time. -
Page 139: Figure 12-4: Add Access Control Rule
MP-202 Telephone Adapter 12. Security Click the link 'New Entry'; the screen 'Add Access Control Rule' opens (refer to the figure below). Figure 12-4: Add Access Control Rule The parameter 'Address' enables you to specify the computer or group of computers for which you would like to apply the access control rule. -
Page 140: Port Forwarding
OpenRG is equipped with a robust list of ALG modules in order to enable maximum functionality home network. The ALG is automatically assigned based on the destination port. MP-202 Telephone Adapter Document #: LTRT-50605... -
Page 141: Figure 12-5: Port Forwarding
MP-202 Telephone Adapter 12. Security To add a new port forwarding service: Select the tab 'Port Forwarding' in the screen 'Security'; the screen 'Port Forwarding' opens (refer to the figure). Figure 12-5: Port Forwarding Click the link 'New Entry'; the screen 'Add Port Forwarding Rule' opens (refer to the figure). -
Page 142: Figure 12-7: Add A Specific Protocol
Click 'Add' to specify a protocol and click 'OK' to save your changes; the screen 'Port Forwarding' displays a summary of the rule that you just added (refer to the figure). Figure 12-10: Port Forwarding Rule MP-202 Telephone Adapter Document #: LTRT-50605... - Page 143 MP-202 Telephone Adapter 12. Security Edit the port forwarding rule by modifying its entry under column 'Local Host' in the screen 'Port Forwarding'. To modify an entry, click the action icon 'Edit' for the rule; the screen 'Edit Port Forwarding Rule' opens (refer to the figure). This screen allows you to edit all the parameters that you configured when creating the port forwarding rule.
-
Page 144: Dmz Host
An incoming request for access to a service in the home network, such as a Web-server, is fielded by the MP-202. The MP-202 will forward this request to the DMZ host (if one is designated) unless the service is being provided by another PC in the home network (assigned in Local Servers), in which case that PC will receive the request instead. -
Page 145: Port Triggering
MP-202 Telephone Adapter 12. Security 12.5 Port Triggering Port triggering can be used for dynamic port forwarding configuration. By setting port triggering rules, you can allow inbound traffic to arrive at a specific LAN host, using ports different than those used for the outbound traffic. This is called port triggering since the outbound traffic triggers to which ports inbound traffic is directed. -
Page 146: Figure 12-13: Adding Port Triggering Rules
Ports'; the screen 'Edit Service Server Ports' opens (refer to the figure). Figure 12-14: Edit Service Server Ports In the Protocol combo-box, select UDP; the screen refreshes, providing source and destination port options (refer to the figure). MP-202 Telephone Adapter Document #: LTRT-50605... -
Page 147: Figure 12-15: Edit Service Server Ports
MP-202 Telephone Adapter 12. Security Leave the Source Ports combo-box at its default 'Any'. In the drop-down list 'Destination Ports', select 'Single'; the screen refreshes again, providing an additional field in which you should enter '2222' as the destination port. -
Page 148: Website Restrictions
You can configure the gateway to block specific Internet websites so that they cannot be accessed from computers in the home network. Moreover, restrictions can be applied to a comprehensive and automatically-updated table of sites to which access is not recommended. MP-202 Telephone Adapter Document #: LTRT-50605... -
Page 149: Figure 12-19: Website Restrictions
MP-202 Telephone Adapter 12. Security To block access to a website: Click the tab 'Website Restrictions' in the screen 'Security' (refer to the figure). Figure 12-19: Website Restrictions Click the link 'New Entry'; the 'Restricted Website' screen opens (refer to the figure). -
Page 150: Figure 12-21: Add A Specific Host
Click button 'Resolve Now'; the gateway checks each of the restricted website addresses and ensures that all IP addresses at which this website can be found are included in the IP addresses column. MP-202 Telephone Adapter Document #: LTRT-50605... -
Page 151: Advanced Filtering
MP-202 Telephone Adapter 12. Security You can disable a restriction to make a website available again without having to remove it from the screen 'Website Restrictions'. This can be useful when making the website temporarily available and when expecting to block it again in the future. -
Page 152: Figure 12-24: Add Advanced Filter
After choosing the traffic direction and the device on which to set the rule, click the appropriate link 'New Entry'; the screen 'Add Advanced Filter' opens (refer to the figure). Figure 12-24: Add Advanced Filter MP-202 Telephone Adapter Document #: LTRT-50605... -
Page 153: Figure 12-25: Specify Source Address
MP-202 Telephone Adapter 12. Security To apply rules: Use the screen section 'Matching' to define a match between IP addresses and a traffic protocol. Configure the source address of the packets sent to or received from the network object (computer A in the above example). To add an address, select the option 'Specify Address' from the drop-down list;... -
Page 154: Figure 12-27: Set Priority Rule
By default, the 'Schedule' rule will always be active. However, you can configure scheduler rules in order to define time segments during which the rule may be active. Click 'OK' to save the settings. MP-202 Telephone Adapter Document #: LTRT-50605... -
Page 155: Security Log
MP-202 Telephone Adapter 12. Security 12.8 Security Log The Security log displays a list of firewall-related events, including attempts to establish inbound and outbound connections, attempts to authenticate at an administrative interface (Web-based management or Telnet terminal), firewall configuration and system start-up. -
Page 156: Figure 12-30: Security Log Settings
Accepted Incoming Connections - Write a log message for each successful attempt to establish an inbound connection to the home network. • Accepted Outgoing Connections - Write a log message for each successful attempt to establish an outgoing connection to the public network. MP-202 Telephone Adapter Document #: LTRT-50605... - Page 157 MP-202 Telephone Adapter 12. Security Blocked Events • All Blocked Connection Attempts - Write a log message for each blocked attempt to establish an inbound connection to the home network or vice versa. You can enable logging of blocked packets of specific types by disabling this option, and enabling some of the more specific options below it.
- Page 158 Fragmented packet, packet too big - a packet has been blocked because after the defragmentation, the packet was too big. Fragmented packet, packet exceeds - a packet has been blocked because defragmentation found more fragments than allowed. MP-202 Telephone Adapter Document #: LTRT-50605...
- Page 159 MP-202 Telephone Adapter 12. Security Fragmented packet, no memory - a fragmented packet has been blocked because there was no memory for fragments. Fragmented packet, overlapped - a packet has been blocked because after the defragmentation, there were overlapping fragments.
- Page 160 User's Manual Reader's Notes MP-202 Telephone Adapter Document #: LTRT-50605...
-
Page 161: Advanced Settings
This section of the Web-based Management is intended primarily for more advanced users. Some changes to settings within this section could adversely affect the operation of the MP-202 and the home network, and should be made with caution. Figure 13-1: Advanced Settings... - Page 162 Perform networking diagnostics Diagnostics Clone MP-202's MAC address. MAC Cloning Change the regional settings Regional Settings Modify administrator settings, including the MP-202's hostname System Settings Configure the MP-202's SNMP agent SNMP Configure Universal Plug and Play (UPnP) parameters Universal Plug...
-
Page 163: Remote Administration
13.1 Remote Administration It is possible to access and control the MP-202 not only from within the home network, but also from the Internet. This allows you to view or change settings while travelling. It also enables you to allow your ISP to change settings or help you trouble-shoot functionality or communication issues from a remote location. - Page 164 Telephone Adapter from the home network. Therefore, remote access to Telnet or HTTP services should be blocked and should only be permitted when absolutely necessary. MP-202 Telephone Adapter Document #: LTRT-50605...
-
Page 165: About The Mp-202
SSL certificate. When accessing the MP-202 for the first time using encrypted remote administration, you will be prompted by your browser with a warning regrading certificate authentication. This is due to the fact that the MP-202's SSL certificate is self generated. When encountering this message under these circumstances, ignore it and continue. -
Page 166: Figure 13-3: Contents Of The Configuration File
When creating a configuration backup, disable the two display check boxes (i.e. save a full configuration file in the hierarchic conf format). This file can be loaded back to the same gateway, using the procedure described in ''Loading From a Computer in the Network'' on page 167. MP-202 Telephone Adapter Document #: LTRT-50605... -
Page 167: Loading From A Computer In The Network
13.3.1 Loading From a Computer in the Network To load the MP-202's configuration file from a computer in the network: Click the icon 'Configuration File' from the 'Advanced' screen; the 'Configuration File' screen is displayed. -
Page 168: Figure 13-5: Advanced - Loading Configuration File From A Pc On The Network
The new configuration file is now applied to the gateway. Figure 13-7: Reboot After Configuration File Load Note: Do not power down the MP-202 or stop the file load process in the middle or else the MP-202 will become inoperable. MP-202 Telephone Adapter... -
Page 169: Loading From A Remote Server
To load the MP-202's configuration file from a remote server: Click the icon 'Configuration File' from the 'Advanced' screen; the 'Configuration File' screen is displayed. - Page 170 Click 'OK' to confirm. The upgrade process will begin and should take no longer than one minute to complete. At the conclusion of the upgrade process, the MP-202 automatically reboots and the new software version runs. If a new version is not available, click the 'Check Now' button to perform an immediate check (instead of waiting for the next scheduled one).
-
Page 171: Restart
13.5 Restoring Default Settings You can restore the MP-202's factory default settings when, for example, you're building a new network from the beginning or when you cannot recall changes made to the network and you need to go back to the default configuration). -
Page 172: Diagnostics
To restore default settings manually: Disconnect the MP-202 DC power cable. Using a paper clip, press the pushbutton located on the bottom of the MP-202 (a pinhole at one of the corners) While pressing the pushbutton, power up the device. Keep the pushbutton pressed for another 5 seconds. -
Page 173: Performing A Traceroute
MP-202 Telephone Adapter 13. Advanced Settings Under the screen section 'Ping (ICMP Echo)', enter the IP address or URL to be tested in the 'Destination' field. Enter the number of pings you would like to perform. Press the 'Go' button. -
Page 174: Mac Cloning
The behavior and parameters of analog telephones lines vary between countries. The set of Call Progress Tones, the protocol used for caller ID and the analog line impedance are all location-specific. The MP-202 enables users to select the country they reside in and the MP-202 automatically selects the correct regional settings. -
Page 175: System Settings
Language - select a different language for the WBM interface. Use the link 'Remote Administration' to access the MP-202's remote administration screen, from where you can selectively enable services that grant remote access to the MP-202. Use the screen section 'Management Application Ports' to configure:... - Page 176 'From Email Address' field. If your outgoing mail server requires authentication check the 'Server Requires Authentication' check-box and enter your user name and password in the 'User Name' and 'Password' fields respectively. MP-202 Telephone Adapter Document #: LTRT-50605...
-
Page 177: Figure 13-15: System Settings
MP-202 Telephone Adapter 13. Advanced Settings Enter the port that is used by your outgoing mail server. Figure 13-15: System Settings Version 2.6 May 1... -
Page 178: Snmp
Messages sent by the gateway to a remote management station, in order to notify the manager about the occurrence of important events or serious conditions. The gateway supports both SNMP version 1 and SNMP version 2c traps. MP-202 Telephone Adapter Document #: LTRT-50605... -
Page 179: Universal Plug And Play
13.12 Firmware Upgrade The MP-202 offers a built-in mechanism for upgrading its software image. There are two methods for upgrading the software image: Upgrading from a Computer on the Network - use a software image file pre-downloaded to your PC's disk drive or located on the accompanying CD. -
Page 180: Upgrading From A Computer In The Network
You can only use files with an rmt extension when performing the firmware upgrade procedure. Click the icon 'MP-202 Firmware Upgrade' from the 'Advanced' screen; the screen 'MP-202 Firmware Upgrade' opens (refer to the figure). Figure 13-18: Advanced - Firmware and Configuration Upgrade In the screen section 'Upgrade From a Computer in the Network', click the button 'Upgrade Now';... -
Page 181: Upgrading From The Internet
At the conclusion of the upgrade process, the device automatically reboots. The new software version runs, maintaining your custom configurations and settings. Note: Do not power down the MP-202 or stop the upgrade process in the middle or else the MP-202 will become inoperable. 13.12.2 Upgrading From the Internet... -
Page 182: Scheduler Rules
To define a Rule: Click the icon 'Scheduler Rules' in the 'Advanced' screen of the Web-based Management; the 'Scheduler Rules' screen appears (refer to the figure). Figure 13-22: Advanced - Scheduler Rules MP-202 Telephone Adapter Document #: LTRT-50605... -
Page 183: Figure 13-23: Advanced - Scheduler Rules - Edit Scheduler Rule
MP-202 Telephone Adapter 13. Advanced Settings Click the link 'New Scheduler Entry'; the 'Scheduler Rule Edit' screen appears (refer to the figure). Figure 13-23: Advanced - Scheduler Rules - Edit Scheduler Rule Specify a name for the rule in the 'Name' field. -
Page 184: Date & Time
Management. The 'Date & Time' settings screen will be displayed. Figure 13-25: Date & Time Settings Select the local time zone from the pull-down menu. The MP-202 can automatically detect daylight saving setting for selected time zones. If the daylight saving settings for... -
Page 185: Configuring Users
MP-202 Telephone Adapter 13. Advanced Settings For the Telephone Adapter to perform an automatic time update: Select the 'Enabled' checkbox under the 'Automatic Time Update' section. Select the protocol to be used to perform the time update by selecting wither the 'Time of Day' or 'Network Time Protocol' radio button. -
Page 186: Email Notification
Enter the user's email address in the 'Address' field in the 'Email' section. Select the 'System' and 'Security' notification levels in the 'System Notify Level' and 'Security Notify Level' combo boxes respectively. MP-202 Telephone Adapter Document #: LTRT-50605... -
Page 187: Routing
MP-202 Telephone Adapter 13. Advanced Settings 13.16 Routing 13.16.1 Managing Routing Table Rules You can access the routing table rules by clicking the 'Routing' icon from the 'Advanced' screen. The 'Routing' screen will appear. Figure 13-27: Routing Rules When adding a routing rule, you need to specify:... -
Page 188: Multicasting
Internet through a router. When an application running on a computer in the home network sends out a request to join a multicast group the MP-202 intercepts and processes the request. If the MP-202 is set to 'Minimum Security' no further action is required. -
Page 189: Dynamic Dns
To be able to use the DDNS feature, you must first open a free DDNS account at http://www.dyndns.org/account/create.html. When applying for an account, you will need to specify a user name and password. Have them readily available when customizing the MP-202's DDNS support. For detailed information on DDNS, refer to http://www.dyndns.org. Version 2.6... -
Page 190: Figure 13-29: Advanced - Dynamic Dns
Figure 13-29: Advanced - Dynamic DNS Click the link 'Add Connection' to add a new connection; alternatively, click the icon under 'Action'; the 'Dynamic DNS' screen appears (refer to the figure). Figure 13-30: Advanced - Dynamic DNS MP-202 Telephone Adapter Document #: LTRT-50605... -
Page 191: Ip Address Distribution
MP-202 Telephone Adapter 13. Advanced Settings Configure the DDNS parameters. Use the table below as a reference. Table 13-4: Dynamic DNS Parameter Descriptions Dynamic DNS Parameter Description Connection In a single WAN scenario, the connection parameter appears as static text (non-configurable). -
Page 192: Dhcp Server Parameters
'Disabled', then DHCP services are not being provided to hosts connected to the network through that gateway. This means that the gateway will not assign IP addresses to these computers, which is useful if you wish to work with static IP addresses only. MP-202 Telephone Adapter Document #: LTRT-50605... -
Page 193: Figure 13-32: Advanced - Ip Address Distribution - Dhcp Server
MP-202 Telephone Adapter 13. Advanced Settings To edit the DHCP server settings for a device: Under the column 'Action', click the icon 'Edit'; the DHCP Server settings for this device are displayed (refer to the figure). Figure 13-32: Advanced - IP Address Distribution - DHCP Server From the 'IP Address Distribution' drop-down list, select whether to enable or disable the DHCP server. -
Page 194: Dhcp Relay Parameters
Click the link 'New IP Address'; the 'DHCP Relay Server Address' screen opens (refer to the figure). Figure 13-35: Advanced - IP Address Distribution - DHCP Relay - New IP Address Specify the IP address of the DHCP server. MP-202 Telephone Adapter Document #: LTRT-50605... -
Page 195: Dhcp Connections
MP-202 Telephone Adapter 13. Advanced Settings Click 'OK' to save the settings. Click 'OK' once more in the 'DHCP Settings' screen. Click the icon 'Network Connections' on the sidebar of the main screen; the screen 'Network Connections' opens. Click the link 'WAN Ethernet'; the 'WAN Ethernet Properties' screen opens. -
Page 196: Dns Server
Supports multiple subnets within the LAN simultaneously. Automatically appends a domain name to unqualified names. Allows new domain names to be added to the database using the MP-202's Web- based Management. Permits a computer to have multiple host names. -
Page 197: Viewing And Modifying The Dns Table
MP-202 Telephone Adapter 13. Advanced Settings 13.20.1 Viewing and Modifying the DNS Table To view the list of computers stored in the DNS table: Click the icon 'DNS Server' in the 'Advanced' screen of the Web-based Management; the DNS table is displayed (refer to the figure). -
Page 198: Protocols
To define a protocol: Click the Advanced icon on the side-bar. Click the icon 'Protocols', the 'Protocols' screen appears (refer to the figure). Figure 13-40: Advanced - Protocols MP-202 Telephone Adapter Document #: LTRT-50605... -
Page 199: Figure 13-41: Advanced - Protocols - Edit Service
MP-202 Telephone Adapter 13. Advanced Settings Click the link 'New Entry'; the 'Edit Service' screen appears (refer to the figure). Figure 13-41: Advanced - Protocols - Edit Service Name the service in the parameter 'Service Name' and click the link 'New Service Ports';... - Page 200 User's Manual Reader's Notes MP-202 Telephone Adapter Document #: LTRT-50605...
-
Page 201: System Monitoring
MP-202 Telephone Adapter 14. System Monitoring System Monitoring The System Monitoring screen displays important system information, including: Key network device parameters Network traffic statistics The system log The length of time that has transpired since the system was last started Voice over IP 14.1... -
Page 202: Traffic
Click tab 'Traffic'; the 'System Monitoring - Traffic' screen opens. Figure 14-2: System Monitoring - Traffic 14.3 System Log The System Log displays a list of the most recent activity that has taken place on the gateway. MP-202 Telephone Adapter Document #: LTRT-50605... -
Page 203: System Up Time
MP-202 Telephone Adapter 14. System Monitoring To open the system log: Click tab 'System Log'; the 'System Monitoring - System Log' screen opens. Figure 14-3: System Monitoring - System Log 14.4 System Up Time To display the system up time: Press tab 'System' to display the length of time that has passed since the system was last started. -
Page 204: Voice Over Ip
Voice over IP To monitor VoIP: Click tab 'Voice over IP'; the 'System Monitoring - Voice over IP' screen opens showing read-only VoIP call related parameters. Figure 14-5: Advanced - System Monitoring - VoIP MP-202 Telephone Adapter Document #: LTRT-50605... -
Page 205: Software And Hardware Specifications
Software and Hardware Specifications Note: For the list of features available in the current software version, refer to the latest Release Notes. Table 15-1: MP-202 Telephone Adapter Software Specifications Feature Details SIP - RFC 3261, RFC 2327 (SDP) VoIP Signaling Protocols... -
Page 206: Table 15-2: Mp-202 Telephone Adapter Hardware Specifications
Caller ID: Telcordia, ETSI, NTT - Type I, Telcordia Type II Call Progress Tones Out-of-band: FXS Loop-start On/Off Hook, Flash Hook Polarity reversal Table 15-2: MP-202 Telephone Adapter Hardware Specifications Power +12VDC Interfaces RJ-45 - 10/100 Base-T for LAN RJ-45 - 10/100 Base-T for WAN...