Table of Contents
Advertisement
Quick Links
LACIE 2BIG NAS (OS 3.0) | LACIE 5BIG NAS PRO USER
MANUAL
CLICK HERE TO ACCESS UP-TO-DATE ONLINE VERSION
of this document for the most recent content as well as for features such as expandable
illustrations, easier navigation, and search capability.
LaCie 2big NAS
LaCie 2big NAS (OS 3.0) | LaCie 5big NAS Pro User Manual
LaCie 5big NAS Pro
1
Advertisement
Table of Contents

Related Manuals for LaCie ICA-312


Summary of Contents for LaCie ICA-312
- Page 1 LACIE 2BIG NAS (OS 3.0) | LACIE 5BIG NAS PRO USER MANUAL CLICK HERE TO ACCESS UP-TO-DATE ONLINE VERSION of this document for the most recent content as well as for features such as expandable illustrations, easier navigation, and search capability. LaCie 2big NAS LaCie 5big NAS Pro LaCie 2big NAS (OS 3.0) | LaCie 5big NAS Pro User Manual...
-
Page 2: Box Content
INTRODUCTION Informação importante: Este manual do usuário é apenas em Inglês. This manual covers: Products Operating System Version LaCie 2big NAS LaCie NAS OS 3.0 (learn more here) LaCie 5big NAS Pro LaCie NAS OS 3.0 Congratulations on your purchase of a LaCie professional NAS (network-attached storage device). Designed to satisfy the data sharing and backup needs of small, medium, and branch offices, your product belongs to the new generation of LaCie NAS, featuring Hybrid Cloud technology. -
Page 3: Minimum System Requirements
MINIMUM SYSTEM REQUIREMENTS Latest version of Windows® XP, Windows Vista®, Windows 7, Windows 8 / Mac® OS X 10.5, 10.6, 10.7, 10.8 Web browsers: Internet Explorer™ 7.0 / 8.0, Firefox™ 3.0, Safari™ 3.0, or Chrome 2.0 or higher Computer with an Ethernet network adapter Ethernet switch or router 10/100/1GB UPnP server or client (to access UPnP services) SMB server or client (to access SMB services) -
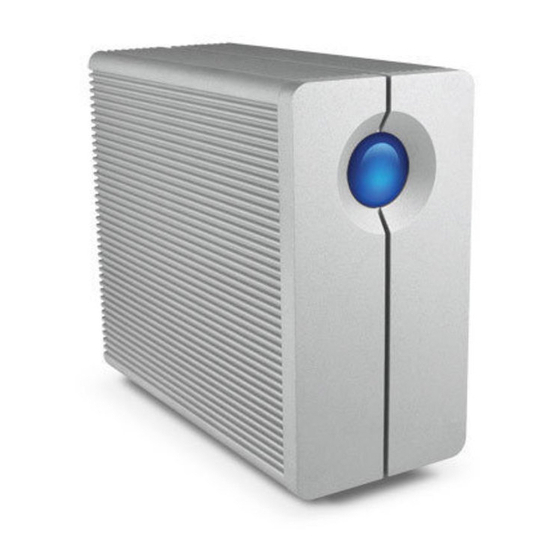
Page 4: Views Of The Product
VIEWS OF THE PRODUCT FRONT VIEW LaCie 2big NAS LaCie 5big NAS Pro Front LED button: The LED button signals the status and health of the device. For further details, see Behavior and Button Functions. LaCie 2big NAS (OS 3.0) | LaCie 5big NAS Pro User Manual... -
Page 5: Rear View
REAR VIEW LaCie 2big NAS Left drive status LED (see LED Behavior and Button Functions) ON/OFF Gigabit Ethernet USB 2.0 expansion eSATA expansion Right drive status LED (see LED Behavior and Button Functions) Drive tray handle Drive lock Power connector LaCie 2big NAS (OS 3.0) | LaCie 5big NAS Pro User Manual... - Page 6 LaCie 5big NAS Pro Drive status LED (see LED Behavior and Button Functions) Drive tray handle Drive lock USB 2.0 expansion (x2) USB 3.0 expansion (x2) Gigabit Ethernet (x2) VGA port Power connector Reset button (see LaCie NAS Rescue - 5big NAS Pro) LaCie 2big NAS (OS 3.0) | LaCie 5big NAS Pro User Manual...
- Page 7 LED BEHAVIOR AND BUTTON FUNCTIONS The front and rear LEDs indicate drive status and activity. This section describes the behavior of the LED indicators. Note that even if you have turned off the front LED using Dashboard > Eco Management, events triggering a red light will always cause the front LED to turn on.
-
Page 8: Front Button
FRONT BUTTON Use the front LED button to turn your device on/off or to enter/exit deep sleep mode. Light Push The default function for a light push on the front LED button is to turn the LaCie NAS on/off. If the device is on, a light push should allow pending actions to restart with the device. -
Page 9: Heat Dissipation Design
HARD DISK HEAT MANAGEMENT (LACIE 2BIG NAS) HEAT DISSIPATION DESIGN This LaCie product's metal body is ideal for naturally dissipating internal drive heat. Its unique design actually draws heat away from the internal drive toward the external casing. The large surface area of the heat sink casing absorbs internal heat and dissipates it, keeping the drive safe and prolonging its life and reliability. -
Page 10: Connect To The Network
CONNECT TO THE NETWORK This chapter explains how to connect your LaCie NAS to a network. Enclosure without disks: If you purchased an enclosure that did not include disks, please see Connect to your Network - Diskless LaCie 2big NAS Connect to your Network - Diskless LaCie 5big NAS Pro instructions on how to connect to your device to the network. - Page 11 Step 2: Power on the LaCie NAS Turn on the device on. LaCie 2big NAS: Push the power button on the back of the device to the ON position. LaCie 5big NAS Pro: Lightly push the the front LED button. The front LED will turn on and then begin blinking.
- Page 12 Step 3: Access the LaCie NAS Dashboard Note: The steps below should be completed by the administrator of the device. Perform the steps below on a PC/Mac connected to the same network as your LaCie NAS: Launch your preferred internet browser and type the default address for the LaCie NAS: Windows XP - http:\\lacie-2big-nas or http:\\lacie-5big-pro Windows Vista / 7 / 8 and Mac OS - http:\\lacie-2big-nas.local or http:\\lacie-5big-pro.local.
-
Page 13: Next Steps
NEXT STEPS Simplify NAS access: LaCie recommends that you install the software utility LaCie Network Assistant before moving forward with the device configuration. LaCie Network Assistant gives you instant information on your LaCie NAS, such as firmware version, IP address, and hardware address. It will also provide quick access to shares (volumes) and the Dashboard. - Page 14 CONNECT TO YOUR NETWORK - DISKLESS LACIE 2BIG Users who purchased a LaCie 2big NAS enclosure without hard disks should follow the instructions below. Enclosure with hard disks: If you purchased an enclosure with hard disks, please see Connect to the Network for instructions on how to connect to your network.
-
Page 15: Installation Steps
INSTALLATION STEPS Step 1: Connect and Power on the Diskless Product Make sure that no disks are installed in the product. Connect the Ethernet cable to the Ethernet port on the back of the product and to an available Ethernet port on your router. - Page 16 The disk tray(s) may be locked. To unlock, use the included disk drawer key to turn the lock until the slot is vertical. Draw out the disk tray by inserting your finger into the space behind the disk tray handle and pulling to LaCie 2big NAS (OS 3.0) | LaCie 5big NAS Pro User Manual...
- Page 17 disengage it. Grasp the disk tray handle and carefully extract it. Repeat the process if you are adding a second disk. LaCie 2big NAS (OS 3.0) | LaCie 5big NAS Pro User Manual...
- Page 18 Step 3: Install the Disk(s) in Disk Tray(s) Find a suitable work area with adequate space and a flat, even surface. Make certain that all necessary components are available: LaCie 2big NAS disk tray Hard disk Disk tray screws. Use only the screws that are provided with your LaCie NAS. Phillips head screwdriver.
- Page 19 Many disks have a label on one side and the printed circuit board on the opposite side. With its label side facing up, gently place the hard disk within the disk tray. Keep the side with the printed circuit board on the work space and the SATA connector facing to the right.
- Page 20 Repeat the process if you are installing two disks. Step 4: Insert the Full Disk Tray(s) Note on illustrations: To reduce complexity in the images, the Ethernet and Power cables have been removed. LaCie recommends that you maintain both connections while continuing with the installation steps. Carefully insert the full disk tray into an empty disk slot.
- Page 21 If you are adding the second disk, insert it next. Use the disk lock tool to lock the disk(s) in place. The disk LEDs on the rear of the product will blink blue. Wait a full minute before moving on to the next step. Step 5: Initialize the New Disk(s) Please note that, during this process, the hard disks you have inserted into the LaCie NAS will be formatted and all data deleted.
- Page 22 After a period of 10 to 16 minutes, initialization will have completed. The system is ready once the front LED turns solid blue. Step 6: Access the LaCie NAS Dashboard Note: The steps below should be completed by the administrator of the device. Perform the steps below on a PC/Mac connected to the same network as your LaCie NAS.
- Page 23 The default administrator login (admin). Your time zone. Make certain to note your login and password for future use. Click Finish to access the Dashboard Home page. LaCie 2big NAS (OS 3.0) | LaCie 5big NAS Pro User Manual...
- Page 24 Next Steps Simplify NAS access: LaCie recommends that you install the software utility LaCie Network Assistant before moving forward with the device configuration. LaCie Network Assistant gives you instant information on your LaCie NAS, such as firmware version, IP address, and hardware address. It will also provide quick access to shares (volumes) and the Dashboard.
- Page 25 CONNECT TO YOUR NETWORK - DISKLESS LACIE 5BIG NAS PRO Users who purchased a LaCie 5big NAS Pro enclosure without hard disks should follow the instructions below. Enclosure with hard disks: If you purchased an enclosure with hard disks, please see Connect to the Network for instructions on how to connect to your network.
- Page 26 LaCie may update firmware on the USB Key for enhanced operation so please follow the directions below: Insert the LaCie USB Key into a USB port on a PC with a connection to the internet. The PC must be running Windows.
- Page 27 Look on the bottom of your LaCie 5big NAS Pro enclosure for the sticker with two numbers that correspond to LAN 1 and LAN 2. You may use one of the two numbers as the MAC address. Connect a VGA monitor to the VGA port located on the back of the LaCie 5big NAS Pro. Following the initial boot process, the system will indicate MAC and IP addresses.
- Page 28 another LaCie device or another manufacturer. Using any other power cable or power supply may cause damage to the device and void your warranty. Always remove the AC adapter before transporting your LaCie device. Failure to remove the adapter may result in damage and will void your warranty. Step 3: Remove the Sticker and Power on the Device Remove the sticker on the back of the enclosure.
- Page 29 Remove the empty disk tray(s): Use the included drawer key to unlock the disk tray. Turn the lock until it is vertical. Place your index finger into the space behind the handle then carefully remove the disk tray. LaCie 2big NAS (OS 3.0) | LaCie 5big NAS Pro User Manual...
- Page 30 Remove additional trays if you are adding more than one hard disk. Make certain to remove the disk trays in the proper slot order. Fasten the hard drive to the hard disk tray: Find a suitable work area with adequate space and a flat, even surface. Make certain that all necessary components are available: LaCie 5big NAS Pro Hard Disk Tray Hard drive...
- Page 31 Many hard disks have a label on one side and the printed circuit board on the opposite side. With its label side facing up, gently place the hard disk within the hard drive tray. Keep the side with the printed circuit board on the work space and the SATA connector facing to the right.
- Page 32 Repeat the process if you are adding more than one hard disk. Carefully insert the full hard drive tray into the empty Disk Slot 1 (far left). You will feel resistance when the hard drive tray is most of the way in the bay. Gently push the hard drive tray handle firmly until you feel it snap into place.
- Page 33 If you are adding more than one hard disk, insert full hard drive trays into empty slots in the enclosure. Make certain to follow the slot numbers. For example, the second hard disk should be inserted into Disk Slot 2, the third disk into Disk Slot 3, etc.
- Page 34 To continue, enter one of the MAC addresses that you noted in Step 1. It is not necessary to enter the colons. Click Start Install. Click Continue at the prompt to install LaCie NAS OS on the hard disk(s). To accommodate the installation, all data stored on the hard disks will be deleted.
- Page 35 It will take approximately five minutes to format the hard drive(s) and install LaCie NAS OS. Once it is finished, the Dashboard will prompt you to create an administrator password. You may also change: The default name of the device (LaCie-5big-Pro). The default administrator login (admin).
- Page 36 Note on IP Address: If you cannot reach the setup wizard using the name of the device, please connect a VGA monitor to the VGA port located on the back of the 5big NAS Pro. Following the initial boot process, the system will indicate MAC and IP addresses.
- Page 37 LACIE NETWORK ASSISTANT LaCie Network Assistant is a software utility that will help you access and manage your LaCie NAS as well as other LaCie storage that may be connected to your network. Use LaCie Network Assistant for instant information on the device's: IP address Version of software/firmware...
- Page 38 Right-click on the icon in the system tray. Mac Users: Select LaCie Network Assistant at Go > Applications > LaCie Network Assistant. The application icon will appear in the menu bar and LaCie Network Assistant will automatically detect your LaCie device(s) on the network.
- Page 39 Review the device's: IP address MAC address (hardware ID) Version of software LaCie 2big NAS (OS 3.0) | LaCie 5big NAS Pro User Manual...
- Page 40 ACCESS THE DASHBOARD WITH LACIE NETWORK ASSISTANT Launch LaCie Network Assistant. Choose your device: Windows: Right-click on the LaCie Network icon in the system tray to select your LaCie NAS. Mac: Click on the LaCie Network Assistant icon in the menu bar to select your LaCie NAS. Select Web access.
- Page 41 Public shares are available to everyone on the network. Private shares will prompt a user for a username and password. The administrator should use the credentials created during the initial setup or Dashboard login (see Connect to the Network/Connect to your Network - Diskless LaCie 2big NAS/Connect to your Network - Diskless LaCie 5big NAS Pro Dashboard (Administration)).
- Page 42 Note on Quick Access to shares: Private shares require a valid username and password (see Authenticate for Private Shares). Mount Launch LaCie Network Assistant. Right-click on the icon in the system tray (Windows) or click the icon in the menu bar (Mac) and select Open LaCie Network Assistant.
- Page 43 Double-click the share you wish to access. The share will open in an Explorer window (Windows) or a Finder window (Mac). Transfer files normally from your computer to the share. Technical note: Mac users: If the share does not open in a Finder window, simply navigate in the Finder to Network >...
- Page 44 Click Authentication… In the pop-up window, choose Registered User and enter your Username and Password. Click OK. All available shares will appear in the list of volumes. Click on Mount as drive (Windows) or Mount (Mac) to open the share. The share will be available in an Explorer window (Windows) or a Finder window (Mac).
- Page 45 Auto-Mount Launch LaCie Network Assistant then right-click (Windows) or click (Mac) on its icon to select Open LaCie Network Assistant. If you have more than one LaCie NAS, select the device you wish to access from the list in the left-hand column.
- Page 46 PC users: The share will mount in Computer/My Computer automatically when the computer detects it on the network. Mac users: The share icon will appear in your Finder automatically when the computer detects it on the network. LaCie 2big NAS (OS 3.0) | LaCie 5big NAS Pro User Manual...
-
Page 47: About Default Shares
SHARES: ACCESS AND TRANSFER FILES ABOUT DEFAULT SHARES A share is a network volume that you can configure to store and share data. Your LaCie NAS has two shares by default: admin and Public. Please note that the share admin will change to the name used by the administrator. For example, if the administrator changes the default login “admin”... - Page 48 Windows In an Explorer window address field, type \\[machine name] or \\[IP address]] and click Go. Alternatively, from the Start menu, click Run, type \\[machine name] or \\[IP address]] and click OK. Windows Vista, Windows 7, and Windows 8 Windows XP Mac Users In your Finder, navigate to Go >...
- Page 49 LaCie 2big NAS (OS 3.0) | LaCie 5big NAS Pro User Manual...
-
Page 50: Creating Shortcuts To Shares
CREATING SHORTCUTS TO SHARES Once you successfully set up your LaCie NAS, you can create shortcuts so you can quickly access stored files. You can do this by using your operating system or LaCie Network Assistant. CREATE SHORTCUT USING LACIE NETWORK ASSISTANT LaCie Network Assistant can be configured to automatically mount shares on your computer, which allows you quick access to the files they store. - Page 51 Browse to and select the share you wish to auto mount. Windows will offer the option to mount the share each time you log on to the computer. Repeat steps 1-3 for other shares. Mac Users Open a new Finder window. On the left of the window, navigate to Shared > [machine name] > [share]. If prompted, type in your username and password and click Connect.
- Page 52 When you log on to the Mac OS, the share(s) will automatically mount on your desktop (as long as you haven't configured your Finder not to display connected servers on your desktop). LaCie 2big NAS (OS 3.0) | LaCie 5big NAS Pro User Manual...
- Page 53 BACKUP: LACIE NAS AND PC/MAC BACKUP YOUR LACIE NAS Backup for a complete explanation on how to automate backups of data stored on your LaCie NAS. You can back up your data to: An external hard drive Another LaCie NAS or rsync-compatible server on your local network Another LaCie NAS or rsync-compatible server on a remote/offsite network BACKUP YOUR COMPUTER(S) Your LaCie NAS is fully compatible with popular backup solutions such as:...
-
Page 54: Set Up Remote Access
REMOTE ACCESS: LACIE MYNAS Remote access to your LaCie NAS is available using: Hybrid Cloud via Wuala secure cloud storage LaCie MyNAS FTP (see Accessing Shares via FTP) While Wuala by LaCie and LaCie MyNAS are easy to configure and use, they differ in how users can access and manage data from remote locations. - Page 55 In the Remote Access drop-down menu, choose LaCie MyNAS. Type a name for your LaCie NAS in the Name field. Click Apply. The Dashboard will query the mynas.lacie.com server to see if the name you chose is available. If so, you will receive a message confirming the connection. If your name is already chosen, type a new one and click Apply until you find an available name.
- Page 56 Access your router's administration page in order to forward this port. Retry the remote access connection. LaCie 2big NAS (OS 3.0) | LaCie 5big NAS Pro User Manual...
-
Page 57: Using Remote Access
USING REMOTE ACCESS Once configured, simply type your LaCie NAS's URL into any browser, anywhere. Your URL will be: mynas.lacie.com/name After you input the URL, you will be asked to log in to the Dashboard. Note that this username and password are the credentials created by the administrator in Dashboard >... - Page 58 MEDIA (UPNP/DLNA) SERVERS You can configure your LaCie NAS to share files (read-only) with UPnP/DLNA devices connected to the same network. Follow these steps: Make sure your LaCie NAS is connected to your network as described in Connect to the Network.
-
Page 59: Windows Media Player
ITUNES Your LaCie NAS can act as an iTunes Music server, streaming audio files to a computer on the network running iTunes. Once configured, a playlist bearing your LaCie NAS's machine name will appear in the Shared category within iTunes, and audio files stored on the LaCie NAS will be listed in this playlist. Follow these steps: Make sure your LaCie NAS is connected to your network as described in Connect to the Network. - Page 60 In the dialogue window, click Add, select your LaCie NAS's machine name under the Network section, and click Include Folder. LaCie 2big NAS (OS 3.0) | LaCie 5big NAS Pro User Manual...
- Page 61 WMP will begin indexing the media files. Once completed, they will appear in the WMP library. LaCie 2big NAS (OS 3.0) | LaCie 5big NAS Pro User Manual...
-
Page 62: Accessing Shares Via Ftp
ACCESSING SHARES VIA FTP FTP (file transfer protocol) is used to transfer files from one computer to another via the local network or the internet. This protocol allows you to exchange files with your colleagues, clients, or business partners securely, as only people with a user account will have access. - Page 63 Access files via third-party FTP applications REMOTE FTP ACCESS You can access and share your LaCie NAS's files from a computer outside of your home network. To gain access using FTP, you will need to know your router's public IP address. From a computer on the same local network as the LaCie NAS, visit this page: http://www.whatismyip.com/.
-
Page 64: Accessing Shares Via Nfs
ACCESSING SHARES VIA NFS Network File System (NFS) is a distributed file system protocol allowing a system to share directories and files with others over a network. Like SMB, NFS grants file-level access to users and programs. NFS is widely distributed to host VMWare datastores or share network folders in a Linux/UNIX environment. When enabling NFS service on a share, it can be accessed with the following path: NAS_NAME_OR_IP_ADDRESS:/shares/SHARE_NAME The NFS protocol is not active by default. -
Page 65: Wake On Lan (Wol)
WAKE ON LAN (WOL) Your LaCie NAS can conserve energy by entering deep sleep mode. Use the Dashboard to schedule deep sleep mode when no one accesses the LaCie NAS and wake it up when your office is ready to work. (See Management for more information on deep sleep mode). - Page 66 Click Wake up. LaCie 2big NAS (OS 3.0) | LaCie 5big NAS Pro User Manual...
-
Page 67: Access The Dashboard
DASHBOARD (ADMINISTRATION) All LaCie NAS feature an easy-to-use browser-based administration tool, called the Dashboard, that will allow you to manage users, groups, shares, and the other product features. ACCESS THE DASHBOARD There are two ways to access the Dashboard: LaCie Network Assistant and an internet browser. Access the Dashboard Using LaCie Network Assistant LaCie Network Assistant for instructions on software installation. - Page 68 Select [machine name] > Web Access. The login page will open in a new browser window or tab. If your browser is not open, LaCie Network Assistant will open it for you. Access the Dashboard Using a Browser Launch your preferred internet browser and type the default address for the LaCie NAS: Windows XP - http:\\lacie-2big-nas or http:\\lacie-5big-pro Windows Vista / 7 / 8 and Mac OS - http:\\lacie-2big-nas.local or http:\\lacie-5big-pro.local.
- Page 69 You can also type your LaCie NAS's IP address in the browser's URL (web address) field. For example: http://[IP-address]. The IP address may be found in LaCie Network Assistant (see Find the IP Address). LaCie 2big NAS (OS 3.0) | LaCie 5big NAS Pro User Manual...
- Page 70 LOG IN The first time you access the Dashboard, complete the Authentication and Timezone fields. (The password should be from 4-20 alphanumeric characters and symbols, and the username should be from 1-20 alphanumeric characters.) In subsequent logins, simply type in your username and password in the login prompt. Then click Log in. LaCie 2big NAS (OS 3.0) | LaCie 5big NAS Pro User Manual...
- Page 71 LaCie 2big NAS (OS 3.0) | LaCie 5big NAS Pro User Manual...
- Page 72 Recover a Lost Password If a user has forgotten his/her password, it can be recovered if the administrator has: Assigned an SMTP server (see Support). Entered an email address for that user (see Manage Users). If the above conditions have been met, the administrator and/or user can follow the steps below to recover a password: On the login page, click Have you lost or forgotten your password?.
- Page 73 Restart, Deep Sleep Mode, and Shutdown To restart or put the LaCie NAS into deep sleep mode, click the power button, then choose between Restart and Deep Sleep Mode. Deep sleep mode must be enabled or the option will not be available (see Management).
-
Page 74: Navigate The Dashboard
Log Out To log out of the Dashboard, click the log out button. NAVIGATE THE DASHBOARD The Dashboard is made up of a central area surrounded by widgets, or small boxes that represent the different pages that make up the Dashboard. The widget displays a summary of the information contained in the page. For full information, navigate to the page itself. -
Page 75: File Browser
FILE BROWSER The Dashboard features an interactive File Browser that allows you to manage and transfer files via HTTP. Access the File Browser by clicking its icon in the upper right-hand corner of the Dashboard. The File Browser allows you to transfer, copy, and delete files, as well as view photos in thumbnails and even stream multimedia content such as mp3 or view photos. -
Page 76: Open Files
This section displays the files contained in a selected folder. To view the files as thumbnails, click Thumbs in the toolbar. OPEN FILES Photo: Click the View button in the toolbar. Music: Click the play button in the Details panel (mp3 files only). TXT files: Click the Edit button in the toolbar. - Page 77 LaCie 2big NAS (OS 3.0) | LaCie 5big NAS Pro User Manual...
-
Page 78: General Settings
GENERAL SETTINGS GENERAL TAB Machine Name: The machine name identifies your LaCie NAS on your network. You can change it from the default by clicking on the pencil icon and typing a new one. If a duplicate name exists on the network, alternate names are automatically created to avoid conflicts. - Page 79 Domain: Select the radio button for Domain if you intend to join a Windows Active Directory (see the next paragraph for instructions on entering your Active Directory credentials). When joining an Acive Directory, existing users/passwords in the domain are respected by the LaCie NAS and treated exactly as if they were created in the Dashboard.
- Page 80 Leave the domain To remove the LaCie NAS's connection to a domain: Click the Leave button. Authenticate by inputting the administrator's username and password. Users and Groups that were imported may still be listed in Manage Users Manage Groups. To remove all imported users and groups from the LaCie NAS, click on the button Remove the imported Users/Groups LaCie 2big NAS (OS 3.0) | LaCie 5big NAS Pro User Manual...
- Page 81 (this button replaces Synchronize imported Users/Groups once you leave a domain). FILE SHARING AND APPLICATION SERVICES TABS File Sharing Application Services These tabs allow you to activate or deactivate sharing and applications protocols on your device on global or default levels. There are three levels of service activation: global, default, and share (specific). The global level overrides the other levels.
- Page 82 Note: Activating NetBackup Server will disable SFTP (see Enable NetBackup Server). LaCie 2big NAS (OS 3.0) | LaCie 5big NAS Pro User Manual...
-
Page 83: Connection Tab
NETWORK LaCie 2big NAS LaCie 5big NAS Pro CONNECTION TAB If your network is DHCP-enabled, your LaCie NAS will automatically be assigned an IP address and other values. As a result, most users will see that the table in the Connections tab has been filled in with values. The LaCie 2big NAS has a single LAN port while the LaCie 5big NAS Pro includes two LAN ports (see below). - Page 84 LAN Details - 5big NAS Pro Selecting Edit allows you to modify certain network parameters. You can manually adjust network values by selecting Manual configuration and give the LAN port a unique name (LaCie 5big NAS Pro only). Please make certain to check the box next to Default Gateway to enter or revise a Gateway address.
- Page 85 Edit - LaCie 5big NAS Pro Important info on Network Addressing: LaCie cautions users that changes to the IP address must be consistent with the values of the router and/or network. You may lose contact with your LaCie NAS by typing addresses that are not available on your network.
- Page 86 LaCie 2big NAS (OS 3.0) | LaCie 5big NAS Pro User Manual...
- Page 87 Port Aggregation: Multiple Networks, Bonding, and Fault Tolerance The LaCie 5big NAS Pro is equipped with two LAN ports for enhanced network performance. Review the instructions below to learn how to configure the LaCie 5big NAS Pro LAN ports for your network. Two Networks: Bridge the data on your LaCie 5big NAS Pro Connect the LaCie 5big NAS Pro to two separate networks to share access to data.
- Page 88 IP Addressing: You can manually configure the IP addresses for the LAN connections by clicking on their respective configuration icons (pencil) and selecting Edit. Bonding: Enhanced Speed Configure both Ethernet ports to act together for speeds up to two times faster than a single LAN connection. Before following the directions below, please make certain that your switch or router supports link aggregation.
- Page 89 Select Load balancing then click Next. Check the boxes next to each LAN port then click Next. LaCie 2big NAS (OS 3.0) | LaCie 5big NAS Pro User Manual...
- Page 90 You can name the LAN bonding as well as select how the paired Ethernet ports will receive a unified IP address (DHCP or Manual configuration). If you select Manual configuration, the IP address must be consistent with the values of the router and/or network. Click Finish to complete the bonding. DHCP IP addressing LaCie 2big NAS (OS 3.0) | LaCie 5big NAS Pro User Manual...
- Page 91 Manual/Static IP addressing The two LAN ports are now listed as one. Break the LAN bond: If you no longer wish to bond the two Ethernet ports, follow the steps below. Click on the configuration icon (pencil) to select Remove virtual interface. LaCie 2big NAS (OS 3.0) | LaCie 5big NAS Pro User Manual...
- Page 92 Click Continue at the prompt. Fault Tolerance: Failover Protection Configure fault tolerance to keep your LaCie 5big NAS Pro connected to the network even if one Ethernet port or cable fails. Before following the directions below, please make certain that your network switch(es)/router(s) support fault tolerance.
- Page 93 With both LANs enabled, click on Create. Select Fault tolerance then click Next. LaCie 2big NAS (OS 3.0) | LaCie 5big NAS Pro User Manual...
- Page 94 Check the boxes next to each LAN port then click Next. Use the pulldown menu to choose the primary LAN port. LaCie 2big NAS (OS 3.0) | LaCie 5big NAS Pro User Manual...
- Page 95 Fault tolerance will switch to the secondary LAN if it cannot detect the primary LAN. Choose if the type of detection should be physical (e.g. a bad Ethernet cable) or software (e.g. contact with another IP address). Enter the IP address that the LaCie 5big NAS Pro should ping to confirm the stability of the primary LAN and the frequency.
- Page 96 The two LAN ports are now listed as one. Break the Fault Tolerance: If you no longer wish to keep Fault Tolerance, follow the steps below. Click on the configuration icon (pencil) to select Remove virtual interface. LaCie 2big NAS (OS 3.0) | LaCie 5big NAS Pro User Manual...
- Page 97 Click Continue at the prompt. LAN Priority: Primary LAN Interface The primary Ethernet port is marked by a star next to the LAN number. In the example below, LAN 1 is the primary Ethernet port. LaCie 2big NAS (OS 3.0) | LaCie 5big NAS Pro User Manual...
- Page 98 The primary Ethernet port: Carries the data when the LaCie 5big NAS Pro is configured in Fault Tolerance Acts as the gateway to the internet when the LaCie 5big NAS Pro is connected to two separate networks LAN interface and LaCie Network Assistant: LAN Port 1 must be enabled to use LaCie Network Assistant. You can change the priority order by reassigning the role of primary port.
- Page 99 PROXY TAB A proxy server may be used to connect compatible devices to the internet. If necessary, your LaCie NAS can be configured to connect to a proxy server. First, activate the feature by selecting the Manual proxy configuration option from the drop-down menu, then fill in the proxy server address, port, and optional authentication information.
- Page 100 PORT FORWARDING TAB This page lets you manage your LaCie NAS's automatic port forwarding. In order that the LaCie NAS be accessible to the internet, it's necessary that certain ports be opened in your router. If you need to change the ports to be forwarded for HTTP, HTTPS, or remote (LaCie MyNAS) connections, you can do so from this page.
-
Page 101: Manage Users
MANAGE USERS This page allows you to manage user accounts. NEW USER To create a new user, click the Add user button, then fill out the required fields. Important info: The password is case-sensitive. In text fields, you may enter from 4 to 20 characters using letters, numbers, symbols, hyphen, and underscore. -
Page 102: Existing User
EXISTING USER User data is organized in a table. The icons in the far left of the table indicate a user's rights: Crown: Administrative privileges. Blue user: Standard user privileges. Grey user: Standard user privileges and the user was imported from an Active Directory. Click the text in the Login column to change the user name. - Page 103 At the prompt, type a few characters in the text field to find the user(s) you wish to import. Hold down the Command key (Mac users) or Ctrl key (Windows users) to select multiple users. Click the Import button. The imported users will appear in the table. You can identify which users were imported from the domain because their user icons are grey.
- Page 104 LaCie 2big NAS (OS 3.0) | LaCie 5big NAS Pro User Manual...
-
Page 105: Delete A User
DELETE A USER Deleting a user will also delete all the user's settings. To delete a user, click the configuration icon (pencil) at the far-right of the user's row, then click Remove. Confirm in the dialogue window. LaCie 2big NAS (OS 3.0) | LaCie 5big NAS Pro User Manual... -
Page 106: Manage Groups
MANAGE GROUPS Assigning users to groups gives you powerful tools to manage large numbers of users and their privileges. They allow administrators to change access rights to entire groups rather than individually. From this page, administrators can: create, modify, delete, and add users to groups. Important info: In text fields, you may enter 1 to 20 characters using letters, numbers, hyphen, and underscore. -
Page 107: New Group
NEW GROUP To create a new group, click the ADD GROUP button, then fill out the required fields. EXISTING GROUP Group data is organized in a table. Click the text in the Group name column to change the group name. Click the empty space or text in the Description column to add or revise details for the group (optional). - Page 108 Delete. See below. LaCie 2big NAS (OS 3.0) | LaCie 5big NAS Pro User Manual...
-
Page 109: Importing Groups From Active Directory
IMPORTING GROUPS FROM ACTIVE DIRECTORY If you have successfully connected to an Active Directory domain (see General Settings), you will see a button labelled Import from domain. Click the button. A prompt allows you to search for groups on the domain. Hold down the Command key (Mac users) or Ctrl key (Windows users) to select multiple users. -
Page 110: Manage Shares
MANAGE SHARES Your LaCie NAS's storage is divided into shares, also known as network folders. Out of the box, it has two shares, admin and Public. This page allows you to assign access rights to users and groups, and to adjust Specific share services. - Page 111 EXISTING SHARES Share data is organized in a table. Click the text in the Name column to change the share name. Click the empty space or text in the Description column to add or revise details for the Share (optional). The number in the Groups column (two silhouettes) shows how many groups have access to the share.
- Page 112 Blue Circle - Default/Global Service Protocol Yellow Circle - Specific Service Protocol To change Specific service settings for individual Shares: From Dashboard > Shares, locate the Share you wish to change then select one of the following to access its Specific values: Click on the circle (blue/yellow) Click on the configuration icon (pencil) to select Access Protocols.
-
Page 113: Manage Share Access
MANAGE SHARE ACCESS Click the configuration icon in the right-hand column and select either Users or Groups. In the left-hand column of the resulting window, the users or groups without access to the share are listed. Select the group or user to be granted access, then click the add arrow (pointing right) either to the Read + Write access cell or to the Read access cell. -
Page 114: Delete A Share
DELETE A SHARE Deleting a Share and data: Note that deleting a share deletes all files on the share and will cause any associated backup jobs to fail. Click on the configuration icon to select Delete. Confirm in the dialogue window. LaCie 2big NAS (OS 3.0) | LaCie 5big NAS Pro User Manual... -
Page 115: External Ports
EXTERNAL PORTS This page provides you with information on devices connected to one of the LaCie NAS's USB or eSATA expansion ports. Port LaCie 2big NAS LaCie 5big NAS Pro eSATA – USB 2.0 USB 3.0 – USB PRINTER LaCie 2big NAS (OS 3.0) | LaCie 5big NAS Pro User Manual... -
Page 116: External Drives
Your LaCie NAS features a printer server. Follow the directions below to connect your printer to the network via the LaCie NAS: In Dashboard > External ports, confirm that the box next to Activate the printer server is checked. Power on the printer and connect it to a USB expansion port on the rear of your LaCie NAS. Once connected, the printer will be listed and available throughout your network. - Page 117 Technical note: External USB or eSATA hard disks must be formatted in one of the supported systems to be compatible with your LaCie NAS: MS-DOS (FAT32), NTFS, HFS+ (non-journaled only), EXT3, or XFS. Disconnect To avoid damaging your external hard drive's file system, click the Eject button before disconnecting it from your LaCie NAS.
- Page 118 BACKUP The Backup page helps the administrator and users configure Backup and Restore Jobs of data stored on the LaCie NAS. A job configured on the Backup page can be: One-time and/or manual backups. An automated backup that runs daily, weekly, or monthly. A restore of all or select files from a backup.
- Page 119 on a LaCie 5big NAS Pro in your office to a LaCie 5big NAS Pro at another office. You can use the Backup page to set up a remote backup to a LaCie 5big NAS Pro at another location (offsite). See Set up Remote Backups details on non-LaCie servers that are rsync-compatible.
- Page 120 Important info: Depending upon the amount of data you intend to back up and the speed of your network, the first backup job may take several hours or, in the case of offsite backups, several days. SET UP A LOCAL (DAS) BACKUP Local Go to Dashboard >...
- Page 121 Under Destination on the right, select the External Share you wish to use for the backup. LaCie highly recommends that you create a folder inside the share to store the backup. Click on the CREATE FOLDER button to add a folder to the share. Click Next. Select a backup type, then click Next.
- Page 122 Select Manual, Scheduled, or Custom then click Next. (Skip this step if you chose Manual.) Select the frequency for your backup and the time of day. Click Next. Enter a name for the backup job then click Next. Confirm the backup settings on the Backup summary. If you wish to begin the backup immediately, keep the box checked next to Start the backup immediately and click Finish.
- Page 123 The backup job will appear on Dashboard > Backup. Note on Manual Backups: A manual backup must be started by the administrator: Navigate to Dashboard > Backup. Locate the manual backup job you wish to start then click on its grey arrow icon on the far right. Supported File Systems for Optimized Backups Operating Systems Hard Disk File System Optimized Backup (Incremental)
- Page 124 SET UP REMOTE BACKUPS Remote backups will copy data from a share on your LaCie NAS to a share/volume on a second NAS. A second NAS can be another LaCie NAS running LaCie NAS OS (see LaCie Network Storage for details). It can also be a third-party NAS compatible with rsync.
- Page 125 Click on Enable. At the prompt, enter and confirm a password then click Apply. The password can be different from the password you used for your share(s)/Dashboard. Your NetBackup password will be needed when you set up a Remote Backup. With NetBackup enabled, the Dashboard provides a summary of the settings.
- Page 126 Important info: The NetBackup Share can only be accessed by the administrator of the LaCie NAS. The administrator can find the NetBackup password if it is forgotten. Go to the NetBackup tab and click on the magnifying glass icon. LaCie 2big NAS (OS 3.0) | LaCie 5big NAS Pro User Manual...
- Page 127 Remote Backup: Local Network Setup Before following the instructions below, please make certain that: The Destination NAS is connected to the same network as your source LaCie NAS and that both devices are powered on. The NetBackup Share has been enabled on the Destination LaCie NAS. Go to Dashboard >...
- Page 128 Select A LaCie NAS to back up to another LaCie network storage device. The steps that follow do not cover backups to third-party network storage devices that are compatible with rsync. If you are backing up to an rsync compatible server, please follow the directions provided by the Dashboard. Click Next.
- Page 129 If the LaCie NAS is listed but cannot be selected, you must enable NetBackup Server. See the instructions above, NetBackup Share. If the LaCie NAS does not appear on the list, please make certain it is powered on and out of sleep mode (see Management).
- Page 130 Manual: You must initiate the backup. Scheduled: The backup will begin at the scheduled time. Enter a name for the backup job then click Next. Review the summary then click Finish. LaCie 2big NAS (OS 3.0) | LaCie 5big NAS Pro User Manual...
- Page 131 The backup will be listed on the Dashboard > Backup page. Note on Manual Backups: A manual backup must be started by the administrator: Go to Dashboard > Backup. Locate the manual backup job you wish to start then click on its grey arrow icon on the far right. LaCie 2big NAS (OS 3.0) | LaCie 5big NAS Pro User Manual...
- Page 132 Remote Backup: Offsite Network Setup Please review the list of prerequisites for an offsite backup before following the instructions: The Destination NAS is connected to an offsite network and powered on. You must have the public IP address for the Destination NAS. You can find the public IP address by clicking here or by accessing your router's management software.
- Page 133 Select the share(s) you want to back up. Please note that shares are also called folders. Select A LaCie NAS to back up to another LaCie network storage device. The steps that follow do not cover backups to third-party network storage devices that are compatible with rsync. If you are backing up to an rsync compatible server, please follow the directions provided by the Dashboard.
- Page 134 Click Next. To send the backup to the offsite Destination NAS, choose NAS name or IP address then enter the public IP address. If you do not know the public address for the Destination NAS, please refer to the offsite network router's documentation or contact the internet service provider.
- Page 135 Click Next. Select the frequency of the backup. Manual: You must initiate the backup. Scheduled: The backup will begin at the scheduled time. Enter a name for the backup job then click Next. LaCie 2big NAS (OS 3.0) | LaCie 5big NAS Pro User Manual...
- Page 136 Review the summary then click Finish. The Backup Job will appear on Dashboard > Backup. Note on Manual Backups: A manual backup must be started by the administrator: Go to Dashboard > Backup. Locate the manual backup job you wish to start then click on its grey arrow icon on the far right. LaCie 2big NAS (OS 3.0) | LaCie 5big NAS Pro User Manual...
- Page 137 RESTORE A LOCAL BACKUP Restore and Remote Backups: Remote Backups cannot be restored using the Backup & Restore Wizard. You can retrieve backup files directly from the backup storage. Setup Go to Dashboard > Backup. Click the Create job button. Select Restore, then click Next.
- Page 138 Backup job: select the backup job from the pulldown menu then click Next. Backup folder: browse for the source folder with your backup. Valid backups have a red folder icon. Choose the backup directory, then click Next. Review the summary of the backup then select Next. LaCie 2big NAS (OS 3.0) | LaCie 5big NAS Pro User Manual...
- Page 139 Select the last backup or choose an earlier restore point. To simplify, a restore point is the date for a backup. You can select an earlier restore point from the calendar and the time from the drop-down menu. Click Next. Choose where to restore the backup.
- Page 140 To free disk space, you can choose to clear the source before the job starts. By checking the box in this step, all data will be erased in the destination directory. Before continuing to the next step, a prompt will ask you to acknowledge that all data will be erased in the destination before the restore begins.
- Page 141 The Restore Job has been added to the list. LaCie 2big NAS (OS 3.0) | LaCie 5big NAS Pro User Manual...
- Page 142 MODIFY EXISTING JOBS Locate the job you wish to modify at Dashboard > Backup and click the configuration icon (pencil). You can get detailed information on a job or choose delete/enable/disable. If you disable a scheduled job, it will not run until it is enabled again. STARTING/STOPPING JOBS Start and stop icons appear on the far left of the Backup Jobs table: Start a job: Click on the triangular play icon.
- Page 143 DOWNLOAD MACHINE The LaCie NAS Dashboard features a torrent server that will allow you to download torrent files. For more information on torrents, see http://en.wikipedia.org/wiki/BitTorrent_protocol. CREATE A DOWNLOAD If the torrent service has not been turned on, click the Start button. To initiate a download, click the Add download button.
- Page 144 Download - URL radio button Paste the URL address Local File: Click on Choose File to browse your computer for the torrent file. Download - Local File radio button Select the Destination share by clicking on the configuration icon (pencil). To better organize your downloads, you can click on Create folder at the prompt to add a folder to the share.
-
Page 145: Download Page Settings
Name the folder for your downloads Click Apply to begin the download. DOWNLOAD PAGE SETTINGS Below the list of downloads are several settings. TCP Listening port: Click configuration icon (pencil) to choose a router port through which the torrent service will operate. Download rate limit (down arrow): Click the configuration icon (pencil) to type a maximum download LaCie 2big NAS (OS 3.0) | LaCie 5big NAS Pro User Manual... - Page 146 speed. Upload limit rate (up arrow): Click the configuration icon (pencil) to type a maximum upload speed. Max. active downloads (two down arrows): Click the configuration icon (pencil) to limit the number of torrents that can download/upload simultaneously. Type zero for no limit. Technical note: Because the torrent client service uses bandwidth and system resources, multiple simultaneous downloads can impact your LaCie NAS's performance.
- Page 147 DRIVE INFORMATION & ISCSI SETUP This page shows you information about disk usage and will allow you to reformat your disk(s). When you click the top Format button, ALL data on the disk(s) (including an iSCSIShare) will be erased and the disk(s) will be formatted for LaCie NAS OS.
-
Page 148: Configure Iscsi
CONFIGURE ISCSI You can configure your LaCie NAS share as an iSCSI target client, which allows you to mount a network share as a local volume. You can then format this volume in a non-network file system such as NTFS, HFS+, or FAT32. Please note that the maximum capacity for an iSCSI volume is 8TB. - Page 149 Advanced Parameters: iSCSI and CHAP Click the configuration icon (pencil) and select Advanced Settings to modify parameters related to the iSCSI Drive. You can also configure CHAP (Challenge-Handshake Authentication Protocol) to limit access to the iSCSI volume. Important Info: If you are using a Microsoft initiator, the CHAP password should be greater than or equal to 12 bytes and less than or equal to 16 bytes.
-
Page 150: Modify Raid Mode
MANAGE RAID - LACIE 2BIG NAS Your LaCie 2big NAS features a robust RAID management system that will allow you to choose and manage the RAID mode most optimized for your data. MODIFY RAID MODE RAID mode: This box shows you the current RAID scheme for your LaCie NAS, as well as the number of disks involved in the scheme. - Page 151 In the next screen, choose a RAID level. Clicking the RAID mode's button will give you an explanation of its strengths and weaknesses. Note that converting to a new level of RAID (e.g. from RAID 1 to RAID 0 or RAID 0 to RAID 1) will erase files on the shares (but the Dashboard configuration will not be affected).
- Page 152 The Dashboard will become unavailable as the system configures the RAID. LaCie 2big NAS (OS 3.0) | LaCie 5big NAS Pro User Manual...
-
Page 153: About Raid Modes
Rebuilding Times Rebuilding a protected RAID array takes many hours, depending on the capacity of the disks and your LaCie NAS's available resources (concurrent tasks such as backups or torrent downloads will slow rebuilding). Changing to an unprotected RAID mode (ie RAID 0) takes less than five minutes. Note that data is accessible during rebuilding. - Page 154 LaCie 2big NAS (OS 3.0) | LaCie 5big NAS Pro User Manual...
-
Page 155: Replacing A Hard Disk
REPLACING A HARD DISK Disk Removal Unprotected RAID Arrays and Swapping/Expanding Hard Disks: Removing a hard disk from a RAID 0 array while the device is powered on may cause you to lose data. To avoid problems, shut down the LaCie NAS before removing healthy disks. Return the hard drive to its proper bay before powering on the LaCie NAS. - Page 156 Draw out the hard drive tray by inserting your finger into the space behind the hard drive tray handle and pulling to disengage the hard drive. Grasp the hard drive tray handle and carefully extract the hard drive. LaCie 2big NAS (OS 3.0) | LaCie 5big NAS Pro User Manual...
- Page 157 LaCie 2big NAS (OS 3.0) | LaCie 5big NAS Pro User Manual...
- Page 158 Disk Insertion Important info: If a hard disk that you have purchased from LaCie fails, please contact your LaCie reseller or LaCie Customer Support. Replacing a hard drive involves two main steps, installing the new hard drive and claiming the new hard disk at Dashboard >...
- Page 159 In the next screen, confirm the addition and complete the RAID Setup wizard. You may use your LaCie 2big NAS as it rebuilds the data across both hard drives. Please note that performance may be affected during a rebuild. If the LaCie 2big NAS is in RAID 0: Click the Manage button and complete the RAID Setup wizard.
- Page 160 Remove Disk Tray 2 (the hard drive on the right when facing the rear of the LaCie 2big NAS). See Disk Removal for more information, if necessary. The Dashboard will show that the disk is missing. Remove the drive currently screwed into the Disk Tray and screw in the new hard drive. For instructions on how to fix a hard disk into the drive tray, please see Connect to your Network - Diskless LaCie 2big NAS.
- Page 161 Following the instructions in Manage will create a new RAID array and delete all media. At the prompt, confirm the synchronization. While the Dashboard is not available during the initial phase of the synchronization, you may access data stored on your LaCie 2big NAS throughout the process. Depending upon the capacity of your hard drives and the amount of data, the synchronization may take several hours.
- Page 162 Synchronization complete Once the synchronization is complete, remove the hard drive in Drive Tray 1 and replace it with the second hard drive using the same steps as Disk Tray 2. Click Replace under the New disk to begin the synchronization. DO NOT click Manage. Following the instructions in Manage will create a new RAID array and delete all media.
- Page 163 At the prompt, confirm the synchronization. While the Dashboard is not available during the initial phase of the synchronization, you may access data stored on your LaCie 2big NAS throughout the process. Please note that the RAID 1 array is stll configured for the capacity of the original hard disks. It is not possible to surpass the previous capacity at this time.
- Page 164 You have successfully expanded the RAID 1 array once synchronizing and resizing are complete. LaCie 2big NAS (OS 3.0) | LaCie 5big NAS Pro User Manual...
- Page 165 MANAGE RAID - LACIE 5BIG NAS PRO Your LaCie 5big NAS Pro optimizes disk performance and capacity using LaCie SimplyRAID. No matter the capacity of your disk(s), LaCie SimplyRAID will prepare the LaCie 5big NAS Pro storage for immediate use as well as future expansion.
- Page 166 This box shows you the current RAID scheme for your LaCie NAS, as well as the number of disks involved in the scheme. RAID Status This box lets you know whether the array is healthy, degraded, or synchronizing. LaCie 2big NAS (OS 3.0) | LaCie 5big NAS Pro User Manual...
- Page 167 RAID 0 (no data protection). RAID degraded due to a missing disk. RAID failure due to missing or bad disks. RAID synchronizing following a disk replacement. LaCie 2big NAS (OS 3.0) | LaCie 5big NAS Pro User Manual...
- Page 168 RAID Status: Expand, Replace, and Reset for instructions on expanding your array and replacing disks. Hard Drive Map Click the illustration of the disk to see which slot in the LaCie NAS the disk occupies. LaCie 2big NAS (OS 3.0) | LaCie 5big NAS Pro User Manual...
- Page 169 Click on the Hard Drive to see its physical location Storage Distribution The multicolor bar below the disks provides a fast reference on how LaCie SimplyRAID distributes the LaCie 5big NAS Pro storage. Dark blue: Storage capacity for your data. Light blue: Protection in case one or two disks fail.
- Page 170 Green: Disk capacity that spans beyond the level of RAID assigned by LaCie SimplyRAID. This space is reserved for expansion should you add new or larger capacity disks. Storage capacity and distribution Factors that determine available data capacity include: The amount of disks in the enclosure The storage capacity of each disk (see note below on mixed capacities) RAID Mode Single disk or double disk security...
- Page 171 LaCie SimplyRAID configuration with three disks. All colors are represented since the RAID array uses single disk security and the disks are of mixed capacities. ABOUT RAID MODES Refer to the table below for an overview of the different RAID modes, and see the descriptions for details. Note that this information is summarized in the RAID Setup Wizard on the Dashboard.
- Page 172 LaCie 2big NAS (OS 3.0) | LaCie 5big NAS Pro User Manual...
- Page 173 LaCie SimplyRAID RAID configurations will use equal disk capacties among the pool of hard drives to protect data. Rather then lose hard disk capacity overhead in mixed disk environments, SimplyRAID will preserve the extra space to use when new disks are added to the enclosure. Unlike standard RAID models, you can easily expand the array without losing data.
- Page 174 RAID 6 In RAID 6, data is striped across all disks (minimum of four) and two parity blocks for each data block (p and q in the illustration below) are written on the same stripe. If one physical disk fails, the data from the failed disk can be rebuilt onto a replacement disk.
-
Page 175: Raid Setup Wizard
RAID Setup Wizard for instructions on creating a spare hard drive (Only available with Standard mode. LaCie SimplyRAID optimizes disk space for you.) RAID SETUP WIZARD Follow the directions to run the RAID Setup Wizard. You may select: LaCie SimplyRAID: LaCie's smart RAID configuration agent. Manual RAID: Configure your array using standard RAID models based upon the amount of disks in your enclosure. - Page 176 Double security will protect data against the loss of two hard disks (minimum of three hard disks required). Click Finish to configure the RAID, then Yes at the prompt. LaCie 2big NAS (OS 3.0) | LaCie 5big NAS Pro User Manual...
- Page 177 LaCie 2big NAS (OS 3.0) | LaCie 5big NAS Pro User Manual...
- Page 178 Manual RAID Your options to select the level of RAID are predicated upon the number of disks in your array. For example, a three-disk configuration allows you to select from RAID 0, RAID 1, or RAID 5. A four- or five-disk configuration offers RAID 0, RAID 5, or RAID 6.
- Page 179 Three-disk configuration includes: RAID 0, RAID 1, and RAID 5 Four- and five-disk configurations include: RAID 0, RAID 5, and RAID 6 Click Next. Review the information then confirm the RAID mode by clicking Finish. Click Yes at the final prompt. LaCie 2big NAS (OS 3.0) | LaCie 5big NAS Pro User Manual...
- Page 180 Manual RAID+Spare Before adding a spare hard drive, you must follow the instructions above (Standard (Manual)) to create the array. When creating the array, please leave a minimum of one hard drive bay free for the spare. You may follow the directions below with RAID 1, RAID 5, or RAID 6 arrays. If you have not inserted the spare hard drive(s) to the LaCie NAS, please see Remove/Insert a Hard Disk instructions.
- Page 181 Make certain that all disks in the RAID array are selected. Check the box under the New hard drive(s) and click Next. Confirm that your current RAID configuration is listed. LaCie 2big NAS (OS 3.0) | LaCie 5big NAS Pro User Manual...
- Page 182 Click on the radio button next to Add a spare drive and click Next. Confirm the configuration and click Finish. LaCie 2big NAS (OS 3.0) | LaCie 5big NAS Pro User Manual...
- Page 183 The Spare is now available. LaCie 2big NAS (OS 3.0) | LaCie 5big NAS Pro User Manual...
- Page 184 Rebuilding Times Rebuilding a protected RAID array can take many hours, depending on the capacity of the hard disks and your LaCie NAS's available resources (concurrent tasks such as backups or torrent downloads will slow rebuilding). Changing to an unprotected RAID mode (e.g. RAID 0) takes less than five minutes. Note that data is accessible during rebuilding.
- Page 185 Caution: After continuous use of the LaCie NAS, hard drives may be hot. Use caution when removing. The hard drive tray may be locked. To unlock it, use the included disk drawer key to turn the lock until the slot is vertical. Draw out the hard drive tray by inserting your finger into the space behind the tray handle and pulling to disengage the tray.
- Page 186 LaCie 2big NAS (OS 3.0) | LaCie 5big NAS Pro User Manual...
- Page 187 Disk Insertion Carefully insert the tray into an empty hard drive bay. When the tray is most of the way in and you feel resistance, press the drive tray handle firmly until you feel the drive snap into place and the drive tray handle is flush with the back of the LaCie NAS.
- Page 188 follow the instructions in Replace a failed or missing disk. Adding Hard Disks: Please note that performing the steps below will delete all data stored on the new, larger capacity hard disk. Insert a new hard drive into an available drive slot in your LaCie 5big NAS Pro (see Remove/Insert a Hard Disk for instructions).
- Page 189 Replace a failed or missing disk If you have configured your RAID as Standard (Manual as opposed to SimplyRAID), the new disk must have equal or greater capacity than the disk it is replacing. Remove the failed disk and insert a new hard drive per the instructions above. Go to Dashboard >...
- Page 190 You may continue to use the LaCie NAS during the RAID synchronization. If the LaCie 5big NAS Pro RAID configuration is RAID 0: Click the Manage button and complete the RAID Setup wizard. The Dashboard will become unavailable for a brief period of time as the system configures the RAID. On protected RAID arrays, you may continue to access files stored on your LaCie NAS during the RAID synchronization.
-
Page 191: Eco Management
ECO MANAGEMENT Status light: Uncheck this box to turn off the front blue light. Note that this will not disable warning indicators or rear disk LEDs (see LED Behavior and Button Functions for details on LED status). Turn off the hard drives (Eco mode): Set the duration of inactivity after which the disks will revert to Eco mode, which spins down the disks and reduces power consumption. - Page 192 Important info: When deep sleep mode is activated, all processes, including downloads and backups, will be terminated. UPS Management: Your LaCie NAS supports UPS (uninterrupted power supply) management. Connect a supported UPS device to a USB port on your LaCie NAS, then click on Advanced to set the battery threshold level (%).
- Page 193 SUPPORT CONFIGURATION Firmware Version: Your LaCie NAS's operating system version will be listed here. This information is important when you're updating the OS or if you need to speak with LaCie technical support. Email Notifications: Click the Edit button to configure email notifications. Important: Please make certain to enter the SMTP address for your email server.
- Page 194 Test email from the NAS System Log: Click the Download button to save the system log to your computer. The log may be useful to LaCie technical support in troubleshooting any issues. LaCie 2big NAS (OS 3.0) | LaCie 5big NAS Pro User Manual...
-
Page 195: Email Notification Triggers
EMAIL NOTIFICATION TRIGGERS The following events will trigger an email notification if an email address has been provided in the User page: Event Identifier Description Recipient Capacity When the total available capacity is less than 90% Admin When a download has completed or when a download error Download Admin has occurred... - Page 196 drive will reboot. Update Using LaCie Network Assistant (LaCie 2big NAS only) Follow the steps below if you wish to download the LaCie NAS OS update from the product support website. This update procedure will not erase your configuration or files saved to the drive. Important info: Before proceeding, make sure to: Connect your PC/Mac to the network using an Ethernet cable (turn off wireless connections).
- Page 197 Enter your LaCie NAS administrator login and password. Browse to and load the update package (.capsule file) you downloaded from the LaCie website. LaCie 2big NAS (OS 3.0) | LaCie 5big NAS Pro User Manual...
- Page 198 Click on Continue… to begin the update. Mac users may have to type in their administrator’s password. Once the update is complete, verify the update: Launch LaCie Network Assistant then select the Configuration tab. Choose your NAS on the left of the window.
- Page 199 LOGS The Logs section will list important events, such as RAID change results and warnings. To purge the listings from this list, click the trash icon. LaCie 2big NAS (OS 3.0) | LaCie 5big NAS Pro User Manual...
- Page 200 HYBRID CLOUD: WUALA & LACIE NAS Wuala is no-hassle cloud storage for business and personal users. All users receive 5GB of free personal storage to store, backup, and synchronize files in the cloud. In addition to personal storage, Wuala can give everyone in your office easy access to files stored on the company's LaCie NAS from any location in the world.
-
Page 201: Create A New Account
CREATE A NEW ACCOUNT All Hybrid Cloud users must have personal Wuala storage, including the administrator. Please note that Wuala personal storage is never confused with your LaCie NAS storage since they remain separate. Additionally, all Wuala users receive 5GB of free secure cloud storage so your team members will experience enhanced data collaboration both at work and at home. - Page 202 First Launch - Wuala on Windows If you already have an account, select Sign in with existing account and skip to LaCie NAS for Wuala: Setup. If you do not have personal storage on Wuala, click Create free Account. Fill in all the applicable fields. Check the box next to I have read and agree with the Terms of Service then click Create Account.
- Page 203 Your personal account has been created. An email will be sent confirming your Wuala account. LaCie 2big NAS (OS 3.0) | LaCie 5big NAS Pro User Manual...
- Page 204 Notes on installation: If Wuala does not open immediately, please launch the application from All Programs/Programs. A second update for Windows Explorer Integration may be required. If you are prompted, please click Setup to complete the installation steps and reboot your computer. LaCie 2big NAS (OS 3.0) | LaCie 5big NAS Pro User Manual...
- Page 205 First Launch - Wuala on Mac If you already have an account, select Sign in with existing account and skip to LaCie NAS for Wuala: Setup. If you do not have personal storage on Wuala, click Create a new account. Fill in all the applicable fields.
- Page 206 Notes on installation: If Wuala has not launched on its own, select Go > Applications and click twice on the Wuala application. Set up your LaCie NAS To learn how to set up your LaCie NAS on Wuala, please go to LaCie NAS for Wuala: Setup.
- Page 207 LACIE NAS FOR WUALA: SETUP Follow the directions in this chapter to configure your LaCie NAS on Wuala. Wuala will recognize all compatible LaCie NAS on your local network. Wuala will help you navigate your LaCie NAS shares on your local network, similar to traditional network volumes.
- Page 208 Enter the administrator's username and password. The LaCie NAS has been added to your Wuala account. LaCie 2big NAS (OS 3.0) | LaCie 5big NAS Pro User Manual...
- Page 209 Note on LaCie NAS discovery: If Wuala cannot find your compatible LaCie NAS, please confirm that your company's firewall permits the following: Multicast UDP Group = 224.0.0.1 Port = 4448 (in and out) TCP is enabled for port 18811 (out only) Proxy server configured for your LaCie NAS (if applicable) At home: Wuala.exe must be authorized by your Windows Firewall or by third-party security software.
- Page 210 In Wuala, click on Configure your device. The Configure window offers two options: General and Users. Within General you can: Change the name of the LaCie NAS Turn off Remote Access View your Remote IP (also known as a Public IP) and Local IP addresses Access the Dashboard anywhere (no password required) Note on Dashboard Access: Wuala is listed as a service in General Settings >...
- Page 211 is enabled. Disabling the service in the Dashboard will prevent you from using Wuala to access your LaCie NAS. Please note that the circle will turn from orange to green once you have registered your LaCie NAS on Wuala. When using Wuala, only a user with administrator rights can access all the management functions by clicking on the link for the Dashboard.
- Page 212 You can invite a user via email or Wuala username. Email: Enter the email address in the applicable field then click Invite. Wuala username: Click on the + symbol then enter the appropriate information. Important: Please see your invitee for his Wuala username and email address. You must add a Wuala username in the Login field. Click Add to add the user to the list.
- Page 213 Users must accept the invitation for access to the LaCie NAS. See below. User: Accept invitation The steps below may be performed on the same network as the LaCie NAS or outside the network. Open your email to view the letter from Wuala. Note the code provided in the email. Log on to Wuala to select Add >...
- Page 214 Enter the code provided in the email. Please respct the case and hyphens. The LaCie NAS has been added to the user's Wuala account with a private share in his/her name. Important info: A user must have Wuala personal storage to accept the invitation. Wuala User Shares A new share will be created on the LaCie NAS with each Wuala invitation.
- Page 215 The administrator invites a coworker to join the company's LaCie 2big NAS Pro via the Wuala username. The administrator has entered the Login David2, which means that the name of the share will be David2. By default, only the user has read+write access to the the share that bears his name. However, the administrator can revise access rights to the share using the Dashboard >...
- Page 216 Select your LaCie NAS in Devices. Click on Configure your device in the main Wuala window. Select Users on the left of the window. Click on the user you wish to remove and click on the X on the right. A popup window will ask you to confirm the removal of the user.
- Page 217 Note on deleting the Wuala user in the Dashboard: Deleting a user that was created in Wuala in Dashboard > Users will only delete the user. The associated share with the user's name will remain in this particular case. Additionally, the user cannot be recreated in Wuala as long as the LaCie NAS continues to have a share with the same name.
- Page 218 WUALA BUSINESS Wuala Business makes cloud integration easy for companies looking to expand their online data collaboration. With its intuitive interface and extensive set of online tools, Wuala Business provides all-new levels of data management within a company as well as with clients and partners. Data is always safe from unauthorized access since Wuala Business uses high-level encryption technologies.
- Page 219 Flyer with Wuala Business Starter Code A Wuala Business Starter Code provides: 100GB of online storage Five Wuala Business Groups (online shares/volumes that may be classified by department, document type, etc.) Five users per Wuala Business Group (Groups can share users or be divided amongst different users) Additionally, Wuala Business storage runs on the same application as Wuala personal storage.
-
Page 220: Getting Help
GETTING HELP If you are having problems with your LaCie product, consult the table below for a list of available resources. Order Source Description Location Concise steps to Quick follow for getting your Either a printed leaflet or accessory box and included in the Install product up and product box, or download PDF from the product page... -
Page 221: Troubleshooting Topics
TROUBLESHOOTING TOPICS Note: Interactive troubleshooting, a highly effective way to resolve problems with your product, is available from www.lacie.com/support/. Select your product, then click the “Troubleshooting” tab. Troubleshooting the Network Connection No shares appear on the network. Q: Does your computer's configuration meet the minimum system requirements? A: Check minimum system requirements in Introduction for more information. - Page 222 A user does not have access to the LaCie NAS Dashboard or shares. Q: Has the administrator created an account for the user? A: In order for another user to access the LaCie NAS, two conditions must be met: 1) the administrator must create and provide the user with username and password;...
- Page 223 iTunes. A: In iTunes preferences, make certain that the box next to Shared Libraries is checked. Q: Why aren't files stored on the network storage appearing in iTunes? A: iTunes Server Service will only access public folders. Therefore, put your music on public folders if you wish to play it using iTunes.
- Page 224 Troubleshooting the Active Directory Connection Thousands of different network and domain configurations exist, so these troubleshooting tips are necessarily general. Product / LAN Side Make sure that the latest product operating system has been installed. Check http://www.lacie.com/us/support/drivers/index.htm?id=10007. Make sure no heavy load processes are running (not mandatory but could help), for example: No RAID construction is running (wait until RAID is built) No multiple downloads are running (stop or wait until download is finished) No multimedia database building (disable Multimedia)
- Page 225 The product must connect to the local network domain, not to a server on the internet. It's important that the product be assigned a correct and reachable DNS server IP address on the local network configuration, because joining a domain is based on DNS resolution. Verify the DNS IP on another computer on the same network as the LaCie product.
- Page 226 Enter the domain's Full Qualified Domain Name (FQDN). For example: directory-example.domain.com (Active Directory Users and Computers Tool on Primary Domain Controller) Admin login: Use the AD's administrator username. Admin password: Case sensitive. Optional Advanced Criteria can be input to help with joining. Server Name is the Domain Controller Host Name Server IP is the Domain Controller IP LaCie 2big NAS (OS 3.0) | LaCie 5big NAS Pro User Manual...
- Page 227 All the above points must be verified, including the next section about configuring the AD to ensure correct Domain joining. Any incorrect configuration can cause the connection to fail. LaCie 2big NAS (OS 3.0) | LaCie 5big NAS Pro User Manual...
- Page 228 Active Directory / Domain Side On the Active Directory / domain side, the following points should be checked by the Active Directory administrator, as configuration is different for every customer. Ask the AD administrator to verify if Kerberos Server & Time Server are registered in the domain DNS, in order to allow the LaCie product to connect.
- Page 229 RESET TO FACTORY CONDITIONS - 2BIG NAS To completely restore your LaCie NAS to its out-of-box state, there are two parts: Reset Dashboard Settings and Format Disks. 1. RESET DASHBOARD SETTINGS Important info: Following these steps will erase all Dashboard data such as users, groups, shares, and settings. It will also reset the machine name to the default and reset the network settings to DHCP.
- Page 230 LACIE NAS RESCUE - 5BIG NAS PRO The LaCie NAS Rescue can help you troubleshoot potential technical problems. The Rescue includes three recovery options: Data Recovery: Enable FTP Access to the data on your LaCie 5big NAS Pro. Once enabled, you can use FTP client software or a web browser to backup the data stored on your LaCie 5big NAS Pro.
- Page 231 PREPARE FOR THE RESCUE The LaCie NAS Rescue will prompt you to enter: The LaCie 5big NAS Pro IP address The LaCie 5big NAS Pro MAC address (Your LaCie 5big NAS Pro has two MAC addresses, one for each LAN port. You may use either MAC address for the Rescue.) Both types of address may be found by connecting a VGA cable to your LaCie 5big NAS Pro (see Views of the...
- Page 232 Windows: Right click on the LaCie Network Assistant icon in the system tray. Mac: Click on the LaCie Network Assistant icon in the menu. Enable IPConf Support by clicking on Activate. Select Activate to enable IPConf Support The digital green LED indicates IPConf Support is enabled. Caution: Recent versions of the LaCie Network Assistant Preferences include the button Recovery Mode.
- Page 233 This option does not launch the Rescue and is not compatible with the LaCie 5big NAS Pro. MAC Address Availability: A third option for finding the MAC address is the sticker located on the bottom of your LaCie 5big NAS Pro enclosure. It features two numbers that correspond to LAN 1 and LAN 2. Both numbers represent MAC addresses for your device.
- Page 234 with the Rescue. Once the backup is complete, please turn the device off. If you have access to the Dashboard, use the Dashboard power icon on the upper right of the window to select Shutdown. Otherwise, push the front LED button.
- Page 235 While you are pushing the reset button with the drive lock tool, turn on the LaCie 5big NAS Pro by pushing the front LED button. DO NOT remove the drive lock tool as the LaCie 5big NAS Pro powers on. Doing so will prevent the LaCie 5big NAS Pro from using the LaCie USB Key as the boot device.
- Page 236 Go to LaCie Network Assistant to select LaCie-5big-pro > Web Access…. If the LaCie NAS Rescue does not appear, enter the IP address or name in your browser's address bar (URL). For example, http://192.168.10.40 or http://lacie-5big-pro.local. (The default name of your LaCie 5big NAS Pro, lacie-5big-pro, will differ if you have changed it.) Enter one of the MAC addresses in the available field.
- Page 237 At the prompt, select your preferred type of Rescue and follow the onscreen instructions. LaCie 2big NAS (OS 3.0) | LaCie 5big NAS Pro User Manual...
-
Page 238: Legal Info
LEGAL INFO COPYRIGHTS Copyright © 2014 LaCie. All rights reserved. No part of this publication may be reproduced, stored in a retrieval system, or transmitted in any form or by any means, electronic, mechanical, photocopying, recording or otherwise, without the prior written consent of LaCie. CHANGES The material in this document is for information only and subject to change without notice. -
Page 239: Licences And Free Software
firmware programmed at the factory to match the intended destination. The firmware setting is not accessible by the end user. WEEE This symbol on the product or on its packaging indicates that this product must not be disposed of with your other household waste. Instead, it is your responsibility to dispose of your waste equipment by handing it over to a designed collection point for the recycling of waste electrical and electronic equipment. - Page 240 JAPAN COMPLIANCE STATEMENT This is a Class B product based on the standard of the Voluntary Control Council for Interference from Information Technology Equipment (VCCI). If this is used near a radio/TV receiver, it may cause radio interference. Install the equipment according to the manual. This statement does not apply to the LaCie CloudBox.
-
Page 241: Health And Safety Precautions
PRECAUTIONS Caution: It is essential that you use only the power supply that shipped with your product, since it is a shielded-type power cord that meets FCC emission limits as well as to prevent interference to the nearby radio and television reception. Caution: Modifications not authorized by the manufacturer may void the user's authority to operate this device. -
Page 242: General Use Precautions
GENERAL USE PRECAUTIONS Power requirements 100-240 V~, 50-60 Hz, (supply voltage fluctuations not exceeding ± 10% of the nominal and transient over-voltages according to over-voltage category II). Do not expose the LaCie device to temperatures outside the range of 5º C to 30º C (41º F to 86º F); or to operational humidity beyond 10-80%, non-condensing, or non-operating humidity beyond 10-90%, non-condensing. -
Page 243: Warranty Information
WARRANTY INFORMATION LaCie offers first-rate service and support through our generous three-tiered warranty policy. Our 1-, 2-, 3-, and 5-year policies include comprehensive, complimentary web-based resources, expert in-house technical support, and worldwide repair and/or replacement coverage. To benefit from this warranty, please contact LaCie Support www.lacie.com/us/support where you can find online support and contact information. - Page 244 EXCEPT FOR THE LIMITED WARRANTY SET FORTH ABOVE, ALL PRODUCTS ARE SOLD “AS IS” AND LACIE EXPRESSLY DISCLAIMS ALL WARRANTIES OF ANY KIND, WHETHER EXPRESS, IMPLIED OR STATUTORY, INCLUDING THE IMPLIED WARRANTIES OF MERCHANTABILITY, NONINFRINGEMENT AND FITNESS FOR A PARTICULAR PURPOSE. WITHOUT FURTHER LIMITING THE GENERALITY OF THE FOREGOING, DOES NOT WARRANT (1) THE PERFORMANCE OR RESULTS OBTAINED FROM USING THIS PRODUCT, (2) THAT THE PRODUCT IS APPROPRIATE FOR THE CUSTOMER'S PURPOSES, (3) THE MANUAL IS ERROR FREE, OR (4) THAT NO DATA WILL BE LOST WHILE USING THE PRODUCT.
-
Page 245: Note To Australian Customers
Read carefully all information related to warranty and precautions of use of your new LaCie product in the user manual. For products purchased in the United States, you may contact LaCie at 22985 NW Evergreen Parkway, Hillsboro, Oregon 97124. Email: sales@lacie.com. Website: www.lacie.com. Customer service: 503-844-4503. Service DOA On rare occasions, a newly purchased LaCie product may be delivered in non-working order.