Banner q4x Instruction Manual
Stainless steel laser sensor
Hide thumbs
Also See for q4x:
- Instruction manual (46 pages) ,
- Quick start manual (14 pages) ,
- User manual (2 pages)
Table of Contents
Advertisement
Quick Links
Download this manual
See also:
Instruction Manual
Advertisement
Table of Contents

Related Manuals for Banner q4x


Summary of Contents for Banner q4x
- Page 1 Q4X Stainless Steel Laser Sensor Instruction Manual Original Instructions 181483 Rev. E 9 March 2015 Phone: 800.894.0412 - Fax: 888.723.4773 - Web: www.clrwtr.com - Email: info@clrwtr.com...
-
Page 2: Table Of Contents
Q4X Stainless Steel Laser Sensor Contents 1 Product Description ......................3 1.1 Models ............................3 1.2 Overview ..........................3 1.3 Features ..........................4 1.3.1 Display and Indicators ......................4 1.3.2 Buttons ......................... 4 1.4 Laser Description and Safety Information ..................5 2 Installation ........................ -
Page 3: Product Description
1.2 Overview The Q4X Sensor is a Class 1 laser CMOS sensor with a bipolar output. The normal sensor state is Run mode. From Run mode, the switch point value and LO/DO selection can be changed and the selected TEACH method can be performed. The secondary sensor state is Setup mode. -
Page 4: Features
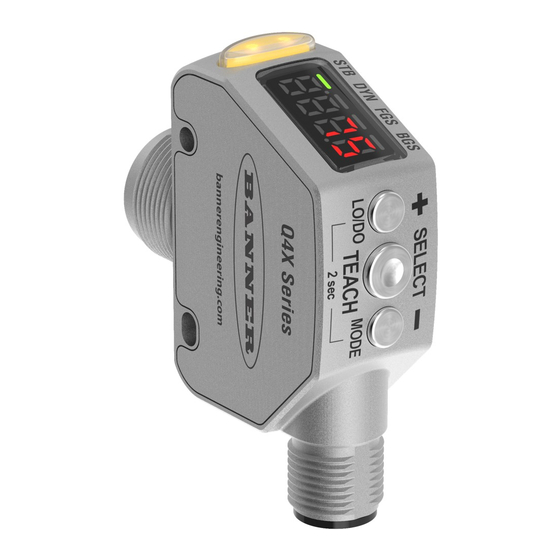
Q4X Stainless Steel Laser Sensor 1.3 Features 1. Output Indicator (Amber) 2. Display 3. Buttons Figure 1. Sensor Features 1.3.1 Display and Indicators The display is a 4-digit, 7-segment LED. The main screen is the Run Mode screen, which shows the current distance to the target in millimeters. -
Page 5: Laser Description And Safety Information
Q4X Stainless Steel Laser Sensor (SELECT)(TEACH) • Press to select menu items in Setup mode • Press and hold for longer than 2 seconds to start the currently selected TEACH mode (the default is two-point TEACH) (+)(LO/DO) • Press to navigate the sensor menu in Setup mode •... -
Page 6: Installation
Figure 4. Optimal Orientation of Target to Sensor See the following figures for examples of correct and incorrect sensor-to-target orientation as certain placements may pose problems for sensing some targets. The Q4X can be used in the less preferred orientation and provide reliable detection performance; see Figure 16 on page 23 for the minimum object separation distance required for each case. -
Page 7: Sensor Mounting
Q4X Stainless Steel Laser Sensor 2.3 Sensor Mounting 1. If a bracket is needed, mount the sensor onto the bracket. 2. Mount the sensor (or the sensor and the bracket) to the machine or equipment at the desired location. Do not tighten at this time. -
Page 8: Sensor Programming
Q4X Stainless Steel Laser Sensor 3 Sensor Programming Program the sensor using the buttons on the sensor or the remote input (limited programming options). In addition to programming the sensor, use the remote input to disable the buttons for security, preventing unauthorized or accidental programming changes. - Page 9 Q4X Stainless Steel Laser Sensor Top Menu Sub Menus Teach Process Selection two-point static BGS default setting) dynamic BGS one-point Window (FGS) one-point BGS Response Speed set Response Speed to 1.5 ms set Response Speed to 3 ms set Response Speed to 10 ms...
-
Page 10: Teach Menu
Q4X Stainless Steel Laser Sensor 3.2.1 TEACH Menu Use this menu to select the TEACH mode. The default is two-point TEACH. • —Two-point static background suppression • —Dynamic background suppression • —One-point window (foreground suppression) • —One-point background suppression After the TEACH mode is selected, from Run mode, press and hold TEACH for longer than 2 seconds to start the TEACH mode and program the sensor. -
Page 11: Zero Reference Location
Q4X Stainless Steel Laser Sensor Output OFF Delay ON Delay 1-Shot Time (D = 1 - 9999 ms) Figure 10. Output Timing Delays When either is chosen, the sensor returns to the Setup menu and additional options become available to set the timer(s): •... -
Page 12: Shift The Zero Reference Location After A Teach
Q4X Stainless Steel Laser Sensor 3.2.5 Shift the Zero Reference Location after a TEACH Use this menu to select whether the sensor shifts the zero reference location to the last taught distance. The default is , 0 = the end of barrel or the maximum range. -
Page 13: Manual Adjustments
Q4X Stainless Steel Laser Sensor Setting Factory Default Output timing delays ( —No delay 10 ms Response speed ( Shift the Zero Reference Location after a TEACH ( —0 = the end of barrel TEACH process selection ( —Two-point TEACH Zero reference location ( —Measurement increases further from sensor... -
Page 14: Select The Teach Mode Using The Remote Input
Q4X Stainless Steel Laser Sensor Remote Input = Set Pulse Timing (T) Input Gray wire is remote teach input 0.04 seconds < T < 0.8 seconds Timing between Pulse groups > 1 second Starts selected Teach (same function as pressing Teach Button for > 2 sec) -
Page 15: Reset To Factory Defaults Using The Remote Input
Q4X Stainless Steel Laser Sensor 3.4.2 Reset to Factory Defaults Using the Remote Input Eight-pulse the remote input to apply the factory defaults and return to Run mode. NOTE: The input wire function remains at remote teach input ( 3.5 Locking and Unlocking the Sensor Buttons Use the lock and unlock feature to prevent unauthorized or accidental programming changes. - Page 16 Q4X Stainless Steel Laser Sensor Press and Hold Press again Press again > 2s Switch Point Value Figure 12. Two-Point Static Background Suppression (Light Operate shown) NOTE: The sensor must be set to to use the following instructions. NOTE: To program the sensor using remote input, remote input must be enabled ( 1.
-
Page 17: Dynamic Background Suppression Teach
Q4X Stainless Steel Laser Sensor Table 2: Expected TEACH Behavior for Two-Point Static Background Suppression Figure 16 on page 23 for the minimum object separation. Condition TEACH Result Display Two valid distances that are greater Sets a switch point between the two... -
Page 18: One-Point Window (Foreground Suppression)
Q4X Stainless Steel Laser Sensor Method Action Result Remote Input No action required. 3. Teach the sensor. Method Action Result Push Button Press TEACH to teach the target. The sensor begins sampling target distance information and Remote Input Single-pulse the remote input. - Page 19 Q4X Stainless Steel Laser Sensor Press and Hold Press again > 2s Switch Point Value A Switch Point Value -A Figure 14. One-Point Window (Foreground Suppression) NOTE: The sensor must be set to to use the following instructions. The FGS indicator is amber to indicate One-Point Window (Foreground Suppression) mode.
-
Page 20: One-Point Background Suppression
Q4X Stainless Steel Laser Sensor Condition TEACH Result Display One valid distance Sets a window (two switch points) The ± window size flashes on the centered around the taught distance. display. The ± window size is the vertical minimum object separation. The two switch points always stay within the specified sensing range. -
Page 21: Sync Master/Slave
3.7 Sync Master/Slave Two Q4X sensors may be used together in a single sensing application. To eliminate crosstalk between the two sensors, configure one sensor to be the master and one to be the slave. In this mode, the sensors alternate taking measurements and the response speed doubles. -
Page 22: Specifications
Q4X Stainless Steel Laser Sensor 4 Specifications Sensing Beam Response Speed Visible red Class 1 laser, 655 nm User selectable: Supply Voltage (Vcc) • —1.5 milliseconds 10 to 30 V dc • —3 milliseconds Power and Current Consumption, exclusive of load <... -
Page 23: Dimensions
Q4X Stainless Steel Laser Sensor 4.1 Dimensions All measurements are listed in millimeters (inches), unless noted otherwise. 4.2 Performance Curves Minimum Separation Distance Between Target and Background for: Uniform and Non-Uniform Targets Matte targets with a non-uniform Target Background reflectivity: 6% to 90%... -
Page 24: Abbreviations
Q4X Stainless Steel Laser Sensor 5 Abbreviations The following table describes the abbreviations used on the sensor display and in this manual. Abbreviation Description No valid signal in range One-shot First Second Two-point TEACH (static background suppression) One-point background suppression... - Page 25 Q4X Stainless Steel Laser Sensor Abbreviation Description Shift the Zero Reference Location after a TEACH Slave Response speed Standard excess gain mode Start Stop TEACH process selection Unlock/unlocked Saturated signal (too much light) Zero—select the zero reference location Phone: 800.894.0412 - Fax: 888.723.4773 - Web: www.clrwtr.com - Email: info@clrwtr.com...
-
Page 26: Troubleshooting
Q4X Stainless Steel Laser Sensor 6 Troubleshooting Table 8: Error Codes Error Code Description Resolution No valid signal in range Reposition the sensor or the target The signal is saturated (too much light) Reposition the sensor or the target to... -
Page 27: Accessories
Q4X Stainless Steel Laser Sensor 7 Accessories 7.1 Cordsets All measurements are listed in millimeters, unless noted otherwise. 5-Pin Threaded M12/Euro-Style Cordsets (Single Ended) Model Length Style Dimensions Pinout (Female) MQDC1-501.5 0.50 m (1.5 ft) 44 Typ. MQDC1-506 1.83 m (6 ft) -
Page 28: Brackets
Kit with glass lens to protect plastic sensor lens Lens from chemical environments and weld splatter damage. Housing Ø 22.4 mm Used with S18, M18, T18, TM18, and Q4X 12.7 mm Additional Information • Borosilicate glass window protects the PMMA window from weld splatter and chemicals •... -
Page 29: Contact Us
9 Banner Engineering Corp Limited Warranty Banner Engineering Corp. warrants its products to be free from defects in material and workmanship for one year following the date of shipment. Banner Engineering Corp. will repair or replace, free of charge, any product of its manufacture which, at the time it is returned to the factory, is found to have been defective during the warranty period.