Sign In
Upload
Manuals
Brands
JVC Manuals
Camcorder
GY-HD250
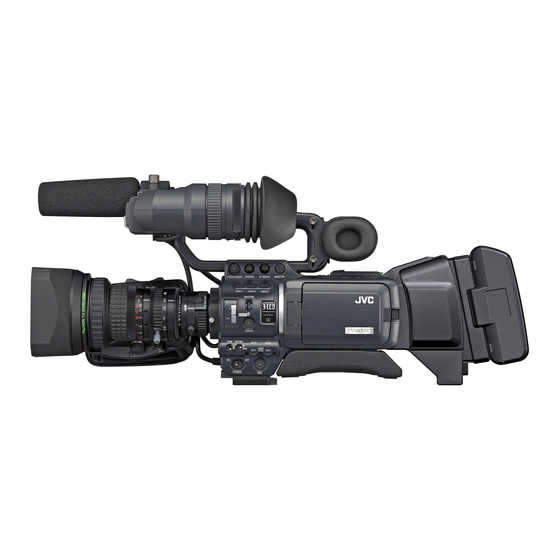
JVC GY-HD250 Manuals
Manuals and User Guides for JVC GY-HD250. We have
6
JVC GY-HD250 manuals available for free PDF download: Instructions Manual, Instrucciones, Brochure & Specs
JVC GY-HD250 Instructions Manual (117 pages)
HD CAMERA RECORDER
Brand:
JVC
| Category:
Camcorder
| Size: 7.26 MB
Table of Contents
Important Safeguards
2
Safety Precautions
3
Accessories
6
Main Features
7
Table of Contents
8
Introduction
10
Precautions for Proper Use
10
Routine and Periodical Maintenance
11
Precautions for Use of Head Cleaning Tape
11
Battery Pack to be Used
12
Videocassette to be Used
12
For Recording and Storing Videotapes in the Best Condition
12
Condensation
13
Characteristic CCD Phenomena
13
Controls, Indicators and Connectors
14
ZOOM Lens
14
Front Section
15
Rear Section
16
LCD Door
17
Right Side Section
18
Left Side Section
20
Top Section
22
Recording and Image Output Formats
24
Indications on the LCD Monitor and in the Viewfinder
26
Status Screens
26
Status Screens in the Camera Mode
27
Status Screen in VTR MODE
32
Magnified Status Indications on the LCD Monitor
33
Synchronized Display with an External Time Code Generator
33
Voltage Indication
33
Auto White Balance Indication (Camera Mode Only)
34
Menu Setting Screen
34
Alarm Message Display
34
Safety Zone Indication (Camera Mode Only)
34
Switching between the LCD Screen and Viewfinder Display
35
Preparations
36
Basic System
36
Attaching the Zoom Lens
37
Attaching the Microphone (Provided)
37
How to Attach the Viewfinder
37
Inserting an SD Memory Card
38
Taking out the SD Memory Card
38
About SD Memory Cards
38
See
38
Attaching the Tripod Base (Provided Only for U Model)
39
AC Operation
40
Charging the Built-In Battery
40
Battery Operation
41
Attaching the Battery
41
Removing the Battery
41
Precautions for the Battery Operation
42
Remaining Battery Power Display
42
Operating Time with Battery Pack
42
Precautions for the Battery Pack
42
Recharging
42
Preparations for Operation
43
Turning the Power on
43
Turning the Power off
43
Loading/Unloading the Cassette
44
Cassette Loading
44
Unloading the Cassette
44
Setting and Displaying the Date and Time
45
Setting the Date and Time Style
45
Setting the Date and Time
46
Displaying the Time and Date on the Screen
46
Displaying Time Code
47
Displayed Time Code/User's Bit
47
Time Code Input Entered the IEEE1394 Connector
47
Presetting and Recording of Time Code
48
Setting
48
Presetting Time Code Data
49
Presetting User's Bit Data
49
Zero-Resetting the Time Code or User's Bit Data
49
Presetting the Time Code from the LCD Screen
50
Recording Time Codes in Continuation of Time Codes Recorded on Tape
51
Playing Back Time Code
51
Synchronizing with the Time Code of the IEEE1394 (DV)-Connected Master Unit
52
Synchronizing with an External Time Code Generator
53
Screen Adjustment
54
Diopter Adjustment
54
Viewfinder Adjustment
54
Adjusting the Lcd Monitor
54
See
54
Back Focus Adjustment
55
White Balance Adjustment
56
Full Auto White Balance (FAW)
56
See
56
White Shading Adjustment
57
Setting and Adjustments before Shooting
58
Setting the Video Format
58
Setting the FRAME RATE Item
58
Camera Settings
59
Screen Size (4:3/16:9) Mode Selection
59
Audio Input Signal Selection
60
Selecting the CH-2 Channel Input Connector
60
Selecting the Audio Signal Input
60
Adjusting Audio During Recording
60
Monitoring Audio During Recording
61
Shooting Operation
62
Basic Recording Operation
62
If the Record-Standby Mode Continues
63
Checking Recorded Contents in Record-Standby Mode (Recording Check Function)
63
HEADER REC Function
64
Playback Mode
66
Playback Procedure
66
Fast-Forward, Rewind
66
Search
66
Outputting Audio
67
Using External Components
68
Connecting the Video Signal Cables
68
Connecting the IEEE1394 Cable
68
Recording Composite Video Signals from an External Device
69
Using GENLOCK Functions
70
See
70
Dubbing with AV Devices
71
HDV/DV Dubbing
72
Backup Recording
74
See
74
Connect a Remote Control Unit (RM-LP55/RM-LP57)
75
Menu Screens
77
Menu Screen Configuration
77
Setting Menu Screens
79
TOP MENU Screen
80
VIDEO FORMAT[1/2] Menu Screen
81
VIDEO FORMAT[2/2] Menu Screen
83
CAMERA OPERATION Menu Screen
84
CAMERA PROCESS[1/2] Menu Screen
85
CAMERA PROCESS[2/2] Menu Screen
86
ADVANCED PROCESS Menu Screen
87
COLOR MATRIX ADJUST Menu Screen
88
SKIN COLOR ADJUST Menu Screen
88
WHITE BALANCE Menu Screen
89
SWITCH MODE Menu Screen
90
See
90
AUDIO/MIC[1/2] Menu Screen
91
AUDIO/MIC[2/2] Menu Screen
92
LCD/VF[1/4] Menu Screen
93
LCD/VF[2/4] Menu Screen
94
LCD/VF[3/4] Menu Screen
95
LCD/VF[4/4] Menu Screen
96
TC/UB/CLOCK Menu Screen
97
HEADER REC Menu Screen
98
TIME/DATE Menu Screen
99
OTHERS[1/2] Menu Screen
100
OTHERS[2/2] Menu Screen
101
GENLOCK Menu Screen
103
FILE MANAGE Menu Screen
104
Displaying the FILE MANAGE Menu Screen
104
Loading a Menu Settings File
104
Saving Settings
105
Resetting the Menu Settings to the Factory Settings
106
Initializing (Formatting) an SD Memory Card
106
Features of the Camera Section
107
How to Use Skin Detail
107
Outputting Color Bars
109
Others
110
Warnings and Responses
110
Troubleshooting
114
How to Display the Hour Meter
115
Specifications
116
Camera Section
116
Vtr Section
116
External Dimensions
117
Advertisement
JVC GY-HD250 Instructions Manual (117 pages)
HD Camera Recorder
Brand:
JVC
| Category:
Camcorder
| Size: 8.82 MB
Table of Contents
Important Safeguards
2
Accessories
4
Main Features
4
Table of Contents
5
Introduction
6
Precautions for Proper Use
6
Routine and Periodical Maintenance
6
Precautions for Use of Head Cleaning Tape
6
Battery Pack to be Used
7
Videocassette to be Used
7
For Recording and Storing Videotapes in the Best
7
Condensation
7
Characteristic CCD Phenomena
7
Controls, Indicators and Connectors
8
ZOOM Lens
8
Front Section
8
Rear Section
9
LCD Door
9
Right Side Section
10
Left Side Section
11
Top Section
12
Recording and Image Output Formats
13
Indications on the LCD Monitor and in the Viewfinder
14
Status Screens
14
Status Screens in the Camera Mode
14
Status Screen in VTR MODE
17
Magnified Status Indications on the LCD Monitor
17
Auto White Balance Indication (Camera Mode Only)
18
Menu Setting Screen
18
Alarm Message Display
18
Safety Zone Indication (Camera Mode Only)
18
Switching between the LCD Screen and Viewfinder Display
18
Preparations
19
Basic System
19
Attaching the Zoom Lens
19
Attaching the Microphone (Provided)
19
How to Attach the Viewfinder
20
Inserting an SD Memory Card
20
Date and Time
23
Adjustment Procedure
28
Camera Operation
41
Error Displays
51
Saving Settings
51
Camera Section
57
Time Code
57
Vtr Section
57
Audio Level Meter Indication Displays the Audio Level Meters During Playback
74
Audio Sampling Frequency In-The Audio Sampling Frequency Used for the Recording Is Displayed During Playback
74
Remaining Tape Time Remaining Tape Indication (Displayed in 1-Minute Steps)
74
See
74
Time Code (TC) and User's Bits Displays the Time Code Data Being Recorded (Hour, Minute, Second, Frame) When in VTR Mode
74
VIDEO FORMAT Display Displays the Video Format Recorded on the Tape When in VTR Mode. also Displays the Video Format of the
74
See
76
About SD Memory Cards
77
Inserting an SD Memory Card
77
Taking out the SD Memory Card
77
Attaching the Tripod Base (Optional)
77
AC Operation
78
Charging the Built-In Battery
78
Battery Operation
78
Attaching the Battery
78
Removing the Battery
78
Precautions for the Battery Operation
79
Remaining Battery Power Display
79
Operating Time with Battery Pack
79
Precautions for the Battery Pack
79
Recharging
79
Preparations for Operation
79
Turning the Power on
79
Turning the Power off
79
Loading/Unloading the Cassette
80
Cassette Loading
80
Unloading the Cassette
80
Setting and Displaying the Date and Time
80
Setting the Date and Time Style
80
Displayed Time Code/User's Bit
81
Setting the Date and Time
81
Time Code Input Entered the IEEE1394 Connector (GY-HD200U/GY-HD201E Only)
81
Displaying Time Code
81
Presetting and Recording of Time Code
82
Setting
82
Presetting Time Code Data
82
Presetting User's Bit Data
82
Zero-Resetting the Time Code or User's Bit Data
82
Codes Recorded on Tape
83
Presetting the Time Code from the LCD Screen
83
Recording Time Codes in Continuation of Time Codes
83
Playing Back Time Code
83
Synchronizing with the Time Code of the IEEE1394
84
(DV)-Connected Master Unit
84
Screen Adjustment
85
Viewfinder Adjustment
85
Back Focus Adjustment
85
White Balance Adjustment
86
Full Auto White Balance (FAW)
86
White Shading Adjustment
86
Setting and Adjustments before Shooting
87
Setting the Video Format
87
Setting the FRAME RATE Item
87
Camera Settings
87
Screen Size (4:3/16:9) Mode Selection
87
Audio Input Signal Selection
88
Selecting the CH-2 Channel Input Connector
88
Selecting the Audio Signal Input
88
Adjusting Audio During Recording
88
Monitoring Audio During Recording
88
Shooting Operation
89
Basic Recording Operation
89
If the Record-Standby Mode Continues
89
Checking Recorded Contents in Record-Standby Mode (Recording Check Function)
89
HEADER REC Function
90
Playback Mode
91
Playback Procedure
91
Fast-Forward, Rewind
91
Search
91
Outputting Audio
91
Using External Components
92
Connecting the Video Signal Cables
92
Connecting the IEEE1394 Cable
92
Dubbing with AV Devices
93
HDV/DV Dubbing
94
Backup Recording
95
Connect a Remote Control Unit (RM-LP55/RM-LP57)
95
Menu Screen Configuration
96
Top Menu Screen
98
Video Format[1/2] Menu Screen
99
Camera Operation Menu Screen
100
Advanced Process Menu Screen
101
Genlock Menu Screen
109
JVC GY-HD250 Instructions Manual (60 pages)
HD CAMERA RECORDER
Brand:
JVC
| Category:
Camcorder
| Size: 4.64 MB
Table of Contents
Important Safeguards
2
Accessories
4
Main Features
4
Table of Contents
5
Introduction
6
Precautions for Proper Use
6
Routine and Periodical Maintenance
6
Precautions for Use of Head Cleaning Tape
6
Battery Pack to be Used
7
Videocassette to be Used
7
For Recording and Storing Videotapes in the Best Condition
7
Condensation
7
Characteristic CCD Phenomena
7
Controls, Indicators and Connectors
8
ZOOM Lens
8
Front Section
8
Rear Section
9
LCD Door
9
Right Side Section
10
Left Side Section
11
Top Section
12
Recording and Image Output Formats
13
Indications on the LCD Monitor and in the Viewfinder
14
Status Screens
14
Status Screens in the Camera Mode
14
Status Screen in VTR MODE
17
Magnified Status Indications on the LCD Monitor
17
Auto White Balance Indication (Camera Mode Only)
18
Menu Setting Screen
18
Alarm Message Display
18
Safety Zone Indication (Camera Mode Only)
18
Switching between the LCD Screen and Viewfinder Display
18
Preparations
19
Basic System
19
Attaching the Zoom Lens
19
Attaching the Microphone (Provided)
19
How to Attach the Viewfinder
19
Inserting an SD Memory Card
20
Taking out the SD Memory Card
20
About SD Memory Cards
20
Attaching the Tripod Base (Provided Only for U Model)
20
AC Operation
21
Charging the Built-In Battery
21
Battery Operation
21
Attaching the Battery
21
Removing the Battery
21
Precautions for the Battery Operation
22
Remaining Battery Power Display
22
Operating Time with Battery Pack
22
Precautions for the Battery Pack
22
Recharging
22
Preparations for Operation
22
Turning the Power on
22
Turning the Power off
22
Loading/Unloading the Cassette
23
Cassette Loading
23
Unloading the Cassette
23
Setting and Displaying the Date and Time
23
Setting the Date and Time Style
23
Setting the Date and Time
24
Displaying Time Code
24
Displayed Time Code/User's Bit
24
Time Code Input Entered the IEEE1394 Connector
24
Presetting and Recording of Time Code
25
Setting
25
Presetting Time Code Data
25
Presetting User's Bit Data
25
Zero-Resetting the Time Code or User's Bit Data
25
Presetting the Time Code from the LCD Screen
26
Recording Time Codes in Continuation of
26
Time Codes Recorded on Tape
26
Playing Back Time Code
26
Synchronizing with the Time Code of the IEEE1394 (DV)-Connected Master Unit
27
Synchronizing with an External Time Code Generator
27
Screen Adjustment
28
Viewfinder Adjustment
28
Back Focus Adjustment
28
White Balance Adjustment
29
Full Auto White Balance (FAW)
29
White Shading Adjustment
29
Setting and Adjustments before Shooting
30
Setting the Video Format
30
Setting the FRAME RATE Item
30
Camera Settings
30
Audio Input Signal Selection
31
Selecting the CH-2 Channel Input Connector
31
Selecting the Audio Signal Input
31
Adjusting Audio During Recording
31
Monitoring Audio During Recording
31
Shooting Operation
32
Basic Recording Operation
32
If the Record-Standby Mode Continues
32
Checking Recorded Contents in Record-Standby Mode (Recording Check Function)
32
HEADER REC Function
33
Playback Mode
34
Playback Procedure
34
Fast-Forward, Rewind
34
Search
34
Outputting Audio
34
Using External Components
35
Connecting the Video Signal Cables
35
Connecting the IEEE1394 Cable
35
Recording Composite Video Signals from
35
An External Device
35
GENLOCK Menu Screen
36
Using GENLOCK Functions
36
Dubbing with AV Devices
36
HDV/DV Dubbing
37
Backup Recording
38
Connect a Remote Control Unit (RM-LP55/RM-LP57)
38
Menu Screen Configuration
39
Setting Menu Screens
40
TOP MENU Screen
41
VIDEO FORMAT[1/2] Menu Screen
42
VIDEO FORMAT[2/2] Menu Screen
42
CAMERA OPERATION Menu Screen
43
CAMERA PROCESS[1/2] Menu Screen
43
CAMERA PROCESS[2/2] Menu Screen
44
ADVANCED PROCESS Menu Screen
44
COLOR MATRIX ADJUST Menu Screen
45
SKIN COLOR ADJUST Menu Screen
45
WHITE BALANCE Menu Screen
45
SWITCH MODE Menu Screen
46
AUDIO/MIC[1/2] Menu Screen
46
AUDIO/MIC[2/2] Menu Screen
47
LCD/VF[1/4] Menu Screen
47
LCD/VF[2/4] Menu Screen
48
LCD/VF[3/4] Menu Screen
48
LCD/VF[4/4] Menu Screen
49
TC/UB/CLOCK Menu Screen
49
HEADER REC Menu Screen
50
TIME/DATE Menu Screen
50
OTHERS[1/2] Menu Screen
51
OTHERS[2/2] Menu Screen
51
GENLOCK Menu Screen
52
FILE MANAGE Menu Screen
53
Displaying the FILE MANAGE Menu Screen
53
Loading a Menu Settings File
53
Saving Settings
53
Error Displays
53
Resetting the Menu Settings to the Factory Settings
54
Initializing (Formatting) an SD Memory Card
54
Features of the Camera Section
54
How to Use Skin Detail
54
Outputting Color Bars
55
Others
56
Warnings and Responses
56
TOP MENU Screen
58
Troubleshooting
58
How to Display the Hour Meter
58
Specifications
59
External Dimensions
59
Camera Section
59
Vtr Section
59
Advertisement
JVC GY-HD250 Brochure & Specs (12 pages)
ProHD Series Compact Shoulder Camcorder
Brand:
JVC
| Category:
Camcorder
| Size: 2.33 MB
Table of Contents
Professional Specifications
6
Professional Functions
7
User-Friendly Design
8
Rear Panel Connectors
9
System Configuration
9
Specifications
12
Jvc GY-HD250 Brochure & Specs (12 pages)
ProHD Compact Shoulder Camcorder
Brand:
Jvc
| Category:
Camcorder
| Size: 2.22 MB
Table of Contents
Professional Specifications
6
User-Friendly Design
8
Rear Panel Connectors
9
System Configuration
9
Specifications
12
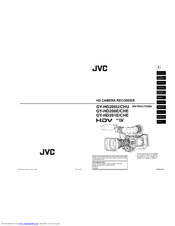
(Spanish) JVC GY-HD250 Instrucciones (58 pages)
CÁMARA DE VÍDEO DIGITAL HD, HDV / MiniDV
Brand:
JVC
| Category:
Camcorder
| Size: 3.45 MB
Table of Contents
Table of Contents
6
Accesorios
4
Table of Contents
6
Precauciones para un Uso Adecuado
8
Precauciones para el Uso de la Cinta Limpiacabezales
9
Condiciones
10
Objetivo ZOOM
12
Puerta del LCD
15
Uso de las Funciones GENLOCK
19
Indicaciones en el Monitor LCD y en el Visor
24
Pantallas de Estado
24
Avisos y Respuestas
26
Modo de Entrada de Imagen Externa (Aux In)
27
Pantalla STATUS 2
29
Status 2
29
1 Visualización VIDEO FORMAT
30
Pantalla de Estado en el Modo de Videograbadora
30
Indicaciones de Estado Ampliadas en el Monitor LCD
31
Véase la
32
3 Visualización Sincronizada con
31
Un Generador de Código de Tiem
31
Po Externo
31
Cambio entre el Monitor LCD y la Pantalla del Visor
33
Véase la
36
Acerca de las Tarjetas de Memoria SD
36
Funcionamiento con CA
38
Recarga
40
Carga de la Cinta
42
Ajuste de la Fecha y la Hora
44
Conector IEEE1394
45
Ajuste
46
Preajuste de Los Datos de Bits del Usuario
47
Conectada al IEEE1394 (DV)
50
Externo
51
Ajuste de la Pantalla
52
Ajuste del Visor
52
Ajuste del Enfoque Trasero
53
Ajuste del Balance de Blancos
54
Ajuste de Sombreado de Blancos
55
5 Indicación del Voltaje
31
Advertisement
Related Products
JVC GY-HD250U - 3-ccd Prohd Camcorder
JVC ProHD GY-HD251
JVC GY-HD250CHU
JVC ProHD GY-HD251E
JVC GY-HD251CHE
JVC GY-HD250U
JVC GY-HD200CHE
JVC GY-HD201E
JVC GY-HD200CHU
JVC GY-HD200U
JVC Categories
Car Receiver
Camcorder
TV
VCR
Stereo System
More JVC Manuals
Login
Sign In
OR
Sign in with Facebook
Sign in with Google
Upload manual
Upload from disk
Upload from URL