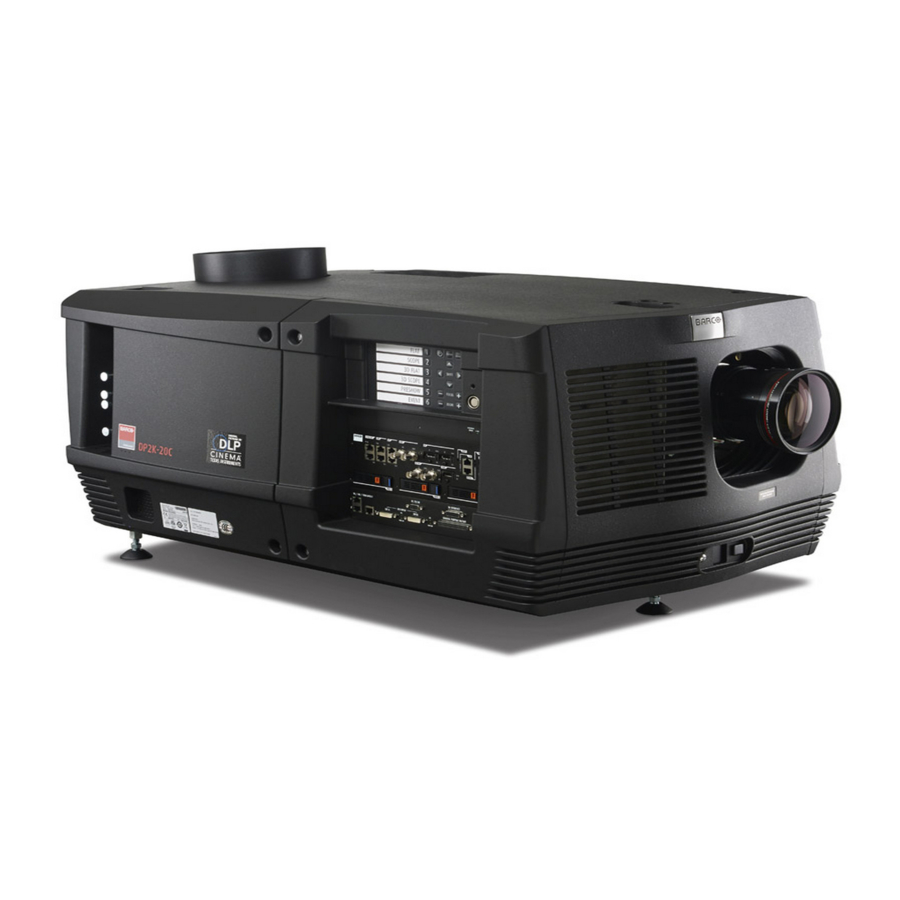
Sign In
Upload
Manuals
Brands
Barco Manuals
Projector
DP2K-12C
Barco DP2K-12C Manuals
Manuals and User Guides for Barco DP2K-12C. We have
6
Barco DP2K-12C manuals available for free PDF download: Service Manual, User And Installation Manual, Installation Manual, Safety & Environmental Information, Preliminary, Specifications
Barco DP2K-12C Service Manual (359 pages)
Brand:
Barco
| Category:
Projector
| Size: 79.89 MB
Table of Contents
Table of Contents
5
1 Safety
9
Safety Instructions
10
2 General
13
Convention Projector Orientation
14
Location of the Main Components of the Projector
15
About the Projector Status Light
18
Projector Block Diagrams
19
Interconnection Diagram
21
Spare Parts for DP2K-12C/11CX
22
3 Preventative Maintenance Actions
23
Monthly Maintenance Actions
24
Lamp Change Maintenance Actions
25
Three Monthly Maintenance Actions
26
Annually Maintenance Actions
27
Yearly Maintenance Actions
30
4 Troubleshooting
31
Troubleshooting Checklist
33
Log Files
78
5 Removal and Installation of Projector Covers
81
Removal of the Lamp Cover
82
Removal of the Input Cover
83
Removal of the
84
Removal of the Side Cover
85
Removal of the Rear Cover
86
Removal of the Top Cover
87
Open the Sealed Compartment
89
Close the Sealed Compartment
90
Installation of the Top Cover
91
Installation of the Rear Cover
92
Installation of the Side Cover
93
Installation of the
94
Installation of the Input Cover
95
6 Lamps and Lamp Houses
97
Introduction
98
Removal of the Lamp House
100
Removal of the Xenon Lamp
102
Installation of the Xenon Lamp
106
Installation of the Lamp House
112
Resetting the Lamp Parameters
114
Realignment of the Lamp in Its Reflector
115
Replacement of the Lamp Info Module
117
Replacement of the UV Blocker
119
Replacement of the Lamp Reflector
122
Cleaning the Reflector of the Lamp House
125
Cleaning the UV Blocker of the Lamp House
126
7 Cold Mirror Assembly
127
Introduction
128
Removal of the Cold Mirror Assembly
129
Replace the Cold Mirror
131
Installation of the Cold Mirror Assembly
133
Adjusting the Cold Mirror
135
Cleaning the Cold Mirror
137
8 Light Processor Assembly
139
Introduction
140
Light Processor Diagnostic
142
Remove Light Processor Top Cover
143
Electrical Disconnection
144
Light Processor Assembly Removal
145
Preparing the New Light Processor Assembly
146
Installation of the Light Processor Assembly
148
Electrical Connections
150
Mount Light Processor Cover
151
Mount Light Processor Assembly into the Flight Case
152
Finalize the Installation of the Light Processor Assembly
154
Replacement of the Light Sensor Module
155
Replacement of the Dowser (Shutter)
156
Replacing of the Notch Filter
158
Adjusting the Notch Filter
160
Cleaning the Prism Exit Side
162
9 Convergence
163
Convergence Controls
164
Preparing the Convergence Adjustment
166
Red on Blue Convergence
167
Green on Blue Convergence
169
10 Integrator Rod
171
Introduction
172
Rod Diagnostic
173
Removal of the Integrator Rod
174
Installation of a New Integrator Rod
177
Adjusting the Integrator Rod
181
11 Lenses and Lens Holder
183
Available Lenses
184
Lens Selection
185
Lens Removal
186
Lens Installation
187
Cleaning the Lens
189
Remove the Lens Holder
190
Install the Lens Holder
193
Scheimpflug Adjustment
196
Replacement of the Vertical Shift Stepper Motor
200
Replacement of the Horizontal Shift Stepper Motor
202
First Placement of the Inner Dust Rubber
204
Replacement of the Inner Dust Rubber
208
12 Card Cage
211
Fan Controller Board
212
Integrated Cinema Processor (ICP) Board
213
HD-SDI Board + Link Decryptor
214
Cinema Controller Board
215
Removing a Board in the Card Cage
217
Inserting a Board in the Card Cage
218
Replacement of the RTC Battery of the ICP Board
219
Battery Replacement on the Cinema Controller Board
221
Removing the Button Unit
223
Installation of the Button Unit
226
Replacement of the Button Module (First Generation Keypad)
227
Replacement of the Keypad (First Generation Keypad)
230
Replacement of the Keypad Assembly (Second Generation Keypad)
234
Replacement of the Signal Back Plane
235
Replacement of the Link Decryptor
247
Authorization to Clear Security Warning on the Projector
249
Replacement of the Status Light
250
13 Software Update Via Communicator (DC Update Companion)
251
Software Upgrade, Launch DC Update Companion
252
Software Upgrade, Projector, ICMP or Touch Panel
255
ICP Software Upgrade
259
Link Decryptor Software Update
262
Update Logging
264
14 Communicator Touch Panel
265
Introduction
266
Installing the Touch Panel Interface
268
Reposition the Touch Panel Interface
270
15 Power Input
271
Introduction
272
Getting Access to the Mains Input Components
273
Replacement of the Mains ON/OFF Switch
275
Replacement of the Mains Input Filter
277
Closing the Mains Input Compartment
279
16 Switched Mode Power Supply
283
Diagnostic Leds on the SMPS
284
Replacement of the Switched Mode Power Supply
285
17 Lamp Power Supply
287
Introduction
288
LPS Diagnostic Led's
289
Removal of the LPS Module
291
Installation of the LPS Module
293
18 Lamp Power Supply (Single Module)
295
LPS Module Diagnostic Led's
296
Removal of the LPS Module
298
Installation of the LPS Module
300
Replacing a Large Frame LPS with a Single Module LPS
303
19 Start Pulse Generator
307
Introduction
308
Troubleshooting
309
Removal of the Start Pulse Generator
310
Installation of the Start Pulse Generator
312
20 Fan Replacement Procedure
315
Card Cage Fans
316
SMPS Compartment Fans
318
Light Processor Compartment Fan
320
Lamp Cathode Fan
323
Lamp Anode Fan
328
Cold Mirror Fan
331
Lamp Info Module Fan
333
Integrated Cinema Processor Fan
334
21 Maintenance Procedures
335
Cleaning the Exterior of the Projector
336
Removing the Front Dust Filter
337
Clean the Dust Filter on the Top Side
339
Pin Configurations
341
About General Purpose Inputs & Outputs (GPIO)
342
Pin Configurations of the Communication Ports
344
Pin Configurations of the ICMP Communication Ports
346
Pin Configurations of the Inputs
349
Input Formats
351
Input Formats
353
Index
355
Advertisement
Barco DP2K-12C User And Installation Manual (184 pages)
Brand:
Barco
| Category:
Projector Accessories
| Size: 45.02 MB
Table of Contents
Table of Contents
7
Safety
11
General Considerations
12
Important Safety Instructions
13
Safety Precautions Hazardous Chemicals
17
High Brightness Precautions: Hazard Distance
17
HD for Fully Enclosed Projection Systems
19
HD in Function of Modifying Optics
20
General
21
Installation Requirements
22
Unpacking the Projector
24
Initial Inspection
26
Installation Process Overview
27
Physical Installation
29
Positioning the Projector at the Port Window
30
Installation of the Exhaust System
32
Connecting the Projector with the Power Net
33
Power Loop through to the Projector Electronics
35
Connecting a UPS with the Projector Electronics
37
Lamp & Lamp House
39
Introduction
40
Removal of the Lamp House
41
Removal of the Xenon Lamp
42
Installation of the Xenon Lamp
46
Installation of the Lamp House
51
Resetting the Lamp Parameters
53
Realignment of the Lamp in Its Reflector
54
Lenses & Lens Holder
57
Available Lenses
58
Lens Selection
58
Lens Installation
59
Lens Removal
62
Lens Shift, Zoom & Focus
62
Scheimpflug Adjustment
64
Input & Communication
69
Introduction
70
Local Keypad
70
Integrated Cinema Processor (ICP)
71
Integrated Cinema Processor - Direct (ICP-D)
72
ICP-D HDMI 2.0 Specifications
74
HD-SDI Input Module (Optional)
74
Integrated Media Block/Server (Optional)
78
Cinema Controller
79
Icmp-X
83
ICMP-X Introduction
85
Icmp-X Hdd
87
What Are the Possible HDD Swaps
89
Installing a HDD into the ICMP-X
90
Removing a HDD from the ICMP-X
92
HDD Status Leds
93
ICMP-X Status Leds
94
ICMP-X Device Certificate
95
Obtaining the ICMP-X Certificate
97
ICMP-X Configuration Via Communicator
98
ICMP-X Communication Ports
99
ICMP-X Source Input Ports
100
ICMP-X Network Streaming (Live IP) Specifications
101
ICMP Displayport Specifications
102
ICMP-X SDI Specifications
104
ICMP-X HDMI 2.0 Specifications
107
ICMP HDMI 1.4 Specifications
110
ICMP-X Reset
113
Communicator Touch Panel
115
Introduction
116
Installing the Touch Panel Interface
117
Reposition the Touch Panel Interface
118
Starting up
121
Switching on the DP2K-XXC
122
Switching off the DP2K-XXC
122
Removal and Installation of Projector Covers
123
Removal of the Lamp Cover
124
Removal of the Input Cover
124
Removal of the
125
Removal of the Side Cover
126
Removal of the Rear Cover
127
Removal of the Top Cover
128
Open the Sealed Compartment
129
Close the Sealed Compartment
130
Installation of the Top Cover
131
Installation of the Rear Cover
132
Installation of the Side Cover
132
Installation of the
133
Installation of the Input Cover
134
Maintenance
135
Removing the Front Dust Filter
136
Clean the Dust Filter on the Bottom Side
137
Clean the Dust Filter on the Top Side
138
Cleaning the Lens
139
Cleaning the Exterior of the Projector
140
Check Cooling Liquid Level
140
Cleaning the UV Blocker of the Lamp House
141
Authorization to Clear Security Warning on the Projector
142
Convergence
143
Convergence Controls
144
Preparing the Convergence Adjustment
146
Red on Blue Convergence
147
Green on Blue Convergence
148
A Specifications
151
Specifications of a DP2K-12C Projector
152
Specifications of a DP2K-15C Projector
153
Specifications of a DP2K-20C Projector
155
Specifications of the ICMP
157
Specifications of the ICMP-X
158
Dimensions of the DP2K-XXC
159
Center of Gravity of the DP2K-XXC
160
Dimensions of the Universal Pedestal
161
Technical Regulations
161
B Pin Configurations
163
About General Purpose Inputs & Outputs (GPIO)
164
Pin Configurations of the Communication Ports
165
Pin Configurations of the ICMP-X Communication Ports
167
Pin Configurations of the Inputs
170
C Environmental Information
171
Disposal Information
172
Turkey Rohs Compliance
172
Contact Information
173
Production Address
173
Download Product Manual
173
Glossary
175
Index
179
Barco DP2K-12C Installation Manual (111 pages)
DP2K C-series
Brand:
Barco
| Category:
Projector
| Size: 32.93 MB
Table of Contents
Disposal Information
3
Software License Agreement
3
Table of Contents
7
1 Safety
9
General Considerations
9
General Safety Instructions
9
Notice on Safety
9
Restricted Access Location
9
Important Safety Instructions
10
2 General
13
Installation Requirements
13
Power Requirements
13
Projector Weight
14
Unpacking the Projector
14
Initial Inspection
16
Box Content
16
Installation Process Overview
17
3 Physical Installation
19
Positioning the DP2K C-Series Projector at Port Window
19
Projector Centering
20
Projector Tilting
20
Installation of the Exhaust System
21
Connecting the Projector with the Power Net
22
Power Loop through to the Projector Electronics
24
Connecting a UPS with the Projector Electronics
25
4 Lamp & Lamp House
27
Introduction
27
Removal of the Lamp House
29
Removal of the Xenon Lamp
30
Installation of the Xenon Lamp
34
Installation of the Lamp House
39
Resetting the Lamp Parameters
40
Realignment of the Lamp in Its Reflector
41
5 Lenses & Lens Holder
43
Available Lenses
43
Lens Selection
44
Lens Removal
45
Lens Installation
46
Lens Shift, Zoom & Focus
48
Scheimpflug Adjustment
48
How to Adjust
49
6 Input & Communication
53
Introduction
53
Local Keypad of the DP2K C-Series Projector
54
Communication Ports of the DP2K C-Series Projector
55
Source Input Ports of the DP2K C-Series Projector
56
LED Indications on the Integrated Cinema Processor Module
57
7 Communicator Touch Panel
59
Introduction
59
Installing the Touch Panel Interface
60
Reposition the Touch Panel Interface
61
8 Starting up
63
Switching on the DP2K C-Series Projector
63
Switching off the DP2K C-Series Projector
63
9 Projector Registration
65
Introduction
65
Download the Certificate File
65
Registration of New Projector
66
Update Registration of an Existing Projector
71
10 Removal and Installation of Projector Covers
73
Removal of the Lamp Cover
73
Removal of the Input Cover
74
Removal of the
75
Removal of the Side Cover
76
Removal of the Rear Cover
76
Removal of the Top Cover
77
Open the Sealed Compartment
78
Close the Sealed Compartment
79
Installation of the Top Cover
80
Installation of the Rear Cover
81
Installation of the Side Cover
82
Installation of the
82
Installation of the Input Cover
83
11 Maintenance
85
Removing the Front Dust Filter
85
Clean the Dust Filter on the Bottom Side
87
Clean the Dust Filter on the Top Side
87
Cleaning the Lens
88
Cleaning the Exterior of the Projector
89
Check Cooling Liquid Level
89
Cleaning the UV Blocker of the Lamp House
90
Authorization to Clear Security Warning on the Projector
91
12 Convergence
93
Convergence Controls
93
Preparing the Convergence Adjustment
95
Red on Blue Convergence
96
Green on Blue Convergence
97
13 Specifications
99
Specifications of a DP2K-12C Projector
99
Specifications of a DP2K-15C Projector
99
Specifications of a DP2K-20C Projector
100
Dimensions of the DP2K C-Series Projector
101
Center of Gravity of the DP2K C-Series Projector
102
Dimensions of the Universal Pedestal
103
Pin Configurations
105
About General Purpose Inputs & Outputs (GPIO)
105
Pin Configurations of the Communication Ports
106
Pin Configurations of the Inputs
107
Ethernet Port
107
Index
109
Advertisement
Barco DP2K-12C Safety & Environmental Information (8 pages)
Brand:
Barco
| Category:
Projector
| Size: 0.4 MB
Table of Contents
Safety & Environmental Information
3
General Considerations
3
Important Safety Instructions
4
Turkey Rohs Compliance
7
Disposal Information
7
Contact Information
7
Production Address
8
Download Product Manual
8
Barco DP2K-12C Preliminary (2 pages)
DP2K C-Series Compact DLP Cinema projectors
Brand:
Barco
| Category:
Projector
| Size: 0.43 MB
Barco DP2K-12C Specifications (2 pages)
Compact DLP Barco Alchemy Cinema projector for screens up to 12m (39ft)
Brand:
Barco
| Category:
Projector
| Size: 0.55 MB
Advertisement
Related Products
Barco DP2K-15C
Barco DP2K-19B
Barco DP2K-10S
Barco DP2K-15CLP
Barco DP2K-17BLP
Barco DP2K-11CX
Barco DP2K-10SLP
Barco DP2K-23B
Barco DP2K-23BLP
Barco DP2K SLP Series
Barco Categories
Projector
Monitor
Projector Accessories
Medical Equipment
Controller
More Barco Manuals
Login
Sign In
OR
Sign in with Facebook
Sign in with Google
Upload manual
Upload from disk
Upload from URL