Table of Contents
Advertisement
Quick Links
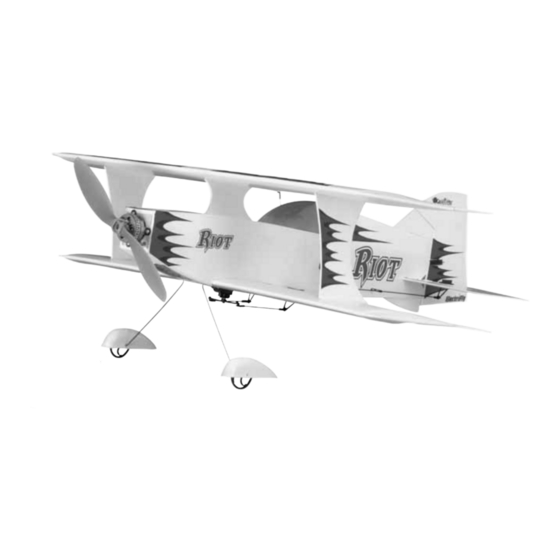
Wingspan: 20.5 in [514mm]
Wing Area: 235 sq in [15.2dm
Weight: 7.4 – 8.0 oz [210 – 225g]
Wing Loading: 4.5 – 4.9 oz/sq ft [14 – 15g/dm
Length: 22.75 in [580mm]
Radio: 4-channel with 3 micro servos
Motor: RIMFIRE
™
28-22-1380kV brushless out-runner
Great Planes
®
Model Manufacturing Co. guarantees this kit to be free from defects in both material and workmanship at the date of
purchase. This warranty does not cover any component parts damaged by use or modification. In no case shall Great Planes' liability
exceed the original cost of the purchased kit. Further, Great Planes reserves the right to change or modify this warranty without notice.
In that Great Planes has no control over the final assembly or material used for final assembly, no liability shall be assumed nor
accepted for any damage resulting from the use by the user of the final user-assembled product. By the act of using the user-assembled
product, the user accepts all resulting liability.
If the buyer is not prepared to accept the liability associated with the use of this product, the buyer is advised to return this
kit immediately in new and unused condition to the place of purchase.
To make a warranty claim send the defective part or item to Hobby Services at the address below:
Include a letter stating your name, return shipping address, as much contact information as possible (daytime telephone number, fax
number, e-mail address), a detailed description of the problem and a photocopy of the purchase receipt. Upon receipt of the package
the problem will be evaluated as quickly as possible.
READ THROUGH THIS MANUAL BEFORE STARTING
CONSTRUCTION. IT CONTAINS IMPORTANT INSTRUCTIONS
AND WARNINGS CONCERNING THE ASSEMBLY AND
USE OF THIS MODEL.
Entire Contents © Copyright 2006
INSTRUCTION MANUAL
2
]
2
]
3002 N. Apollo Dr., Suite 1
Champaign, IL 61822 USA
WARRANTY
Hobby Services
™
Champaign, Illinois
(217) 398-8970, Ext 5
airsupport@greatplanes.com
GPMZ1570 for GPMA1570/1571 V1.0
™
Advertisement
Table of Contents

Related Manuals for GREAT PLANES Riot 3D


Summary of Contents for GREAT PLANES Riot 3D
-
Page 1: Instruction Manual
Further, Great Planes reserves the right to change or modify this warranty without notice. In that Great Planes has no control over the final assembly or material used for final assembly, no liability shall be assumed nor accepted for any damage resulting from the use by the user of the final user-assembled product. -
Page 2: Table Of Contents
Incredibly fast rolls, unlimited vertical, and amazing may result in an unsafe or unflyable model. In a few cases acrobatics the Riot 3D ARF is sure to impress all who see it. the instructions may differ slightly from the photos. In those... -
Page 3: Lithium Battery Handling & Usage
Here is a list of optional tools mentioned in the manual that cause bodily harm! will help you build the Riot 3D ARF. • ONLY use a LiPo approved charger. NEVER use a ❏... -
Page 4: Important Building Notes
IMPORTANT BUILDING NOTES METRIC CONVERSIONS • When you see the term test fit in the instructions, it 1" = 25.4mm (conversion factor) means that you should first position the part on the 1/64" .4mm 3/4" 19.0mm assembly without using any glue, then slightly modify or 1/32"... -
Page 5: Kit Inspection
If any parts are missing or are not of acceptable quality, or if you need assistance with assembly, contact Product Support. When reporting defective or missing parts, use the part names exactly as they are written in the Kit Contents list on this page. Great Planes Product Support 3002 N. Apollo Drive, Suite 1 Champaign, IL 61822 Telephone: (217) 398-8970, ext. -
Page 6: Assemble The Fuselage
should be equal. Sand the slot in the rear of the fuse as ASSEMBLE THE FUSELAGE needed for a proper fit. Install the Tail Surfaces ❏ 1. Locate the pre-hinged horizontal stab and elevator. Measure and mark the center of the stabilizer as shown. ❏... -
Page 7: Mount The Wings
Mount the Wings ❏ 8. Carefully cut a slot for the rudder control horn in the area marked on the sketch. ❏ 1. Attach each of the ailerons to the wings using three CA hinges. ❏ 9. Using three CA hinges, attach the rudder to the fin and fuselage. - Page 8 ❏ 3. Center the bottom wing in the wing saddle area as shown using the same measuring technique as the stabilizer. It may assist you to mark the centerline on the fuselage and bottom wing with a felt-tip pen. Mark on the wing where it meets the fuselage.
-
Page 9: Radio System Installation
RADIO SYSTEM INSTALLATION In the following sections, the hardware you will be using will come from the included plastic parts trees. Whenever possible, the part will have a number associated with it and that number will be in parentheses. For example, the Z-bend clevis part number is A1 on the parts tree. - Page 10 ❏ 13. Install two Z-bend clevises (A1) into the outer holes on the double servo arm (G4). ❏ 14. Attach a double servo arm (G4) that fits your servo. Enlarge the outer holes in the double servo arm (G4) before installing the arm on the servo.
-
Page 11: Motor & Esc Installation
❏ 17. Insert a Z-bend clevis (A1) into four closed ended hinge points (C4) as shown. ❏ 1. The power system recommended for the Riot 3D ARF is the ElectriFly RimFire ™ 28-22-1380kV out-runner motor, 8x3.8 APC Slo-Flyer prop, and Silver Series SS-8 Amp ESC. This is the power system that will be illustrated in the manual. -
Page 12: Battery & Receiver Installation
❏ ❏ 3. Attach the ESC to the inside wall of the fuselage as 3. Drill two 1/16" [1.6mm] holes approximately 1/4" [6.4mm] shown using hook and loop material or double-sided tape. apart. Route the antenna from the receiver out of the bottom of the airplane and “thread”... -
Page 13: Attach The Propeller
ATTACH THE PROPELLER ❏ 3. Temporarily attach a 1" [25mm] main wheel to the landing gear wire. Align a wheel pant as shown. Mark on the wheel pant where the landing gear wire enters the pant. Drill a 1/16" [1.6mm] hole in the wheel pant. ❏... -
Page 14: Set The Control Throws
Due to the size of the Riot 3D ARF and its control surfaces, successful. If you value this model and wish to enjoy it for... -
Page 15: Balance The Model Laterally
Use Great Planes (GPMQ4485) “stick-on” lead to add additional weight to the Riot 3D ARF if needed. A good place to add stick-on nose Charge the Batteries weight is to the bottom of the fuselage under the firewall. Begin... -
Page 16: Balance The Propellers
General We use a Top Flite Precision Magnetic Prop Balancer (TOPQ5700) in the workshop and keep a Great Planes 1) I will not fly my model aircraft in sanctioned events, air Fingertip Prop Balancer (GPMQ5000) in our flight box. -
Page 17: Check List
Since the Riot 3D ARF does indeed have a large thrust- to-weight ratio, ground takeoffs will require very short distances. Point the nose of the Riot 3D ARF into the wind and advance the throttle smoothly. A very sudden throttle movement could cause a great deal of roll due to torque and make the plane very difficult to control. -
Page 18: Flight
While full throttle is usually desirable for takeoff, most models fly more smoothly at reduced speeds. Take it easy with the Riot 3D ARF for the first few flights, gradually getting acquainted with it as you gain confidence. - Page 19 two keys and a lever. But the 4EXA’s biggest benefit is this: room to grow. With the 4EXA, EPA for servos, expo, wing mixing for V-tail and elevon are at your fingertips whenever you want them. Includes an R124 receiver, full NiCds and three S3108M servos.
- Page 20 BUILDING NOTES Kit Purchased Date: _______________________ Date Construction Finished: _________________ Where Purchased:_________________________ Finished Weight: __________________________ Date Construction Started: __________________ Date of First Flight: ________________________ FLIGHT LOG...
Need help?
Do you have a question about the Riot 3D and is the answer not in the manual?
Questions and answers