Table of Contents
Advertisement
Quick Links
Download this manual
See also:
Instruction Manual
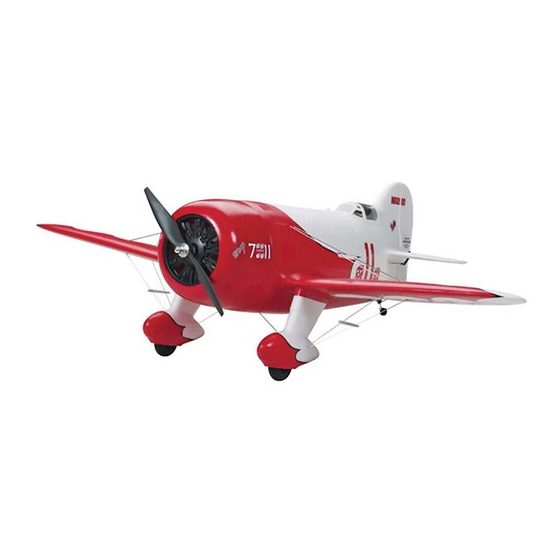
Wingspan: 38.5 in [980 mm]
Wing Area: 241 in
Wing Loading: 16.7−19.1 oz/ft
Length: 27 in [685 mm]
WARRANTY
Great Planes Model Manufacturing
be free from defects in both material and workmanship at the
date of purchase. This warranty does not cover any component
parts damaged by use or modification. In no case shall Great
Planes' liability exceed the original cost of the purchased kit.
Further, Great Planes reserves the right to change or modify this
warranty without notice.
In that Great Planes has no control over the final assembly or
material used for final assembly, no liability shall be assumed nor
accepted for any damage resulting from the use by the user of
the final user-assembled product. By the act of using the
user-assembled product, the user accepts all resulting liability.
If the buyer is not prepared to accept the liability associated
with the use of this product, the buyer is advised to return
READ THROUGH THIS MANUAL BEFORE STARTING CONSTRUCTION. IT CONTAINS IMPORTANT
INSTRUCTIONS AND WARNINGS CONCERNING THE ASSEMBLY AND USE OF THIS MODEL.
®
Entire Contents © 2011 Hobbico,
Inc. All rights reserved.
2
2
[15.5 dm
]
2
2
[51− 58 g /dm
]
®
Co. guarantees this kit to
Weight: 1.75− 2 lb
[790 −910 g]
Radio: 4-channel
this kit immediately in new and unused condition to the
place of purchase.
To make a warranty claim send the defective part or item to
Hobby Services at the address below:
Include a letter stating your name, return shipping address, as
much contact information as possible (daytime telephone
number, fax number, e-mail address), a detailed description of
the problem and a photocopy of the purchase receipt. Upon
receipt of the package the problem will be evaluated as quickly
as possible.
INSTRUCTION
MANUAL
SPECIFICATIONS
Motor: Included
Hobby Services
3002 N. Apollo Dr. Suite 1
Champaign IL 61822 USA
Champaign, Illinois
(217) 398-8970, Ext 5
airsupport@greatplanes.com
GPMA6020 v1.1
Advertisement
Table of Contents

Related Manuals for GREAT PLANES Gee Bee


Summary of Contents for GREAT PLANES Gee Bee
- Page 1 3002 N. Apollo Dr. Suite 1 Champaign IL 61822 USA In that Great Planes has no control over the final assembly or material used for final assembly, no liability shall be assumed nor Include a letter stating your name, return shipping address, as...
-
Page 2: Table Of Contents
Massachusetts in 1932, the Gee Bee R1 won the Thompson Trophy race that same year. It also set a new landplane world 1. Your Gee Bee EP Rx-R should not be considered a toy, speed record of 296mph (476 km/h) in the Shell Speed Dash. -
Page 3: Decisions You Must Make
7 Thin Electric Propeller (APCQ4123) DECISIONS YOU MUST MAKE ADDITIONAL ITEMS REQUIRED This is a partial list of items required to fi nish the Gee Bee Adhesives and Building Supplies EP Rx-R that may require planning or decision making before starting to build. -
Page 4: Ordering Replacement Parts
Description can be provided by your hobby dealer or mail-order company. GPMA3170 Fuselage To locate a hobby dealer, visit the Great Planes web site at GPMA3171 Wing www.greatplanes.com. Select “Where to Buy” in the menu across the top of the page and follow the instructions provided... -
Page 5: Horizontal Stabilizer Installation
HORIZONTAL STABILIZER INSTALLATION ❏ 3. Carefully insert the left stabilizer into the fuselage. Align the elevator joiner with the hole in the elevator. Center the horizontal stabilizer in the fuselage. IMPORTANT: To remove the battery hatch cover, pull straight up on the knob at the aft end of the hatch cover. The magnets hold the hatch on well. -
Page 6: Install The Main Landing Gear
INSTALL THE MAIN LANDING GEAR ❏ ❏ 4. Re-install the outside wheel pant half. ❏ 5. Return to step 1 and install the left main gear. ❏ ❏ 1. Set the right main landing gear wire in the plastic RADIO SETUP landing gear mount, in the wing. - Page 7 ❏ 3. Apply the soft side of the hook and loop material to the 4-CHANNEL RADIO SETUP bottom of the motor battery. Insert the battery in the fuselage (STANDARD MODE 2) and secure it with the battery strap. RIGHT AILERON RUDDER MOVES UP MOVES...
- Page 8 NOTE: The throws are measured at the widest part of the elevators, rudder and ailerons. To ensure a successful fi rst fl ight, set up your Gee Bee EP Rx-R according to the control throws specifi ed in this manual. The throws have been determined through actual fl...
-
Page 9: Installation Of The Flying Wires
INSTALLATION OF THE FLYING WIRES (Optional) ❏ ❏ 3. Reattach the outer wheel pant to the inner wheel pant. Extend the elastic thread to the fuselage. Do not stretch the elastic. Cut the elastic thread, allowing a few inches extra for securing the thread inside the fuselage. -
Page 10: Balance The Model (C.g.)
❏ 12. Glue the elastic thread to the wheel pant as before. ❏ ❏ 6. Pull the elastic thread through the fuselage. Pass the thread through the fl ying wire retainer as shown. ❏ ❏ 7. Follow the same procedure to install the aft fl ying wire. ❏... -
Page 11: Balance The Model Laterally
1-1/4" [32 mm] back from the leading model by the engine propeller shaft and the bottom of the edge. Due to the Gee Bee having a short nose (and depending fuse under the TE of the fi n. Do this several times. -
Page 12: Preflight
ALWAYS set the charger’s output volts to match the We use a Top Flite Precision Magnetic Prop Balancer (TOPQ5700) in the workshop and keep a Great Planes battery volts. Fingertip Prop Balancer (GPMQ5000) in our fl ight box. -
Page 13: Ama Safety Code Excerpts
NEVER disassemble or modify the pack wiring in other side for spectators. Only personnel involved with fl ying any way or puncture the cells. the aircraft are allowed at or in the front of the fl ight line. Intentional fl ying behind the fl ight line is prohibited. NEVER discharge below 2.5V per cell. -
Page 14: Flying
fl y more smoothly at reduced speeds. aileron or elevator) or a fl ying surface (such as a wing or Take it easy with the Gee Bee EP Rx-R for the fi rst few fl ights, stab) rapidly vibrates up and down (thus causing the noise). - Page 15 maneuver(s), improving a maneuver(s) you already know, or learning how the model behaves in certain conditions This model belongs to: (such as on high or low rates). This is not necessarily to improve your skills (though it is never a bad idea!), but more Name importantly so you do not surprise yourself by impulsively attempting a maneuver and suddenly fi...
- Page 16 ® Entire Contents © 2011 Hobbico, Inc. All rights reserved. GPMA6020 v1.1...
Need help?
Do you have a question about the Gee Bee and is the answer not in the manual?
Questions and answers