
Related Manuals for GRAUPNER MZ-10 HOTT


Summary of Contents for GRAUPNER MZ-10 HOTT
- Page 1 No. S1001 OPERATING INSTRUCTION Prior to use, please read this manual thoroughly. Keep this manual in a convenient place for quick and easy reference.
-
Page 2: Table Of Contents
BEFORE USE Contents Thank you for purchasing mz-10 HoTT 2.4GHz Radio System. This system is extremely • Before Use versatile and may be used by beginners and pros alike. In order for you to make the best • Support and Service use of your system and to fly safely, please read this manual carefully. -
Page 3: Safety Notes
15. Don’t move or touch the transmitter antenna during flight sion. Do not attempt disassembly, use with incompatible components or augment product in any way without the approval of Graupner/SJ. This manual contains instructions for safety, 3. FEATURES operation and maintenance. It is essential to read and follow all the instructions and warn- ings in the manual, prior to assembly, setup or use, in order to operate correctly and avoid 1. -
Page 4: Transmitter Control Identification
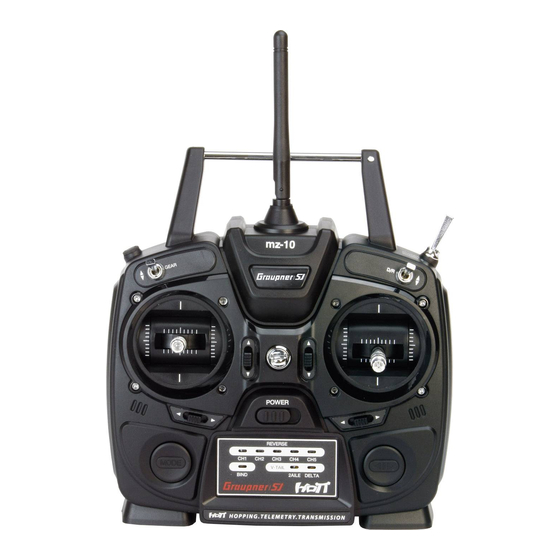
5. TRANSMITTER CONTROL IDENTIFICATION Antenna TX Handel RF Trainer Switch 5 Channel Switch Dual Rate Switch Neck Strap Lug Battery Cover Rudder and Throttle and Elevator Stick Aileron Stick Throttle Trim Elevator Trim Power Switch Rudder Trim Aileron Trim Mode Button Direction Button Bind LED... -
Page 5: Adjustble Stick Length
6. ADJUSTBLE STICK LENGTH 8. Mode exchange of throttle stick for Mode 1 and Mode 2 The control stick is consisted of 2pc of stick levers and it allows you to adjust the control Disassemble the centering cam Unscrew the transmitter’s rear case stick’s length as you want. - Page 6 Screw the disassembled bolt from Unscrew the tension spring control Screw the disassembled tension Assemble the centering cam into the the throttle gimbal of mode 1 trans- bolt in the elevator gimbal of mode control bolt from the elevator gimbal throttle gimbal of mode 1 transmitter and mitter into the elevator gimbal to fix 1 transmitter...
- Page 7 The sticks of mz-10 Europe Version shall be operated by tension Modes. According to the below picture with guideline, after disabling the other side stick, you can pick the throttle channel of mode 1 or 2. The method of Disabling Tension The both sticks could be used tension or throttle types according to the users.
-
Page 8: What Is Hott 8P
Voltage, Temperature, User programmed warning, and etc. The use of up to 75 channels ensures All Graupner/SJ charge jacks are center-pin negative. This is the opposite of many charg- extreme operating reliability and immunity to external ers. Before using a charger make sure the connector is center-pin negative. This can be interference thanks to optimized frequency hopping done using a voltmeter. -
Page 9: Binding
4. Binding You must bind the receiver to the transmitter before the receiver will operate. Binding teaches the receiver the specific code of the transmitter so that it will only connect to it’s corresponding transmitter. 1. Switch on the transmitter and receiver. 2. -
Page 10: Delta Wing
When you bind your transmitter, you are programming the receiver with failsafe defaults. Graupner/SJ receiver has 4 Failsafe modes: FAILSAFE, HOLD, OFF and STANDARD. 1. Press & hold the DIRECTION button for over 2 sec and then release the button, the transmit- ter enters reverse mode. -
Page 11: Failsafe
Move the control sticks on the transmitter to the desired preset failsafe positions. Press & hold the MODE button for over 2 sec and release the button. The Graupner/SJ logo turns solid red, Move transmitter’s RF TRAINER SWITCH of the TEACHER transmitter to TEACHER indicating the failsafe mode has been set. -
Page 12: Country Setting
RF TRAINER SWITCH of the teacher transmitter would be moved 2. Press MODE button once more, The Graupner/SJ logo blinks red with 3 times beeps, indi- to PUPIL position, the pupil transmitter can control all channels. -
Page 13: Range Testing
VOLT : 05.9 V - ALARM VOLT : Battery low voltage alarm The transmitter repeats that Graupner/SJ logo blinks 3 times red with 3 times beeps. M AXIMUM V OLT : 0 8.0V - COUNTRY : Country setting M AINIMUM VOLT : 05.9V... - Page 14 This equipment has been tested and found to comply with the limits for a Class B digital device, pursuant to Part 15 of the FCC Rules. These limits are designed to provide rea- - Product(s): Graupner/SJ mz-10 Transmitter, Graupner/SJ GR-12L 6 Channel HoTT Receiver sonable protection against harmful interference in a residential installation. This equipment...
- Page 15 - Check all working systems and carry out at least one full range check on the ground Product(s) : Graupner/SJ GR-12L 6 Channel HoTT Receiver before every flight, in order to show up any errors in the system and the models program- ming.
- Page 16 No. S1001...
Need help?
Do you have a question about the MZ-10 HOTT and is the answer not in the manual?
Questions and answers