Table of Contents
Advertisement
Quick Links
Advertisement
Table of Contents

Related Manuals for Insportline Oberon 4464


Summary of Contents for Insportline Oberon 4464
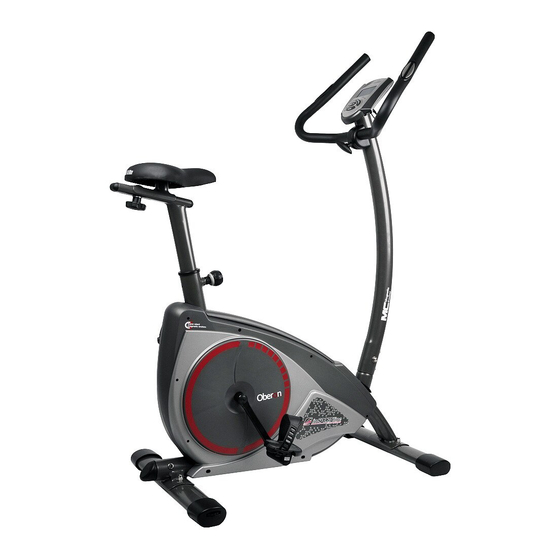
- Page 1 User’s manual – EN IN 4464 Up-right bike inSPORTline Oberon...
-
Page 2: Safety Instructions
Safety Instructions • To ensure the best safety of the exerciser, regularly • Make sure there is sufficient free space around check it on damages and worn parts. the exerciser when you set it up. • To avoid possible accidents, do not allow children •... - Page 3 Important Notes • Assemble the exerciser as per assembly instructions and be sure to only use the structural parts provided with the exerciser and designed for it. Prior to the assembly, make sure the content of the delivery is complete by referring to the parts list of the assembly and operating instructions.
-
Page 4: Exploded Drawing
Exploded Drawing 51 53 56 57 49 48 17 20 21 18 24 78 79 80... -
Page 5: Part List
Part List Part No. Description Part No. Description Main frame Cross screw ST4.2x1.4x20L Balling knob D50xM16x22xD8 Handlebar post Inner plug D66xD52x170L Inner allen bolt M8*1.25*20L Idle fixed plate Spring washer D15.4 155*62.2*5T XD8.2x2T Curved washer Inner allen bolt M10*35L D22*D8.5*1.5T Bushing D20*D14*11.5T Stabilizer 40*80*1.5T*480L Idle wheel D23.8xD38x24... - Page 6 Bolt cover D35*8 Upper computer cable 1000L Part No. Description Part No. Description Magnetic fixed plate Lower computer cable 1250L Spring D1.2*55L Round magnetic Flat washer D13*D6.5*1.0T Sensor cable 150L Allen bolt M6*65L Cross screw M5x0.8x12L Nylon washer D6*D19*1.5T Motor Allen nut M6*1*6T Cross screw ST4.2*1.4*15L Nylon nut M6*1*6T...
- Page 7 Check List 86L&R M8*1.25*20L D15.4*D8.2*2T D22*D8.5*1.5T M8*1.25*55L M8*15L...
- Page 8 Step 1 M8*55L M8*15L D15.4 Assemble the front stabilizer (51) and the rear stabilizer (50) on the main frame (1) by using the Square neck bolt (56), the Domed nut (57), the spring washer (48) and the curved washer (49).
- Page 9 Step 2 1) Assemble the seat (64) on the seat adjustable tube (60) by using the flat washer (62) and the knob (63). 2) Insert the seat post welding sets (60) into the main frame (1) and use the ball quick-release knob (2) to lock the seat post.
- Page 10 Step 3 M8*20L D15.4 1) Assemble the handlebar post (46) on the main frame (1) by using the curved washer (49), spring washer (48) and the inner allen bolt (47). 2) Connect the upper computer cable (46) and lower computer cable (47).
- Page 11 Step 4 1) Assemble the handlebar(66) by using T-knob(70), flat washer(71), spring washer(72), bushing (73) and protective cover (74). 2) The Handlebar is adjustable.
- Page 12 Step 5 1) Assembele the computer (75) by using the 2) Assemble the pedal sets (86L&R) to the crank( ( ( ( 16L&R) ) ) ) . 3) Plug the adaptor (85).
- Page 13 INSTRUCTION MANUAL FOR TZ-6139 Appearance Power Up When turned on, the monitor will emit a long beep sounds and all LCD displays light up. After that it will enter to MANUAL PROGRAM. There are 6 basic workout modes: MANUAL 、 、 、 、 PRESET PROGRAM、 、 、 、 BODYFAT PROGRAM、 、 、 、 T.H.R PROGRAM、 、 、 、 HRC PROGRAM、...
- Page 14 1. Press this key to select one workout mode in selection mode. 2. Press this key to increase the function value in setting mode. 3. Press this key to increase the level of loading in workout mode. DOWN: 1. Press this key to select one workout mode in selection mode. 2.
-
Page 15: Program Operation
will flash . Program Operation MANUAL PROGRAM Setting parameters for MANUAL PROGRAM Select MANUAL PROGRAM by UP or DOWN key, then press ENTER key, and select the function values of time、 、 、 、 distance、 、 、 、 calories 、 、 、 、 age etc to set, when select the function value , it will flash, then press UP or DOWN key to adjust and press ENTER key to confirm the setting value, at the same time enter to the next parameter to set. -
Page 16: User Program
Setting parameters for T.H.R PROGRAM Select T.H.R PROGRAM by UP or DOWN key, , , , then press ENTER key , , , , and select the function values of time、 、 、 、 distance、 、 、 、 calories、 、 、 、 T.H.R to set, when select the function value, it will flash and press UP or DOWN key to adjust, then press ENTER key to confirm the setting value, at the same time enter to the next parameter to set. - Page 17 values of time 、 、 、 、 distance 、 、 、 、 calories、 、 、 、 age to set. When select the function value, it will flash and press UP or DOWN key to adjust, , , , then press ENTER key to confirm the setting value, at the same time enter to the next parameter to set.
Need help?
Do you have a question about the Oberon 4464 and is the answer not in the manual?
Questions and answers