Table of Contents
Advertisement
Quick Links
Advertisement
Table of Contents

Subscribe to Our Youtube Channel
Related Manuals for Insportline Moriston UB


Summary of Contents for Insportline Moriston UB
- Page 1 USER MANUAL – EN IN 20218 Exercise bike inSPORTline Moriston UB...
-
Page 2: Table Of Contents
CONTENTS SAFETY INSTRUCTIONS ........................3 IMPORTANT NOTES ..........................3 PRODUCT DESCRIPTION ........................5 TECHNICAL PARAMETERS ........................5 ASSEMBLY ............................. 6 CONSOLE ............................. 13 USE ............................... 15 EXERCISING INSTRUCTIONS ......................16 CORRECT BODY POSTURE ....................... 17 MAINTENANCE ............................ 17 STORAGE ............................. 17 IMPORTANT NOTICE ........................... -
Page 3: Safety Instructions
SAFETY INSTRUCTIONS • To ensure the best safety of the exerciser, regularly check it on damages and worn parts. • If you pass on this exerciser to another person or if you allow another person to use it, make sure that that person is familiar with the content and instructions in these instructions. •... - Page 4 • Be sure to set up the exerciser in a dry and even place and always protect it from humidity. If you wish to protect the place particularly against pressure points, contamination, etc., it is recommended to put a suitable, non-slip mat under the exerciser. •...
-
Page 5: Product Description
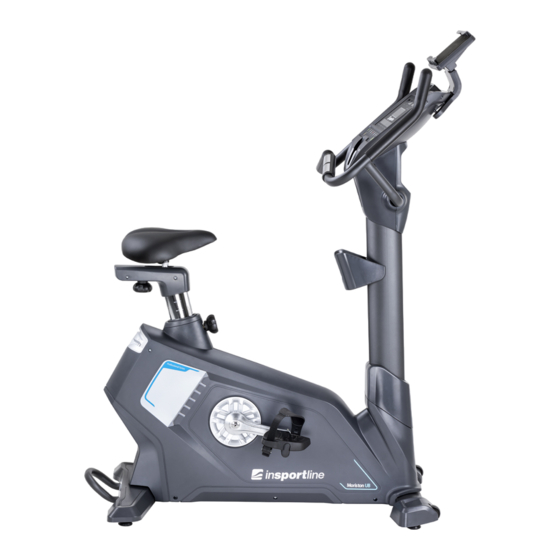
PRODUCT DESCRIPTION 1. Tablet holder 2. Console 3. Handlebars 4. Middle post 5. Front stabilizer 6. Pedal (L) 7. Main frame 8. Rear 9. Seat 10. Bottle holder 11. Pulse plates TECHNICAL PARAMETERS Unfolded dimensions 1200 x 590 x 1510 mm Maximal load capacity 150 kg Speed ratio... -
Page 6: Assembly
ASSEMBLY PREPARATION Name Specifications M8×20 Allen screw M12×70 Allen screw M10×110×20 Allen screw M10×45 Allen screw M4×10 Screw Screw ST4x16 Screw M5×15 Φ8 Washer Φ10 Washer Φ8 Washer Φ10 Washer 6×66×140 Wrench t4.0×110×32 Wrench 14×17×75 Wrench Prepare all parts and tools in clean and free space. Follow each step carefully. - Page 8 STEP 1 Secure the front stabilizer (3) to the main frame (1) using a flat washer (30), spring washer (32), and screw (16). STEP 2 Attach the rear stabilizer (4) to the main frame (1) using a flat washer (30), spring washer (32) and screw (19).
- Page 9 STEP 4 Connect the cables (77) with the console cable (84). Pass the pulse cable from the console (84) from the top. Attach the console (45) to the middle post (2) with the screws (26). STEP 5 Attach the pulse cable from the console (84) with the pulse cable from the handles (85). Attach the handles (9) to the middle post (2) using the washer (29), spring washer (31) and screw (11).
- Page 10 STEP 6 Attach the front handlebars (57) and rear handlebars (58) to the middle pillar (2) with the screws (24 and 26). Attach the bottle holder (62) to the middle post (2) using the screws (20). STEP 7 Attach the seat (69) to the seat post (5) using the hand screw (70).
- Page 11 STEP 8 Secure the Seat cover- L (63) and the Seat cover-R (64) to the seat post (5) with the screws (20). STEP 9 Attach the pedal L (66) and pedal R (67) to the main frame (1).
- Page 12 STEP 10 Attach the tablet holder (88) to the console (45) and secure with the bolt (24).
-
Page 13: Console
CONSOLE BUTTONS START / STOP Starts or stops the program RESET Press to return to the main menu while the program is paused Hold down for 5 seconds to reset the system Press to return to the previous value in the setting MODE Press to set or adjust the value Press to change the displayed data during the program... - Page 14 DISPLAY Display: 0:00–99:99, set: 0:00 – 99:00 min TIME Display: 0.0–99.99, set: 0,0 – 99,99 km DISTANCE CALORIES Display: 0–999 Cal, set: 0-999 Cal SPEED Display: 0,0–99,9 Km/h, mil/h RESISTANCE LEVEL Set 1–20 PULSE Display: 40–220 WEIGHT Set 30–150 kg, default value 70 kg for the metric system Set 40–400 liber, default value 155 liber for imperial system HEIGHT Set 90–210 cm...
-
Page 15: Use
BODY FAT MODE Press the BODY FAT button in the main menu (MW window displays FOD FAT). Use the MODE and RESISTANCE +/- buttons to set AGE, WEIGHT, HEIGHT. Then start the program with the START / STOP button. Hold the pulse plates during the test. The console starts receiving a pulse signal for 10 seconds. Then the test starts for 25 seconds. -
Page 16: Exercising Instructions
Exercise on the exercise bike also leads to the formation of muscles. It is mainly used to strengthen the thigh and calf muscles. While exercising on a bicycle, you also move your buttocks. If you want to exercise right, you should not forget to breathe properly. Proper and regular breathing is recommended in any exercise. -
Page 17: Correct Body Posture
CORRECT BODY POSTURE When training, keep your body upright, or you can learn your hand on your forearms. During pedaling, you should not have your legs fully extended. Your knees should be slightly bent when fully pressing down the pedal. Keep your head straight with your spine to minimize the pain of the cervical muscles and upper back muscles. -
Page 18: Diagram
DIAGRAM... -
Page 19: Parts List
PARTS LIST Name Qty. Name Qty. Main frame Middle post Front stabilizer Rear stabilizer Ball bearing Seat post Ball bearing Seat slider Belt compressor in the tube Load wheel flange Controller Connecting plate Crank L Handlebars Crank R Screw M6×10 Console M8×20 Flywheel... -
Page 20: Terms And Conditions Of Warranty, Warranty Claims
Leveling feet Console Cables Transport wheels Handrail cables to console End cap Handrail cables End cap Pulse sensors on handles Seat post clamp Battery holder Crank cap Tablet holder Top cabling 45-1 Top console bracket Main Frame Cable 45-2 Bottom console bracket Magnet 45-3 Tablet holder... - Page 21 • Mechanical damages • Regular use (e.g. wearing out of rubber and plastic parts, moving mechanisms, joints etc.) • Unavoidable event, natural disaster • Adjustments made by unqualified person • Improper maintenance, improper placement, damages caused by low or high temperature, water, inappropriate pressure, shocks, intentional changes in design or construction etc.
Need help?
Do you have a question about the Moriston UB and is the answer not in the manual?
Questions and answers