Table of Contents
Advertisement
Quick Links
Advertisement
Table of Contents

Related Manuals for SSS Siedle Siedle Scope S 850-0


Summary of Contents for SSS Siedle Siedle Scope S 850-0
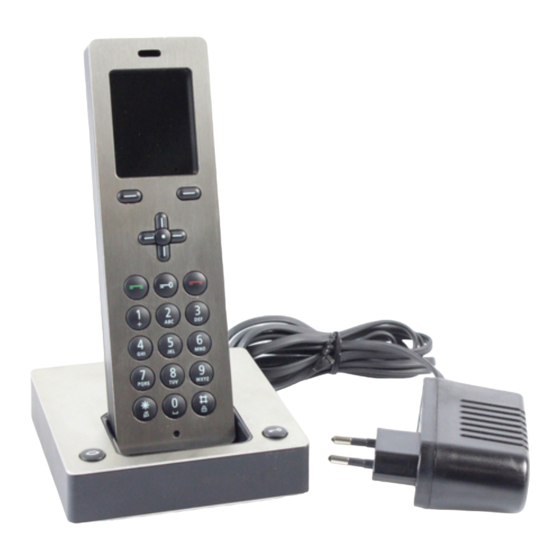
- Page 1 EN Operating Instructions Siedle Scope S 850-0...
- Page 2 Overview Display and navigation Intercom menu Main menu Phonebook Phone volume Access to building Access to the call Access to favourite Setting the communication list, intercom set- telephone numbers. volume for the functions (e.g. con- tings, general set- receiver and trol and switching).
- Page 3 Overview Model: Siedle Scope Loudspeaker for audio privacy The loudspeaker for handsfree calls is located at the back. Status indications in the display 14:34 Monday 21/03/2011 Display Light Door call Frequently used functions Display buttons Control buttons for menu navigation Enter button Green Pick up button Door release button...
- Page 4 Overview Display Standby mode In the standby status, the cordless handset shows the time and date 14:34 in the display, the 4 symbols of the Monday 21/03/2011 main menu and 2 frequently used functions using display buttons, if these have been set up. Status indications in the display The current Siedle Scope status dis- plays are shown along the top of the...
-
Page 5: Table Of Contents
Contents Overview Phone volume Making a call to a phonebook entry Display and navigation Change entry Model: Siedle Scope Main menu Deleting an entry Display Call lists Intercom menu Intercom settings The individual symbols in the Siedle Scope Doormatic Intercom menu One for all Door call forwarding Door call forwarding to the... -
Page 6: Doormatic
Siedle Scope One for all A new freedom Scope of delivery Cordless handset performance Siedle Scope is a video indoor sta- Siedle Scope cordless DECT tel- features tion and a landline telephone in ephone with door video function • Individual design concept with six one device. And it’s cordless. That for the In-Home bus. -
Page 7: Safety Remarks
Safety remarks Danger Warning Disposal Mounting, installation and servicing • Operating the device not in work on electrical devices may only accordance with its intended pur- be performed by a suitably qualified pose can cause injury. • All electrical and electronic devices electrician. Failure to observe this • Do not drop or throw the devices! must be disposed of separately from regulation could result in the risk of... -
Page 8: Registering Additional Cordless
Getting started Procedure: Registering the cordless handset • If the display of the cordless at the base station handset shows the following mes- Your cordless handset is already 14:34 sage highlighted in yellow: Base not registered in the set: The left-hand Monday 21/03/2011 found, then connect the base sta- signal strength symbol indicates the... -
Page 9: Switching The Cordless Handset
Getting started Registering additional cordless The following display appears during handsets at the base station the registration process: Searching base Please wait After selecting the base, the fol- lowing display appears: Registering handset Please wait • As soon as the base station has been found, confirm the located base with the left-hand display button OK. -
Page 10: Keypad Lock
Getting started Telephony • If a display is in the power saving Switching the cordless handset mode, the first time a button is on and off pressed this only reactivates the dis- play and has no other function. Procedure: Incoming calls • Incoming calls are picked up using The call number is visible in the the green Pick up button. -
Page 11: Microphone Silencing
Getting started Telephony Procedure: Call silencing • To switch the muting function on If required, all ringtones can be and off, hold down the Star button muted. until the bell symbol in the status bar Incoming calls are then only sig- at the top of the display appears / nalled optically at the display. -
Page 12: Call Forwarding
Getting started Telephony Call transfer Call forwarding Call transfer • If you have picked up a call, to for- Any incoming calls, whether from ward the call activate the Forward public network telephones or door Handset 1 call display button. calls, as well as calls from other bus • The submenu „Call forwarding“... -
Page 13: Brokering
Getting started Telephony • Accept the door or public network Brokering call with the green Pick up button. Brokering is used to describe the • By pressing the green Pick up process of switching backwards and button again, you can accept the forwards between a door call and a second incoming call. -
Page 14: Language
Getting started Setting the date and time Setting the date and time Procedure: The date and time are required • Using the right-hand control in order to show the correct time button, select the Main menu. against incoming calls in the call list. • In the Main menu, select the set- tings by pressing the right and then the lower control button. -
Page 15: Date Settings
Getting started Setting the date and time • The display shows the current Setting the time Time settings date and time settings. These can be deleted using the display button <C. Hour • Enter the current time using the numerical keypad, e.g. 17 for the Minute hour. -
Page 16: Video
Getting started Video Procedure: Video • Using the central control button, When a call arrives, the Scope zoom into the video image. cordless handset rings and shows • Select the required image excerpt the video image. After pressing using the upper, lower, left and right the green Pick up button or the control buttons. -
Page 17: Phone Volume
Phone volume Using the upper control button, select the submenu Phone volume. Procedure: Earpiece volume • Using the right and left control Phone volume buttons (+ and -), set the volume in 8 stages. Earpiece volume • If you wish to adopt a value, con- –... -
Page 18: Main Menu
Main menu Call lists Procedure: • Using the right-hand control button, select the main menu. • The main menu offers quick access • Call lists • Intercom settings • General settings • Phonebook • Access the call lists by pressing the green Pick up button from the ready status. - Page 19 Main menu Call lists Procedure: Call lists Main menu The call list symbol is highlighted The Call lists symbol is highlighted in yellow. in yellow in the main menu. • Confirm by pressing the left-hand display button OK. First of all the complete call list is displayed.
-
Page 20: Intercom Settings
Main menu Intercom settings • Using the right-hand control button, select the main menu. • The main menu offers quick access • Call lists • Intercom settings • General settings • Phonebook • In the main menu, select the Intercom settings Main menu Intercom settings using the control The Intercom settings menu is used buttons. -
Page 21: Door Call Forwarding
Main menu Intercom settings Procedure: Door call forwarding Intercom settings • In the Intercom settings menu, In the Door call forwarding menu, select the entry Door call for- the door call is automatically Doormatic warding using the control button. forwarded to the public network • Confirm by pressing the left-hand telephone. - Page 22 Main menu Intercom settings Procedure: Functions Functions • In the Intercom settings menu, The Functions menu lists the con- select the entry Functions using the trol functions and the internal call 1 Light lower control button. functions which have been set up • Confirm by pressing the left-hand by your electrical installer.
-
Page 23: Control Device
Main menu Intercom settings Door • Select Door entry using the con- New entry Select this function type if the func- trol buttons. tion is to be used to dial a door. • Confirm by pressing the left-hand Name display button OK. Type Door Function Back • Select Control device entry using Control Device New entry... -
Page 24: Settings
Main menu Settings In the Settings menu, you can obtain • Using the right-hand control information about your cordless button, select the Main menu. handset and carry out general set- tings required for running operation. The following menu points are avail- able: • Status • In the main menu, select the... -
Page 25: Setting The Time
Main menu Settings Procedure: Setting the date and time • Using the right-hand control The date and time are required button, select the Main menu. in order to show the correct time • In the Main menu, select the set- against incoming calls in the call list. tings by pressing the right and then the lower control button. -
Page 26: Date Settings
Main menu Settings Date settings Procedure: • In the main menu, select the Settings symbol by pressing the right and then the lower control button. • Confirm by pressing the left-hand display button OK. • In the Settings menu, select the date and time using the lower con- trol button. -
Page 27: Audio Settings
Main menu Settings Procedure: In the Settings menu, you can • Using the right-hand control obtain information about your cord- button, select the Main menu. less handset and carry out general settings required for running opera- tion. • In the main menu, select the The following menu points are avail- Settings symbol by pressing the able:... -
Page 28: Phone Volume
Main menu Settings • Select the menu item Melody Melody Phone using the lower control button. Volume • The Melody selection menu is – opened by pressing the central Enter button. Melody • Select the required melody using Marimba the control buttons. • Confirm by pressing the left-hand display button Save. -
Page 29: Notifications
Main menu Settings Procedure: Notifications Audio settings • In the Audio settings menu, select In the Signal tones menu, acoustic the submenu Signal tones using signal tones can be switched on and Ringtones the lower control button. off for different statuses. • Confirm by pressing the left-hand Phone volume display button OK. -
Page 30: Speed Dial
Main menu Settings Procedure: Speed dial Settings • In the Settings menu, select the For fast access to favourite users Speed dialling submenu using the from the phonebook or intercom Status lower control button. users or functions, it is possible to • Confirm by pressing the left-hand assign a speed dialling number from Date and time... -
Page 31: Making A Speed Dialling Call
Main menu Settings • When the Scope mobile handset Making a speed dialling call is in the ready status, press the assigned number for around 3 sec- onds. The user is dialled directly. Frequently used functions Two frequently used functions or user numbers (so-called softkeys) 14:34 can be indicated in the display for... - Page 32 Main menu Settings • Select the speed dialling number I Frequently used functions Speed dial (for the left-hand display button) or II (for the right-hand display button) using the lower control button. • Select the required Speed dialling number using the control button. • Access the Assign speed dial menu using the display button Assign.
- Page 33 Main menu Settings Procedure: Language Settings • Select the submenu Language In the Language menu, you can using the lower control button. select the menu language and Status • Confirm by pressing the left-hand the possible special symbols for display button OK. phonebook entries. There are 10 Date and time • Select the required language using languages to choose from: Danish,...
- Page 34 Main menu Settings Procedure: ECO mode ECO mode • Select Eco mode in the System In the ECO mode, the transmission menu using the lower control output is reduced to a fixed value. button. This reduction of the radio output • Confirm by pressing the left-hand is intended to reduce electro smog. display button OK.
- Page 35 Main menu Settings Procedure: Change PIN Settings • Select Change PIN in the System menu using the control button. Change PIN • Confirm by pressing the left-hand display button OK. • Using the numerical keypad, enter Enter PIN the 4-digit PIN you wish to use. **** • Confirm by pressing the left-hand display button OK.
-
Page 36: Resetting The Base Station
Main menu Settings Procedure: Resetting the base station • Unplug the patch cable for the When the base station is RESET, it In-Home bus at the base station. returns to the as-delivered status, in In-Home Prog. • The base station can continue to other words: Line be supplied with power during this... -
Page 37: Deregistering / Registering A
Main menu Settings Procedure: Door call Door call • Select Door call in the System If there are several cordless handsets menu using the lower control registered to one base station, it is button. possible to activate call silencing at • Confirm by pressing the left-hand any of the cordless handsets in order display button OK. -
Page 38: External Line Digit
Main menu Settings • Select External line digit in the External line digit External line digit System menu using the lower con- Depending on the telephone system, trol button. Scope may have to automatically dial • Confirm by pressing the left-hand the external line digit before the call External line digit display button OK. -
Page 39: New Entry
Main menu Phonebook Procedure: Phonebook • When your cordless handset In the Phonebook menu, you enter is in the ready status, select the your preferred users and have direct Phonebook menu directly using the access to these users. Up to 50 lower control button. -
Page 40: Phonebook Options
Main menu Phonebook The following options are available Phonebook options Phonebook for making entries in the phone- book: New entry • Call • Edit Company X • Delete • Select the required phonebook entry using the control buttons. • Select Options using the display Call button located on the left below. -
Page 41: Change Entry
Main menu Phonebook Procedure: Change entry Change entry • Select Change in the Phonebook options menu using the lower con- Name: trol button. Edit: The name entry can be edited, Number: extended or deleted here. • Corrections can be made using the display button <C. -
Page 42: Intercom Menu
Intercom menu Procedure: Using the Intercom menu, it is pos- When your cordless handset is in the sible to execute functions in the ready status, select the Intercom building communication mode. menu directly using the left-hand Examples include: control button. Switching on the light Dialling last door Calling an in-house telephone... -
Page 44: Frequently Asked Questions
Frequently asked questions There is nothing showing in the The display says Base not found It is not possible to call back the display. 1 The cordless handset is out of numbers entered in the call list 1 The cordless handset is range of the base station 1 Your telephone system hibernating. -
Page 45: Index
Index Audio settings German Reception quality Register additional cordless handsets Battery charge status Handsfree 8, 15 Ringtones Battery tone Handsfree volume Brokering Security awareness Idle status Settings Call Incoming calls Signal tone Call forwarding Intercom menu 2, 37, 38, 39 Spanish Call parking Intercom settings Speed dial Call silencing Italian Standby mode Change PIN 32, 33... - Page 46 S. Siedle & Söhne © 2011/07.11 Printed in Germany Postfach 1155 Best. Nr. 0-1106/141359 EN 78113 Furtwangen Bregstraße 1 78120 Furtwangen Telefon +49 7723 63-0 Telefax +49 7723 63-300 www.siedle.de info@siedle.de Germany...
Need help?
Do you have a question about the Siedle Scope S 850-0 and is the answer not in the manual?
Questions and answers