Table of Contents
Advertisement
Quick Links
Advertisement
Table of Contents

Related Manuals for Philco POB62


Summary of Contents for Philco POB62
- Page 1 User manual Steam oven POB62...
-
Page 2: Table Of Contents
CONTENTS Safety information Using the accessories Safety instructions Additional functions Product description Helpful hints and tips Before first use Care and cleaning Control panel What to do if… Daily use Installation Clock functions Environment concerns Automatic programmes Subject to change without notice. SAFETY INFORMATION Before the installation and use of the appliance, carefully read the supplied instructions. -
Page 3: Safety Instructions
• Before maintenance cut the power supply. • Do not use harsh abrasive cleaners or sharp metal scrapers to clean the glass door since they can scratch the surface, which may result in shattering of the glass. • Only use the core temperature sensor recommended for this appliance. -
Page 4: Care And Cleaning
• Do not change the specification of this Care and Cleaning appliance. Warning! Risk of injury, fire or damage • Make sure that the ventilation openings to the appliance. are not blocked. • Do not let the appliance stay unattended •... -
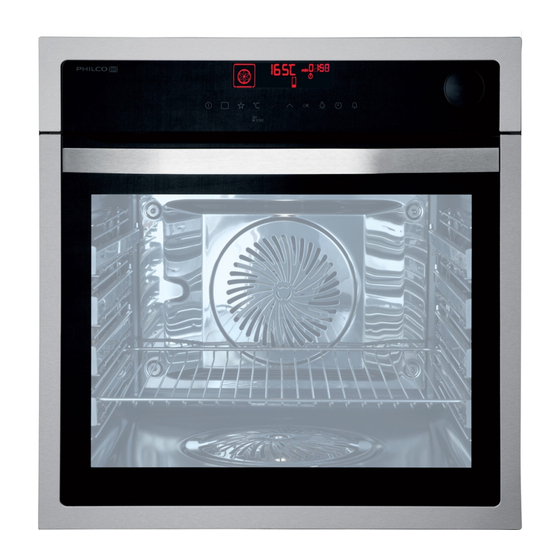
Page 5: Product Description
PRODUCT DESCRIPTION Control panel Electronic programmer Water drawer Socket for the core temperature sensor Heating element Lamp Rear wall heating element Steam generator with cover Shelf support, removable Shelf positions Accessories Wire shelf For cookware, cake tins, roasts. Baking tray For cakes and biscuits. -
Page 6: Before First Use
Trivet • For roasting and grilling. Use the trivet only with the Grill- / roasting pan. Steam set One unperforated and one perforated food container. The steam set drains the condensing water away from the food during steam cooking. Use it to prepare food that should not be in the water during the cooking (e.g. -
Page 7: Control Panel
Important! Refer to chapter "Care and 2. Touch Cleaning". 3. Touch to set the minutes. 4. Touch Setting and changing the time The Temperature / Time display shows the After the first connection to the mains, all new time. symbols in the display are on for some sec- Changing the time of day onds. -
Page 8: Daily Use
Sensor Field Function Description To confirm a selection or setting. To move down in the menu. OVEN LIGHT To activate or deactivate the lamp. CLOCK To set the clock functions. MINUTE MINDER To set the Minute Minder. Display A) Oven function symbol B) Temperature / Time display C) Clock / Residual heat display (also Mi- nute minder and Time of day) -
Page 9: Oven Functions
• automatic programmes - to prepare a dish when you do not have knowledge or experience in cooking. Oven Functions Oven function Application Full Steam For vegetables, fish, potatoes, rice, pasta or special side- dishes. Half Steam + Heat For dishes with a high moisture content and for poaching fish, custard royale and terrines. -
Page 10: Setting The Oven Function
Oven function Application ECO Roasting ECO functions let you to optimize the energy consumption during cooking. Thus it is necessary to set the cooking time first. To get more information about the recommended set- tings, refer to the cooking tables with the equivalent usual oven function. -
Page 11: Clock Functions
Energy saving The clock / residual heat display shows the remaining temperature, The appliance contains features and the bars show the tempera- which help you save energy during ture as it decreases. everyday cooking: • Cooking with the lamp off - Touch •... -
Page 12: Automatic Programmes
Setting the END 5. Touch a sensor field (apart from ON / OFF) to start the SET+GO function. 1. Activate the appliance and set an oven function and temperature. You can use the SET+GO function only 2. Touch again and again until the dis- when the DURATION is set. -
Page 13: Using The Accessories
You can find the recipes for the auto- 4. Touch or the settings save auto- matic programmes specified for this matically after five seconds. appliance on our website. To find the 5. The appliance activates. A symbol of proper Recipe Book check the PNC the weight unit flashes in the display. - Page 14 While the appliance calculates the ap- proximate duration time, the value of the Count Up Timer function shows in the Timer / residual heat display. When the first calculation ends, an acoustic signal sounds and the Timer / residual heat display shows —:— and then the approximate duration of the cooking.
-
Page 15: Inserting The Oven Accessories
Inserting the oven accessories The deep pan and the wire shelf have side edges. These edges and the shape of the guide-bars are a special device to prevent the cookware from slipping. Inserting the wire shelf and the deep pan together Put the wire shelf on the deep pan. -
Page 16: Additional Functions
Inserting the wire shelf and the deep pan together Put the wire shelf on the deep pan. Put the wire shelf and the deep pan on the tele- scopic runners. Trivet and Grill- / Roasting pan Warning! Be careful when you remove the accessories from a hot appliance. -
Page 17: Child Lock
When the function operates, you can 2. Activate an oven function or setting. change the time and temperature. 3. Touch and hold at the same time for 2 seconds. An acoustic signal Child Lock sounds. The Child Lock prevents an accidental op- Loc comes on or goes out in the display. -
Page 18: Helpful Hints And Tips
Temperature Switch-off time 120 °C - 195 °C 8.5 h 200 °C - 230 °C 5.5 h After the Automatic switch-off, touch a sen- the display goes back to the day sor field to operate the appliance again. brightness mode for the next 10 sec- onds. - Page 19 Water in the water drawer (ml) Time (min.) 40 - 50 1) The times are for guidance only. quantity of water necessary for one of the Full Steam / Eco Steam dishes in the operation. Put the dishes into Warning! Do not open the appliance the correct cookware and then on the oven door when the function is activated.
- Page 20 Temperature Water in the wa- Time Food Shelf position (ºC) ter drawer (ml) (min.) Peeling tomatoes White haricot 30 - 40 beans Savoy cabbage 20 - 25 Courgette, slices 15 - 20 1) The times are for guidance only. Side dishes / accompaniments Water in the wa- Time Food...
- Page 21 Shelf posi- Water in the wa- Time Food Temperature (ºC) tion ter drawer (ml) (min.) Veal / pork loin without 800 + 300 80 - 90 leg, 800 - 1000 g Kasseler (smoked loin 800 + 300 90 - 110 of pork), poached Tafelspitz (prime boiled 800 + 700...
- Page 22 Half Steam + Heat Half Steam + Heat (Water amount: about 300 ml) Type of Food Shelf position Temperature (°C) Time (min.) Custard / flan in individual 40 - 45 dishes 35 - 45 Baked eggs 40 - 50 Terrine Thin fish fillet 15 - 25 Thick fish fillet...
-
Page 23: General Instructions
Quarter Steam + Heat Type of Food Shelf position Temperature (°C) Time (min.) Ready-to-bake baguettes 40 - 50 25 - 35 g, frozen 1) Amount of water to be added will depend on the length of the cooking time. How to use the Baking Tables Baking •... - Page 24 Type of baking Oven function Shelf position Temperature Time (min) (°C) Ring cake / Brio- True Fan Cook- 150 - 160 50 - 70 Madeira cake / True Fan Cook- 140 - 160 70 - 90 Fruit cakes Fatless sponge True Fan Cook- 140 - 150 35 - 50...
- Page 25 Temperature Type of baking Oven function Shelf position Time (min) (°C) Fruit flans (made with yeast dough / sponge True Fan Cooking 35 - 55 mixture) Fruit flans (made with yeast Conventional dough / sponge 35 - 55 Cooking mixture) Fruit flans made True Fan Cooking 160 - 170...
-
Page 26: Multileveled Baking
Temperature Type of baking Oven function Shelf position Time (min) (°C) Small cakes / Conventional Small cakes (20 20 - 30 Cooking per tray) 1) Preheat the oven. Bakes and gratins Temperature Dish Oven function Shelf position Time (min) (°C) Conventional Pasta bake 180 - 200... -
Page 27: Slow Cook
True Fan Cooking Temperature Type of baking Shelf position Time (min) (°C) 2 shelf positions 3 shelf positions Dry streusel cake 1 / 4 150 - 160 30 - 45 1) Preheat the oven. Biscuits / small cakes / small cakes / pastries / rolls True Fan Cooking Temperature Type of baking... -
Page 28: Pizza Setting
Food to be Weight (g) Shelf position Temperature °C Time in min. cooked Fillet of beef 1000 - 1500 90 - 150 Roast veal 1000 - 1500 120 - 150 Steaks 200 - 300 20 - 40 Pizza Setting Type of baking Shelf position Temperature (°C) Time (min) - Page 29 Oven func- Shelf posi- Tempera- Type of meat Quantity Time (min.) tion tion ture °C Roast beef or fil- per cm of Turbo Grilling 5 - 6 190 - 200 let: rare thickness Roast beef or fil- per cm of Turbo Grilling 6 - 8 180 - 190...
-
Page 30: Convenience Food
Type of meat Quantity Oven func- Shelf posi- Temperature Time (min.) tion tion °C Half chicken 400 - 500 g Turbo Grilling 190 - 210 35 - 50 each Chicken, pou- 1 - 1.5 kg Turbo Grilling 190 - 210 50 - 70 lard Duck... - Page 31 Convenience food Shelf position Temperature (°C) Time (min.) Pizza, frozen 200 - 220 15 - 25 Pizza American, frozen 190 - 210 20 - 25 Pizza, chilled 210 - 230 13 - 25 Pizza Snacks, frozen 180 - 200 15 - 30 French Fries, thin 200 - 220 20 - 30...
- Page 32 Defrosting Further defrosting Dish Comment time (min.) time (min.) Strawberries, 300 g 30 - 40 10 - 20 Butter, 250 g 30 - 40 10 - 15 Cream can also be whipped Cream, 2 x 200 g 80 - 100 10 - 15 when still slightly frozen in places.
-
Page 33: Core Temperature Sensor Table
Shelf position Food to be Temperature Time (h) dried (°C) 1 level 2 levels Beans 1 / 4 60 - 70 6- 8 Peppers 1 / 4 60 - 70 5 - 6 Vegetables for 1 / 4 60 - 70 5 - 6 sour Mushrooms... -
Page 34: Care And Cleaning
Food Food Core Temperature °C Whole hare 70 - 75 Saddle of venison 70 - 75 Leg of venison 70 - 75 Fish Food Food Core Temperature °C Salmon 65 - 70 Trouts 65 - 70 Information on acrylamides acrylamides can pose a health risk. Thus, we recommend that you cook at the lowest Important! According to the newest temperatures and do not brown food too... -
Page 35: Steam Generation System
Steam generation system Before you change the lamp: • Deactivate the appliance. Caution! Dry the steam generator • Remove the fuses from the fuse box or after each use. Remove the water deactivate the circuit breaker. with the sponge. Caution! Put a cloth on the bottom of Remove the limescale with water and the interior of the appliance. -
Page 36: What To Do If
1. Open the door fully. 2. Fully press the clamping levers (A) on the two door hinges. 3. Close the oven door to the first open- ing position (approximately 70° angle). 4. Hold the door with one hand on each side and pull it away from the appli- ance at an up angle. -
Page 37: Installation
Problem Possible cause Remedy The appliance does not heat The fuse is released. Make sure that the fuse is the cause of the malfunction. If the fuse releases again and again, contact a qualified electrician. The lamp does not operate. The lamp is defective. - Page 38 min. 50 mm 560 min. 20 min. ! 530 min.
- Page 39 560 min. 530 min. 590 min. alternativ 100 max. R1200 mm H05VV-F H05RR-F min. 1600 mm...
-
Page 40: Environment Concerns
90 º 2x3,5x25 ENVIRONMENT CONCERNS about recycling of this product, please The symbol on the product or on its contact your local council, your household packaging indicates that this product may waste disposal service or the shop where not be treated as household waste. Instead you purchased the product. - Page 44 892956694-A-362012...
Need help?
Do you have a question about the POB62 and is the answer not in the manual?
Questions and answers