Table of Contents
Advertisement
Advertisement
Table of Contents

Related Manuals for Philco POB79


Summary of Contents for Philco POB79
- Page 1 User manual Oven POB79...
-
Page 2: Table Of Contents
CONTENTS Safety information Additional functions Safety instructions Helpful hints and tips Product description Care and cleaning Before first use What to do if… Daily use Installation Clock functions Environment concerns Using the accessories Subject to change without notice. SAFETY INFORMATION Before the installation and use of the appliance, carefully read the supplied instructions. -
Page 3: Safety Instructions
• Before maintenance cut the power supply. • Do not use harsh abrasive cleaners or sharp metal scrapers to clean the glass door since they can scratch the surface, which may result in shattering of the glass. • To remove the shelf supports first pull the front of the shelf support and then the rear end away from the side walls. -
Page 4: Internal Light
• Be careful, when you open the appliance • Make sure the appliance is cold. There is door while the appliance is in operation. the risk that the glass panels can break. Hot air can release. • Replace immediately the door glass pan- •... -
Page 5: Product Description
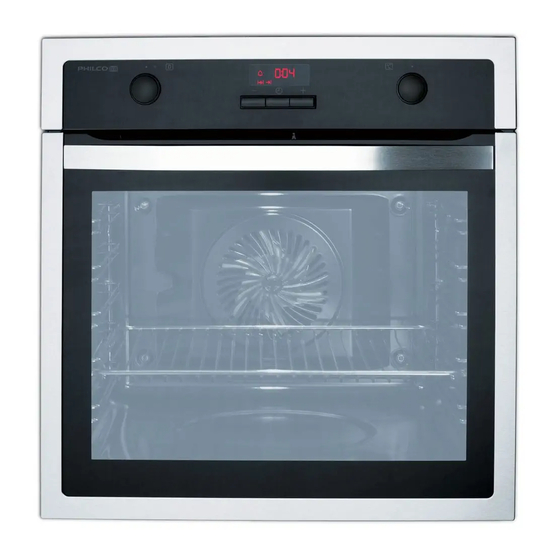
PRODUCT DESCRIPTION Control panel Knob for the oven functions Power lamp / symbol Electronic programmer Knob for the temperature Temperature lamp / symbol / indicator Heating element Lamp Rear wall heating element Bottom heat Shelf support, removable Shelf positions Accessories Wire shelf For cookware, cake tins, roasts. -
Page 6: Before First Use
BEFORE FIRST USE Warning! Refer to the Safety chapters. When you connect the appliance to the electrical supply or after a power cut, the in- dicator for the Time function flashes. Initial Cleaning Press the + or - button to set the correct •... -
Page 7: Clock Functions
Electronic programmer Function indicators Time display Function indicator Button + hr min Selection button Button - CLOCK FUNCTIONS Clock function Application Time of day To show, set, or change the time. Minute minder To set a countdown time. This function has no effect on the op- eration of the oven. -
Page 8: Using The Accessories
USING THE ACCESSORIES Warning! Refer to the Safety chapters. Inserting the oven accessories The deep pan and the wire shelf have side edges. These edges and the shape of the guide-bars are a special device to prevent the cookware from slipping. Installing the wire shelf and the deep pan together Put the wire shelf on the deep pan. -
Page 9: Additional Functions
You can use the trivet to grill flat dishes in large quantities and to toast: • Put the trivet into the deep pan so that the supports of the wire shelf point down. • Put the deep pan into the oven on the necessary shelf position. -
Page 10: Baking On One Level
Baking results Possible cause Remedy Use less liquid. Be careful with The cake sinks and becomes There is too much liquid in the mixing times, especially if you soggy, lumpy or streaky. mixture. use a mixing machine. The oven temperature is too The next time you bake, set a The cake is too dry. -
Page 11: Multileveled Baking
Shelf posi- Temperature Type of baking Oven function Time (min) tion (°C) Biscuits made with True Fan Cooking 150 - 160 15 - 20 sponge mixture Pastries made with egg True Fan Cooking 80 - 100 120 - 150 white, merungues Macaroons True Fan Cooking 100 - 120... -
Page 12: Roasting With Turbo Grilling
True Fan Cooking Temperature Type of baking Shelf position Time (min) (°C) 2 shelf positions 3 shelf positions Small cakes / Small cakes (20 1 / 4 25 - 40 per tray) 1) Preheat the oven. Bakes and gratins Temperature Dish Oven function Shelf position... - Page 13 Type of meat Quantity Oven func- Shelf posi- Temperature Time min. tion tion °C Roast veal 1 kg Turbo Grilling 160 - 180 90 - 120 Knuckle of 1.5 - 2 kg Turbo Grilling 160 - 180 120 - 150 veal Lamb Type of meat...
-
Page 14: Care And Cleaning
Defrosting Further defrosting Dish Comment time (min.) time (min.) Cream can also be whipped Cream, 2 x 200 g 80 - 100 10 - 15 when still slightly frozen in places. Gateau, 1400 g appliance door and let the appliance cool Drying - True Fan Cooking down. -
Page 15: Shelf Supports
Shelf supports Removing the shelf supports You can remove the shelf supports to clean the side walls. 1. Pull the front of the shelf support away from the side wall. 2. Pull the rear end of the shelf support away from the side wall and remove it. Replacing the lamp at the cavity Installing the shelf supports ceiling:... -
Page 16: Cleaning The Oven Door
3. Pull it forwards against the spring pres- sure and out along the supports on the two sides. 4. The heating element folds down. You can clean the oven ceiling. Installing the heating element 1. Install the heating element in the oppo- site sequence. -
Page 17: What To Do If
8. Hold the door glass panels on their top edge one by one and pull them up out of the guide. 9. Clean the glass panel with water and soap. Dry the glass panel carefully. Installing the door and the glass above steps in the opposite sequence. - Page 18 min. 3 mm min. 50 mm...
- Page 19 560 min. 20 min. ! 530 min. 560 min. 530 min. 590 min.
-
Page 20: Environment Concerns
alternativ 100 max. R1200 mm H05VV-F H05RR-F min. 1600 mm 90 º 2x3,5x25 ENVIRONMENT CONCERNS it should be taken to the appropriate The symbol on the product or on its collection point for the recycling of electrical packaging indicates that this product may and electronic equipment. - Page 21 product is disposed of correctly, you will Packaging material help prevent potential negative The packaging material is environmen- consequences for the environment and tally-friendly and recyclable. Plastic human health, which could otherwise be parts are marked with international ab- caused by inappropriate waste handling of breviations such as PE, PS, etc.
- Page 24 892956692-A-362012...
Need help?
Do you have a question about the POB79 and is the answer not in the manual?
Questions and answers