Table of Contents
Advertisement
Quick Links
Advertisement
Table of Contents

Related Manuals for Insportline Zidaho QS8480C


Summary of Contents for Insportline Zidaho QS8480C
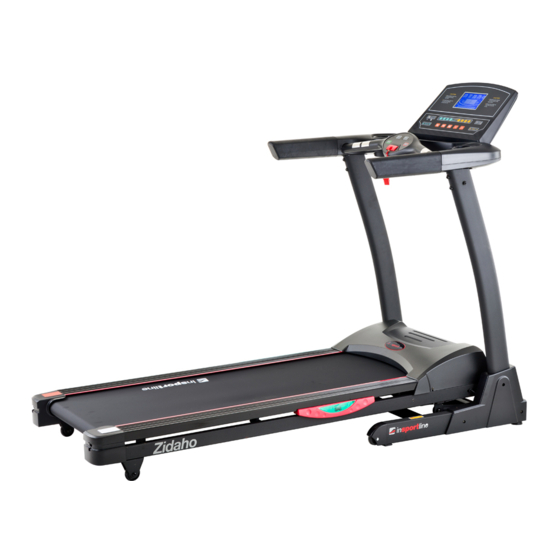
- Page 1 USER MANUAL – EN IN 7562 Motorized Treadmill inSPORTline Zidaho (QS8480C)
-
Page 2: Table Of Contents
CONTENTS TIPS FOR SAFETY ..............................3 SPECIAL TIPS FOR SAFETY........................... 4 PACKING DETAILS ............................. 4 EXPLODED VIEW ..............................6 PARTS LIST ................................6 TREADMILL STRUCTURE ..........................8 ASSEMBLY ................................9 USE ..................................11 SAFETY KEY ..............................11 FOLDING / UNFOLDING ..........................12 INSTRUCTION FOR CONSOLE ........................ -
Page 3: Tips For Safety
Special tips: Before installation and operation, please read this operation manual carefully and save this manual for future reference. WARRANTY We make sure that this item is made of high quality materials. In normal use, if any problem, we will take charge of maintenance. The warranty time for this item is 1 year (From the day you buy it). -
Page 4: Special Tips For Safety
Please use the spare parts from us, it is not acceptable if you use spare parts from others. This machine is HC level, max weight shall be less than 120 kg. Please consult your doctor at first before running, if you have one of the following diseases. Cardiopathy, hypertension, sugar diabetes, respiratory disease, smoking, and other chronic diseases, complication disease. - Page 5 Umbrella-type allen screw Umbrella-type allen screw Umbrella-type cross tapping M8*60 M8*20 screw M4.2*15 2 pcs 8 pcs 12 pcs Safety key Washer Lubricant 10 pcs MP3 connector 1 pc...
-
Page 6: Exploded View
EXPLODED VIEW These are all the components used in installation. All components are listed in the following form. PARTS LIST Component Quantity Base frame frame Left pillar accessory Right pillar accessory Dashboard frame Incline frame Meter stator Motor stator Safety brace for base frame pressure rod Front roller... - Page 7 Back roller Incline motor Motor Power switch Overload protector Running board Running belt Multislot belt Long bumper Bumper Locating pad for side rail Motor cover Side rail Left back cover Right back cover Rubber transport wheel Lower cover of motor Adjusting pad Transporting wheel set at base Left decorative cover at base...
-
Page 8: Treadmill Structure
Speed reed pipe sensor wire Upper communication line Middle communication line Lower communication line Green connecting line Red connecting line Power wire Red connecting line TREADMILL STRUCTURE... -
Page 9: Assembly
ASSEMBLY STEP 1: Set meter stator on upper cover of meter Set meter stator on upper cover of meter. Use 4 pcs of Screw ST4.2*15 to solid meter stator. (Fasten screws). STEP 2: Put meter board on meter stator a) Make sure that communication lines and connecting lines are connected correctly, in case they are connected in reverse. - Page 10 STEP 3: Set meter tube at base frame Set meter tube at base frame, use 2 pcs of Screw M8*20 and 2 pcs of washer, 2 pcs of Screw M8*60, 2 pcs of washer and 2 pcs of nut to solid the meter tube (Don’t fasten screw at first) STEP 4: Put meter on the meter tube a) Make sure that communication lines are connected correctly, in case they are connected in reverse.
-
Page 11: Use
STEP 5: Install decorating cover at base Use 6 pcs of Screw ST4.2*15 to solid left and right decorating cover at base. Step 6: Disassemble connecting screw for base frame Insert the power plug into the socket and switch on the machine. The switch light will be on and you will hear a voice “Di”. -
Page 12: Folding / Unfolding
FOLDING / UNFOLDING Folding: Folding will help to save space. Before folding, please switch off and pull off the plug. Use your hand to lift the running board until it has been locked. Unfolding: Step on the supporting tube and pull running board with your hands. The running board will fall to the ground slowly. -
Page 13: Instruction For Console
INSTRUCTION FOR CONSOLE Tech info: Time 00:00-99:59 Min Speed 0.0-20.0 km/h Incline 0-20 % Distance 0.00-99.9 km Calorie 0-999 KCAL Heart rate 40-250 / Min Program P1-P99, U1-U3, BODYFAT PANEL KEYS AND FUNCTIONS START Key: Press "Start" Key, there will be 3 seconds countdown displayed on the window! After countdown, the machine will run at the speed of 1.0km/h. - Page 14 STOP Key: Under running condition, press “stop” key, it will slow down then stop. Reset: Press "Stop" Key for a long time, the machine will be reset and start for new exercise record when you press "Start ". PROG. Key Under ready condition, Press "PROG.", you could select program P1-P99, U1-U3 and BODY FAT.
-
Page 15: Displayed Window
Music Voice + - key You could use these two keys to change the voice of music. Music Select key You could use these two keys to select next or last music. DISPLAYED WINDOW PACE: Display the time rate; CALORIES: Display running calories TIME: Display running time DISTANCE: Display running distance PULSE: Display running heart rates;... -
Page 16: Programs
PROGRAMS QUICK START (FOR MANUAL MODE) Turn on power switch, Put safe key in the right position. Press “START” Key, there will be 3 seconds countdown displayed on the window! After countdown, the machine will run at the speed of 1.0km/h. ... -
Page 17: Maintenance
Time (minute:second) 5:00-99:00 0:00-99:59 Incline (%) 0-20 0-20 Speed (KM/H) 1.0-20 1.0-20 Distance (KM) 0.5-99.5 0.00-99.9 Heart rate (time/minute) 40-250 Calorie (cal) 10-995 0-999 BODY FAT TEST Under ready condition, press “PROG.” Key continuously to come into BODYFAT. Press “MODE” key, you could find “F-1-SEX”,”F-2-AGE”,”F-3-HEIGHT”,”F-4-WEIGHT”,”P”-BODYFAT”... - Page 18 Adjustment running belt: a) Turn the speed to be 6km/h. for running b) Turn the both tension screws located at the end of the treadmill on the right and left sides, half a turn clockwise using the Allen key. (Diagram1 and Diagram 2) c) After adjustment, running belt still slips;...
-
Page 19: Cleaning
CLEANING a) Please power off and pull the plug out before cleaning. b) Wipe out the dust stuck on the surface and running board frequently. c) Please clean the surface of frame and running belt with a soft cloth dipped with suds, don’t use things like eradicator and naphtha.(After cleaning, please dry it for use) d) Please take the protecting cover off every two month, use vacuum dust-collector to suck the dust remaining inside of the protecting cover.(The dust will make the components of circuitry board short... - Page 20 Disturbed by electromagnetism Stay away from electromagnetism The motor wire is not well Incline doesn’t work Open the motor cover and reconnect it connected Running belt runs faster or slower than Unadjusted Readjust it what has been displayed Please read “Maintenance: Running belt slips Running belt is not tight enough...
-
Page 21: Terms And Conditions Of Warranty, Warranty Claims
TERMS AND CONDITIONS OF WARRANTY, WARRANTY CLAIMS General Conditions of Warranty and Definition of Terms All Warranty Conditions stated hereunder determine Warranty Coverage and Warranty Claim Procedure. Conditions of Warranty and Warranty Claims are governed by Act No. 40/1964 Coll. Civil Code, Act No. 513/1991 Coll., Commercial Code, and Act No. - Page 22 +420 556 770 190, Mobile: +420 604 853 019, servis@insportline.cz Fax: +420 556 770 192, (Service +420 556 770 191) Web: www.insportline.cz, www.worker.cz, www.worker-moto.cz INSPORTLINE, s.r.o. Bratislavska 36, 911 05 Trencin, Slovakia CRN: 36311723, VAT ID: SK2020177082 Orders: +421(0)326 526 701, +421(0)917 649 192, objednavky@insportline.sk...
Need help?
Do you have a question about the Zidaho QS8480C and is the answer not in the manual?
Questions and answers