Epygi Quadro6L Installation Manual
Ip pbx
Hide thumbs
Also See for Quadro6L:
- Extension user manual (45 pages) ,
- Installation manual (47 pages) ,
- System recovery procedure (7 pages)
Table of Contents
Advertisement
Quick Links
Advertisement
Table of Contents

Related Manuals for Epygi Quadro6L


Summary of Contents for Epygi Quadro6L
-
Page 2: Quadro6L/4L/2X2 Manual I: Installation Guide
(ii) external power sources such as a power line, telephone line, or connected equipment; (iii) products that have been serviced or modified by a party other than Epygi or an authorized Epygi service center; (iv) products that have had their original manufacturer’s serial numbers altered, defaced, or deleted; (v) damage due to lightning, fire, flood, or other acts of God. - Page 3 Quadro. User further acknowledges that any interruption in the supply or delivery of electricity or network availability is beyond Epygi's control and Epygi shall have no responsibility for losses arising from such interruption.
-
Page 4: Table Of Contents
Configuring SLA Lines ................38 How to disable the Key System Emulation ..........40 Step 2-C: Using Receptionist ............. 41 Step 3: Registering on Epygi’s Technical Support ......42 Step 4: Making/Receiving Calls ..........43 Using the Default SIP Addresses ............43 Appendix: Changing the Admin Password ........ - Page 5 Manual III: see Extension User's Guide This guide describes in detail the menus available for extension users. Further- more, it includes all the call codes at a glance. Quadro6L/4L/2x2; (SW Version 5.3.x and higher)
-
Page 6: About This Installation Guide
Quadro6L/4L/2x2 Manual I: Installation Guide About This Installation Guide About This Installation Guide This Installation Guide explains the installation of the Quadro IP PBXs of Quadro6L, Qua- dro4L and Quadro2x2 series. • Quadro6L offers 6 phone lines (FXO), 1 Ethernet LAN port and 1 Ethernet WAN port as external interfaces. -
Page 7: Requirements
For optimal results, Internet Explorer 5.5 or higher, or Netscape Navigator 4.7 or higher are recommended. Please Note: The Quadro6L/4L/2x2 is shipped with one RJ11 cable and one straight RJ45 CAT 5 cable. If the LAN connector of the Quadro connects to a hub or switch, a crossover cable may be required. -
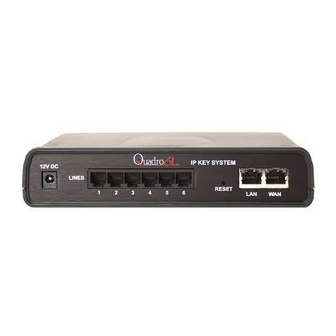
Page 8: Hardware Overview
Hardware Overview Hardware Overview The Connectors Panel of Quadro6L/4L/2x2 The illustration below includes the connector’s panel of Quadro6L model. Fig. l- 1: Connectors Panels of Quadro6L IP PBX The illustration below includes the connector’s panel of Quadro4L/2x2 models. Fig. l- 2: Connectors Panels of Quadro4L IP PBX Power supply socket. -
Page 9: Quadro6L/4L/2X2'S Front Panel Leds
LED Indication during a boot sequence A boot sequence is indicated as follows: The yellow/red/green Info/Fault LED will glow red for a few seconds, then turn to yellow for another four or five minutes while the green Busy Quadro6L/4L/2x2; (SW Version 5.3.x and higher) - Page 10 The yellow/red/green Info/Fault LED will stop blinking alternately red/yellow and start blink- ing red/green/red/yellow. This shows that Quadro has accepted the emergency firmware and is loading it. After a few seconds, Quadro will boot, showing the boot LED sequence. Quadro6L/4L/2x2; (SW Version 5.3.x and higher)
-
Page 11: Step 1: Installing The Quadro
PCs, to the wide area network (WAN) or the Internet. The Quadro will process and regulate the data traffic between these two networks. The Quadro6L/4L/2x2 has one LAN port that can connect to Ethernet hubs and switches on the LAN, allowing additional devices to be connected to the network. -
Page 12: Lan/Wan Connection Options
Step 1: Installing the Quadro LAN/WAN Connection Options • A Quadro6L with an Ethernet WAN port behind a router, which is connected to a cable or xDSL modem. IP phones are placed on the WAN side of the Quadro6L. Fig. l- 4: Configuration: Quadro6L behind a router with IP phones on WAN •... - Page 13 Since Quadro uses STUN by default, it will work with most basic rou- ters without any further configuration. • A Quadro6L with an Ethernet WAN port behind a router, which is connected to a cable or xDSL modem. IP phones are placed on the LAN side of the Quadro6L.
- Page 14 Step 1: Installing the Quadro Fig. l- 7: Configuration: Quadro4L/2x2 behind a router with IP phones on LAN • A Quadro6L used as an Internet Access Router, connected directly to the Internet. Fig. l- 8: Configuration: Quadro6L used as Internet Access Router •...
- Page 15 Web Management of the Quadro (Fig. I -6, Fig. I -7, Fig. I -8 and Fig. I -9). It is recommended to have Admin PC acting as a DHCP client and obtaining IP address from the Quadro. Quadro6L/4L/2x2; (SW Version 5.3.x and higher)
-
Page 16: Connecting The Hardware
Connecting the Hardware • Quadro6L behind a router with IP phones connected to WAN Fig. l- 10: Installation: Quadro6L behind a router with IP phones on WAN • Quadro4L behind a router with IP phones connected to WAN Quadro2x2 is connected accordingly. - Page 17 Quadro6L/4L/2x2 Manual I: Installation Guide Step 1: Installing the Quadro Fig. l- 12: Installation: Quadro6L behind a router with IP phones on LAN • Quadro4L behind a router with IP phones connected to LAN Quadro2x2 is connected accordingly. Fig. l- 13: Installation: Quadro4L behind a router with IP phones on LAN •...
- Page 18 • Connect at least one of Quadro's LINE (FXO) ports to the telephone service from the PSTN. The Quadro6L offers connectivity of six lines, the Quadro4L offers connectivi- ty of four lines and the Quadro2x2 offers connectivity of two lines.
- Page 19 WAN LEDs verify that the Ethernet connection is established between the end points. If these LEDs are not illuminated, there is a connection problem between the Quadro and the other device. Some modems, hubs, switches and routers will require the use of crossover cables. Quadro6L/4L/2x2; (SW Version 5.3.x and higher)
-
Page 20: Step 2: Configuring The Quadro
Step 2.1: Logging into Quadro • Start a browser (MS Internet Explorer, Netscape, Opera) on a PC connected to the Quadro6L/4L/2x2 via the LAN or WAN interface. • In the address field, enter http://Quadro_WAN_IP (the IP address assigned by the company’s DHCP sever) if the PC is connected to the Quadro WAN port;... -
Page 21: Step 2.2: System Configuration Wizard
Next button to start. Enter into the Host Name field the unique name (top right corner, un- der Epygi logo) for the Quadro device. The Domain Name text field requires the LAN side domain name which the Quadro belongs to. -
Page 22: Dhcp Settings For The Lan Interface
PSTN in your location. Fig. l- 20: Regional Settings page Proper configuration of Regional Settings is important for the functionality of the voice subsystem. The Regional Settings determine the proper telephony parameters on the LINE Quadro6L/4L/2x2; (SW Version 5.3.x and higher) -
Page 23: Emergency And Pstn Access Code Settings
9 here. European users usually would want to enter zero (0). If you do not enter anything into this field the currently configured PSTN Access Code will stay un- changed. Click on Next to display the Summary Page. Quadro6L/4L/2x2; (SW Version 5.3.x and higher) -
Page 24: Finishing The System Configuration Wizard
Wizard. Fig. l- 23: Wizard Execution Progress page After this is complete, the Quadro will reply with the Confirm Settings page requesting confirmation of the changes. Press OK to confirm the settings. Quadro6L/4L/2x2; (SW Version 5.3.x and higher) - Page 25 If you changed the network configuration of the LAN, restart your LAN connection to re- ceive a new IP address from the new network. Then you can access the Web Management of the Quadro on the new IP address you’ve assigned to the Quadro. Quadro6L/4L/2x2; (SW Version 5.3.x and higher)
-
Page 26: Step 2.3: Internet Configuration Wizard
(PAP, CHAP or MSCHAP) is needed including the username and password of the PPPoE account. This information will be needed to be inserted in the Internet Configuration Wizard. Quadro6L/4L/2x2; (SW Version 5.3.x and higher) -
Page 27: Uplink Configuration
For Ethernet, clicking Next will display the WAN IP Configuration page. If PPPoE is the selected WAN Interface Protocol, the next page will be PPP/PPTP Configuration. For PPTP WAN Interface Protocol, PPP/PPTP Configuration page will follow the WAN IP Configu- ration. Quadro6L/4L/2x2; (SW Version 5.3.x and higher) -
Page 28: Wan Ip Configuration
Subnet Mask, and the IP address of the Standard Gateway. This is common when you have a static IP address with your ISP. Fig. l- 27: WAN IP Configuration page Click on Next to display the WAN Interface Configuration page. Quadro6L/4L/2x2; (SW Version 5.3.x and higher) -
Page 29: Ppp/Pptp Configuration
ISP. Keep Connection Alive checkbox enables keeping the connection alive by sending control packets dedicated for the link state verification. Click the Next button to display the WAN Interface Configuration page. Quadro6L/4L/2x2; (SW Version 5.3.x and higher) -
Page 30: Wan Interface Configuration
Fig. l- 30: DNS Settings page The Quadro will suggest the correct settings. If Dynamically by Provider is selected, the DNS server settings will be set automatically whenever a connection to the Internet is es- tablished. Quadro6L/4L/2x2; (SW Version 5.3.x and higher) -
Page 31: Finishing The Internet Configuration Wizard
Quadro will display the Confirm Settings page requesting confirmation of the changes. Press the OK button to confirm the settings. Please Note: the settings should be confirmed within 20 minutes; otherwise, the device will revert back to the previous configuration and reboot. Quadro6L/4L/2x2; (SW Version 5.3.x and higher) -
Page 32: Step 2-A: Using Ip Lines
WAN, which the default configuration assumes, please ensure that the Connect IP phones from WAN side checkbox is enabled on the Line Settings page (see Fig. l- 32). The Quadro6L/4L/2x2 provides two options for configuring IP phones: • The Plug-and-Play option is available for supported SIP phones only. The list of these phones is given below. - Page 33 If you are unable to define a strong password, press Choose Generated Password to use one of system de- fined strong passwords. Quadro6L/4L/2x2; (SW Version 5.3.x and higher)
- Page 34 Go to Quadro Status – SIP Registration status – Registered IP Lines to see if IP Line registration is successful. • Dial *74 to get the line information. • Make outgoing and accept incoming calls. Quadro6L/4L/2x2; (SW Version 5.3.x and higher)
-
Page 35: Supported Sip Phones
Step 2: Configuring the Quadro Supported SIP Phones Below is the list of SIP phones that are officially supported by Epygi and can be configured to work with Quadro6L/4L/2x2 using both Plug and Play and/or the automatically configura- tion options, as well as the full set of advanced features, like paging and intercom: •... - Page 36 In the model’s list the Polycom phones with (*) sign are also presented as Polycom-xx-Pre-3.3.0 due to backward incompatibility of UCSoftware 3.1.1 configuration. It is recommended to use Pre-3.3.0 models with Application SIP software 3.2.2.0477. Quadro6L/4L/2x2; (SW Version 5.3.x and higher)
-
Page 37: Step 2-B: Using Key System Emulation
The Key System Emulation is a widely used service in legacy PBXs simplifying the direct connection to the available PSTN lines. On the Quadro6L/4L, the usage of Key System Emulation services (not available for Quadro2x2) is limited to the IP phones attached to the Quadro through the available IP lines and provides direct connection to the available PSTN lines and SIP networks. -
Page 38: Configuring Sla Lines
You may want to use the SLA lines of the Key System Emulation for SIP calls through cer- tain SIP servers instead of assigning them to the PSTN lines. To do so, go to the Key Sys- Quadro6L/4L/2x2; (SW Version 5.3.x and higher) - Page 39 This selection disappears when there are no more unassigned PSTN lines available. This means that each FXO line on the Quadro6L/4L is assigned to the SLA line and all incoming calls on that FXO line will be ringing on the corresponding SLA line.
-
Page 40: How To Disable The Key System Emulation
As indicated above, this causes some limitations in using the FXO lines on the Quadro. If you wish to move back to the regular FXO lines usage on the Quadro6L/4L, you can achieve it by disconnecting the FXO line from the SLA by inactivating the SLA or by chang- ing the SLA assignment to a SIP server. -
Page 41: Step 2-C: Using Receptionist
The Receptionist related setup, with detailed instructions on how to configure the Quadro and the attached IP Phones, is described in the “Receptionist Setup on Quadro” docu- ment, which you can find at the Epygi’s Web portal. Quadro6L/4L/2x2; (SW Version 5.3.x and higher) -
Page 42: Step 3: Registering On Epygi's Technical Support
To register, you need to know the serial number of your Quadro, which is located on a label on the bottom of Quadro. You will also need the date of purchase. Next, open the Epygi home page (www.epygi.com), select Support and click on Registration Form. The online... -
Page 43: Step 4: Making/Receiving Calls
Address (of the user on the remote Quadro) + #. You are calling over the Internet to a remote user. Please Note: Epygi has a SIP Address test line to test newly provisioned Quadro de- vices. Call 8 + 99 + # and you will hear a message if the call was successful. This message comes from a Quadro in one of our offices. - Page 44 Appendix: Registering on Epygi’s SIP Server, which describes how to change the default, SIP addresses on the Epygi SIP server and in the Quadro devices. With the directory ser- vice, you can create a private directory accessible from the Internet using a user- name/password.
-
Page 45: Appendix: Changing The Admin Password
Up to twenty (0-20) digits and symbols are allowed. The Pass- word field is checked against its strength and you may see how strong is your inserted password right below that field. Quadro6L/4L/2x2; (SW Version 5.3.x and higher) - Page 46 Write down the password somewhere and keep it in a secure place. If the password is lost, a factory reset will be required on the unit (see Administrator's Guide, Hardware Overview). All settings are lost after a factory reset. After a factory reset the default password (19) will be restored. Quadro6L/4L/2x2; (SW Version 5.3.x and higher)
-
Page 47: Appendix: Configuring Nat Traversal
From the Telephony menu of the Quadro Management go to the NAT Traversal Set- tings page, go to General Settings and set the enable NAT Traversal for SIP radio buttons selection to Force. Save the selection. Quadro6L/4L/2x2; (SW Version 5.3.x and higher) - Page 48 Mapped Host text field. For Mapped Port, enter the router's corresponding port num- ber, in this case 5060. Save the entries. • Go to the RTP Parameters page and select Use Manual NAT Traversal. Fig. l- 43: NAT Traversal Settings - RTP Parameters Quadro6L/4L/2x2; (SW Version 5.3.x and higher)
- Page 49 6000 (Min) and 6099 (Max), respectively. Click the Save button to save the contents. The Quadro will activate the settings and register the extensions on the Epygi SIP Server after a few minutes. You can verify the settings from the main Quadro Management menu under Status in the SIP Registration Status section.
-
Page 50: Appendix: Registering On Epygi's Sip Server
Technical Support Center. If you have not registered with Epygi Technical Support, you cannot login to the Epygi SIP Server. Log in to the Epygi SIP Server at www.epygi.com. Click on SIP, Login here. Use the same login name and password you used for Epygi Support for Customer Login. - Page 51 This table shows unreg. in the Stat. column. This entry will change to reg. when the re- quired settings in the Quadro are complete and the Quadro successfully registers on the SIP Server. Repeat this for all four extensions on the Quadro and the Auto Attendant. Quadro6L/4L/2x2; (SW Version 5.3.x and higher)
- Page 52 Go to the General Settings page and adjust the Display Name as needed. Fig. l- 49: Extensions Management - Edit Entry – General Settings page Go to the SIP Settings page to enter the SIP Registration Settings you received from the Epygi SIP server. Quadro6L/4L/2x2; (SW Version 5.3.x and higher)
- Page 53 Fig.I-51. Fig. l- 51: Extensions Management page If you go back to Epygi’s SIP Server, you will find the value reg. for this number in the col- Quadro6L/4L/2x2; (SW Version 5.3.x and higher)
- Page 54 Configuring Quadro Extensions umn Stat. Reg. This will indicate that the Quadro has successfully registered the new num- ber. If this does not happen after a few minutes, again verify the SIP Number and pass- words. Quadro6L/4L/2x2; (SW Version 5.3.x and higher)
-
Page 55: Appendix: Checking The Connections
Largest usable MTU size is: 1500 Bytes Test successful. Depending on where the test is failing, the diagnostic can give some advice on how to solve the problem. See the example below of a failed test: Quadro6L/4L/2x2; (SW Version 5.3.x and higher) - Page 56 Traversal. If you are unable to resolve your problems, please send us a technical support request on the Support section of http://www.epygi.com/. Please prepare a system log file and at- tach it to your request. To download the system logs, open the System Diagnostics page from System menu Di- agnostics and click Download System Logs.
- Page 57 Quadro6L/4L/2x2; (SW Version 5.3.x and higher)
Need help?
Do you have a question about the Quadro6L and is the answer not in the manual?
Questions and answers