HP Kayak XA User Manual
Pc workstation
Hide thumbs
Also See for Kayak XA:
- Installation manual (199 pages) ,
- User manual (190 pages) ,
- Technical reference manual (108 pages)

Related Manuals for HP Kayak XA


Summary of Contents for HP Kayak XA
- Page 1 : mamdtfc2.fb4 Page i Tuesday, August 5, 1997 4:20 PM HP Kayak XA PC Workstation User’s Guide...
- Page 2 mamdt.bk : mamdtfc2.fb4 Page ii Tuesday, August 5, 1997 4:20 PM Notice The information contained in this document is subject to change without notice. Hewlett-Packard makes no warranty of any kind with regard to this material, including, but not limited to, the implied warranties of merchantability and fitness for a particular purpose.
- Page 3 mamdt.bk : title.fb4 Page iii Tuesday, August 5, 1997 4:20 PM User’s Guide...
-
Page 4: Important Safety Information
Important Information on Ergonomics It is strongly recommended that you read the information on ergonomics before using your PC Workstation. This information is found in the HP-specific online help on your PC Workstation. English... -
Page 5: Table Of Contents
Using the Flexible Disk Drive ....... 17 Using Your HP Enhanced Keyboard ......18 Setting Passwords . - Page 6 mamdt.bk : mamdt.toc Page vi Tuesday, August 5, 1997 4:20 PM 2 Installing Accessories in Your PC Workstation Accessories You Can Install ....... . Removing and Replacing the Cover .
- Page 7 HP Summary Screen ........
- Page 8 HP Summary Screen ......... Using the HP Setup Program ........
- Page 9 Hewlett-Packard Information Services..... . . 107 HP Forum on CompuServe ........
- Page 10 mamdt.bk : mamdt.toc Page x Tuesday, August 5, 1997 4:20 PM Glossary ......... . 119 Index .
-
Page 11: Setting Up And Using Your Pc Workstation
mamdt.bk : mamdt1.fb4 Page 1 Tuesday, August 5, 1997 4:20 PM Setting Up and Using Your PC Workstation... -
Page 12: Unpacking Your Pc Workstation
mamdt.bk : mamdt1.fb4 Page 2 Tuesday, August 5, 1997 4:20 PM 1 Setting Up and Using Your PC Workstation Unpacking Your PC Workstation Unpacking Your PC Workstation 1 When you receive your PC Workstation, unpack all the components. WARNING If you have any doubt that you can lift the computer or display safely, do not try to move it without help. -
Page 13: Connecting The Mouse, Keyboard, Printer And Display
mamdt.bk : mamdt1.fb4 Page 3 Tuesday, August 5, 1997 4:20 PM 1 Setting Up and Using Your PC Workstation Connecting the Mouse, Keyboard, Printer and Display Connecting the Mouse, Keyboard, Printer and Display Connect the mouse and keyboard to the back of the computer. The connectors are shaped to go in one way only. - Page 14 mamdt.bk : mamdt1.fb4 Page 4 Tuesday, August 5, 1997 4:20 PM 1 Setting Up and Using Your PC Workstation Connecting the Mouse, Keyboard, Printer and Display Connect the display to the back of the computer. The connector is shaped to go in one way only. Tighten the display cable attachment screws.
-
Page 15: Connecting To A Network (Lan)
mamdt.bk : mamdt1.fb4 Page 5 Tuesday, August 5, 1997 4:20 PM 1 Setting Up and Using Your PC Workstation Connecting to a Network (LAN) Connecting to a Network (LAN) Depending on your model, your PC Workstation may have a 10BT/100TX LAN interface adapter. The LAN adapter supports both 10 Mbit/s and 100 Mbit/s operation. -
Page 16: Connecting Audio Accessories
mamdt.bk : mamdt1.fb4 Page 6 Tuesday, August 5, 1997 4:20 PM 1 Setting Up and Using Your PC Workstation Connecting Audio Accessories Connecting Audio Accessories Your PC Workstation has multimedia connectors on the rear panel. The front panel also has a headphones/speaker jack, a microphone jack, and a volume control which is deactivated by default (the keyboard volume control is activated by default). - Page 17 mamdt.bk : mamdt1.fb4 Page 7 Tuesday, August 5, 1997 4:20 PM 1 Setting Up and Using Your PC Workstation Connecting Audio Accessories The multimedia rear panel has an audio Line In jack (LINE IN), an audio Line Out jack (LINE OUT), and a microphone jack (MIC IN). NOTE The internal speaker and the LINE OUT jack on the rear of your PC Workstation are deactivated when you use the Headphones jack on the front of the PC...
- Page 18 mamdt.bk : mamdt1.fb4 Page 8 Tuesday, August 5, 1997 4:20 PM 1 Setting Up and Using Your PC Workstation Connecting Audio Accessories If you want to listen to audio CDs on your CD-ROM drive, you can also use the headphones jack and the volume control on the front of the CD-ROM drive.
-
Page 19: Connecting An External Scsi Accessory
mamdt.bk : mamdt1.fb4 Page 9 Tuesday, August 5, 1997 4:20 PM 1 Setting Up and Using Your PC Workstation Connecting an External SCSI Accessory Connecting an External SCSI Accessory If you have a SCSI-based system, your PC Workstation is equipped with an Ultra wide 16-bit SCSI connector for internal devices and an Ultra narrow 8-bit SCSI connector for external devices. - Page 20 The total length of the external SCSI cables should not exceed 3 meters (approximately 10 feet). Contact your dealer to order shielded HP SCSI cables to connect external SCSI accessories. For information on how to install an internal SCSI device, refer to page...
-
Page 21: Connecting The Power Cords
mamdt.bk : mamdt1.fb4 Page 11 Tuesday, August 5, 1997 4:20 PM 1 Setting Up and Using Your PC Workstation Connecting the Power Cords Connecting the Power Cords WARNING For your safety, always connect the equipment to a grounded wall outlet. Always use a power cord with a properly grounded plug such as the one provided with this equipment or in compliance with your national regulations. -
Page 22: Your Pc Workstation's Hardware Control Panel
mamdt.bk : mamdt1.fb4 Page 12 Tuesday, August 5, 1997 4:20 PM 1 Setting Up and Using Your PC Workstation Your PC Workstation’s Hardware Control Panel Your PC Workstation’s Hardware Control Panel Your PC Workstation’s hardware control panel is on the front of the PC Workstation. - Page 23 Hard Disk Activity Light This light flickers when your hard disk drive is being accessed. The hard disk activity light also works for a second hard disk drive (supplied by HP). Network Activity Light This light flickers when network activity is taking place.
-
Page 24: Starting And Stopping Your Pc Workstation
Self-Test (POST) while the PC Workstation’s logo is displayed. If you wish to view the POST details, press to get the HP Summary Screen. If there is an error in the POST, the error is automatically displayed. For details, refer to page 59. -
Page 25: Starting The Pc Workstation For The First Time
(If necessary, the name of the user can be modified later.) The current date and time. • The type of printer (for example, HP LaserJet 5L). This is shown • on the front of the printer. You also need to enter the connection used by the printer. -
Page 26: Stopping Your Pc Workstation
mamdt.bk : mamdt1.fb4 Page 16 Tuesday, August 5, 1997 4:20 PM 1 Setting Up and Using Your PC Workstation Starting and Stopping Your PC Workstation 4 When the initialization routine has finished, click on OK to restart the PC Workstation. After Your PC Workstation Has Restarted Move the keyboard to a comfortable position. -
Page 27: Using The Flexible Disk Drive
mamdt.bk : mamdt1.fb4 Page 17 Tuesday, August 5, 1997 4:20 PM 1 Setting Up and Using Your PC Workstation Using the Flexible Disk Drive Using the Flexible Disk Drive Your PC Workstation has a flexible disk drive for 3½-inch flexible disks. Ensure that you insert the flexible disk correctly when using the drive. -
Page 28: Using Your Hp Enhanced Keyboard
1 Setting Up and Using Your PC Workstation Using Your HP Enhanced Keyboard Using Your HP Enhanced Keyboard The HP enhanced keyboard includes soft keys you can use to: Display and configure the actions assigned to keys. • Perform one-touch shortcuts to start applications, open files, or •... - Page 29 Using Your HP Enhanced Keyboard Menu Key Pressing the Menu key displays the soft key section of the HP enhanced keyboard on your screen. Click any of the keys on the screen to display the action assigned to an individual key or to change or assign an action to a key.
- Page 30 NOTE By default, the volume on your system can be controlled with the Mute and Volume keys on the keyboard or through the HP Volume Control software. The volume control on the audio front panel is disabled. For information on how to enable the volume control on the front panel, refer to page 73.
-
Page 31: Setting Passwords
mamdt.bk : mamdt1.fb4 Page 21 Tuesday, August 5, 1997 4:20 PM 1 Setting Up and Using Your PC Workstation Setting Passwords Setting Passwords You can set two passwords, the Administrator password and the User password, to provide two levels of protection for your PC Workstation. You set both passwords in the Security menu group of the Setup program. -
Page 32: Setting A User Password
mamdt.bk : mamdt1.fb4 Page 22 Tuesday, August 5, 1997 4:20 PM 1 Setting Up and Using Your PC Workstation Setting Passwords Setting a User Password A User password can only be set if an Administrator password has already been set. Set a User Password to: Provide a power-on password prompt to prevent your PC •... -
Page 33: Using Power Management
Additional information about your PC Workstation is preloaded on your hard disk drive. This information includes: Working in comfort—guidance on ergonomic issues. • HP support—similar to chapter 5 in this User’s Guide. • Using Sound on Your PC—comprehensive online book describing •... -
Page 34: Recycling An Old Pc Workstation
Your HP PC Workstation has been designed to respect the environment as much as possible. HP can take an old PC Workstation back for recycling when it reaches the end of its useful life. In several countries, HP has a product take-back program. Collected equipment is sent to one of HP’s recycling facilities in Europe or the... -
Page 35: Installing Accessories In Your Pc Workstation
mamdt.bk : mamdt2.fb4 Page 25 Tuesday, August 5, 1997 4:20 PM Installing Accessories in Your PC Workstation This chapter explains how to install accessories such as extra memory, accessory boards, and additional disk drives, in your PC Workstation. -
Page 36: Accessories You Can Install
: mamdt2.fb4 Page 26 Tuesday, August 5, 1997 4:20 PM 2 Installing Accessories in Your PC Workstation Accessories You Can Install Accessories You Can Install Please contact your authorized reseller for information about HP accessory part numbers. Order numbers given below are subject to change. WARNING For your safety, never remove your PC Workstation’s cover without... -
Page 37: Removing And Replacing The Cover
mamdt.bk : mamdt2.fb4 Page 27 Tuesday, August 5, 1997 4:20 PM 2 Installing Accessories in Your PC Workstation Removing and Replacing the Cover Removing and Replacing the Cover Removing the Cover 1 Turn off the display and the computer. 2 Disconnect the power cords from the power outlets, the computer and the display. -
Page 38: Replacing The Cover After Installing Accessories
mamdt.bk : mamdt2.fb4 Page 28 Tuesday, August 5, 1997 4:20 PM 2 Installing Accessories in Your PC Workstation Removing and Replacing the Cover Replacing the Cover After Installing Accessories 1 Check that you have installed all your accessories. 2 Check that all internal cables are properly connected and safely routed so they will not be entangled when you replace the cover. -
Page 39: Moving And Replacing The Power Supply Unit
mamdt.bk : mamdt2.fb4 Page 29 Tuesday, August 5, 1997 4:20 PM 2 Installing Accessories in Your PC Workstation Moving and Replacing the Power Supply Unit Moving and Replacing the Power Supply Unit You must move the power supply unit to access the rear drive shelves and the additional accessory board slot (some models). -
Page 40: Replacing The Power Supply Unit
mamdt.bk : mamdt2.fb4 Page 30 Tuesday, August 5, 1997 4:20 PM 2 Installing Accessories in Your PC Workstation Moving and Replacing the Power Supply Unit Replacing the Power Supply Unit 1 Before replacing the power supply unit, ensure that the hard disk drive(s), and the LAN or LAN/SCSI board (some models only), are correctly installed and that all data and power cables are properly connected and correctly routed. -
Page 41: Installing Memory
mamdt.bk : mamdt2.fb4 Page 31 Tuesday, August 5, 1997 4:20 PM 2 Installing Accessories in Your PC Workstation Installing Memory Installing Memory CAUTION Static electricity can damage electronic components. Turn OFF all equipment. Don’t let your clothes touch the accessory. To equalize the static electricity, rest the accessory bag on top of the PC Workstation while you are removing the accessory from the bag. - Page 42 mamdt.bk : mamdt2.fb4 Page 32 Tuesday, August 5, 1997 4:20 PM 2 Installing Accessories in Your PC Workstation Installing Memory Step 4 Step 3 5 Repeat this procedure for each memory module you are installing. 6 If you need to remove a memory module, gently open the retaining clips and lift the module out of the socket.
-
Page 43: Installing Video Memory
mamdt.bk : mamdt2.fb4 Page 33 Tuesday, August 5, 1997 4:20 PM 2 Installing Accessories in Your PC Workstation Installing Memory Installing Video Memory Your PC workstation is supplied with video memory integrated on the system board (2 MB). You also have a video memory module (2 MB) installed in the video memory upgrade socket, giving you 4 MB in total. - Page 44 mamdt.bk : mamdt2.fb4 Page 34 Tuesday, August 5, 1997 4:20 PM 2 Installing Accessories in Your PC Workstation Installing Memory 5 Carefully insert the new, 4 MB, video memory module into the video memory module socket. The module will fit one way only. 6 Install any other accessories before replacing the cover.
-
Page 45: Installing Mass Storage Devices
mamdt.bk : mamdt2.fb4 Page 35 Tuesday, August 5, 1997 4:20 PM 2 Installing Accessories in Your PC Workstation Installing Mass Storage Devices Installing Mass Storage Devices You can install additional mass storage devices, if you need extra mass storage space for your application software. Your PC Workstation has one hard disk drive already installed. - Page 46 mamdt.bk : mamdt2.fb4 Page 36 Tuesday, August 5, 1997 4:20 PM 2 Installing Accessories in Your PC Workstation Installing Mass Storage Devices SCSI Cable (some models) One end of the cable is connected to the SCSI interface board (just above the hard disk drive). One connector on the cable is connected to the hard disk drive itself.
-
Page 47: Installing A Hard Disk Drive In The Top Rear Shelf
mamdt.bk : mamdt2.fb4 Page 37 Tuesday, August 5, 1997 4:20 PM 2 Installing Accessories in Your PC Workstation Installing Mass Storage Devices Some SCSI disk drives may have termination resistors that must be removed or disabled before installation in your PC Workstation. Refer to the drive’s installation guide for more details and to see if there is a special installation procedure to follow. - Page 48 mamdt.bk : mamdt2.fb4 Page 38 Tuesday, August 5, 1997 4:20 PM 2 Installing Accessories in Your PC Workstation Installing Mass Storage Devices 3 At the rear of the computer, unscrew the retaining bracket (you can use a coin to do this) and remove it. ½...
- Page 49 mamdt.bk : mamdt2.fb4 Page 39 Tuesday, August 5, 1997 4:20 PM 2 Installing Accessories in Your PC Workstation Installing Mass Storage Devices 5 Align the disk drive with the holes in the tray, making sure that the drive connectors are on the open end of the tray. Then secure the drive using the screws provided with it.
-
Page 50: Replacing The Hard Disk Drive In The Bottom Rear Shelf
mamdt.bk : mamdt2.fb4 Page 40 Tuesday, August 5, 1997 4:20 PM 2 Installing Accessories in Your PC Workstation Installing Mass Storage Devices Replacing the Hard Disk Drive in the Bottom Rear Shelf You can install either a 3.5-inch or a 5.25-inch hard disk drive in this shelf. - Page 51 mamdt.bk : mamdt2.fb4 Page 41 Tuesday, August 5, 1997 4:20 PM 2 Installing Accessories in Your PC Workstation Installing Mass Storage Devices 5 Remove the tray by pushing it from the inside and sliding it out of the back of the computer. 6 Remove the drive from the tray by unscrewing it from the back of the tray.
- Page 52 mamdt.bk : mamdt2.fb4 Page 42 Tuesday, August 5, 1997 4:20 PM 2 Installing Accessories in Your PC Workstation Installing Mass Storage Devices 9 At the rear of the computer, replace the metal plate. Insert the flat end first then push it until it clicks into place. Step 8 Step 9 10 Connect the power cable and the data cable to the rear of the drive.
-
Page 53: Installing A Drive In A Front Shelf
mamdt.bk : mamdt2.fb4 Page 43 Tuesday, August 5, 1997 4:20 PM 2 Installing Accessories in Your PC Workstation Installing Mass Storage Devices Installing a Drive in a Front Shelf WARNING To avoid electric shock and harm to your eyes by laser light from a CD-ROM or CD-RW drive, do not open the CD-ROM or CD-RW enclosure. - Page 54 Remove the metal filler plate from the empty shelf if there is one. 7 If the drive to be installed has a tray, attach the drive to the tray. Many devices, such as the HP Zip drive, require an HP-supplied tray before they can be installed. Attach drive to tray...
- Page 55 mamdt.bk : mamdt2.fb4 Page 45 Tuesday, August 5, 1997 4:20 PM 2 Installing Accessories in Your PC Workstation Installing Mass Storage Devices Top mounting bracket 10 Pull the PC Workstation’s data cable through the front drive bay area and connect it to the rear of each drive. The connectors are shaped to fit one way only.
- Page 56 mamdt.bk : mamdt2.fb4 Page 46 Tuesday, August 5, 1997 4:20 PM 2 Installing Accessories in Your PC Workstation Installing Mass Storage Devices 14 Replace the power supply unit. Then push the front drive unit fully into the PC Workstation until the two retaining clips click into place. 15 Retrieve the generic filler from the PC Workstation’s chassis by opening the two clips.
-
Page 57: Completing The Installation Of A Drive
mamdt.bk : mamdt2.fb4 Page 47 Tuesday, August 5, 1997 4:20 PM 2 Installing Accessories in Your PC Workstation Installing Mass Storage Devices Completing the Installation of a Drive Completing the 1 Make sure you have set a unique SCSI address for the new device Installation of a SCSI (this is done automatically with Plug-and-Play drives). -
Page 58: Installing Accessory Boards
mamdt.bk : mamdt2.fb4 Page 48 Tuesday, August 5, 1997 4:20 PM 2 Installing Accessories in Your PC Workstation Installing Accessory Boards Installing Accessory Boards CAUTION Static electricity can damage electronic components. Turn OFF all equipment. Don’t let your clothes touch the accessory. To equalize the static electricity, rest the accessory bag on top of the computer while you are removing the accessory from the bag. -
Page 59: Configuring Non-Plug And Play Isa Accessory Boards
mamdt.bk : mamdt2.fb4 Page 49 Tuesday, August 5, 1997 4:20 PM 2 Installing Accessories in Your PC Workstation Installing Accessory Boards When you start your PC Workstation after installing an accessory board, the Plug and Play BIOS automatically detects which hardware resources (IRQs, DMAs, memory ranges, and I/O addresses) are used by the system-based components. -
Page 60: Installing The Board
mamdt.bk : mamdt2.fb4 Page 50 Tuesday, August 5, 1997 4:20 PM 2 Installing Accessories in Your PC Workstation Installing Accessory Boards Installing the Board The procedure described below assumes that you are installing an accessory board in slot 1, 2, 3 or 4. If you are installing a board in slot 5, the supplementary slot, after removing the cover (step 2, below), you need to move the power supply unit (refer to page 29) so that you can access the slot. - Page 61 mamdt.bk : mamdt2.fb4 Page 51 Tuesday, August 5, 1997 4:20 PM 2 Installing Accessories in Your PC Workstation Installing Accessory Boards Installing an Accessory Board (refer to previous page) Step 3: Unscrew the retaining bracket. Step 5: Remove slot cover. Step 6: Slide board into the slot.
-
Page 62: Removing An Accessory Board
mamdt.bk : mamdt2.fb4 Page 52 Tuesday, August 5, 1997 4:20 PM 2 Installing Accessories in Your PC Workstation Installing Accessory Boards 11 Depending on which operating system you have, and whether you have installed a Plug and Play or a non-Plug and Play board, your system may be able to automatically configure the new board. -
Page 63: Installing A Security Cable
2 Turn the key to lock the cable to the PC Workstation. 3 Remove the key and store it in a safe place. NOTE The Kensington security cable is not an HP accessory. It cannot be ordered from HP. Contact your reseller for more information. English... - Page 64 mamdt.bk : mamdt2.fb4 Page 54 Tuesday, August 5, 1997 4:20 PM...
-
Page 65: Troubleshooting Your Pc Workstation
mamdt.bk : mamdt3.fb4 Page 55 Tuesday, August 5, 1997 4:20 PM Troubleshooting Your PC Workstation This chapter can help you solve problems that you may encounter when using your PC Workstation. -
Page 66: Solving Problems
Workstation’s logo is displayed during the Power-on-Self-Test (POST). Refer to page 87 for more information. HP Diagnostics An HP Hardware Diagnostic utility is either preloaded on your hard disk drive or available on the World Wide Web. With this utility, you can diagnose any hardware-related problems that may arise with your PC Workstation. -
Page 67: If Your Pc Workstation Does Not Start Properly
mamdt.bk : mamdt3.fb4 Page 57 Tuesday, August 5, 1997 4:20 PM 3 Troubleshooting Your PC Workstation If Your PC Workstation Does Not Start Properly If Your PC Workstation Does Not Start Properly Use this section if your PC Workstation does not start properly when you turn it on, and you experience one of the following symptoms: Your display is blank and there are no error messages. - Page 68 mamdt.bk : mamdt3.fb4 Page 58 Tuesday, August 5, 1997 4:20 PM 3 Troubleshooting Your PC Workstation If Your PC Workstation Does Not Start Properly Check Internal Items If the PC Workstation still does not start properly, follow this procedure to check the internal items: 1 Turn off the display, the computer, and all external devices.
-
Page 69: If A Post Error Message Is Displayed
• Press to run the Setup program and correct a system • configuration error. HP recommends that you correct the error before proceeding, even if the PC Workstation appears to start successfully. Press to accept (validate) the change and update the Setup •... - Page 70 mamdt.bk : mamdt3.fb4 Page 60 Tuesday, August 5, 1997 4:20 PM 3 Troubleshooting Your PC Workstation If Your PC Workstation Does Not Start Properly Clearing the PC Workstation’s Configuration Memory If the PC Workstation then starts, but POST still persists in reporting an error, clear the current configuration memory values and reinstall the built-in default values: 1 Turn off the PC Workstation, disconnect the power cord and all...
-
Page 71: If You Cannot Turn Off Your Pc Workstation
mamdt.bk : mamdt3.fb4 Page 61 Tuesday, August 5, 1997 4:20 PM 3 Troubleshooting Your PC Workstation If You Cannot Turn Off Your PC Workstation If You Cannot Turn Off Your PC Workstation Use this section if you cannot turn off your PC Workstation, the power indication light is red, and you hear a “buzzing”... -
Page 72: If Your Pc Workstation Has A Hardware Problem
The HP Hardware Diagnostics utility helps you diagnose any hardware- related problems with your PC Workstation. The utility is either preloaded on your hard disk as part of the HP TopTOOLS application, or is available on the World Wide Web at: http://www.hp.com/go/pcsupport/... - Page 73 Support Ticket To produce a complete record of your system’s configuration and test results, you need to create a Support Ticket. You can then send this, via email or fax, to your local or HP-dedicated Support Agent. English...
-
Page 74: If Your Display Does Not Work Properly
mamdt.bk : mamdt3.fb4 Page 64 Tuesday, August 5, 1997 4:20 PM 3 Troubleshooting Your PC Workstation If Your PC Workstation Has a Hardware Problem If Your Display Does Not Work Properly If Your Display Is Blurred or Unreadable If you have selected the wrong display type in your operating system, the display screen may become blurred or unreadable. - Page 75 mamdt.bk : mamdt3.fb4 Page 65 Tuesday, August 5, 1997 4:20 PM 3 Troubleshooting Your PC Workstation If Your PC Workstation Has a Hardware Problem If nothing is displayed on the screen at all, but the PC Workstation starts and the keyboard, disk drives, and other peripheral devices seem to operate properly: Check that the display is plugged in and turned ON.
-
Page 76: If Your Keyboard Does Not Work
mamdt.bk : mamdt3.fb4 Page 66 Tuesday, August 5, 1997 4:20 PM 3 Troubleshooting Your PC Workstation If Your PC Workstation Has a Hardware Problem Other Display Problems If the display image is not aligned with the screen, use the display’s controls to center the image (refer to the display manual for instructions). -
Page 77: If Your Printer Does Not Work
mamdt.bk : mamdt3.fb4 Page 67 Tuesday, August 5, 1997 4:20 PM 3 Troubleshooting Your PC Workstation If Your PC Workstation Has a Hardware Problem If Your Printer Does Not Work Check that the printer is configured correctly for the PC Workstation •... -
Page 78: If Your Hard Disk Does Not Work
mamdt.bk : mamdt3.fb4 Page 68 Tuesday, August 5, 1997 4:20 PM 3 Troubleshooting Your PC Workstation If Your PC Workstation Has a Hardware Problem If Your Hard Disk Does Not Work Check that the disk power and data cables are correctly connected •... - Page 79 mamdt.bk : mamdt3.fb4 Page 69 Tuesday, August 5, 1997 4:20 PM 3 Troubleshooting Your PC Workstation If Your PC Workstation Has a Hardware Problem If the CD-ROM Drive Does Not Work Check that the cables have been properly connected. • Check that a CD is inserted in the drive.
-
Page 80: If An Accessory Board Does Not Work
mamdt.bk : mamdt3.fb4 Page 70 Tuesday, August 5, 1997 4:20 PM 3 Troubleshooting Your PC Workstation If Your PC Workstation Has a Hardware Problem If the CD-ROM Drive Door Does Not Open If you have difficulty removing a CD-ROM disk from the CD-ROM drive (during a power failure for example), you can use the manual eject button. -
Page 81: If You Have Forgotten Your Password
mamdt.bk : mamdt3.fb4 Page 71 Tuesday, August 5, 1997 4:20 PM 3 Troubleshooting Your PC Workstation If You Have Forgotten Your Password If You Have Forgotten Your Password If you forget the User password, but not the Administrator password, carry out the following procedure: 1 Turn off the PC Workstation. -
Page 82: If Your Pc Workstation Has A Software Problem
mamdt.bk : mamdt3.fb4 Page 72 Tuesday, August 5, 1997 4:20 PM 3 Troubleshooting Your PC Workstation If Your PC Workstation Has a Software Problem If Your PC Workstation Has a Software Problem If Your Application Software Does Not Work If the PC Workstation reports the system is OK and the indicator light over the power switch is illuminated, but some software will not run, refer to the operating system and/or application software manuals. -
Page 83: If Your Pc Workstation Has An Audio Problem
To enable the hardware volume control, follow the appropriate section for your own operating system, described below. Enabling the HP Front You can enable the HP Front Panel Volume Control from the Device tab Panel Volume Control as follows: Under Windows NT 4.0 1 Click the Start button and select Settings Control Panel. -
Page 84: Other Audio Problems
If Your PC Workstation Has an Audio Problem 4 Click the Enable Hardware Volume Control checkbox, and then click OK to exit. 5 Check that the HP Front Panel Volume Control is enabled by first double-clicking the speaker symbol in the right corner of the taskbar. -
Page 85: Connecting An External Battery
Please return used batteries to the shop from which you bought them, or to the dealer from whom you purchased your PC Workstation, or to HP, so that they can be either recycled or disposed of in an environmentally sound way. Returned batteries will be accepted free of charge. - Page 86 mamdt.bk : mamdt3.fb4 Page 76 Tuesday, August 5, 1997 4:20 PM...
-
Page 87: Technical Information
mamdt4.fb4 Page 77 Tuesday, August 5, 1997 5:25 PM Technical Information... -
Page 88: Features Of Your Pc Workstation
mamdt4.fb4 Page 78 Tuesday, August 5, 1997 5:25 PM 4 Technical Information Features of Your PC Workstation Features of Your PC Workstation Feature: Description: Processor (standard) Pentium II MMX Cache Memory • Level-One: 16 KB code, 16 KB data (integrated in processor package) •... - Page 89 • One 16-bit ISA (Industry Standard Architecture) slot • Two combination ISA or PCI slots Keyboard/Mouse • HP enhanced keyboard with mini-DIN connector • HP two-button mouse with mini-DIN connector English...
-
Page 90: System Specifications
mamdt4.fb4 Page 80 Wednesday, August 6, 1997 10:05 AM 4 Technical Information System Specifications System Specifications Power Consumption Information 115V / 60 Hz 230V / 50Hz On (idle - no file transfer) - Windows 95 On (idle - no file transfer) - Windows NT 4.0 Sleep/Suspend Mode - Windows 95 25.5W 1.6W... -
Page 91: Irqs, Dmas, And I/O Addresses Used By Your Pc Workstation
mamdt4.fb4 Page 81 Tuesday, August 5, 1997 5:25 PM 4 Technical Information System Specifications IRQs, DMAs, and I/O Addresses Used by Your PC Workstation The IRQ, DMA, and I/O address mappings shown here are typical and should be used as a guideline. The resources used by your PC Workstation may be slightly different. - Page 92 mamdt4.fb4 Page 82 Tuesday, August 5, 1997 5:25 PM 4 Technical Information System Specifications I/O Addresses used by 0000 - 000F DMA controller 1 PC Workstation 0020 - 0021 Master interrupt controller 002E - 002F NS-317 Configuration registers 0040 - 0043 Timer 1 0060, 0064 Keyboard controller...
-
Page 93: Audio Features
mamdt4.fb4 Page 83 Tuesday, August 5, 1997 5:25 PM 4 Technical Information System Specifications Audio Features Feature: Description: Digitized Sounds • 16-bit and 8-bit stereo sampling from 4 kHz to 55.2 kHz • Programmable sample rates with 1 Hz resolution •... -
Page 94: Available Video Resolutions
mamdt4.fb4 Page 84 Tuesday, August 5, 1997 5:25 PM 4 Technical Information System Specifications Available Video Resolutions Resolution Minimum video memory required for these color scales Refresh rates 256 colors 64 K colors 16.7 M 16.7 M (8 bits per hi-color colors colors... -
Page 95: Scsi Features
mamdt4.fb4 Page 85 Tuesday, August 5, 1997 5:25 PM 4 Technical Information System Specifications SCSI Features Feature: Description: SCSI Controller • Symbios Logic PCI Interface • Full 32-bit DMA bus master • Zero wait-state bus master data bursts • Universal PCI bus voltage support SCSI Interface •... -
Page 96: System Board Switches
mamdt4.fb4 Page 86 Tuesday, August 5, 1997 5:25 PM 4 Technical Information System Board Switches System Board Switches System Board Switches Switch Switch function Reserved - Do not use (always set to Open) 2 - 5 Processor speed, see next table CMOS: Open = normal (default) Closed = clear CMOS and reload default values in Setup... -
Page 97: The Hp Summary Screen And Setup Program
PC Workstation. 2 While the PC Workstation’s logo is displayed on your screen, press . This takes you to the HP Summary Screen. (To go immediately into the Setup program, and bypass the Summary Screen, press instead of ). -
Page 98: Using The Hp Setup Program
The HP Summary Screen and Setup Program When you press the HP Summary Screen (similar to that shown below) appears: HP PC WORKSTATION XA 6/xxx - Copyright 1997 Hewlett-Packard - 3.0 BIOS Version : HC.08.xx PC Serial Number : FR74011111... - Page 99 Page 89 Tuesday, August 5, 1997 5:25 PM 4 Technical Information The HP Summary Screen and Setup Program 2 Press while is displayed at the bottom of the screen. F2 Setup appears for a short period during the POST (Power-On- F2 Setup Self-Test).
- Page 100 Page 90 Tuesday, August 5, 1997 5:25 PM 4 Technical Information The HP Summary Screen and Setup Program You move through the Setup program by using the following keys: arrows can be used to select fields in the current •...
-
Page 101: Saving Your Changes And Leaving The Setup Program
Page 91 Tuesday, August 5, 1997 5:25 PM 4 Technical Information The HP Summary Screen and Setup Program Saving Your Changes and Leaving the Setup Program When you have made all your changes, you must save them and exit the Setup program. -
Page 102: Configuring Your Network Connection
Configuring Your Network Connection Configuring Your Network Connection Use the information in this section if your PC Workstation comes with an HP-supplied integrated network solution. You must use the PC Workstation's Setup program to change the integrated Ethernet interface settings. -
Page 103: Controlling The Network Security Features
mamdt4.fb4 Page 93 Tuesday, August 5, 1997 5:25 PM 4 Technical Information Configuring Your Network Connection Controlling the Network Security Features The Security Features allow you to enable starting from the network if you want the PC Workstation to start from a LAN server. To enable starting from the network: 1 With the Setup program running, use the key to select... -
Page 104: Using The Scsi Configuration Utility
mamdt4.fb4 Page 94 Tuesday, August 5, 1997 5:25 PM 4 Technical Information Using the SCSI Configuration Utility Using the SCSI Configuration Utility The Symbios Logic SCSI Configuration Utility lets you view and change the default configuration for your host adapter and all SCSI devices connected to it, or for individual SCSI devices. -
Page 105: Starting The Scsi Configuration Utility
mamdt4.fb4 Page 95 Tuesday, August 5, 1997 5:25 PM 4 Technical Information Using the SCSI Configuration Utility Starting the SCSI Configuration Utility You access the SCSI Configuration Utility by pressing when the message Press F6 to start Configuration Utility... displayed during the PC Workstation’s start-up routine. A further message is then displayed: Please wait, invoking Configuration before the Main menu of the Symbios Logic SCSI... - Page 106 mamdt4.fb4 Page 96 Tuesday, August 5, 1997 5:25 PM 4 Technical Information Using the SCSI Configuration Utility B-Adapter Boot Order This option is only available when you have more than one host adapter installed. It lets you set the order in which host adapters boot. When you select this option the Boot Order menu is displayed.
-
Page 107: Adapter Utilities Menu
mamdt4.fb4 Page 97 Tuesday, August 5, 1997 5:25 PM 4 Technical Information Using the SCSI Configuration Utility Adapter Utilities Menu When you select (click on and press ) a host adapter from the Main menu, the Utilities menu is displayed: Symbios Logic SCSI Configuration Utility Version 1.07 1. -
Page 108: Adapter Setup Menu
mamdt4.fb4 Page 98 Tuesday, August 5, 1997 5:25 PM 4 Technical Information Using the SCSI Configuration Utility Adapter Setup Menu When you select Adapter Setup from the Adapter Utilities menu, the Adapter Setup menu is displayed: Symbios Logic SCSI Configuration Utility Version 1.07 1. -
Page 109: Device Selections Menu
mamdt4.fb4 Page 99 Tuesday, August 5, 1997 5:25 PM 4 Technical Information Using the SCSI Configuration Utility I-Host SCSI ID In general it is not advisable to change your host adapter ID from the default value of 7, as this gives it the highest priority on the SCSI bus. However, if you have two adapters sharing the same SCSI devices, you should give one of the adapters a currently-unassigned ID to avoid duplication of SCSI IDs. -
Page 110: Device Setup Menu
mamdt4.fb4 Page 100 Tuesday, August 5, 1997 5:25 PM 4 Technical Information Using the SCSI Configuration Utility Device Setup Menu When you select a device from the Device Selections menu, the Device Setup menu is displayed: Symbios Logic SCSI Configuration Utility Version 1.00 1. -
Page 111: Exiting From The Configuration Utility
mamdt4.fb4 Page 101 Tuesday, August 5, 1997 5:25 PM 4 Technical Information Using the SCSI Configuration Utility D-Disconnect This option lets you enable or disable disconnects for the device. To optimize SCSI bus performance, this option should be set to Enabled when two or more SCSI devices are connected to the host adapter. - Page 112 mamdt4.fb4 Page 102 Tuesday, August 5, 1997 5:25 PM...
-
Page 113: Hewlett-Packard Support And Information Services
mamdt.bk : mamdt5.fb4 Page 103 Tuesday, August 5, 1997 4:20 PM Hewlett-Packard Support and Information Services... -
Page 114: Introduction
To ensure that your system maintains its reliability and to keep you up-to-date with the latest developments, HP and a worldwide network of trained and authorized resellers provide a comprehensive range of service and support options... -
Page 115: Your Hp-Authorized Reseller
Support organization in your country. HP SupportPack Hewlett-Packard’s three-year SupportPack is available from your local reseller. It must be purchased within 30 days of purchasing your HP PC Workstation. The concept of SupportPack is simple. It allows you to extend your one-year on-site hardware warranty to a three-year on-site hardware warranty, offering next day on-site response. -
Page 116: Hp Support Assistant Cd-Rom
5 Hewlett-Packard Support and Information Services HP Support Assistant CD-ROM HP Support Assistant CD-ROM HP Support Assistant is a yearly subscription service on two CD-ROMs: one for software, and the other for support documentation. The software CD-ROM is updated monthly and contains the latest HP drivers and utilities. -
Page 117: Hewlett-Packard Information Services
HP Forum on CompuServe The HP Systems Forum on CompuServe is an online service, accessible via modem. This service provides information about your HP PC, and allows you to communicate with other HP users through an online user forum. -
Page 118: Hp Forum On America Online
• This will load the HP Home Page directly onto your screen. In the HP Forum you can ask and answer questions about HP products and you can also download drivers, software application notes, or utilities for HP products. -
Page 119: Hp Bbs Library
Set your modem for no parity, 8 data bits, and 1 stop bit (N, 8, 1). HP World Wide Web Site The HP World Wide Web site gives you access to information about HP, its products, including product data sheets, service and support information, electronic newsletters and technical tips. -
Page 120: Hp Faxback On Demand-Hp First
Hewlett-Packard Information Services HP FAXback on Demand—HP FIRST HP FIRST is a service where you can select documents, support and technical information, data sheets and pre-sales information, which are then faxed to you. To access this service, you can use a touch-tone... -
Page 121: Ordering Drivers And Bios On Diskette
Contact your authorized HP reseller for assistance in selecting the • appropriate driver. If your reseller is unable to help you, call HP FIRST for the most up- • to-date list of drivers. English... -
Page 122: Hp Support Services
HP or HP-authorized service outlet. HP telephone support for your HP PC Workstation is available during the first year of your hardware warranty. This service will also provide technical assistance with regard to the basic configuration and setup of your HP PC Workstation and for the bundled or preloaded operating system. -
Page 123: Hewlett-Packard Telephone Support
5 Hewlett-Packard Support and Information Services Hewlett-Packard Telephone Support Hewlett-Packard Telephone Support HP North American Assistance from the HP North American Customer Support Center is available Monday to Friday, 7:00 am to 6:00 pm Mountain time. Customer Support Center The number is: +1 (970) 635-1000. -
Page 124: Lifeline Telephone Support
The charge begins AFTER you have been put in contact with a support technician. If your problem is found to be covered by the HP Hardware Warranty, no charge will be applied. In the US, please call the appropriate number listed below. -
Page 125: Hp Network Phone-In Support Service (Nps)
• Increase network uptime. • You can purchase the HP NPS service as an annual contract, billable in advance annually, bi-annually, quarterly, or at an hourly rate. This contract service provides unlimited toll-free access to HP Response Center Engineers (RCEs). -
Page 126: Summary
Service Covers Period Response When Purchase covered time available from Basic Parts and labor for HP Three years from Next working day No charge. At time of Warranty products: date of purchase. for on-site. purchase. first year on-site, second and third year return to HP. -
Page 127: Hewlett-Packard Marketing Headquarters
Should you wish to contact Hewlett-Packard, check your local telephone directory for the HP Sales and Service Office near you. If you cannot find a convenient HP office, you can write to one of the major HP Sales and Service Offices or one of the Worldwide Marketing Headquarters listed here. - Page 128 mamdt.bk : mamdt5.fb4 Page 118 Tuesday, August 5, 1997 4:20 PM...
-
Page 129: Glossary
CD-RW Compact Disc Read Write. A 1 MB. mass storage device that uses compact disc technology to read data HP Utilities Software provided by on CDs and write data to CDs. Hewlett-Packard to perform certain tasks, for example, changing the date and time. - Page 130 mamdt.bk : glossary.fb4 Page 120 Tuesday, August 5, 1997 4:20 PM Glossary IDE Integrated Device Electronics. Pentium II MMX A Pentium An interface standard for processor with an extended communications between the instruction set specifically geared computer and a hard disk or CD-ROM. towards multimedia processing functions such as video, 3-D and sound.
- Page 131 mamdt.bk : glossary.fb4 Page 121 Tuesday, August 5, 1997 4:20 PM Glossary SCSI chain Devices connected on a single SCSI bus. SDRAM Synchronous Dynamic Random-Access Memory. Setup program Used to inform the computer about its configuration, for example the amount of memory installed.
- Page 132 mamdt.bk : glossary.fb4 Page 122 Tuesday, August 5, 1997 4:20 PM...
-
Page 133: Index
SCSI, external, 9 marketing headquarters, 117 removing, 52 control panel support and information services, 103 America Online, HP Forum, 108 hard disk activity light, 13 World Wide Web access, 109 application software does not work, 72 network activity light, 13... - Page 134 71 Setup, 72 connecting, 3 setting, 21 solving, 56 enhanced, 18 PC Lock activity light, 13 HP Customer Information, 20 HP TopTOOLS, 19 PC Workstation recycling PC Workstation, 24 Internet key, 19 cannot turn off, 61 removing features, 78...
- Page 135 : mamdt.ix Page 125 Tuesday, August 5, 1997 4:20 PM Index under warranty, 113 troubleshooting, PC Workstation, 55–75 unpacking PC Workstation, 2 for HP World Wide Web site, 109 USB connector, 3 using, flexible disk drive, 17 VESA connector, 50 video memory, installing, 33...
- Page 136 mamdt.bk : mamdt.ix Page 126 Tuesday, August 5, 1997 4:20 PM...
-
Page 137: Regulatory Information And Warranty
mamdt.bk : bckmttr.fb4 Page 127 Tuesday, August 5, 1997 4:20 PM Regulatory Information and Warranty... -
Page 138: Regulatory Information
Manufacturer’s Address: 5 Avenue Raymond Chanas 38320 Eybens, FRANCE Declares that the product: Product Name: Personal Computer Model Number: HP Kayak XA PC Workstation Models DT and MT Conforms to the following Product Specifications: SAFETY International: IEC 950: 1991+A1+A2 +A3 + A4... - Page 139 Remplacer uniquement avec une pile du même type ou d’un type équivalent recommandé par HP. La pile est une pile au lithium qui ne contient pas de métaux lourds, néanmoins, afin de protéger l’environnement, il ne faut pas la jeter dans les ordures ménagères mais la rendre au magasin ou vous l’avez achetée, ou revendeur où...
- Page 140 : bckmttr.fb4 Page 130 Tuesday, August 5, 1997 4:20 PM Notice for the United Kingdom The HP PC Workstation is approved under approval number NS/G/1234/J/100003 for indirect connection to Public Telecommunication Systems within the United Kingdom. Hinweis für Deutschland: Geräuschemission Lärmangabe nach Maschinenlärmverordnung - 3 GSGV (Deutschland)
- Page 141 If the product is not normally sold by HP in the country of use, it must be returned to the country of purchase for service.
- Page 142 Response time for HP on-site service in an HP Service Travel Area is normally next business day (excluding HP holidays) for HP Travel Zones 1-3 (generally 100 miles or 160 Km from the HP office). Response time is second business day for Zones 4 and 5 (200 miles, 320 Km); third business day for Zone 6 (300 miles, 480 Km); and negotiated beyond Zone 6.
- Page 143 CD-ROM and/or support utility software may only be used for restoring the hard disk of the HP computer with which the product recovery CD-ROM was originally provided.(ii) The use of any operating system software by Microsoft contained in any such product recovery CD-ROM shall be governed by the Microsoft End User License Agreement (EULA).
- Page 144 Customer’s remedy shall be a refund or repair. Should HP be unable to replace the media within a reasonable amount of time, Customer’s alternate remedy shall be a refund of the purchase price upon return of the product and all copies.
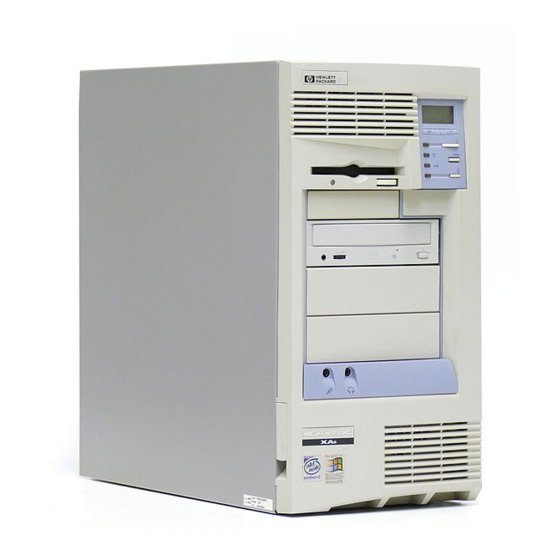
-
Page 145: Physical Characteristics Of Your Pc Workstation
mamdt.bk : mamdtbc.fb4 Page 135 Tuesday, August 5, 1997 4:20 PM Physical Characteristics of Your PC Workstation Characteristic Description Weight 9 kg (20 pounds) (excluding display and keyboard) Dimensions Width: 43.5 cm (17.1 inches) Height: 13.2 cm (5.2 inches) Depth: 44.6 cm (17.5 inches) Footprint 0.194 m (2.08 ft... - Page 146 Contents Learn how to use your operating system Operating System User’s Guide Learn how to upgrade your HP Kayak XA PC Workstation by HP User’s Guide installing accessories Installing Accessories in Your PC Workstation Troubleshooting and Support Find out about the...
- Page 147 mamdt.bk : mamdtsp.fb4 Page 137 Tuesday, August 5, 1997 4:20 PM...
- Page 148 mamdt.bk : mamdtsp.fb4 Page 138 Tuesday, August 5, 1997 4:20 PM...
Need help?
Do you have a question about the Kayak XA and is the answer not in the manual?
Questions and answers