Table of Contents
Advertisement
Advertisement
Table of Contents

Related Manuals for Sartorius IS 150 IGG-H


Summary of Contents for Sartorius IS 150 IGG-H
- Page 1 98648-006-05 Sartorius Installation and Operating Instructions IS 150 IGG-H , IS 150 IGG-H0CE, Sartorius IS 150 IGG-H , IS 150 IGG-H0CE, IS 300 IGG-H , IS 300 IGG-H0CE IS 300 IGG-H , IS 300 IGG-H0CE Wägeplattformen Weighing Platforms Aufstellungs- und Betriebsanleitung...
-
Page 2: Table Of Contents
Contents Contents General Specifications ........21 General View of the Weighing Platform ..3 ID Label ............. 22 Notes ..............4 Pin Assignment Chart RS-485 ....... 23 Safety Instructions..........5 Troubleshooting Guide ........24 Installation Instructions ........6 Care and Maintenance ........25 Getting Started ...........7 Servicing ............ -
Page 3: General View Of The Weighing Platform
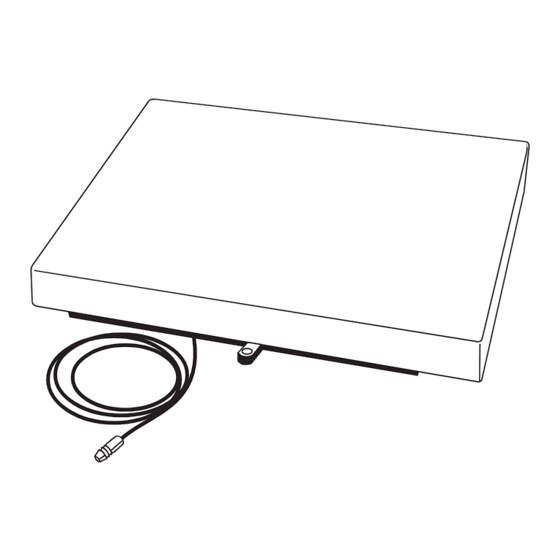
General View General View of the Weighing Platform No. Designation Load plate Manufacturer‘s label Line voltage connector (optional) Leveling feet Level indicator Tag plate for metrological ID label Connecting cable (interface port/power supply) Installation Instructions... -
Page 4: Notes
Notes With this Sartorius IS weighing platform, you have acquired a high-quality weighing instrument that features advanced technology. As a rule, you will be using this weighing platform as part of a modular weighing system. Please read through these installation and operating instructions before operating your new weighing platform. -
Page 5: Safety Instructions
If you will be operating the platform outside the European Community in a Zone 2 hazardous area, you must comply with the national electrical code and applicable safety regulations of your country. Please ask your local Sartorius service technician, office or dealer for information on the currently valid regulations applicable in your country. -
Page 6: Installation Instructions
Installation Instructions Installation Instructions Sartorius dealers or service technicians, who have received special training, will help you set up the weighing platform and show you how to operate it. Ambient Conditions Choose a suitable place to set up the weighing platform. Avoid exposing the weighing platform to the following ambient conditions: –... -
Page 7: Getting Started
Getting Started Getting Started Unpacking the Weighing Platform Important Note To install the weighing platform in a pit, please observe the special requirements given in the section „Pit Installation.“ Unpacking the Weighing Platform - Remove the weighing platform and the load plate from the packaging - To transport the weighing platform, lift it on both long sides - Remove the plastic bags, packaging strips and foam material Removing the Transport Locking Devices... -
Page 8: Leveling The Weighing Platform
Getting Started Leveling the Weighing Platform Using the Level Indicator At the place of installation, level the weighing platform using the leveling feet so that the air bubble is centered within the circle of the level indicator. Check to ensure that all 4 leveling feet securely touch the surface and that they equally support the weight of the platform. -
Page 9: Connecting The Weighing Platform
Before initially operating the scale, connect the following cables and completely assemble the components listed below: - interface cable to a Sartorius isi industrial terminal or a computer with special software - separate power cable for power supply via a Sartorius AC adapter... - Page 10 Getting Started The following diagrams show the options for powering weighing platforms and industrial terminals. Cables for connecting the industrial-grade AC adapter, model ING2, to the „IS“ weighing platform without an extension cord (using the YDO50IS (3m) or YDO53IS (6m) data output port): Cables for connecting the industrial-grade AC adapter, model ING2, to the isi industrial terminal without an extension cord (using the YD050IS (3 m) or the YD053IS (6 m) data output port):...
-
Page 11: Safety Precautions
If the voltage specified on the label or the plug design does not match the rating or standard you use, please contact your local Sartorius dealer or office. To use a main feeder cable from the ceiling or to mount a CEE plug, you will have to make arrangements inside your facilities for installation of such cable equipment. -
Page 12: Warm-Up Time
*including the Signatories of the Agreement on the European Economic Area Operating Limits Maximum Overload Capacity Sartorius weighing platforms are built so that occasionally loading them beyond their maximum weighing capacity will not damage them in any way. The maximum overload capacity of this IS model is 600 kg. -
Page 13: General Instructions
General Instructions General Instructions for Integration into Conveyor Systems The IS weighing platform is suitable for installation in conveyor systems. Follow the general instructions given below and refer to the „Dimensions (Scale Drawings)“ to meet the requirements for such installation. Secure the weighing platform using the appropriate components from the set of fasteners, YAS04 IS. -
Page 14: Dimensions
Dimensions Dimensions (Scale Drawings) Dimensions in millimeters Installation Instructions... -
Page 15: Pit Installation Of The Weighing Platform
Pit Installation of the Weighing Platform Pit Installation of the Weighing Platform Einbau der Wägeplattform in Gruben Preparation Choose the appropriate pit frame from the list of accessories. Vorbereitungen Note to Users in the EU* Wählen Sie den Grubenrahmen aus der Zubehörliste aus. If necessary, the weighing platform can be installed into the pit prior to initial verification. - Page 16 - Adjust the height by placing thin metal plates (7) underneath the pit frame. Back fill with concrete and allow area to dry. Positioning and Connecting the Weighing Platforms (Your Sartorius Service Technician Will Help You ) - Remove the load plate, the level indicator and leveling feet - Take the 4 hexagon bolts, M 10x70, from the set of fasteners, YAS 04 IS, attach the locknuts to them and screw them into the threads for the leveling feet (foot screws).
-
Page 17: Installation Of The Drive-On Ramp Yar
Installation of the Drive-on Ramp YAR 10 IS Anbau der Auffahrrampe YAR 10 IS Installation of the Drive-on Ramp YAR 10 IS To install the drive-on ramp, YAR 10 IS, use the angular braces and screws Für den Anbau verwenden Sie die im Lieferumfang enthaltenen Winkel und provided. -
Page 18: Configuring The Weighing Platform
– and to perform optimally under various ambient conditions as well as process weighing data. For this reason, final configuration of your Sartorius Modular Technology equipment is possible only at your dealer’s or your particular facilities. -
Page 19: Specifications Chart
Specifications Charts Access the configuration menu of the Sartorius isi industrial terminal to set the code for the group of specifications of your Access the configuration menu of the conected Sartorius terminal to set the code for the group of specifications of your choice. - Page 20 Specifications Charts IS 300 IGG-H0CE IS 300 IGG-H0CE Weighing range structure SuperRange SingleRange Multi-Interval Weighing range Standard Configurable Maximum capacity, Max Readability 0 ... 30 kg 30 ... 60 kg 60 ...150 kg ± 6 ± 1.22 ± 0.62 ± 3 Zero tracking ±...
-
Page 21: General Specifications
Net weight (without "isi" terminal) approx. Power requirements (optional) via A/C adapter, model ING2, 230 VAC or 115 VAC (to be connected by your dealer or a Sartorius service technician only) Frequency 48 – 63 Power consumption 34: maximum, 18: average... -
Page 22: Id Label
TN, models CIS2, CSL2, CIS3, CISL3, type TN-X, model CISX3, type TN-Pro, model Combics Pro, type isi10, isi20, isi30, type YAC01LA, type YAC01LP, type YAC01FC, type YAC02FC, PC with Sartorius Win Scale software EC Type Approval Certificate No. D97-09-018, type iso-TEST is applicable. ID plate for class... -
Page 23: Pin Assignment Chart Rs-485
Pin Assignment Chart for the Interface RS-485 Pin Assignment Chart for the Interface RS-485 RS-485, 3-m Cable Male Connector: Type C091D, 12-pin round connector with threaded locking ring, Amphenol (IP67)) Pin Assignment A RxD-TxD-N B Not Connected C Not Connected D Not Connected Signal GND Menu Access Switch for Calibration/... -
Page 24: Troubleshooting Guide
The weighing platform has not been calibrated/ adjusted Calibrate/ adjust the weighing platform The weighing platform was not tared before Tare before weighing result is obviously wrong weighing If any other errors occur, please contact your nearest Sartorius service center or your dealer. Installation Instructions... -
Page 25: Care And Maintenance
Care and Maintenance Care and Maintenance Servicing Regular servicing by a Sartorius technician will extend the service life of your weighing platform and ensure its continued weighing accuracy. Sartorius can offer you service contracts, with your choice of regular maintenance intervals ranging from 1 month to 2 years. -
Page 26: Safety Inspection
In this case, notify your nearest Sartorius Service Center or the International Technical Support Unit based in Goettingen, Germany. Only service technicians who are authorized by Sartorius and who have access to the required service manuals are allowed to perform maintenance and repair work on the equipment. -
Page 27: Tüv Certificates
Certificate Installation Instructions... - Page 28 Certificate Installation Instructions...
- Page 29 Certificate Installation Instructions...
- Page 30 Certificate Installation Instructions...
-
Page 31: Installation Instructions
Installation instructions Installation Instructions... - Page 32 Installation instructions Installation Instructions...
- Page 33 Installation instructions Installation Instructions...
-
Page 34: Legal Measuring Instrument
Therefore, a legal weighing instrument can consist of the following: – a Sartorius isi industrial terminal + 1 to 3 IS weighing platforms – a Sartorius isi industrial terminal + at least 1 weighing platform + up to 2 further EC- or nationally type-approved weighing instruments As a weighing instrument, the weighing platform is not allowed to be used for weighing goods intended for direct sale to the public. -
Page 35: Preload
To have your weighing platform verified, you must change the preload setting before verification only. The legal basis permitting Sartorius to perform initial verification is constituted by the following: 1) EC Council Directive No. 90/384/EEC on non-automatic weighing instruments, which has been applicable within the harmonized Internal Market of the European Union since 1 January 1993;... -
Page 36: Approved Auxiliary Measuring Devices
Information Concerning the EC Machinery Directive Sartorius balances, scales and weighing platforms are not machines in the sense of the EC Machinery Directive; however, as individual instruments they meet the safety requirements of this Directive. -
Page 37: Certificate
Certificate Installation Instructions... - Page 38 Certificate Installation Instructions...
-
Page 39: Declarations Of Conformity
Important Note: The operator shall be responsible for any modifications to Sartorius equipment and for any connections of equipment not supplied by Sartorius and must check and, if necessary, correct these modifications and connections. On request, Sartorius will provide information on the minimum operating specifications (in accordance with the Standards listed above for defined immunity to interference). - Page 40 – price calculation For the respective Declaration of Type Conformity for weighing instruments that have been verified by Sartorius for use as legal measuring instruments and that have an EC Type-Approval Certificate, see page 37. This Directive also regulates the performance of the EC verification by the...
- Page 41 Declarations of Conformity Installation Instructions...
-
Page 42: Plates And Markings
Plates and Markings Installation Instructions... - Page 43 Plates and Markings Installation Instructions...
- Page 44 Plates and Markings Installation Instructions...
-
Page 45: A Service Offered By Sartoriusr
For information on verification and legal regulations currently applicable in your country, and to obtain the names of the persons to contact, please contact your local Sartorius office, dealer or service center as indicated on the following page. -
Page 46: Accessories (Options)
Round male connector, IP65, 69 QC0010 type C091D, 12-pin, Amphenol Adapter cable, from round connector to PC, YCC 01-0017D2 25-pin D-Submini, 0.2 m long (YDO52IS required) For ordering customized cables and accessories, contact your local Sartorius office or dealer. Installation Instructions... - Page 47 YAR 10 IS Pit frames – Stainless steel YEG 01 IP – Painted YEG 04 IP Set of fasteners for pit frame installation YAS 04 IS For ordering customized cables and accessories, contact your local Sartorius office or dealer. Installation Instructions...
-
Page 48: Certificate
Certificate Installation Instructions... - Page 49 Installation Instructions...
- Page 50 Installation Instructions...
- Page 51 Installation Instructions...
- Page 52 Date: September 2013, Sartorius Industrial Scales GmbH & Co. KG , Goettingen, Germany Printed in Germany. Gedruckt auf chlorfrei gebleichtem Papier RS · KT...
Need help?
Do you have a question about the IS 150 IGG-H and is the answer not in the manual?
Questions and answers
Buenas noches tengo un problema me da error 262 y no se a q se debe y no deja ni reiniciar