Table of Contents
Advertisement
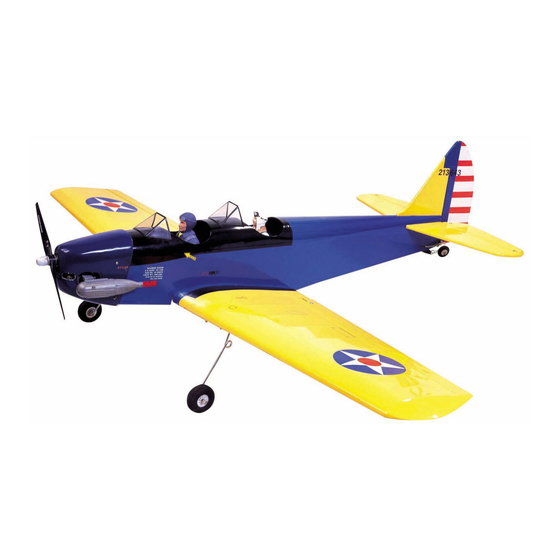
INSTRUCTIONS FOR FINAL ASSEMBLY
Specifications:
Wingspan -------------------------------------------- 156 cm, 61.42 in.
Wing area --------------------------------- 3900 sq.cm, 604.5 sq.in.
Approximate flying weight ------------ 2.6-2.9 kg, 5.72-6.38 lbs.
Recommended engine size ------------- .46-.52 cu.in 2-stroke.
.52 cu.in
4-stroke.
Recommended R/C ------------------------- 4 channels minimum.
Made in Vietnam.
Advertisement
Table of Contents

Related Manuals for Seagull Models Fairchild PT-19


Summary of Contents for Seagull Models Fairchild PT-19
-
Page 1: Specifications
INSTRUCTIONS FOR FINAL ASSEMBLY Specifications: Wingspan -------------------------------------------- 156 cm, 61.42 in. Wing area --------------------------------- 3900 sq.cm, 604.5 sq.in. Approximate flying weight ------------ 2.6-2.9 kg, 5.72-6.38 lbs. Recommended engine size ------------- .46-.52 cu.in 2-stroke. .52 cu.in 4-stroke. Recommended R/C ------------------------- 4 channels minimum. Made in Vietnam. -
Page 2: Instruction Manual
Instruction Manual INTRODUCTION. Thank you for choosing the PT-19 ARTF by SEAGULL MODELS. The PT-19 was designed with the intermediate/advanced sport flyer in mind. It is a low-wing scale aeroplane which is easy to fly and quick to assemble. The airframe is conventionally built using balsa, plywood make it stronger than the average ARTF , yet the design allows the aeroplane to be kept light. -
Page 3: Hinging The Ailerons
FAIRCHILD PT-19 Instruction Manual NOTE: To avoid scratching your new aero- HINGING THE AILERONS. plane we suggest that you cover your workbench with an old towel. Note: The control surfaces, including the Keep a couple of jars or bowls handy... -
Page 4: Hinging The Elevators
FAIRCHILD PT-19 Instruction Manual ! 3) Slide the wing panel on the aileron until ! 5) Turn the wing panel over and deflect the there is only a slight gap. The hinge is now aileron in the opposite direction from the centered on the wing panel and aileron. -
Page 5: Hinging The Rudder
FAIRCHILD PT-19 Instruction Manual HINGING THE RUDDER. Glue the rudder hinges in place using the same tectniques used to hinge the ailerons. ! 3) Remove the brace when satisfied with its fit ineach wing half. Coat both sides of one half of the dihedral brace with 30 minute epoxy. -
Page 6: Installing The Aileron Servos
FAIRCHILD PT-19 Instruction Manual Because the size of servos differ, you may need to adjust the size of the precut opening in the mount. The notch in the sides of the mount allow the servo lead to pass through. Masking tape. -
Page 7: Aileron Linkage
FAIRCHILD PT-19 Instruction Manual Servo wire. String. Plastic tape. ! 4) Attach the string to the servo lead ! 6) Reinstall the servo into the servo and carefully thread it though the wing. Once mount and secure the servo inplace using the you have thread the lead throught the wing, wood screws provided with you radio system. - Page 8 FAIRCHILD PT-19 Instruction Manual ! 2) Locate the two nylon control horns, two nylon control horn backplates and four machine screws. Pen. 2mm X 20mm. ! 3) Position the aileron horn on the bottom side of aileron. The clevis attachment holes Cut.
-
Page 9: Main Landing Gear Installation
FAIRCHILD PT-19 Instruction Manual ! 5) Remove the two straps and the gear MAIN LANDING GEAR wire. Drill four 1mm pilot holes into the wing INSTALLATION. for the wood screws. INSTALLING THE MAIN GEAR WIRES. Be careful not to drill through the top... -
Page 10: Installing The Engine Mount
FAIRCHILD PT-19 Instruction Manual INSTALLING THE ENGINE MOUNT. Vent tube. See pictures below: 4x20mm. Fuel fill Tube. Fuel Pick up Tube. When the stopper assembly is installed in the tank, the top of the vent tube should rest just below the top surface of the tank. It should not touch the top of the tank. -
Page 11: Mounting The Engine
FAIRCHILD PT-19 Instruction Manual Blow through one of the lines to en- sure the fuel lines have not become kinked inside the fuel tank compartment. Air should flow through easily. MOUNTING THE ENGINE. PARTS REQUIRED 3 x 25mm. Slide the tank into the fuselage from inside so that the neck is at the top of the fuselage and it locates through the engine bulkhead. -
Page 12: Parts Required
FAIRCHILD PT-19 Instruction Manual front of the cowl should be positioned so the COWLING. crankshaft is in the middle of the cowl open- PARTS REQUIRED ing. Hold the cowl firmly in place using pieces {1} Molded Fiberglass Cowling of masking tape. -
Page 13: Installing The Fuselage Servos
FAIRCHILD PT-19 Instruction Manual Switch. ! 2) Install the rubber grommets and brass collets onto the elevator, rudder and throttle Open hole servos. Test fit the servos into the preinstalled for air intake. servo tray. Because the size of servos dif- fer, you may need to adjust the size of the precut openings in the tray. -
Page 14: Aligning The Horizontal Stabilizer
FAIRCHILD PT-19 Instruction Manual HORIZONTAL STABILIZER. PARTS REQUIRED {1} Horizontal Stabilizer with Elevator Halves ALIGNING THE HORIZONTAL STABILIZER. ! 1) Using a ruler and a pen, locate the centerline of the horizontal stabilizer, at the trail- ing edge, and place a mark. Use a triangle Pen. -
Page 15: Vertical Stabilizer Installation
FAIRCHILD PT-19 Instruction Manual ! 5) After the epoxy has fully cured, re- move the masking tape or T-pins used to hold the stabilizer in place. Carefully inspect the glue joints. Use more epoxy to fill in any gaps that may exist that were not filled previously and clean up the excess using a paper towel and rubbing alcohol. -
Page 16: Control Horn Installation
FAIRCHILD PT-19 Instruction Manual ! 5) Slide the vertical stabilizer back in CONTROL HORN INSTALLATION. place. Using a triangle, check to ensure that the vertical stabilizer is aligned 90º to the hori- !1) Locate the two nylon control horns, two zontal stabilizer. - Page 17 FAIRCHILD PT-19 Instruction Manual MOUNTING THE CONTROL CLASP. Elevator control !1) Align the tail wheel wire so that the wire horn both side. is parallel with the bottom of the rudder. The control clasp has a predrilled hole through the top of it.
-
Page 18: Control Throws
FAIRCHILD PT-19 Instruction Manual PILOTS INSTALLATION. INSTALLING THE RECEIVER AND BATTERY. !1) Plug the five servo leads and the switch lead into the receiver. Plug the battery pack lead into the switch also. !2) Wrap the receiver and battery pack in 2pcs. -
Page 19: Flight Preparation
FAIRCHILD PT-19 Instruction Manual ! 2) Turn on the radio system, and with If it does not, flip the servo reversing switch on the trim tabs on the transmitter in neutral, cen- your transmitter to change the direction. ter the control surfaces by making adjust- ments to the clevises or adjustable servo con- D) Check the throttle. -
Page 20: Preflight Check
FAIRCHILD PT-19 Instruction Manual PREFLIGHT CHECK. 1) Completely charge your transmitter and receiver batteries before your first day of flying. 2) Check every bolt and every glue joint in the PT-19 to ensure that everything is tight and well bonded.
Need help?
Do you have a question about the Fairchild PT-19 and is the answer not in the manual?
Questions and answers